iOS關於選單滾動檢視實現
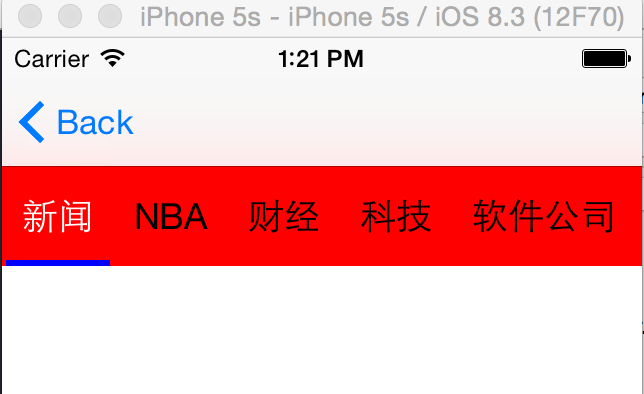
選單滾動檢視也是在專案開發過程中比較常用到的功能,先直接看效果圖
 |
 |
實現的效果如下:
當選單個數的總長度超過一個屏寬度就計算每一個的文字寬度,若沒有則只進行一個屏平分,點選選單項時,滾動的檢視位置會隨著調整;下面將會把程式碼貼出來;
1:控制器.h檔案的內容

// // myScrollerViewController.h // testTest // // Created by wujunyang on 16/1/22. // Copyright © 2016年 wujunyang. All rights reserved. // #import <UIKit/UIKit.h> @protocol myScrollTabBarDelegate<NSObject> @optional - (void)itemDidSelectedWithIndex:(NSInteger)index; @end @interface myScrollerViewController : UIViewController @property (nonatomic, weak) id <myScrollTabBarDelegate>delegate; @property (nonatomic, assign) NSInteger currentIndex; @property(nonatomic,copy)NSArray*myTitleArray; @end

注意:這邊建立的一個delegate,主要是為了當點選事件時把相應的動作往外傳,並把相應的選單索引值傳出,方便做其它操作
2:.m控制器的內容

#import "myScrollerViewController.h" #define SCREEN_WIDTH ([UIScreen mainScreen].bounds.size.width) #define SCREEN_HEIGHT ([UIScreen mainScreen].bounds.size.height) #define TABBAR_TITLE_FONT [UIFont systemFontOfSize:18.f] #defineNAV_TAB_BAR_HEIGHT 50 #define NAV_TAB_BAR_Width SCREEN_WIDTH @interface myScrollerViewController () //滾動檢視 @property(strong,nonatomic)UIScrollView *myScrollView; //滾動下劃線 @property(strong,nonatomic)UIView *line; //所有的Button集合 @property(nonatomic,strong)NSMutableArray *items; //所有的Button的寬度集合 @property(nonatomic,copy)NSArray *itemsWidth; //被選中前面的寬度合(用於計算是否進行超過一屏,沒有一屏則進行平分) @property(nonatomic,assign)CGFloat selectedTitlesWidth; @end @implementation myScrollerViewController - (void)viewDidLoad { [super viewDidLoad]; self.automaticallyAdjustsScrollViewInsets=NO; self.view.backgroundColor=[UIColor whiteColor]; //初始化陣列 if (!self.myTitleArray) { self.myTitleArray[email protected][@"新聞",@"NBA",@"財經",@"科技",@"軟體公司",@"健身",@"優秀文摘"]; } self.items=[[NSMutableArray alloc]init]; self.itemsWidth=[[NSArray alloc]init]; //初始化滾動 if (!self.myScrollView) { self.myScrollView=[[UIScrollView alloc]initWithFrame:CGRectMake(0, 64, NAV_TAB_BAR_Width, NAV_TAB_BAR_HEIGHT)]; self.myScrollView.backgroundColor=[UIColor redColor]; self.myScrollView.showsHorizontalScrollIndicator = NO; self.myScrollView.showsVerticalScrollIndicator = NO; [self.view addSubview:self.myScrollView]; } //賦值跟計算滾動 _itemsWidth = [self getButtonsWidthWithTitles:self.myTitleArray]; CGFloat contentWidth = [self contentWidthAndAddNavTabBarItemsWithButtonsWidth:_itemsWidth]; self.myScrollView.contentSize = CGSizeMake(contentWidth, 0); self.currentIndex=0; } /** * @author wujunyang, 16-01-22 13:01:45 * * @brief 計算寬度 * * @param titles <#titles description#> * * @return <#return value description#> * * @since <#version number#> */ - (NSArray *)getButtonsWidthWithTitles:(NSArray *)titles; { NSMutableArray *widths = [@[] mutableCopy]; _selectedTitlesWidth = 0; for (NSString *title in titles) { CGSize size = [title boundingRectWithSize:CGSizeMake(CGFLOAT_MAX, CGFLOAT_MAX) options:NSStringDrawingUsesLineFragmentOrigin attributes:@{NSFontAttributeName : TABBAR_TITLE_FONT} context:nil].size; CGFloat eachButtonWidth = size.width + 20.f; _selectedTitlesWidth += eachButtonWidth; NSNumber *width = [NSNumber numberWithFloat:eachButtonWidth]; [widths addObject:width]; } if (_selectedTitlesWidth < NAV_TAB_BAR_Width) { [widths removeAllObjects]; NSNumber *width = [NSNumber numberWithFloat:NAV_TAB_BAR_Width / titles.count]; for (int index = 0; index < titles.count; index++) { [widths addObject:width]; } } return widths; } /** * @author wujunyang, 16-01-22 13:01:14 * * @brief 初始化Button * * @param widths <#widths description#> * * @return <#return value description#> * * @since <#version number#> */ - (CGFloat)contentWidthAndAddNavTabBarItemsWithButtonsWidth:(NSArray *)widths { CGFloat buttonX = 0; for (NSInteger index = 0; index < widths.count; index++) { UIButton *button = [UIButton buttonWithType:UIButtonTypeCustom]; button.frame = CGRectMake(buttonX, 0, [widths[index] floatValue], NAV_TAB_BAR_HEIGHT); button.titleLabel.font = TABBAR_TITLE_FONT; button.backgroundColor = [UIColor clearColor]; [button setTitle:self.myTitleArray[index] forState:UIControlStateNormal]; [button setTitleColor:[UIColor blackColor] forState:UIControlStateNormal]; [button addTarget:self action:@selector(itemPressed:) forControlEvents:UIControlEventTouchUpInside]; [self.myScrollView addSubview:button]; [_items addObject:button]; buttonX += [widths[index] floatValue]; } if (widths.count) { [self showLineWithButtonWidth:[widths[0] floatValue]]; } return buttonX; } /** * @author wujunyang, 16-01-22 13:01:33 * * @brief 選中 * * @param currentIndex 選中索引 * * @since <#version number#> */ - (void)setCurrentIndex:(NSInteger)currentIndex { _currentIndex = currentIndex; UIButton *button = nil; button = _items[currentIndex]; [button setTitleColor:[UIColor whiteColor] forState:UIControlStateNormal]; CGFloat offsetX = button.center.x - NAV_TAB_BAR_Width * 0.5; CGFloat offsetMax = _selectedTitlesWidth - NAV_TAB_BAR_Width; if (offsetX < 0 || offsetMax < 0) { offsetX = 0; } else if (offsetX > offsetMax){ offsetX = offsetMax; } [self.myScrollView setContentOffset:CGPointMake(offsetX, 0) animated:YES]; [UIView animateWithDuration:.2f animations:^{ _line.frame = CGRectMake(button.frame.origin.x + 2.0f, _line.frame.origin.y, [_itemsWidth[currentIndex] floatValue] - 4.0f, _line.frame.size.height); }]; } /** * @author wujunyang, 16-01-22 13:01:47 * * @brief 增加下劃線 * * @param width Button的寬 * * @since <#version number#> */ - (void)showLineWithButtonWidth:(CGFloat)width { _line = [[UIView alloc] initWithFrame:CGRectMake(2.0f, NAV_TAB_BAR_HEIGHT - 3.0f, width - 4.0f, 3.0f)]; _line.backgroundColor = [UIColor blueColor]; [self.myScrollView addSubview:_line]; } - (void)cleanData { [_items removeAllObjects]; [self.myScrollView.subviews makeObjectsPerformSelector:@selector(removeFromSuperview)]; } /** * @author wujunyang, 16-01-22 11:01:27 * * @brief 選中時的事件 * * @param button <#button description#> * * @since <#version number#> */ - (void)itemPressed:(UIButton *)button { NSInteger index = [_items indexOfObject:button]; self.currentIndex=index; if ([self.delegate respondsToSelector:@selector(itemDidSelectedWithIndex:)]) { [self.delegate itemDidSelectedWithIndex:index]; } //修改選中跟沒選中的Button字型顏色 for (int i=0; i<_items.count; i++) { if (i==index) { [button setTitleColor:[UIColor whiteColor] forState:UIControlStateNormal]; } else { [_items[i] setTitleColor:[UIColor blackColor] forState:UIControlStateNormal]; } } [UIView animateWithDuration:0.1 animations:^{ button.transform = CGAffineTransformMakeScale(1.1, 1.1); } completion:^(BOOL finished) { [UIView animateWithDuration:0.1 animations:^{ button.transform = CGAffineTransformIdentity; }completion:^(BOOL finished) { }]; }]; } - (void)didReceiveMemoryWarning { [super didReceiveMemoryWarning]; // Dispose of any resources that can be recreated. } @end

程式碼都有進行相應的註解,接下來會對它進行整理,把它移到通用的MVC專案框架中,方便以後專案使用;
二:編輯於2016-01-24
在上面的程式碼進行擴充套件,並整理上面的程式碼封裝在一個外掛裡面實現下面的內容,可以顯示跟隱藏彈出窗,彈出窗裡面顯示出每個選單項的內容;效果如下:
 |
 |
使用的程式碼如下:

#import "ViewController.h"

@interface ViewController ()<WJScrollerMenuDelegate>

@end

@implementation ViewController

- (void)viewDidLoad {
    [super viewDidLoad];

    self.automaticallyAdjustsScrollViewInsets=NO;

//    WJScrollerMenuView *vc=[[WJScrollerMenuView alloc]initWithFrame:CGRectMake(0, 64, 320, 50) showArrayButton:NO];
    WJScrollerMenuView *vc=[[WJScrollerMenuView alloc]initWithFrame:CGRectMake(0, 64, [[UIScreen mainScreen] bounds].size.width, 50) showArrayButton:YES];
    vc.delegate=self;
    vc.backgroundColor=[UIColor greenColor];
    vc.selectedColor=[UIColor blueColor];
    vc.noSlectedColor=[UIColor blackColor];
    vc.myTitleArray[email protected][@"第一階段",@"第二階段",@"第三階段",@"第四階段",@"第五階段"];
    vc.currentIndex=0;
    [self.view addSubview:vc];
}

- (void)didReceiveMemoryWarning {
    [super didReceiveMemoryWarning];
    // Dispose of any resources that can be recreated.
}

- (void)itemDidSelectedWithIndex:(NSInteger)index
{
    NSLog(@"選中%d",index);
}

@end

相關推薦
iOS關於選單滾動檢視實現
選單滾動檢視也是在專案開發過程中比較常用到的功能,先直接看效果圖 實現的效果如下: 當選單個數的總長度超過一個屏寬度就計算每一個的文字寬度,若沒有則只進行一個屏平分,點選選單項時,滾動的檢視位置會隨著調整;下面將會把程式碼貼出來; 1:控制器.h檔案的內容 // // myScrollerV
iOS開發-------滾動檢視(UIScrollView)並實現迴圈滾動
滾動檢視(UIScrollView) 其實是一個能夠實現存放大圖片以及實現滾動的元件,比如有的圖片很大,但是用UIImageView裝不下,那麼這個時候就需要UIScrollView了,如果說舉例子的話,很多地方都用到了,比如頁面滾動的廣告檢視,滾動的頭條等,
iOS UIScrollView滾動檢視/無限迴圈滾動/自動滾動
我是在UITableView的表頭裡建立的滾動檢視 別忘了籤協議 <UIScrollViewDelegate> #define WIDTH [[UIScreen mainScreen] bounds].size.width #define
iOS開發滾動檢視UIScrollView
當手指觸控 後,ScrollView會暫時攔截觸控事件,並開啟一個計時器。假如在計時器到點後沒有發生手指移動事件,那麼ScrollView傳送、 tracking events到被點選的subview;假如在計時器到點前發生了移動事件,那麼ScrollView取消tracking,自己發生滾動。 初始化
iOS 頂部滾動標題檢視SGPagingView
專案介紹: SGPagingView 效果圖 主要內容的介紹 多種指示器長度樣式 多種指示器滾動樣式 標題按鈕文字漸顯效果 標題按鈕文字縮放效果 SG
iOS滾動檢視UIScrollView使用方法
//.h檔案 @property (strong, nonatomic) IBOutlet UIScrollView *scrollView; //.m檔案 //初始化ScrollView,設定位置 self.scrollView = [[UIScrollVie
正確處理iOS從下方滑出滾動檢視
在iOS 11開始,從最早的地圖應用到最近的捷徑,陸續有系統應用使用從下方滑出列表的形式,這種系統提供的圓角風格檢視用手勢劃出和隱藏時非常自然流暢。國內的一些應用也跟進了這種互動方式,但是我發現很大一部分APP都沒有正確的處理ScrollView滾動和檢視滾動的銜接,以至於相比於系統應用不夠自然。比如知乎的
iOS學習筆記——滾動檢視(scrollView)
原始地址:http://blog.csdn.net/u012889435/article/details/17523705 滾動檢視:在根檢視中新增UIScrollViewDelegate協議,宣告一些物件屬性 @interface BoViewContro
ios之UIScrollerView滾動檢視
UIScrollView 類負責所有基於 UIKit 的滾動操作。 一、建立 CGRect bounds = [ [ UIScreen mainScreen ] applicationFrame ] ; UIScrollView* scrollView =
ios:點選tabbar中間按鈕彈出選單(swift 3實現)
先上一張圖看看效果: 最近在自學swift3,就用swift3重寫了這個小demo,在專案開發中像這種彈出選單使用的機率還是很大的,在這裡僅僅做一個簡單的分享,本例子中沒有難度大高深的程式碼,純屬練練手,如有不嚴謹的地方,還請多多指正! 下面mark一下
iOS 仿照今日頭條 實現的滾動表格 XLSlideSwitch
一、實現效果 二、原理說明 上面標題部分是通過UICollectionView實現的; 下面滾動部分是通過UIPageViewController實現的; 三、程式碼說明 1、建立方
iOS中scrollview自動滾動的實現
原問題是,我要展現給使用者的內容放在scrollview中,讓內容從上到底自動滾動,我最開始用的是DDAutoscrollview,但是無法實現。 一種解決方案見下邊,更多解決方案見:http://ask.csdn.n
滾動檢視(UIScrollView)的用法和實現頁面滾動切換
1,當圖片尺寸超過螢幕時,使用UIScrollView可以實現滾動條檢視,即手指觸控滾動螢幕方便瀏覽整個頁面。 1 2 3 4 5 6 let scrollView=UIScrollView() scrollView.fram
iOS開發:定時器與滾動檢視的互動
定時器與滾動檢視的互動 新聞類的APP一般都有輪播圖,最常見的設計就是給輪播圖一個計時器,讓其自己每隔幾秒輪播到下一張。但如果使用者自行拖拽時計時器就應該失去響應,以使用者的手勢方法為第一響應
Android可滾動檢視隱藏Toolbar實現
@SuppressLint("NewApi") public class MainActivity extends ActionBarActivity { private static final String TAG = "MainActivity"; private Toolbar mToolba
[objc]-ios 分頁控制器實現
width 單個 fse 初始 mil icontrol uilable action per 效果圖 如下 上方的滑條 根據頁面可以滑動 思路: 下方灰色的部分是一個scrollview 其中放置了2個view。 上方的綠色滑條是uilable控件。 綠色滑條下面
iOS重寫drawRect方法實現帶箭頭的View
hat oid line wid addition arrow memory alt ins 創建一個UIView的子類,重寫drawRect方法可以實現不規則形狀的View,這裏提供一個帶箭頭View的實現代碼: ArrowView.h #import <UIKi
iOS開發各種底層實現--面試必備!
task 源碼 控件 改變 消息發送 釋放內存 retain select 匹配 iOS開發常用技術底層實現(精簡概述) 本章將對ios開發技術底層實現的總結,其實關於ios開發中各種底層的實現,網上相關文章多到數不過來,而不且非常不錯,我也沒有自信我能比他們做的更好,因
vue監聽滾動事件 實現動態錨點
title 復制代碼 嘗試 理念 元素 滾動 功能 time 滿足 前幾天做項目的時候,需要實現一個動態錨點的效果 如果是傳統項目,這個效果就非常簡單。但是放到 Vue 中,就有兩大難題: 1. 在沒有 jQuery 的 animate() 方法的情況下,如何實現平滑滾動
ios 動畫 利用CAGradientLayer實現動畫
class view code rom basic ear idg cloc 光柵 先看下效果圖片 分析步驟: 1. 先畫一個方形的layer,如果: 代碼如下: CAGradientLayer *colorLayer = [CAGradientLayer laye
