
Deploying Java Microservices on Amazon Elastic Container Service
This post and accompanying code graciously contributed by:
 |
 |
| Huy Huynh Sr. Solutions Architect |
Magnus Bjorkman Solutions Architect |
Java is a popular language used by many enterprises today. To simplify and accelerate Java application development, many companies are moving from a monolithic to microservices architecture. For some, it has become a strategic imperative.
In this post, I cover how to containerize a monolithic Java application to run on Docker. Then, I show how to deploy it on AWS using Amazon Elastic Container Service (
Application Architecture
For this example, I use the Spring Pet Clinic, a monolithic Java application for managing a veterinary practice. It is a simple REST API, which allows the client to manage and view Owners, Pets, Vets, and Visits.

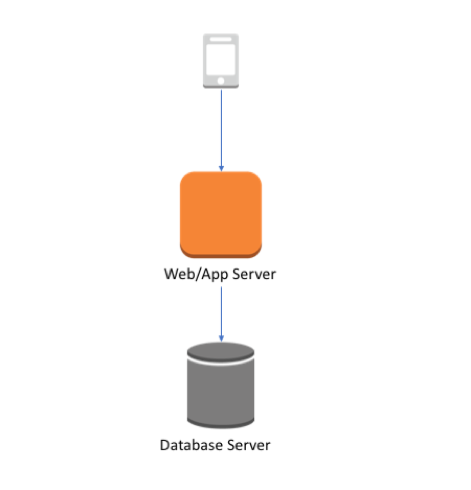
It is a simple three-tier architecture:
- Client
You simulate this by using curl commands. - Web/app server
This is the Java and Spring-based application that you run using the embedded Tomcat. As part of this post, you run this within Docker containers. - Database server
This is the relational database for your application that stores information about owners, pets, vets, and visits. For this post, use MySQL RDS.
I decided to not put the database inside a container as containers were designed for applications and are transient in nature. The choice was made even easier because you have a fully managed database service available with Amazon RDS.
RDS manages the work involved in setting up a relational database, from provisioning the infrastructure capacity that you request to installing the database software. After your database is up and running, RDS automates common administrative tasks, such as performing backups and patching the software that powers your database. With optional Multi-AZ deployments, Amazon RDS also manages synchronous data replication across Availability Zones with automatic failover.
Walkthrough
You can find the code for the example covered in this post at amazon-ecs-java-microservices on GitHub.
Prerequisites
You need the following to walk through this solution:
- An AWS account
- An access key and secret key for a user in the account
- The AWS CLI installed
Also, install the latest versions of the following:
- Java
- Maven
- Python
- Docker
Step 1: Move the existing Java Spring application to a container deployed using Amazon ECS
First, move the existing monolith application to a container and deploy it using Amazon ECS. This is a great first step before breaking the monolith apart because you still get some benefits before breaking apart the monolith:
- An improved pipeline. The container also allows an engineering organization to create a standard pipeline for the application lifecycle.
- No mutations to machines.
Container deployment overview
The following diagram is an overview of what the setup looks like for Amazon ECS and related services:

This setup consists of the following resources:
- The client application that makes a request to the load balancer.
- The load balancer that distributes requests across all available ports and instances registered in the application’s target group using round-robin.
- The target group that is updated by Amazon ECS to always have an up-to-date list of all the service containers in the cluster. This includes the port on which they are accessible.
- One Amazon ECS cluster that hosts the container for the application.
- A VPC network to host the Amazon ECS cluster and associated security groups.
Each container has a single application process that is bound to port 8080 within its namespace. In reality, all the containers are exposed on a different, randomly assigned port on the host.
The architecture is containerized but still monolithic because each container has all the same features of the rest of the containers
The following is also part of the solution but not depicted in the above diagram:
- A service/task definition that spins up containers on the instances of the Amazon ECS cluster.
- A MySQL RDS instance that hosts the applications schema. The information about the MySQL RDS instance is sent in through environment variables to the containers, so that the application can connect to the MySQL RDS instance.
The Python script calls the CloudFormation template for the initial setup of the VPC, Amazon ECS cluster, and RDS instance. It then extracts the outputs from the template and uses those for API calls to create Amazon ECR repositories, tasks, services, Application Load Balancer, and target groups.
Environment variables and Spring properties binding
As part of the Python script, you pass in a number of environment variables to the container as part of the task/container definition:
'environment': [
{
'name': 'SPRING_PROFILES_ACTIVE',
'value': 'mysql'
},
{
'name': 'SPRING_DATASOURCE_URL',
'value': my_sql_options['dns_name']
},
{
'name': 'SPRING_DATASOURCE_USERNAME',
'value': my_sql_options['username']
},
{
'name': 'SPRING_DATASOURCE_PASSWORD',
'value': my_sql_options['password']
}
],
The preceding environment variables work in concert with the Spring property system. The value in the variable SPRING_PROFILES_ACTIVE, makes Spring use the MySQL version of the application property file. The other environment files override the following properties in that file:
spring.datasource.urlspring.datasource.usernamespring.datasource.password
Spotify Docker Maven plugin
Use the Spotify Docker Maven plugin to create the image and push it directly to Amazon ECR. This allows you to do this as part of the regular Maven build. It also integrates the image generation as part of the overall build process. Use an explicit Dockerfile as input to the plugin.
FROM frolvlad/alpine-oraclejdk8:slim
VOLUME /tmp
ADD spring-petclinic-rest-1.7.jar app.jar
RUN sh -c 'touch /app.jar'
ENV JAVA_OPTS=""
ENTRYPOINT [ "sh", "-c", "java $JAVA_OPTS -Djava.security.egd=file:/dev/./urandom -jar /app.jar" ]
The Python script discussed earlier uses the AWS CLI to authenticate you with AWS. The script places the token in the appropriate location so that the plugin can work directly against the Amazon ECR repository.
Test setup
You can test the setup by running the Python script:
python setup.py -m setup -r <your region>
After the script has successfully run, you can test by querying an endpoint:
curl <your endpoint from output above>/owner
You can clean this up before going to the next section:
python setup.py -m cleanup -r <your region>
Step 2: Converting the monolith into microservices running on Amazon ECS
The second step is to convert the monolith into microservices. For a real application, you would likely not do this as one step, but re-architect an application piece by piece. You would continue to run your monolith but it would keep getting smaller for each piece that you are breaking apart.
By migrating microservices, you would get four benefits associated with microservices:
- Isolation of crashes
If one microservice in your application is crashing, then only that part of your application goes down. The rest of your application continues to work properly. - Isolation of security
When microservice best practices are followed, the result is that if an attacker compromises one service, they only gain access to the resources of that service. They can’t horizontally access other resources from other services without breaking into those services as well. - Independent scaling
When features are broken out into microservices, then the amount of infrastructure and number of instances of each microservice class can be scaled up and down independently. - Development velocity
In a monolith, adding a new feature can potentially impact every other feature that the monolith contains. On the other hand, a proper microservice architecture has new code for a new feature going into a new service. You can be confident that any code you write won’t impact the existing code at all, unless you explicitly write a connection between two microservices.
Find the monolith example at 2_ECS_Java_Spring_PetClinic_Microservices.
You break apart the Spring Pet Clinic application by creating a microservice for each REST API operation, as well as creating one for the system services.
Java code changes
Comparing the project structure between the monolith and the microservices version, you can see that each service is now its own separate build.
First, the monolith version:

You can clearly see how each API operation is its own subpackage under the org.springframework.samples.petclinic package, all part of the same monolithic application.
This changes as you break it apart in the microservices version:

Now, each API operation is its own separate build, which you can build independently and deploy. You have also duplicated some code across the different microservices, such as the classes under the model subpackage. This is intentional as you don’t want to introduce artificial dependencies among the microservices and allow these to evolve differently for each microservice.
Also, make the dependencies among the API operations more loosely coupled. In the monolithic version, the components are tightly coupled and use object-based invocation.
Here is an example of this from the OwnerController operation, where the class is directly calling PetRepository to get information about pets. PetRepository is the Repository class (Spring data access layer) to the Pet table in the RDS instance for the Pet API:
@RestController
class OwnerController {

    @Inject
    private PetRepository pets;
    @Inject
    private OwnerRepository owners;
    private static final Logger logger = LoggerFactory.getLogger(OwnerController.class);

    @RequestMapping(value = "/owner/{ownerId}/getVisits", method = RequestMethod.GET)
    public ResponseEntity<List<Visit>> getOwnerVisits(@PathVariable int ownerId){
        List<Pet> petList = this.owners.findById(ownerId).getPets();
        List<Visit> visitList = new ArrayList<Visit>();
        petList.forEach(pet -> visitList.addAll(pet.getVisits()));
        return new ResponseEntity<List<Visit>>(visitList, HttpStatus.OK);
    }
}
In the microservice version, call the Pet API operation and not PetRepository directly. Decouple the components by using interprocess communication; in this case, the Rest API. This provides for fault tolerance and disposability.
@RestController
class OwnerController {

    @Value("#{environment['SERVICE_ENDPOINT'] ?: 'localhost:8080'}")
    private String serviceEndpoint;

    @Inject
    private OwnerRepository owners;
    private static final Logger logger = LoggerFactory.getLogger(OwnerController.class);

    @RequestMapping(value = "/owner/{ownerId}/getVisits", method = RequestMethod.GET)
    public ResponseEntity<List<Visit>> getOwnerVisits(@PathVariable int ownerId){
        List<Pet> petList = this.owners.findById(ownerId).getPets();
        List<Visit> visitList = new ArrayList<Visit>();
        petList.forEach(pet -> {
            logger.info(getPetVisits(pet.getId()).toString());
            visitList.addAll(getPetVisits(pet.getId()));
        });
        return new ResponseEntity<List<Visit>>(visitList, HttpStatus.OK);
    }

    private List<Visit> getPetVisits(int petId){
        List<Visit> visitList = new ArrayList<Visit>();
        RestTemplate restTemplate = new RestTemplate();
        Pet pet = restTemplate.getForObject("http://"+serviceEndpoint+"/pet/"+petId, Pet.class);
        logger.info(pet.getVisits().toString());
        return pet.getVisits();
    }
}
You now have an additional method that calls the API. You are also handing in the service endpoint that should be called, so that you can easily inject dynamic endpoints based on the current deployment.
Container deployment overview
Here is an overview of what the setup looks like for Amazon ECS and the related services:
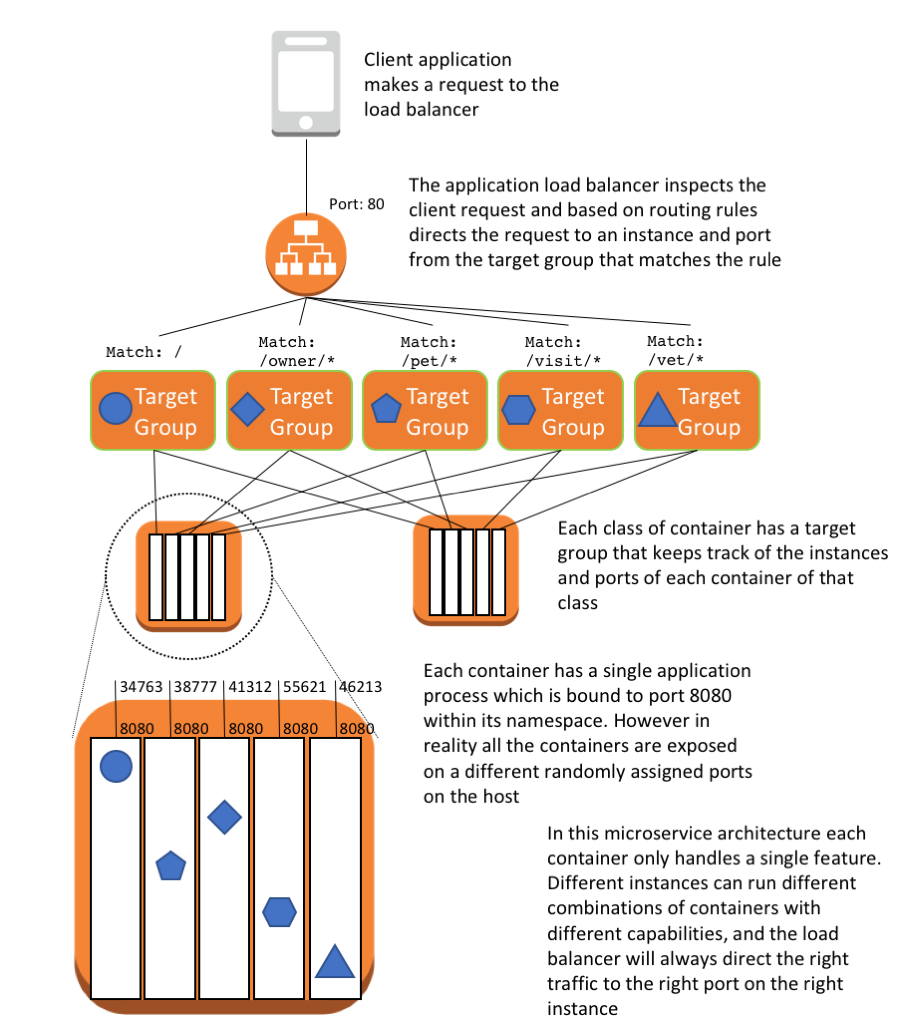
This setup consists of the following resources:
- The client application that makes a request to the load balancer.
- The Application Load Balancer that inspects the client request. Based on routing rules, it directs the request to an instance and port from the target group that matches the rule.
- The Application Load Balancer that has a target group for each microservice. The target groups are used by the corresponding services to register available container instances. Each target group has a path, so when you call the path for a particular microservice, it is mapped to the correct target group. This allows you to use one Application Load Balancer to serve all the different microservices, accessed by the path. For example, https:///owner/* would be mapped and directed to the Owner microservice.
- One Amazon ECS cluster that hosts the containers for each microservice of the application.
- A VPC network to host the Amazon ECS cluster and associated security groups.
Because you are running multiple containers on the same instances, use dynamic port mapping to avoid port clashing. By using dynamic port mapping, the container is allocated an anonymous port on the host to which the container port (8080) is mapped. The anonymous port is registered with the Application Load Balancer and target group so that traffic is routed correctly.
The following is also part of the solution but not depicted in the above diagram:
- One Amazon ECR repository for each microservice.
- A service/task definition per microservice that spins up containers on the instances of the Amazon ECS cluster.
- A MySQL RDS instance that hosts the applications schema. The information about the MySQL RDS instance is sent in through environment variables to the containers. That way, the application can connect to the MySQL RDS instance.
The CloudFormation template remains the same as in the previous section. In the Python script, you are now building five different Java applications, one for each microservice (also includes a system application). There is a separate Maven POM file for each one. The resulting Docker image gets pushed to its own Amazon ECR repository, and is deployed separately using its own service/task definition. This is critical to get the benefits described earlier for microservices.
Here is an example of the POM file for the Owner microservice:
<?xml version="1.0" encoding="UTF-8"?>
<project xmlns="http://maven.apache.org/POM/4.0.0" xmlns:xsi="http://www.w3.org/2001/XMLSchema-instance"
         xsi:schemaLocation="http://maven.apache.org/POM/4.0.0 http://maven.apache.org/maven-v4_0_0.xsd">
    <modelVersion>4.0.0</modelVersion>
    <groupId>org.springframework.samples</groupId>
    <artifactId>spring-petclinic-rest</artifactId>
    <version>1.7</version>
    <parent>
        <groupId>org.springframework.boot</groupId>
        <artifactId>spring-boot-starter-parent</artifactId>
        <version>1.5.2.RELEASE</version>
    </parent>
    <properties>
        <!-- Generic properties -->
        <java.version>1.8</java.version>
        <docker.registry.host>${env.docker_registry_host}</docker.registry.host>
    </properties>
    <dependencies>
        <dependency>
            <groupId>javax.inject</groupId>
            <artifactId>javax.inject</artifactId>
            <version>1</version>
        </dependency>
        <!-- Spring and Spring Boot dependencies -->
        <dependency>
            <groupId>org.springframework.boot</groupId>
            <artifactId>spring-boot-starter-actuator</artifactId>
        </dependency>
        <dependency>
            <groupId>org.springframework.boot</groupId>
            <artifactId>spring-boot-starter-data-rest</artifactId>
        </dependency>
        <dependency>
            <groupId>org.springframework.boot</groupId>
            <artifactId>spring-boot-starter-cache</artifactId>
        </dependency>
        <dependency>
            <groupId>org.springframework.boot</groupId>
            <artifactId>spring-boot-starter-data-jpa</artifactId>
        </dependency>
        <dependency>
            <groupId>org.springframework.boot</groupId>
            <artifactId>spring-boot-starter-web</artifactId>
        </dependency>
        <dependency>
            <groupId>org.springframework.boot</groupId>
            <artifactId>spring-boot-starter-test</artifactId>
            <scope>test</scope>
        </dependency>
        <!-- Databases - Uses HSQL by default -->
        <dependency>
            <groupId>org.hsqldb</groupId>
            <artifactId>hsqldb</artifactId>
            <scope>runtime</scope>
        </dependency>
        <dependency>
            <groupId>mysql</groupId>
            <artifactId>mysql-connector-java</artifactId>
            <scope>runtime</scope>
        </dependency>
        <!-- caching -->
        <dependency>
            <groupId>javax.cache</groupId>
            <artifactId>cache-api</artifactId>
        </dependency>
        <dependency>
            <groupId>org.ehcache</groupId>
            <artifactId>ehcache</artifactId>
        </dependency>
        <!-- end of webjars -->
        <dependency>
            <groupId>org.springframework.boot</groupId>
            <artifactId>spring-boot-devtools</artifactId>
            <scope>runtime</scope>
        </dependency>
    </dependencies>
    <build>
        <plugins>
            <plugin>
                <groupId>org.springframework.boot</groupId>
                <artifactId>spring-boot-maven-plugin</artifactId>
            </plugin>
            <plugin>
                <groupId>com.spotify</groupId>
                <artifactId>docker-maven-plugin</artifactId>
                <version>0.4.13</version>
                <configuration>
                    <imageName>${env.docker_registry_host}/${project.artifactId}</imageName>
                    <dockerDirectory>src/main/docker</dockerDirectory>
                    <useConfigFile>true</useConfigFile>
                    <registryUrl>${env.docker_registry_host}</registryUrl>
                    <!--dockerHost>https://${docker.registry.host}</dockerHost-->
                    <resources>
                        <resource>
                            <targetPath>/</targetPath>
                            <directory>${project.build.directory}</directory>
                            <include>${project.build.finalName}.jar</include>
                        </resource>
                    </resources>
                    <forceTags>false</forceTags>
                    <imageTags>
                        <imageTag>${project.version}</imageTag>
                    </imageTags>
                </configuration>
            </plugin>
        </plugins>
    </build>
</project>
Test setup
You can test this by running the Python script:
python setup.py -m setup -r <your region>
After the script has successfully run, you can test by querying an endpoint:
curl <your endpoint from output above>/owner
Conclusion
Migrating a monolithic application to a containerized set of microservices can seem like a daunting task. Following the steps outlined in this post, you can begin to containerize monolithic Java apps, taking advantage of the container runtime environment, and beginning the process of re-architecting into microservices. On the whole, containerized microservices are faster to develop, easier to iterate on, and more cost effective to maintain and secure.
This post focused on the first steps of microservice migration. You can learn more about optimizing and scaling your microservices with components such as service discovery, blue/green deployment, circuit breakers, and configuration servers at http://aws.amazon.com/containers.
If you have questions or suggestions, please comment below.
相關推薦
Deploying Java Microservices on Amazon Elastic Container Service
This post and accompanying code graciously contributed by:
How to Break a Monolith Application into Microservices with Amazon Elastic Container Service, Docker, and Amazon EC2
Traditional monolithic architectures are hard to scale. As an application's code base grows, it becomes complex to update and maintain.
Amazon Elastic Container Service (ECS
Amazon Elastic Container Service (Amazon ECS) は、Docker コンテナをサポートする拡張性とパフォーマンスに優れたコンテナオーケストレーションサービスです。これにより、コンテナ化されたアプリケーションを AWS で簡単に実行およびスケールできま
Blue/Green Deployments with Amazon Elastic Container Service
This post and accompanying code was generously contributed by:
How to Deploy a Kubernetes Application with Amazon Elastic Container Service for Kubernetes
This tutorial shows you how to deploy a containerized application onto a Kubernetes cluster managed by Amazon Elastic Container Service
How to force https on amazon elastic beanstalk
conf 使用 quest The 沒有 last director 改變 etc 假設您已在負載平衡器安全組中啟用https,將SSL證書添加到負載平衡器,將443添加到負載平衡器轉發的端口,並使用Route 53將您的域名指向Elastic Beanstalk環境(或等
Учебное пособие: разбивка монолитного приложения с помощью Amazon EC2 Container Service
Традиционные монолитные архитектуры трудно масштабировать. Когда основа кода приложения разрастается, его становится сложно обновлять и
白皮書:Amazon EC2 Container Service(ECS)上的微服務架構(下篇)
ECS上構建微服務架構 在構建微服務架構時面臨的一個主要問題就是,如果減輕執行、維護、擴充套件和管理微服務架構所需大規模分散式叢集資源的工作量和複雜性。目前主流的解決此問題的方案之一就是通過容器化部署和執行服務,降低運維和部署的複雜性。Amazon EC2 Container
Didacticiel : Division du monolithe avec Amazon EC2 Container Service
Il est difficile de mettre à l’échelle les architectures monolithiques traditionnelles. Plus le code source d’une application augmente e
Resolve "OutOfMemoryError" Hive Java Heap Space Exceptions on Amazon EMR that Occur when Hive Outputs the Query Results
export HIVE_CLIENT_HEAPSIZE=1024 export HIVE_METASTORE_HEAPSIZE=2048 export HIVE_SERVER2_HEAPSIZE=3072 if [ "$SERVICE" = "metastore" ] then exp
Running Container-Enabled Microservices on AWS
このコースでは、Amazon Elastic Container Service (Amazon ECS) を使用して、コンテナ対応アプリケーションを管理およびスケールする方法を學習します。コンテナ化されたアプリケーションを大規模に実行するという課題に注目し、Amazo
Have You Tried Delphi on Amazon Linux? (就是AWS用的Linux)
enables custom customers servers nbsp ble exists compile targe The new Delphi Linux compiler enables customers to take new or existing Wi
Java 調用PHP的Web Service(三)
ron eight pad rgs asc ali auto mat 請求 usoap是PHP環境中的開源soap工具,算是用得比較多的一個工具了。 在utf-8環境中,nusoap可以工作得很好。但是當用於中文環境中時,nusoap經常會出現一些讓人不得其解的問題
How to Install Oracle JAVA 8 on Debian 9 / Debian 8
tar int rac oracle linu https min html .com https://www.itzgeek.com/how-tos/linux/debian/how-to-install-oracle-java-8-on-debian-9-ubuntu-
Java Web中的mapper,service,controller,model
目錄 一、SSM(Spring+SpringMVC+MyBatis)架構 1、 SSM的工作原理 (1) SSM系統架構 (2) SSM程式執行流程 2、 MSCM是什麼及其作用 (1) controller (2) model (3) service
WebService客戶端出現A WebService annotation is not present on class: com.java1234.service.IUserService
去客戶端找你的類,注意看報錯 加上WebService註解 即可 附上webService建立過程 1.分別建立兩個專案,右鍵web service 2.webserviceClient 直接啟動 服務端 訪問wsdl即可 packa
Java使用JWS API開發Web Service
也歡迎大家轉載本篇文章。分享知識,造福人民,實現我們中華民族偉大復興! JAX-WS,即Java API for XML Web Service,是Java開發基於SOAP協議的Web Service的標準。使用JWS API就可以
SpringXD on yarn 使用Container工作組
SpringXD on Yarn支援Container分組。可以更好的控制admin和container分配。 控制組內成員 以組單位整體控制生命週期 動態建立組 重啟失敗的容器 實際上,XD on Yarn有內建分組
java web專案中dao和service前面為什麼要有介面呢??
介面提供了一個公用的方法提供方。 介面是用來規定子類的行為的。舉個例子吧 , 比如有個需求, 需要儲存客戶資訊, 有些客戶從網站來, 有些從手機客戶端來, 有些從後臺管理系統錄入, 假設不同來源的客戶有不同的處理業務流程, 這個時候我定義介面來提供一個儲存客戶的方法, 然後不同平臺實現我這個儲存客戶的介面,
剖析微軟Azure Container Service服務,多方管道支援Kubernetes_Kubernetes中文社群
微軟Azure Container Service重點策略 單一平臺可管理Windows和Linux的容器叢集 開發工具深度整合容器部署,挾開發工具生態系優勢搶攻企業市場 在微軟CEO Satya Nadella上任之後,近年微軟無論是擁抱Linux或是走向開源的可說成效有目共睹,其公有