
Manage Kubernetes Clusters on AWS Using CoreOS Tectonic
There are multiple ways to run a Kubernetes cluster on Amazon Web Services (AWS). The first post in this series explained how to manage a Kubernetes cluster on AWS using kops. This second post explains how to manage a Kubernetes cluster on AWS using CoreOS Tectonic.
Tectonic overview
Tectonic delivers the most current upstream version of Kubernetes with additional features. It is a commercial offering from CoreOS and adds the following features over the upstream:
- Installer
Comes with a graphical installer that installs a highly available Kubernetes cluster. Alternatively, the cluster can be installed using AWS CloudFormation templates or Terraform scripts. - Operators
An operator is an application-specific controller that extends the Kubernetes API to create, configure, and manage instances of complex stateful applications on behalf of a Kubernetes user. This release includes an etcd operator for rolling upgrades and a Prometheus operator for monitoring capabilities. - Console
A web console provides a full view of applications running in the cluster. It also allows you to deploy applications to the cluster and start the rolling upgrade of the cluster. - Monitoring
Node CPU and memory metrics are powered by the Prometheus operator. The graphs are available in the console. A large set of preconfigured Prometheus alerts are also available. - Security
Tectonic ensures that cluster is always up to date with the most recent patches/fixes. Tectonic clusters also enable role-based access control (RBAC). Different roles can be mapped to an LDAP service. - Support
CoreOS provides commercial support for clusters created using Tectonic.
Tectonic can be installed on AWS using a GUI installer or Terraform scripts. The installer prompts you for the information needed to boot the Kubernetes cluster, such as AWS access and secret key, number of master and worker nodes, and instance size for the master and worker nodes. The cluster can be created after all the options are specified. Alternatively, Terraform assets can be downloaded and the cluster can be created later. This post shows using the installer.
CoreOS License and Pull Secret
Even though Tectonic is a commercial offering, a cluster for up to 10 nodes can be created by creating a free account at Get Tectonic for Kubernetes. After signup, a CoreOS License and Pull Secret files are provided on your CoreOS account page. Download these files as they are needed by the installer to boot the cluster.
IAM user permission
The IAM user to create the Kubernetes cluster must have access to the following services and features:
- Amazon Route 53
- Amazon EC2
- Elastic Load Balancing
- Amazon S3
- Amazon VPC
- Security groups
Use the aws-policy policy to grant the required permissions for the IAM user.
DNS configuration
A subdomain is required to create the cluster, and it must be registered as a public Route 53 hosted zone. The zone is used to host and expose the console web application. It is also used as the static namespace for the Kubernetes API server. This allows kubectl to be able to talk directly with the master.
The domain may be registered using Route 53. Alternatively, a domain may be registered at a third-party registrar. This post uses a kubernetes-aws.io domain registered at a third-party registrar and a tectonic subdomain within it.
Generate a Route 53 hosted zone using the AWS CLI. Download jq to run this command:
ID=$(uuidgen) && \
aws route53 create-hosted-zone \
--name tectonic.kubernetes-aws.io \
--caller-reference $ID \
| jq .DelegationSet.NameServers
The command shows an output such as the following:
[
  "ns-1924.awsdns-48.co.uk",
  "ns-501.awsdns-62.com",
  "ns-1259.awsdns-29.org",
  "ns-749.awsdns-29.net"
]
Create NS records for the domain with your registrar. Make sure that the NS records can be resolved using a utility like dig web interface. A sample output would look like the following:

The bottom of the screenshot shows NS records configured for the subdomain.
Download and run the Tectonic installer
Download the Tectonic installer (version 1.7.1) and extract it. The latest installer can always be found at coreos.com/tectonic. Start the installer:
./tectonic/tectonic-installer/$PLATFORM/installer
Replace $PLATFORM with either darwin or linux. The installer opens your default browser and prompts you to select the cloud provider. Choose Amazon Web Services as the platform. Choose Next Step.
Specify the Access Key ID and Secret Access Key for the IAM role that you created earlier. This allows the installer to create resources required for the Kubernetes cluster. This also gives the installer full access to your AWS account. Alternatively, to protect the integrity of your main AWS credentials, use a temporary session token to generate temporary credentials.
You also need to choose a region in which to install the cluster. For the purpose of this post, I chose a region close to where I live, Northern California. Choose Next Step.
Give your cluster a name. This name is part of the static namespace for the master and the address of the console.
To enable in-place update to the Kubernetes cluster, select the checkbox next to Automated Updates. It also enables update to the etcd and Prometheus operators. This feature may become a default in future releases.
Choose Upload “tectonic-license.txt” and upload the previously downloaded license file.
Choose Upload “config.json” and upload the previously downloaded pull secret file. Choose Next Step.
Let the installer generate a CA certificate and key. In this case, the browser may not recognize this certificate, which I discuss later in the post. Alternatively, you can provide a CA certificate and a key in PEM format issued by an authorized certificate authority. Choose Next Step.
Use the SSH key for the region specified earlier. You also have an option to generate a new key. This allows you to later connect using SSH into the Amazon EC2 instances provisioned by the cluster. Here is the command that can be used to log in:
ssh –i <key> [email protected]<ec2-instance-ip>
Choose Next Step.

Define the number and instance type of master and worker nodes. In this case, create a 6 nodes cluster. Make sure that the worker nodes have enough processing power and memory to run the containers.
An etcd cluster is used as persistent storage for all of Kubernetes API objects. This cluster is required for the Kubernetes cluster to operate. There are three ways to use the etcd cluster as part of the Tectonic installer:
- (Default) Provision the cluster using EC2 instances. Additional EC2 instances are used in this case.
- Use an alpha support for cluster provisioning using the etcd operator. The etcd operator is used for automated operations of the etcd master nodes for the cluster itself, in addition to for etcd instances that are created for application usage. The etcd cluster is provisioned within the Tectonic installer.
- Bring your own pre-provisioned etcd cluster.
Use the first option in this case.

For more information about choosing the appropriate instance type, see the etcd hardware recommendation. Choose Next Step.
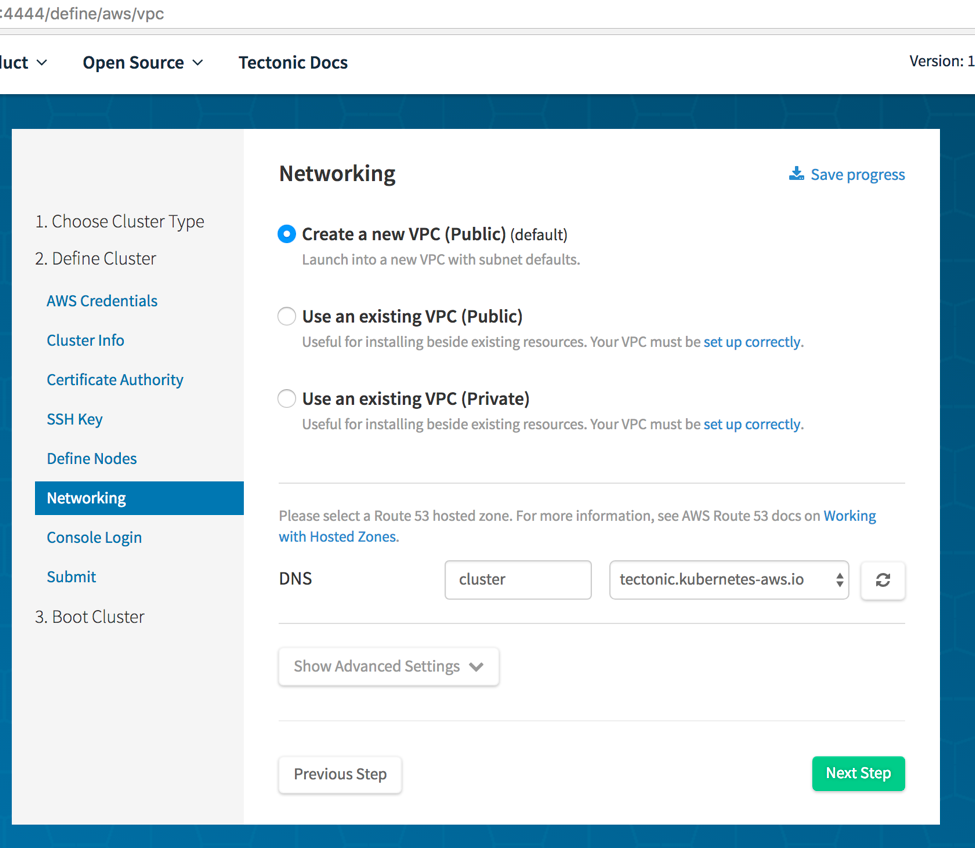
Specify the networking options. The installer can create a new public VPC or use a pre-existing public or private VPC. Make sure that the VPC requirements are met for an existing VPC.
Give a DNS name for the cluster. Choose the domain for which the Route 53 hosted zone was configured earlier, such as tectonic.kubernetes-aws.io. Multiple clusters may be created under a single domain. The cluster name and the DNS name would typically match each other.
To select the CIDR range, choose Show Advanced Settings. You can also choose the Availability Zones for the master and worker nodes. By default, the master and worker nodes are spread across multiple Availability Zones in the chosen region. This makes the cluster highly available.
Leave the other values as default. Choose Next Step.
Specify an email address and password to be used as credentials to log in to the console. Choose Next Step.
At any point during the installation, you can choose Save progress. This allows you to save configurations specified in the installer. This configuration file can then be used to restore progress in the installer at a later point.
To start the cluster installation, choose Submit. At another time, you can download the Terraform assets by choosing Manually boot. This allows you to boot the cluster later.
The logs from the Terraform scripts are shown in the installer. When the installation is complete, the console shows that the Terraform scripts were successfully applied, the domain name was resolved successfully, and that the console has started. The domain works successfully if the DNS resolution worked earlier, and it’s the address where the console is accessible.
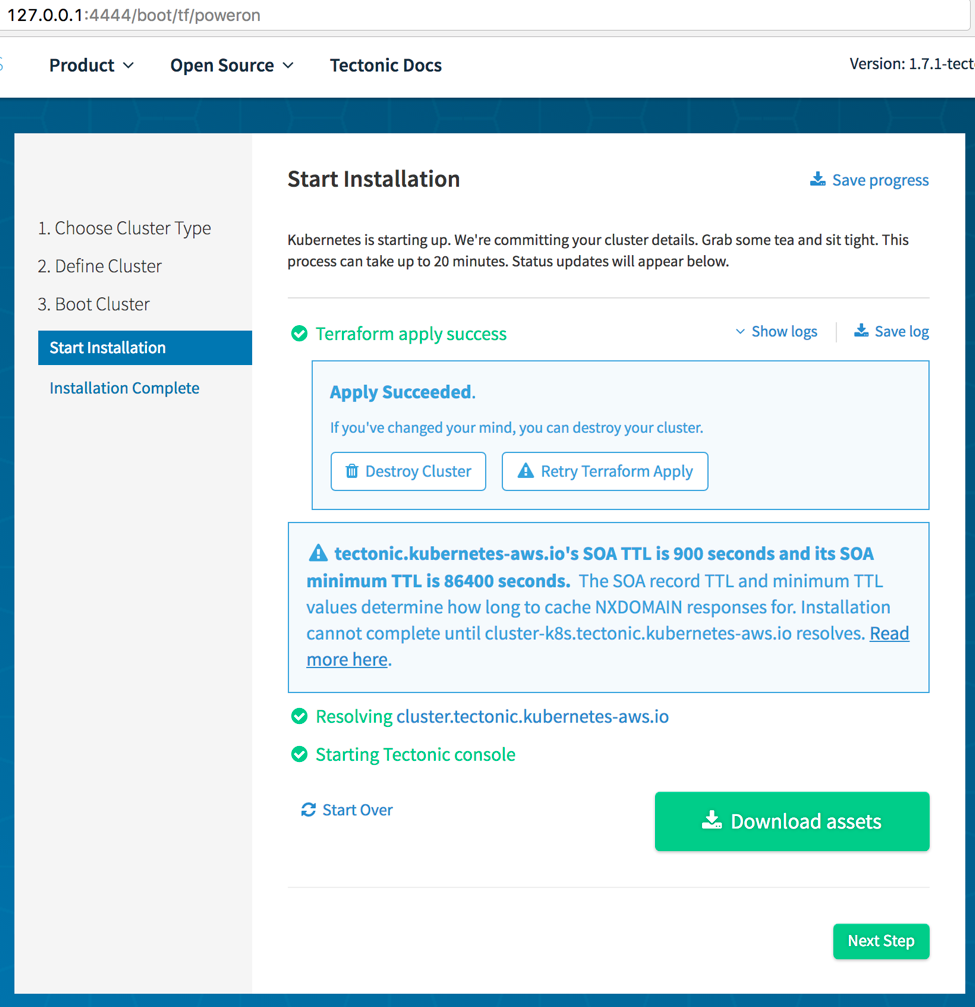
Choose Download assets to download assets related to your cluster. It contains your generated CA, kubectl configuration file, and the Terraform state. This download is an important step as it allows you to delete the cluster later.
Choose Next Step for the final installation screen. It allows you to access the Tectonic console, gives you instructions about how to configure kubectl to manage this cluster, and finally deploys an application using kubectl.
Choose Go to my Tectonic Console. In our case, it is also accessible at http://cluster.tectonic.kubernetes-aws.io/.
As I mentioned earlier, the browser does not recognize the self-generated CA certificate. Choose Advanced and connect to the console. Enter the login credentials specified earlier in the installer and choose Login.
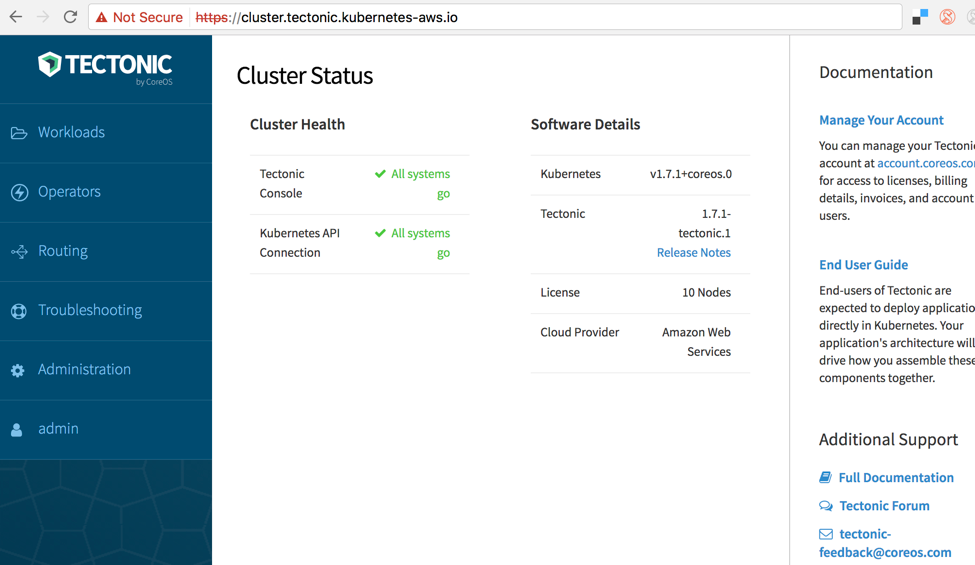
The Kubernetes upstream and console version are shown under Software Details. Cluster health shows All systems go and it means that the API server and the backend API can be reached.
To view different Kubernetes resources in the cluster choose, the resource in the left navigation bar. For example, all deployments can be seen by choosing Deployments.

By default, resources in the all namespace are shown. Other namespaces may be chosen by clicking on a menu item on the top of the screen. Different administration tasks such as managing the namespaces, getting list of the nodes and RBAC can be configured as well.
Download and run Kubectl
Kubectl is required to manage the Kubernetes cluster. The latest version of kubectl can be downloaded using the following command:
curl -LO https://storage.googleapis.com/kubernetes-release/release/$(curl -s https://storage.googleapis.com/kubernetes-release/release/stable.txt)/bin/darwin/amd64/kubectl
It can also be conveniently installed using the Homebrew package manager. To find and access a cluster, Kubectl needs a kubeconfig file. By default, this configuration file is at ~/.kube/config. This file is created when a Kubernetes cluster is created from your machine. However, in this case, download this file from the console.
In the console, choose admin, My Account, Download Configuration and follow the steps to download the kubectl configuration file. Move this file to ~/.kube/config. If kubectl has already been used on your machine before, then this file already exists. Make sure to take a backup of that file first.
Now you can run the commands to view the list of deployments:
~ $ kubectl get deployments --all-namespaces
NAMESPACE         NAME                                    DESIRED   CURRENT   UP-TO-DATE   AVAILABLE   AGE
kube-system       etcd-operator                           1         1         1            1           43m
kube-system       heapster                                1         1         1            1           40m
kube-system       kube-controller-manager                 3         3         3            3           43m
kube-system       kube-dns                                1         1         1            1           43m
kube-system       kube-scheduler                          3         3         3            3           43m
tectonic-system   container-linux-update-operator         1         1         1            1           40m
tectonic-system   default-http-backend                    1         1         1            1           40m
tectonic-system   kube-state-metrics                      1         1         1            1           40m
tectonic-system   kube-version-operator                   1         1         1            1           40m
tectonic-system   prometheus-operator                     1         1         1            1           40m
tectonic-system   tectonic-channel-operator               1         1         1            1           40m
tectonic-system   tectonic-console                        2         2         2            2           40m
tectonic-system   tectonic-identity                       2         2         2            2           40m
tectonic-system   tectonic-ingress-controller             1         1         1            1           40m
tectonic-system   tectonic-monitoring-auth-alertmanager   1         1         1            1           40m
tectonic-system   tectonic-monitoring-auth-prometheus     1         1         1            1           40m
tectonic-system   tectonic-prometheus-operator            1         1         1            1           40m
tectonic-system   tectonic-stats-emitter                  1         1         1            1           40m
This output is similar to the one shown in the console earlier. Now, this kubectl can be used to manage your resources.
Upgrade the Kubernetes cluster
Tectonic allows the in-place upgrade of the cluster. This is an experimental feature as of this release. The clusters can be updated either automatically, or with manual approval.
To perform the update, choose Administration, Cluster Settings. If an earlier Tectonic installer, version 1.6.2 in this case, is used to install the cluster, then this screen would look like the following:
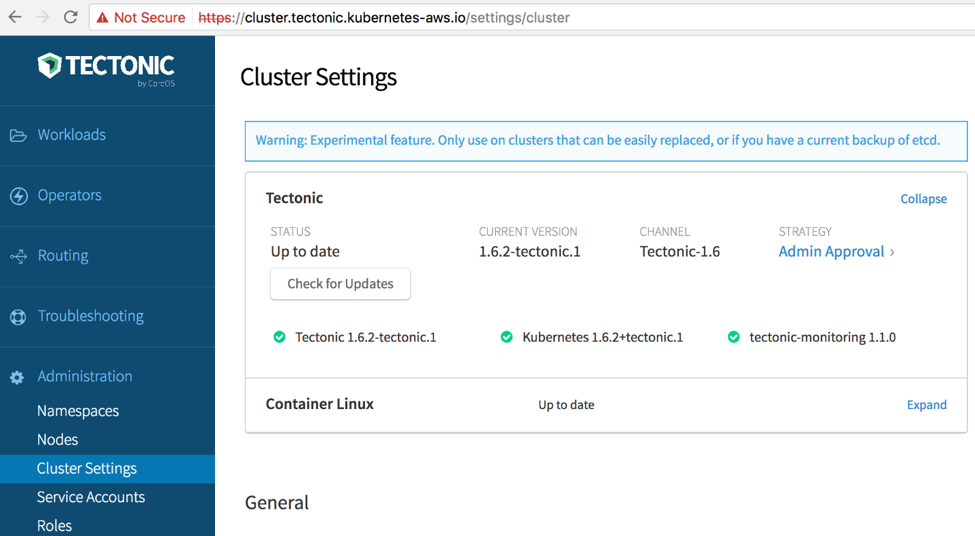
Choose Check for Updates. If any updates are available, choose Start Upgrade. After the upgrade is completed, the screen is refreshed.
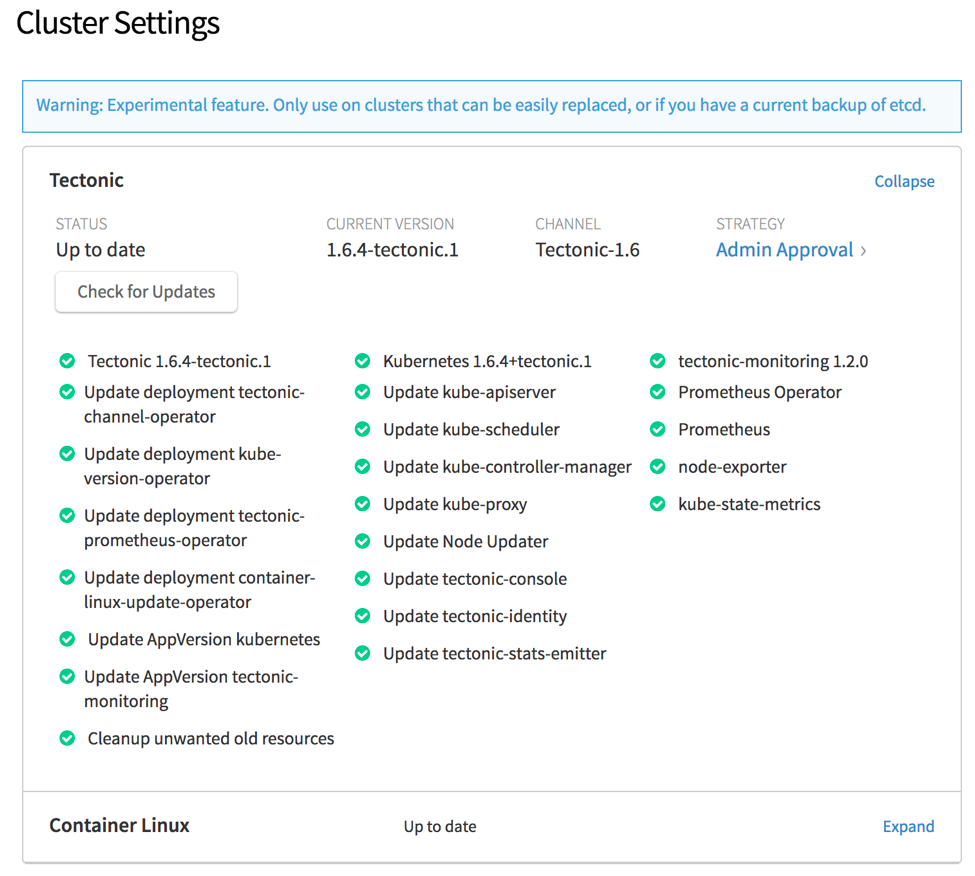
This is an experimental feature in this release and so should only be used on clusters that can be easily replaced. This feature may become a fully supported in a future release. For more information about the upgrade process, see Upgrading Tectonic & Kubernetes.
Delete the Kubernetes cluster
Typically, the Kubernetes cluster is a long-running cluster to serve your applications. After its purpose is served, you may delete it. It is important to delete the cluster as this ensures that all resources created by the cluster are appropriately cleaned up.
The easiest way to delete the cluster is using the assets downloaded in the last step of the installer. Extract the downloaded zip file. This creates a directory like <cluster-name>_TIMESTAMP. In that directory, give the following command to delete the cluster:
TERRAFORM_CONFIG=$(pwd)/.terraformrc terraform destroy --force
This destroys the cluster and all associated resources.
You may have forgotten to download the assets. There is a copy of the assets in the directory tectonic/tectonic-installer/darwin/clusters. In this directory, another directory with the name <cluster-name>_TIMESTAMP contains your assets.
Conclusion
This post explained how to manage Kubernetes clusters using the CoreOS Tectonic graphical installer. For more details, see Graphical Installer with AWS. If the installation does not succeed, see the helpful Troubleshooting tips. After the cluster is created, see the Tectonic tutorials to learn how to deploy, scale, version, and delete an application.
Future posts in this series will explain other ways of creating and running a Kubernetes cluster on AWS.
—Arun
相關推薦
Manage Kubernetes Clusters on AWS Using CoreOS Tectonic
There are multiple ways to run a Kubernetes cluster on Amazon Web Services (AWS). The first post in this series explained how to manage a Kubernet
Manage Kubernetes Clusters on AWS Using Kops
Any containerized application typically consists of multiple containers. There are containers for the application itself, a database, possibly a w
Running FaaS on a Kubernetes Cluster on AWS using Kubeless
Serverless computing allows you to build and run applications and services without provisioning, scaling, or managing any servers. FaaS (
Using Presto in our Big Data Platform on AWS
Using Presto in our Big Data Platform on AWSby Eva Tse, Zhenxiao Luo, Nezih Yigitbasi @ Big Data Platform teamAt Netflix, the Big Data Platform team is res
Running Bleeding-Edge Kubernetes on AWS with kops
In an earlier blog post, I explained how to set up a Kubernetes cluster on AWS using kops. By default, the kops create cluster command chooses the
Microservices on AWS Compute Using Containers and Serverless
Deploying microservices-based applications can be complex. First, it requires setting up your basic compute, storage, and networking capa
kube-aws: Highly Available, Scalable, and Secure Kubernetes on AWS
There are many ways to manage a Kubernetes cluster on AWS. Kube-AWS is a Kubernetes incubator project that allows you to create,
Mastering Kubernetes on AWS – Video Replay
Shalom! I had the opportunity to speak at AWS Summit Tel Aviv a few weeks ago. It is always refreshing to meet our customers and learn how
DevOps on AWS之Cloudformation概念介紹篇
Cloudformation的相關概念 AWS cloudformation是一項典型的(IAC)基礎架構即程式碼服務。。通過編寫模板對亞馬遜雲服務的資源進行呼叫和編排。藉助cloudformation可以極大幫助DevOps提升工作效率,減少重複勞動,配置和部署相關服務的時間,並把更多的精力花在應用程式領
DevOps on AWS之Cloudformation實踐篇
cloudformation入門實踐 AWS cloudformation通過模板對AWS雲資源進行編排和呼叫。並且可以通過模板程式碼層面的修改就可以對現有環境進行升級改造,雲端業務的靈活便捷特點展現無疑。下面我們通過一個入門級的簡單動手案例給大家展示cloudformation是如何使用的。希望大家也動手
DevOps on AWS之Elastic BeanStalk
Elastic BeanStalk相關概念 童話世界中存在著一種魔力beanstalk(豆莢),種在花盆裡可以無限的向上生長,越長越高直達雲端。AWS Elastic Beanstalk也採用類似概念,使用者只需部署程式碼即可自動處理包括容量預置、負載均衡、自動擴充套件和應用程式執行狀況監控在內的部署工作。
DevOps on AWS之OpsWorks初體驗
AWS OpsWorks 是一款配置管理服務,提供 Chef 和 Puppet 的託管EC2虛擬機器例項。Chef 和 Puppet 是自動化平臺,允許使用者使用程式碼來自動配置伺服器。使用者藉助OpsWorks可以使用 Chef或Puppet 自動完成所有 EC2 例項或本地計算環境中的
Building Serverless Apps on AWS 在AWS上構建無伺服器應用程式 Lynda課程中文字幕
Building Serverless Apps on AWS 中文字幕 在AWS上構建無伺服器應用程式 中文字幕Building Serverless Apps on AWS 瞭解如何在Amazon Web Services(AWS)上開發NodeJS無伺服器應用程式 首先,介紹
Why You Should Not Neglect Your Developer’s Kubernetes Clusters
What could go wrong?Let’s look at some of the issues you could run into, when putting less importance on DEV, and the impact they might have.I did not come
This surge protector lets you turn on devices using Alexa or Google Assistant
If there is anything the widely-acclaimed, sob-inducing series This Is Us has taught us, it's that you should always be wary of how you plug in your home a
Highly Available WordPress on AWS: Don’t Learn The Hard Way
Highly Available WordPress on AWS: Don’t Learn The Hard WayToday we’ll be going over some of potential strategies for hosting WordPress on AWS in a scalabl
throughput genomics workflows on AWS | AWS Startups Blog
Guest post by Tomaz Berisa, Cofounder and CTO at Gencove We have been working hard to scale low-pass sequencing at Gencove and ran into a
Go Serverless! Let’s create a File Sharing application based on AWS services
Let’s start illustrating the services that are utilized according to design choices.Amazon S3“Amazon S3 is an object storage service created to memorize an
In the news: Go on AWS Lambda · Applied Go
On Jan 15th, Amazon announced Go support for AWS Lambda. This was exciting news for many, according to the number of blog posts that followed this annou
Check your balance on Coinbase using Python
Check your balance on Coinbase using Pythoncredits: pixabayEven though Coinbase has a mobile application for you to check your balance on the go, I prefer