
react native 學習之模仿”探探“實現豆瓣電影app部分功能
一、 首先配置環境 當然是node 下用npm
npm install -g react-native-clireact-native init react1
cd react1
react-native run-android
新開一個cmd 啟動專案
react-native start 在電腦上啟動的安卓虛擬機器 不能搖一搖,所以還需要在 cmd 裡輸入
adb shell input keyevent 82
或者
adb -s emulator-5554 shell input keyevent 82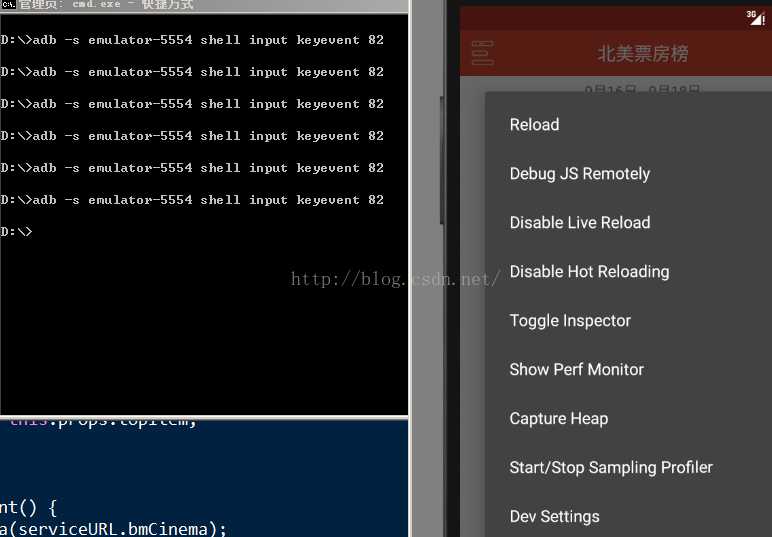
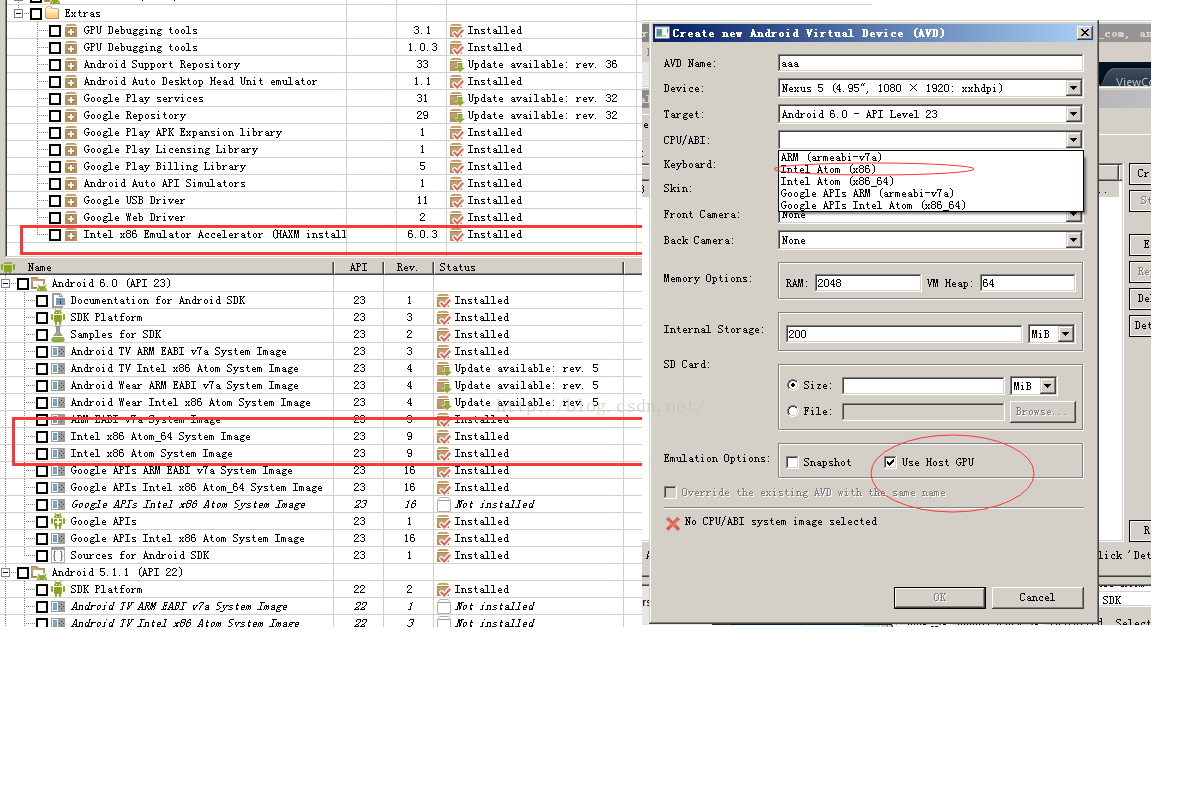
在筆記本下啟動的虛擬機器會比較卡可以設定如下,會稍微好點
二、需要實現的介面和功能如下


新建一個AppNavigator.js 檔案 用於首頁和詳情頁的跳轉
index.android.js 首先展示首頁'use strict' import React, { Component } from 'react'; import { StyleSheet, Navigator } from 'react-native'; import ViewContainer from '../views/indexView'; import DetailContainer from '../views/Detail'; class AppNavigator extends Component { _renderScene(route, navigator) { let globalNavigatorProps = { navigator }; switch(route.ident){ case 'indexView': return( <ViewContainer {...globalNavigatorProps} /> ) case 'detail': return( <DetailContainer {...globalNavigatorProps} /> ) default: return( <ViewContainer {...globalNavigatorProps} /> ) } } render() { return ( <Navigator initialRoute={this.props.initialRoute} ref="AppNavigator" renderScene={this._renderScene}/> ); } } module.exports = AppNavigator;
reactjs 寫樣式和傳統的css 有一定的區別,駝峰和沒有簡寫如(margin: 0 auto) 是沒有的,同時安卓機下是不能顯示出陰影的'use strict' import React, { Component } from 'react'; import { AppRegistry, StatusBar } from 'react-native'; import AppNavigator from './app/common/AppNavigator'; class react1 extends Component { render() { this._setStatusBar(); return ( <AppNavigator initialRoute={{ident: 'indexView'}}/> ); } //狀態列的顏色 _setStatusBar() { StatusBar.setBackgroundColor('#af3329', true); } } AppRegistry.registerComponent('react1', () => react1);
首頁中的 卡片佈局如下

'use strict'
import React, { Component } from 'react';
import { StyleSheet, Text, View, AsyncStorage, Image } from 'react-native';
import util from '../common/util';

class Card extends Component {
    constructor(props) {
        super(props);
    }

    render() {
        let subject, posterImage, image; // 大圖

        this.props.subject ? subject = this.props.subject : subject = this.props;

        posterImage = subject.images.large;

        if(posterImage != '' && posterImage != null) {
            image = <Image resizeMode="stretch" style={styles.posterImage}
                        source={{uri: posterImage}}/>;
        }else{
            image = <Text>{this.props.subject.title}</Text>;
        }
        return (
            <View style={[styles.cardBox, this.props.CardPosition ? {
                position: 'absolute',
                top: this.props.CardTop} : null
            ]}>
                <View style={styles.posterWrap}>
                    {image}
                    {this.props.new ?  <Text style={styles.newTop}>新上榜</Text> : null }
                    {this.props.rank ? <Text style={styles.topNumber}>Top {this.props.rank}</Text> : null}
                </View>
                <View style={styles.cinemaMsg}>
                    <View style={styles.cinemaMsgItem}>
                        <Text style={styles.title} numberOfLines={1} >{subject.title}
                            { this.props.box ? <Text style={styles.cast}> {subject.casts[0].name}...</Text> : null}
                        </Text>
                        <Text style={styles.average}>評分:{subject.rating.average}</Text>
                    </View>
                    <View style={styles.cinemaMsgItem}>
                        <Text style={[styles.arrivedMsg, styles.flex2]} numberOfLines={1}>{subject.original_title} ({subject.year})</Text>
                        <Text style={styles.boxOffice} numberOfLines={1}>{ this.props.box ?  '票房:' + this.props.box/1000 :  subject.casts[0].name}</Text>
                    </View>
                    <View style={styles.cinemaMsgItem}>
                        <Text style={styles.arrivedMsg}>型別:{subject.genres.join('\/')}</Text>
                        <Text style={styles.directors}>導演:{subject.directors[0].name}</Text>
                    </View>
                </View>
            </View>

        );
    }

}

const styles = StyleSheet.create({
    flex2: {
        overflow: 'hidden',
    },
    cardBox: {
        borderRadius: 5,
        borderWidth: 2,
        marginTop: 2,
        width: 310,
        marginHorizontal: (util.size.width - 310) / 2 ,
        borderColor: '#e1e2da',
        backgroundColor: '#ffffff',
    },
    posterWrap: {
        width: 310,
        borderColor: '#e1e2da',
    },
    posterImage: {
        height: 340,
        width: 310,
    },
    newTop: {
        position: 'absolute',
        top: 0,
        right: 0,
        fontSize: 12,
        color: '#ffffff',
        backgroundColor: 'rgba(230,69,51,0.65)',
        paddingVertical: 1,
        paddingHorizontal: 3,
    },
    topNumber: {
        position: 'absolute',
        top: 0,
        left: 0,
        fontSize: 12,
        color: '#ffffff',
        paddingVertical: 1,
        paddingHorizontal: 3,
        backgroundColor: 'rgba(255,164,51,0.7)',
    },
    cinemaMsg: {
        width: 300,
        padding: 2,
        flexDirection: 'column',
    },
    cinemaMsgItem: {
        flex: 1,
        justifyContent: 'space-between',
        flexDirection: 'row',
    },
    title: {
        flex: 2,
        fontSize: 15,
        color: '#1d1d1d',
        textAlign: 'left',
    },
    cast: {
        fontSize: 12,
    },
    average: {
        flex: 1,
        fontSize: 15,
        color: '#e64533',
        textAlign: 'right',
    },
    arrivedMsg: {
        fontSize: 13,
        textAlign: 'left',
    },
    boxOffice: {
        flex:1,
        fontSize: 12,
        color: '#e64533',
        textAlign: 'right',
    },
    directors: {
        fontSize: 12,
        textAlign: 'right',
        color: '#1d1d1d',
    },
});

module.exports = Card;
卡片滑動swipe 效果
npm install -g react-native-swipe-cardsimport SwipeCards from 'react-native-swipe-cards';
render() {
let data = (this.props.dataCinema ? JSON.parse(this.props.dataCinema) : null);
return (
<View style={styles.box}>
{ data ?
<SwipeCards cards={data} style={styles.swipeCards}
loop={true}
renderCard={(cardData) => <Card {...cardData} />}
handleYup={this.handleYup} renderNope={this.renderNope} renderYup={this.renderYup}
handleNope={this.handleNope}
cardRemoved={this.cardRemoved}/>
: null
}
</View>
);
}
首頁抽屜效果
npm install -g react-native-drawer render() {
return (
<Drawer
ref={(ref) => this._drawer = ref}
type="static"
content={
<LeftControlPanel closeDrawer={this.closeDrawer}/>
}
styles={{main: {shadowColor: '#000000', shadowOpacity: 0.3, shadowRadius: 15}}}
captureGestures={true}
acceptTap={true}
acceptPan={true}
negotiatePan={false}
useInteractionManager={false}
tweenDuration={100}
panThreshold={0.08}
panOpenMask={0.03}
panCloseMask={0}
disabled={this.state.drawerDisabled}
openDrawerOffset={(viewport) => {
return 80
}}
panOpenMaskY={50}
side="left"
tweenHandler={Drawer.tweenPresets.parallax}
>
<Drawer
type="static"
ref={(ref) => this._drawer2 = ref}
content={
<RightControlPanel closeDrawer={this.closeDrawer2} />
}
captureGestures={true}
acceptTap={true}
acceptPan={true}
negotiatePan={false}
useInteractionManager={false}
tweenDuration={100}
panThreshold={0.08}
panOpenMask={0.03}
panCloseMask={0}
openDrawerOffset={(viewport) => {
return 80
}}
side="right"
tweenHandler={Drawer.tweenPresets.parallax}
>
<Main topItem={this.state.topItem} navigator={this.props.navigator}/>
</Drawer>
</Drawer>
以上所用外掛我都有改動 符合demo的需求····
通過這次的demo學習對react 有進一步的認識與體會,
元件的生命週期
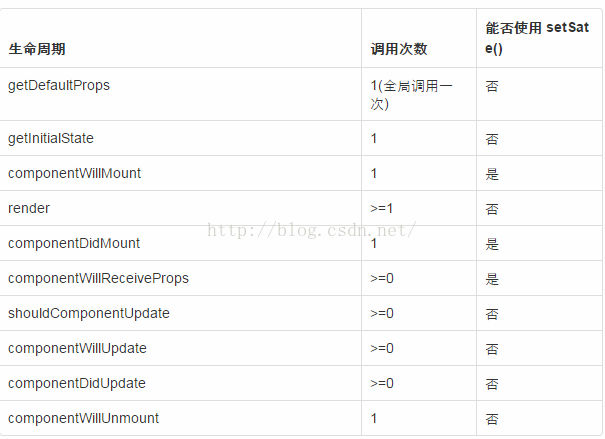
componentWillReceiveProps(nextProps){} 接收新的資料
shouldComponentUpdate(nextProps, nextState){ return boo} 必須有返回值, 返回 false componentWillUpdate()不會被呼叫 render()也再不執行 ,這樣根據需要可以禁止頁面的更新。
react native事件捕獲
onStartShouldSetPanResponderCapture, onMoveShouldSetPanResponderCapture連個方法都有返回值, 返回true 時,事件就不再傳遞,被當前元件劫持並呼叫當前元件的onResponderStart或者onResponderRlase等
資料請求利用 facth 比傳統ajax 更簡潔 當然屬於es6 的
fetch(url).then((response) => response.text())
        .then((responseText) => {
            successCallback(JSON.parse(responseText));
        }).catch(function(err){
            failCallback(err);
}); this.state['cards'] = JSON.parse(nextProps.dataCinema);
this.forceUpdate();forceUpdate就是重新render。有變數不在state上,缺又想更新state,重新整理render;或者state裡的某個變數層次太深,更新的時候沒有自動觸發render。這些時候都可以手動呼叫forceUpdate自動觸發render。
有需要合作的,可以加個好友

相關推薦
react native 學習之模仿”探探“實現豆瓣電影app部分功能
一、 首先配置環境 當然是node 下用npm npm install -g react-native-cli然後建立專案react-native init react1 cd react1 react-native run-android 新開一個cmd 啟動專案 re
react native 學習之 native modules
每一個 nsstring類 了解 lba 執行過程 span nsnumber 開發 github 翻譯自https://facebook.github.io/react-native/docs/native-modules-ios.html Native Module
React-Native學習之 防止鍵盤遮擋TextInput
import React, {Component} from 'react'; import ReactNative, { AppRegistry, StyleSheet, Text, View, Image, TextInput,
React-Native學習之第三方開源元件--側滑欄----react-native-side-menu
react-native-side-menu 側滑欄元件 1.匯入方式 切換到當前目錄在命令列執行下面的命令 npm install react-native-side-menu --save 開啟package.json檢視是否成功匯入
React-Native學習之 圖片做背景 modal 點選其他區域消失
1.modal點選其他區域消失 <TouchableWithoutFeedback onPress={()=>this.setState({showTopMenu:false})}> <View style={{position:
(React-Native 學習之四) RN 官方Demo 搭建 RNTester 執行
一,前言: 學習react-native相信對於我們最好的教程就是官方教程。因此學習和檢視官方demo。是我們學習進步的階梯。本文是博主學習react-native中遇到的一些基本問題,分享出來供大家學習和參考: 二,準備工作:
React-native 學習之AlertDialog彈出框
/** * 功能: alert對話方塊 */ 'use strict'; /** * 匯入模組 */ // 系統模組 import React, { Component } from 'react'; import { StyleSheet,
React Native學習之JavaScript語法轉換器
JavaScript語法轉換器 語法轉換器可以使編寫程式碼的過程更加享受,因為開發者可以藉助轉換器直接使用新的JavaScirpt語法標準,而無需等待JS直譯器的支援。 React Native從0.5.0版本開始已經內建Babel轉換器。你可以檢視Babe
一.React-Native學習之Window環境下搭建環境配置
一.安裝JDK 1.從Java官網下載JDK並安裝。 也可以從百度雲下載x64版本 2.安裝成功可以用java -version檢視版本資訊 3. 配置環境變數 JAVA_HOME=C:\Program Files\Java\
【原創】東方耀react native學習之-37AsyncStorage
AsyncStorage是一個簡單的、具有非同步特性的鍵值對的儲存系統,全域性的!替代LocalStorage AsyncStorage裡面都有一個回撥函式,而回調的第一個引數都是錯誤物件,如果發生錯誤,該物件就會展示錯誤資訊,否則為null;每個方法都會返回
React-native 學習之Confirm彈出框
``` /** * 功能: Confirm對話方塊 */ /*visible bool 控制彈出框隱藏(false)或顯示(true) transparent bool 控制彈出框背景,若為false則彈出框背景為灰色,會擋住彈出框後面的內容,true時才為
React-Native 學習之--問題處理 一. github上下載的專案不能執行?
在github上下載的專案不能執行? 出現”RCTRootView.h” file not found 紅色提示 如圖. 這是依賴庫沒有下載, 可以在專案的根目錄下 輸入 npm install , 或者 直接拷一份node_modules到跟目錄下就可
React Native 學習之Image元件
/** * @Author: fantasy * @Date: 2016-06-13T17:27:21+08:00 * @Last modified by: fantasy * @Last modified time: 2016-07-11T10:45:42+08:
React-Native學習之路(九)TabNavigator隱藏問題的分析及解決
首先說明一下我是用的TabNavigator+StackNavigator來寫的頁面跳轉。 我們先分析一下為什麼在每個Tab的Item裡面實現跳轉,跳轉頁面還是會有底部的TabNvigator 先看下我出問題的專案結構,首先,我們可以看到我給這個Tab的Item指定的
React Native 學習之路:Unable to load script from assets 'index.android.bundle'.
最近總遇到這個問題:問題背景:1.伺服器已啟動2.裝置插入了兩個裝置(模擬器與真機)3.之後出現以下報錯問題Unable to load script from assets 'index.android.bundle'. Make sure your bundle is
(React-Native 學習之七) Rn混合開發之--Activity直接引用React native元件
簡介: Activity 和 ReactNative 混合開發時,有時我們需要直接引入已經寫好的reactNative js元件。此時就需要我們對Activity如何引用ReactNative進行了解。 本篇介紹了Activity如何直接應用一個寫好的Rea
React-Native學習之路(六)Navigator
Navigator頁面跳轉和資料傳遞 2018年7月21日 15:37 1.首先需要匯入 npm install react-native-deprecated-custom-components --save 然後在專案中使用navigator的時候 impor
爬蟲學習之11:爬取豆瓣電影TOP250並存入資料庫
本次實驗主要測試使用PyMySQL庫寫資料進MySQL,爬取資料使用XPATH和正則表示式,在很多場合可以用XPATH提取資料,但有些資料項在網頁中沒有明顯特徵,用正則表示式反而反而更輕鬆獲取資料。直接上程式碼:from lxml import etree impo
vue2.0巢狀路由實現豆瓣電影分頁功能(附加豆瓣web-app)
前言 最近練習Vue,看到官方文件中的巢狀路由, 不做不知道,實在是太坑了,網上資料demo少之又少,然後自己就做了一個demo,用了vue2.0巢狀路由實現豆瓣電影分頁功能,供大家學習學習,寫得不好望見諒。 demo截圖: douban.gif Demo
React-Native學習筆記之:導航器Navigator實現頁面間跳轉
Navigator用來實現不同頁面的切換,想設定Navigator,必須確定一個或多個呼叫routes物件,去定義每個場景。 還可以利用renderScene方法,導航欄可以根據指定的路由來渲染場景。