Android Launcher分析和修改7——AllApp全部應用列表(AppsCustomizeTabHost)
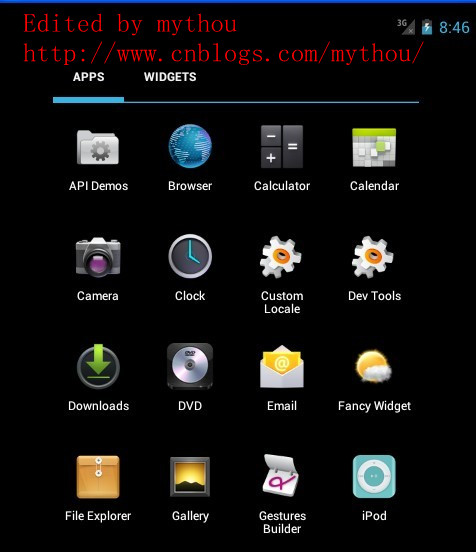
今天主要是分析一下Launcher裡面的所有應用列表。Android4.0 Launcher的所有應用列表跟2.X比較大的區別就是多了Widget的顯示。下面會詳細分析Launcher裡面有關所有應用列表配置和程式碼分析。

1、AllApp列表配置檔案
配置AllAPP應用列表介面的配置檔案是\res\Layout\apps_customize_pane.xml檔案。AllAPP列表使用了一個TabHost組織了兩個頁面(全部應用和Widget),通過介面上面的TabHost進行切換。下面是TabHost的配置和AllAPP介面配置,我這裡需要把Widget部分功能取消,因為我做的Launcher把Widget放到workspace裡面實現了。
<!-- 取消TabHost的顯示,把TabHost設定為0dp高,避免影響all app顯示 mythou --> <com.android.launcher2.AppsCustomizeTabHost android:background="@android:color/transparent"> <LinearLayout android:id="@+id/apps_customize_content" android:orientation="vertical" android:layout_width="match_parent" android:layout_height="match_parent">
<!-- TabHost欄,配置TahHost欄的高度寬度
我這裡把TabHost取消了,因為我的Launcher需要把Widget反正workspace裡面實現,
所以全部應用列表修改成和2.X的Launcher一樣 mythou--> <FrameLayout android:id="@+id/tabs_container" android:layout_width="0dp" android:layout_height="0dp" android:layout_marginTop="0dp" android:layout_gravity="center_horizontal">
<!-- TabHost上面Widget 的按鈕--> <com.android.launcher2.FocusOnlyTabWidget android:id="@android:id/tabs" android:layout_width="match_parent" android:layout_height="match_parent" android:layout_gravity="left" android:background="@android:color/transparent" android:tabStripEnabled="false" android:tabStripLeft="@null" android:tabStripRight="@null" android:divider="@null" />
<!--TabHost 右邊的Android市場的圖示,不需要可以去掉--> <include android:id="@+id/market_button" layout="@layout/market_button" android:layout_width="wrap_content" android:layout_height="match_parent" android:layout_gravity="right" /> </FrameLayout>
<!--下面這裡就是我們所有應用列表的選項和所有應用列表的顯示View
需要注意的是AppsCustomizePagedView同時支援顯示所有應用列表和Widget列表 mythou--> <FrameLayout android:id="@android:id/tabcontent" android:layout_width="match_parent" android:layout_height="match_parent" >
<!-- 所有應用列表是通過自定義VIewAppsCustomizePagedView顯示,後面會詳細分析這個View
下面只對部分重要屬性加入註釋--> <com.android.launcher2.AppsCustomizePagedView android:id="@+id/apps_customize_pane_content" android:layout_width="match_parent" android:layout_height="match_parent"
//MaxAppCellCountX 和MaxAppCellCounY指的是所有App圖示排列的最大行列數。
//一般設定為-1,表示無限制 launcher:maxAppCellCountX="@integer/apps_customize_maxCellCountX" launcher:maxAppCellCountY="@integer/apps_customize_maxCellCountY"
//pageLayoutWidthGap和pageLayoutHeightGap分別表示選單介面與螢幕邊緣的距離,
//一般小螢幕這裡設定為-1。避免邊框太窄誤觸螢幕才需要設定。 launcher:pageLayoutWidthGap="@dimen/apps_customize_pageLayoutWidthGap" launcher:pageLayoutHeightGap="@dimen/apps_customize_pageLayoutHeightGap" launcher:pageLayoutPaddingTop="50dp"
//pageLayoutPaddingXXX指的是內填充,這個和系統的padding一樣 launcher:pageLayoutPaddingBottom="@dimen/apps_customize_pageLayoutPaddingBottom" launcher:pageLayoutPaddingLeft="@dimen/apps_customize_pageLayoutPaddingLeft" launcher:pageLayoutPaddingRight="@dimen/apps_customize_pageLayoutPaddingRight"
//widgetCellWithGap和widgetCellHeightGap指的是widget列表介面各個widget之間的間隔,
//和系統的margin屬性類似 launcher:widgetCellWidthGap="@dimen/apps_customize_widget_cell_width_gap" launcher:widgetCellHeightGap="@dimen/apps_customize_widget_cell_height_gap"
//widgetCountX和WidgetCountY都是表示Widget介面每行每列顯示多少Widget launcher:widgetCountX="@integer/apps_customize_widget_cell_count_x" launcher:widgetCountY="@integer/apps_customize_widget_cell_count_y"
//提示介面的焦點 launcher:clingFocusedX="@integer/apps_customize_cling_focused_x" launcher:clingFocusedY="@integer/apps_customize_cling_focused_y" launcher:maxGap="@dimen/workspace_max_gap" />
<!-- 載入全部應用時的旋轉動畫 --> <FrameLayout android:id="@+id/animation_buffer" android:layout_width="match_parent" android:layout_height="match_parent" android:background="#FF000000" android:visibility="gone" /> <!-- 分頁符,代表多少頁和當前頁面--> <include android:id="@+id/paged_view_indicator" layout="@layout/scroll_indicator" android:layout_width="wrap_content" android:layout_height="wrap_content" android:layout_gravity="bottom" /> </FrameLayout> </LinearLayout> <!--第一次進入所有應用列表的提示介面,和workspace提示介面一樣--> <include layout="@layout/all_apps_cling" android:id="@+id/all_apps_cling" android:layout_width="match_parent" android:layout_height="match_parent"/> </com.android.launcher2.AppsCustomizeTabHost>
上面已經針對TabHost的配置檔案給了詳細註釋,這裡需要說明的一點是,不管是所有應用列表還是Widget列表都是通過AppsCustomizedPagedView顯示出來,也就是說這個自定義View支援兩種形式顯示。下面我們先對AppsCustomizeTabHost做個簡單分析。
2、AppsCustomizeTabHost分析
AppsCustomizeTabHost是繼承了TabHost的之類,主要是對TabHost進行擴充套件,增加一些功能。AppsCustomizeTabHost的程式碼不多,這裡主要對生成AllAPP和Widget頁面選項部分介紹一下。
  protected void onFinishInflate()
    {
        //.......//建立所有應用列表Tab mythou
        TextView tabView;
        String label;
        label = mContext.getString(R.string.all_apps_button_label);
        tabView = (TextView) mLayoutInflater.inflate(R.layout.tab_widget_indicator, tabs, false);
        tabView.setText(label);
        tabView.setContentDescription(label);
        addTab(newTabSpec(APPS_TAB_TAG).setIndicator(tabView).setContent(contentFactory));
        //Widget的Tab頁面
        label = mContext.getString(R.string.widgets_tab_label);
        tabView = (TextView) mLayoutInflater.inflate(R.layout.tab_widget_indicator, tabs, false);
        tabView.setText(label);
        tabView.setContentDescription(label);
        addTab(newTabSpec(WIDGETS_TAB_TAG).setIndicator(tabView).setContent(contentFactory));
        //設定監聽器
        setOnTabChangedListener(this);

        AppsCustomizeTabKeyEventListener keyListener = new AppsCustomizeTabKeyEventListener();
        View lastTab = tabs.getChildTabViewAt(tabs.getTabCount() - 1);
        lastTab.setOnKeyListener(keyListener);

        //Android商店按鈕
        View shopButton = findViewById(R.id.market_button);
        shopButton.setOnKeyListener(keyListener);

        // Hide the tab bar until we measure
        mTabsContainer.setAlpha(0f);
    }
onFinishInflate回撥函式裡面執行了建立TabHost需要的Tab View,這個函式在View載入完配置檔案的時候會執行。除了建立TabHost外,還有幾個函式需要注意瞭解。
3、Tab變化時執行onTabChanged
在TabHost切換選項的時候,會執行onTabChanged回撥函式,這裡執行了切換頁面的操作,具體切換其實是切換AppsCustomizedPagedView類裡面的切換,因為所有應用和Widget都是依靠AppsCustomizedPagedView來顯示。onTabChanged裡面有兩個地方需要注意一下:
    public void onTabChanged(String tabId)
    {
    //使用Runnable執行一個切換的動畫效果,因為切換的時候會存在資料載入導致的延時問題。
    //在載入切換資料的過程中,加入動畫可以增強使用者體驗 mythou
        post(new Runnable()
        {
            @Override
            public void run()
            {
                ArrayList<View> visiblePages = new ArrayList<View>();
                for (int i = visiblePageRange[0]; i <= visiblePageRange[1]; i++)
                {
                    visiblePages.add(mAppsCustomizePane.getPageAt(i));
                }

                //保證每個頁面都是使用統一的動畫效果
                mAnimationBuffer.scrollTo(mAppsCustomizePane.getScrollX(), 0);

                // mAppsCustomizePane顯示子頁面是使用相反的順序,所以新增頁面動畫的時候,
                //也是使用相反的新增順序
                for (int i = visiblePages.size() - 1; i >= 0; i--)
                {
                    View child = visiblePages.get(i);
            //增加切換動畫快取,提供下面切換動畫使用
                    mAnimationBuffer.addView(child, p);
                }

                // Toggle the new content
                onTabChangedStart();
                onTabChangedEnd(type);

                //過渡動畫開始
                ObjectAnimator outAnim = ObjectAnimator.ofFloat(mAnimationBuffer, "alpha", 0f);
         //。。。。。。。。
    }
onTabChanged主要是提供了一個切換頁面的動畫,以為切換TabHost的時候,會存在一個載入和切換資料的過程,這個過程需要消耗一定時間,所以開了一個執行緒來執行一個過渡動畫,增強使用者體驗。Launcher裡面很多切換操作都存在類似的操作,每個操作都伴隨著一個動畫效果。主要目的就是讓使用者覺得介面操作流暢。
4、onLauncherTransitionStart和onLauncherTransitionEnd
這兩個方法是在Launcher.java類裡面呼叫的,具體呼叫時機就是從workspace切換到AllAPP列表的時候,切換前會呼叫onLauncherTransitionStart方法,切換後也會呼叫onLauncherTransitionEnd。看名字我們大概也能猜出這兩個方法的作用,也是提供一個過渡的動畫效果。onLauncherTransitionEnd還會呼叫提示介面。
今天就講到這裡,下次會開始進入AppsCustomizedPagedView分析。
Launcher分析系列文章:
Edited by mythou
相關推薦
Android Launcher分析和修改7——AllApp全部應用列表(AppsCustomizeTabHost)
今天主要是分析一下Launcher裡面的所有應用列表。Android4.0 Launcher的所有應用列表跟2.X比較大的區別就是多了Widget的顯示。下面會詳細分析Launcher裡面有關所有應用列表配置和程式碼分析。 1、AllApp列表配置檔案 配置AllAPP應用列表介面的配置檔案
Android Launcher分析和修改8——AllAPP介面拖拽元素(PagedViewWithDraggableItems)
接著上一篇文章,繼續分析AllAPP列表介面。上一篇文章分析了所有應用列表的介面構成以及如何通過配置檔案修改屬性。今天主要是分析PagedViewWithDraggableItems類,因為在我們分析AppsCustomizePagedView之前,需要先了解PagedViewWithDraggableI
Android Launcher分析和修改3 Launcher啟動和初始化
分享一下我老師大神的人工智慧教程!零基礎,通俗易懂!http://blog.csdn.net/jiangjunshow 也歡迎大家轉載本篇文章。分享知識,造福人民,實現我們中華民族偉大復興!
Android Launcher分析和修改1——Launcher預設介面配置(default_workspace)
//Edited by mythou // //傳入default_workspace檔案的資源ID和資料庫實力,把xml裡面資料解析,儲存到Launcher資料庫。返回總共解析了多少個標籤。 private int loadFavorites(SQLiteDatabase db, int workspa
Android Launcher分析和修改13——實現Launcher編輯模式(1) 桌布更換
已經很久沒更新Launcher系列文章,今天不分析原始碼,講講如何在Launcher裡面新增桌面設定的功能。目前很多第三方Launcher或者定製Rom都有簡單易用的桌面設定功能。例如小米MIUI的Launcher就有很豐富編輯功能。今天開始會講一下如何實現桌面編輯功能。網上對於實現Launcher一些編
Android Launcher分析和修改2——Icon修改、介面佈局調整、桌布設定
<!-- Workspace cell size --> <dimen name="workspace_cell_width_land">88dp</dimen> <dimen name="workspace_cell_width_port">
Android Launcher分析和修改11——自定義分頁指示器(paged_view_indicator)
Android4.0的Launcher自帶了一個簡單的分頁指示器,就是Hotseat上面那個線段,這個本質上是一個ImageView利用.9.png圖片做,效果實在是不太美觀,用測試人員的話,太醜了。特別是搭配其他風格的圖示和背景,的確不好看。所以打算自己重新寫一個指示器。這個所謂的分頁指示器作用很簡單,
Android Launcher分析和修改6——頁面滑動(PagedView)
public boolean onTouchEvent(MotionEvent ev) { if(OWL_DEBUG) Log.d(OWL, "onTouchEvent entering.."); //........switch (action &
Android Launcher分析和修改10——HotSeat深入進階
void addInScreen(View child, long container, int screen, int x, int y, int spanX, int spanY, boolean insert) { if(OWLLaunche
Android Launcher分析和修改9——Launcher啟動APP流程
本來想分析AppsCustomizePagedView類,不過今天突然接到一個臨時任務。客戶反饋說機器介面的圖示很難點選啟動程式,經常點選了沒有反應,Boss說要優先解決這問題。沒辦法,只能看看是怎麼回事。今天分析一下Launcher啟動APP的過程。從使用者點選到程式啟動的流程,下面針對WorkSpac
Android Launcher分析和修改5——HotSeat分析
void resetLayout() { //清空原來的內容 mContent.removeAllViewsInLayout(); //新增AllAPP按鈕,也是一個BubbleTextView物件 Context context = g
Android Launcher分析和修改4——初始化載入資料
private void bindWorkspace() { //通知Launcher開始繫結資料 mHandler.post(new Runnable() { public void run() {
Android Launcher分析和修改3——Launcher啟動和初始化
@Override protected void onCreate(Bundle savedInstanceState) { super.onCreate(savedInstanceState); //獲取Application 例項 La
Android Launcher分析和修改12——Widget列表資訊收集
public void syncWidgetPageItems(final int page, final boolean immediate) { int numItemsPerPage = mWidgetCountX * mWidgetCountY; //
Kali Linux Web滲透測試手冊(第二版) - 2.6 - 使用瀏覽器自帶的開發工具來做基本的分析和修改
翻譯來自:掣雷小組 成員資訊: thr0cyte,Gr33k,花花,MrTools,R1ght0us,7089bAt, 這個公眾號,一定要關注哦,慢慢會跟上面老哥們一起分享很多幹貨哦~~ 第二章:偵察 介紹 2.1、被動資訊收集 2.2、使用Recon-ng收集資訊 2.3、
Android記憶體分析和調優(上)
PID Vss Rss Pss Uss cmdline ...... 2319 42068K 42032K 13536K 7028K com.xxx ...... 該命令可以列出當前系統所有程序的記憶體佔用情況。 PID是程序ID。 Vss是佔用的虛擬
Android記憶體分析和調優
在前文中討論瞭如果使用adb shell procrank, dumpsys meminfo和showmaps分析程序的記憶體佔用情況。 本文將繼續細化,具體分析導致記憶體過大的dalvik heap。 Dalvik heap分析和優化 Dalkvik heap是最常見的android應用記憶體優化的物件。
Android Launcher 分析
1. Launcher的啟動過程 從網路上找了一段關於Launcher的啟動過程的文章,作為學習Launcher的背景知識: Linux kernel啟動以後會通過app_main程序來初始化android Runtime Java執行環境,而zygote是Andro
Android Launcher 如何去掉主選單,所有應用擺在桌面,類似小米桌面
protected void onMeasure(int widthMeasureSpec, int heightMeasureSpec) { int width = MeasureSpec.getSize(widthMeasureSpec); int height =
android黑科技系列——修改鎖屏密碼和惡意鎖機樣本原理分析
無需 功能 log 輔助 數據庫文件 手勢密碼 安全網 樣式 進制 一、Android中加密算法 上一篇文章已經介紹了Android中系統鎖屏密碼算法原理,這裏在來總結說一下: 第一種:輸入密碼算法 將輸入的明文密碼+設備的salt值,然後操作MD5和SHA1之後在轉
