
Nutch+MongoDB+ElasticSearch+Kibana 搭建搜尋引擎
前言:
文章講述如何通過Nutch、MongoDB、ElasticSearch、Kibana搭建網路爬蟲,其中Nutch用於網頁資料爬取,MongoDB用於儲存爬蟲而來的資料,ElasticSearch用來作Index索引,Kibana用來形象化檢視索引結果。具體步驟如下:
配置環境:
系統環境:Ubuntu 14.04
JDK版本:jdk1.8.0_45
通過wget獲取下載安裝包:
gannyee@ubuntu:~/download$ wget https://www.reucon.com/cdn/java/jdk-8u45-linux-x64.tar.gz
tar zxvf jdk-8 解壓後得到jdk1.8.0_45這個資料夾,先檢視/usr/lib/路徑下有沒有jvm這個資料夾,若沒有,則新建一個jvm資料夾:
gannyee@ubuntu:~/download$ mkdir /usr/lib/jvm將當前解壓得到的jdk1.8.0_45複製到/usr/lib/jvm中:
gannyee@ubuntu:~/download$mv jdk1.8.0_45 /usr/lib/jvm開啟profile設定環境變數:
gannyee@ubuntu:~/download$vim /etc/profile在profile的末尾加入以下內容:
export 然後使用以下命令使得環境變數生效:
gannyee@ubuntu:~/download$source /etc/profile到此為止,JDK就安裝完成了。檢視JDK的版本:
gannyee@ubuntu:~/download$java –version
java version "1.8.0_45" 若以上命令沒有成功顯示版本資訊,那有可能是之前的操作出現問題,請仔細檢查之前的操作。
gannyee@ubuntu:~/download$ wget https://archive.apache.org/dist/ant/binaries/binaries/apache-ant-1.9.4-bin.tar.gz解壓後可得到apache-ant-1.9.6這個資料夾,將其移動到/usr/local/ant資料夾中:
gannyee@ubuntu:~/download$sudo tar -zvxf apache-ant-1.9.4-bin.tar.gz
gannyee@ubuntu:~/download$sudo mkdir /usr/local/ant
gannyee@ubuntu:~/download$mv apache-ant-1.9.4 /usr/local/ant
開啟profile設定環境變數:
gannyee@ubuntu:~/download$vim /etc/profile在profile檔案末尾加入以下內容:
export ANT_HOME=/usr/local/ant/apache-ant-1.9.4
export PATH=$PATH:$ANT_HOME/bin
使用以下命令使得環境變數生效:
gannyee@ubuntu:~/download$source /etc/profile檢視Ant版本:
gannyee@ubuntu:~/download$ant -version
Apache Ant(TM) version 1.9.4 compiled on April 29 2014
至此,配置引擎所需的環境預先配置完成!
引擎資料流如圖示:

Mongodb下載、安裝、啟動
開源文件資料庫,Nosql資料典型代表之一。
版本:MongoDB-2.6.11
[email protected]:~/download$ wget https://fastdl.mongodb.org/src/mongodb-src-r2.6.11.tar.gz
[email protected]:~/download$ sudo tar -zxvf mongodb-src-r2.6.11.tar.gz
[email protected]:~/download$ mv mongodb-src-r2.6.11/ ../mongodb/
[email protected]:~$cd mongodb/
[email protected]:~/mongodb$
sudo mkdir log/ conf/ data/從2.6版開始,mongodb使用YAML-based配置檔案格式。參考下面的配置可以在這裡找到。
建立se.yml
gannyee@ubuntu:~/mongodb$ vim conf/se.yml
net:
  port: 27017
  bindIp: 127.0.0.1
systemLog:
  destination: file
  path: "/opt/mongodb/log/mongodb.log"
  logAppend: true
processManagement:
  fork: true
  pidFilePath: "/opt/mongodb/log/mongodb.pid"
storage:
  dbPath: "/opt/mongodb/data"
  directoryPerDB: true
  smallFiles: true
啟動Mongodb
gannyee@ubuntu:~/mongodb$ ./bin/mongod -f conf/se.yml進入Mongodb以檢查Mongodb是否啟動成功
gannyee@ubuntu:~/mongodb$ ./bin/mongo
MongoDB shell version: 2.6.11
connecting to: test
> show dbs
admin (empty)
local 0.031GB
> exit
bye
關閉Mongodb:
>use admin
>db.shutdownServer() gannyee@ubuntu:~/mongodb$ sudo wget http://app.robomongo.org/files/linux/robomongo-0.8.5-x86_64.deb
gannyee@ubuntu:~/mongodb$sudo dpkg -i robomongo-0.8.5-x86_64.deb[email protected]:~$robomongo就可以開啟客戶端。
建立新連線,只需要新增host和port即可。
note:我第一次安裝成功後連結也成功,但是看不到任何資料。
解決辦法:重新使用root許可權安裝即可。
軟體介面如圖所示:
如果需要外網訪問的話,需要配置檔案中的bindIp: 127.0.0.1改為bindIp: 0.0.0.0
然後在瀏覽器中輸入:http://localhost:27017,如果出現以下內容,說明外網可以訪問:
It looks like you are trying to access MongoDB over HTTP on the native driver port.
如果出現無法執行./mongod的錯誤
大部分是因為mongodb 服務在不正常關閉的情況下,mongod 被鎖,想想可能是上次無故宕機造成的.
如何解決這種問題:刪除 mongod.lock 檔案和日誌檔案 mongodb.log.2016-1-26T06-55-20 ,如果有必要把 log日誌全部刪除
mongod –repair –dbpath /home/gannyee/mongodb/data/db / –repairpath /home/gannyee/mongodb
ElasticSearch下載、安裝
從Apache Lucene提取高效能的分散式搜尋引擎。
版本:ElastricSearch-1.4.4
gannyee@ubuntu:~/download$wget https://download.elasticsearch.org/elasticsearch/elasticsearch/elasticsearch-1.4.4.tar.gz
gannyee@ubuntu:~/download$tar -zxvf elasticsearch-1.4.4.tar.gz
gannyee@ubuntu:~/download$ mv elasticsearch-1.4.4 ../elasticsearch
gannyee@ubuntu:~$cd /elasticsearch
修改config下檔案elasticsearch.yml
[email protected]:~/elasticsearch$ vim config/elasticsearch.yml
......
cluster.name: gannyee
node.name: "gannyee"
node.master: true
node.data: true
path.conf: /home/gannyee/elasticsearch/config
path.data: /home/gannyee/elasticsearch/data
http.enabled: true
network.bind_host: 127.0.0.1
network.publish_host: 127.0.0.1
network.host: 127.0.0.1
.......
後臺啟動ElasticSearch
gannyee@ubuntu:~/elasticsearch$ ./bin/elasticsearch -d終止ElasticSearch程序
關閉單一節點
gannyee@ubuntu:~/elasticsearch$curl -XPOST
http://localhost:9200/_cluster/nodes/_shutdown
關閉節點BlrmMvBdSKiCeYGsiHijdg
gannyee@ubuntu:~/elasticsearch$curl –XPOST
http://localhost:9200/_cluster/nodes/BlrmMvBdSKiCeYGsiHijdg/_shutdown
檢測是否成功執行ElasticSearch
gannyee@ubuntu:~/elasticsearch$ curl -XGET 'http://localhost:9200'
{
  "status" : 200,
  "name" : "gannyee",
  "cluster_name" : "gannyee",
  "version" : {
    "number" : "1.4.4",
    "build_hash" : "c88f77ffc81301dfa9dfd81ca2232f09588bd512",
    "build_timestamp" : "2015-02-19T13:05:36Z",
    "build_snapshot" : false,
    "lucene_version" : "4.10.3"
  },
  "tagline" : "You Know, for Search"
}
elasticsearch-head是一個elasticsearch的叢集管理工具,它是完全由html5編寫的獨立網頁程式,你可以通過外掛把它整合到es
安裝 elasticsearch-head外掛
gannyee@ubuntu:~/elasticsearch$ cd elasticsearch
gannyee@ubuntu:~/elasticsearch$ ./bin/plugin -install mobz/elasticsearch-head
執行重啟elasticsearch
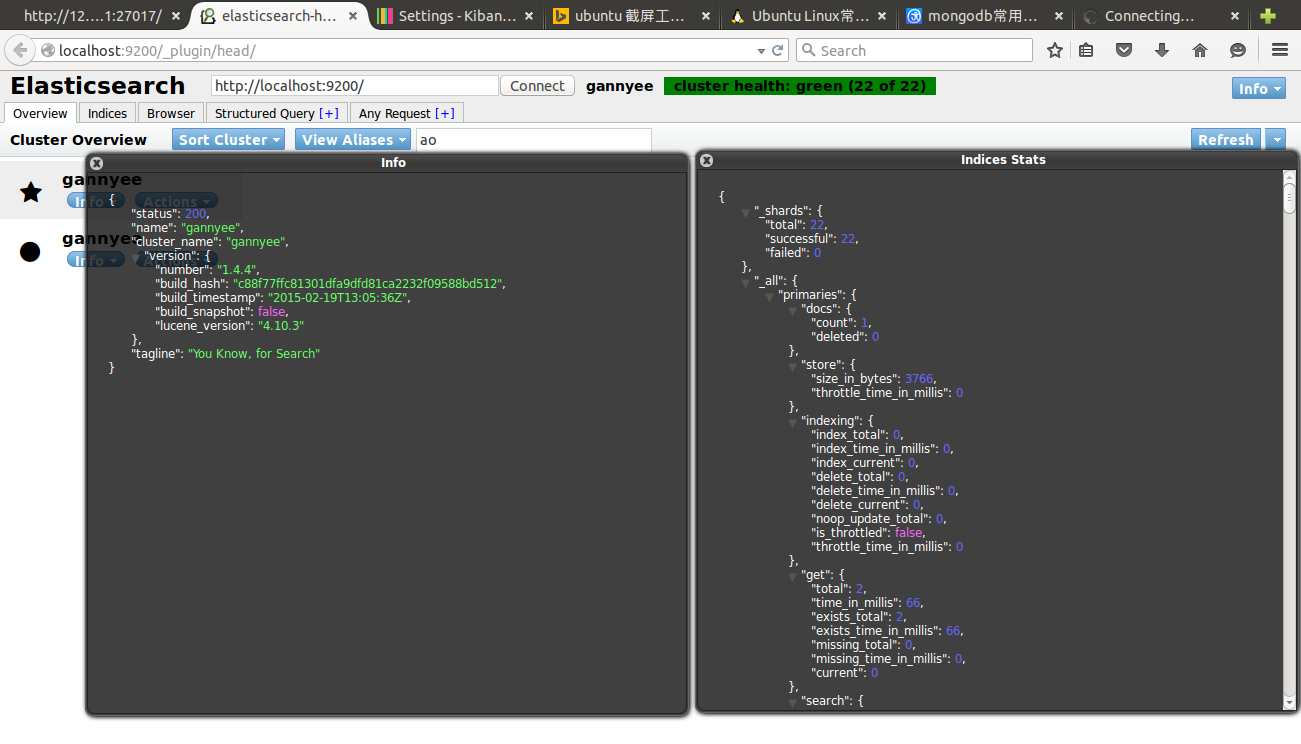
在瀏覽器輸入:http://localhost:9200/_plugin/head/
介面的右邊有些按鈕,如:node stats, cluster nodes,這些是直接請求es的相關狀態的api,返回結果為json,如下圖:
Kibana下載、安裝
基於分析和搜尋Elasticsearch儀表板的開源瀏覽器
版本:kibana-4.0.1
gannyee@ubuntu:~/download$wget https://download.elasticsearch.org/kibana/kibana/kibana-4.0.1-linux-x64.tar.gz
gannyee@ubuntu:~/download$ tar -zxvf /download kibana-4.0.1-linux-x64.tar.gz
gannyee@ubuntu:~/download$mv kibana-4.0.1-linux-x64/ ../kibana/
gannyee@ubuntu:~/download$cd ../kibana/
gannyee@ubuntu:~/kibana$ ./bin/kibana
Apache Nutch 安裝、編譯、配置:
在Lucene發展來的開源網路爬蟲,本次配置只能使用nutch2.x系列,1.x系列不支援MongoDB等其他如Mysql,Habase資料庫。
版本:apache-nutch-2.3.1
Nutch2.3下載、編譯、配置
gannyee@ubuntu:~/download$  wget
http://www.apache.org/dyn/closer.lua/nutch/2.3.1/apache-nutch-2.3.1-src.tar.gz
gannyee@ubuntu:~/download$ tar -zxvf apache-nutch-2.3.1-src.tar.gz
gannyee@ubuntu:~/download$  mv apache-nutch-2.3.1 ../nutch
gannyee@ubuntu:~/download$ cd ../nutch
gannyee@ubuntu:~/nutch$ export NUTCH_HOME=$(pwd)
修改/conf/nutch-site.xml使Mongodb作為GORA的儲存單元
[email protected]:~/nutch/conf$ vim nutch-site.conf
<configuration>
  <property>
    <name>storage.data.store.class</name>
    <value>org.apache.gora.mongodb.store.MongoStore</value>
    <description>Default class for storing data</description>
  </property>
</configuration>
從/ivy/ivy.xml檔案中取消下面部分的註釋
[email protected]:~/nutch/conf$  vim $NUTCH_HOME/ivy/ivy.xml
<dependency org="org.apache.gora" name="gora-mongodb" rev="0.5" conf="*->default" />
...
</dependency>
確保MongoStore設定為預設資料儲存
[email protected]:~/nutch$ vim conf/gora.properties
/#######################
/# MongoDBStore properties #
/#######################
gora.datastore.default=org.apache.gora.mongodb.store.MongoStore
gora.mongodb.override_hadoop_configuration=false
gora.mongodb.mapping.file=/gora-mongodb-mapping.xml
gora.mongodb.servers=localhost:27017
gora.mongodb.db=nutch
開始編譯nutch
gannyee@ubuntu:~/nutch$ant runtime如果編譯過程中有如下錯誤
Trying to override old definition of task javac
  [taskdef] Could not load definitions from resource org/sonar/ant/antlib.xml. It could not be found.

ivy-probe-antlib:

ivy-download:
  [taskdef] Could not load definitions from resource org/sonar/ant/antlib.xml. It could not be found.

Trying to override old definition of task javac
  [taskdef] Could not load definitions from resource org/sonar/ant/antlib.xml. It could not be found.

ivy-probe-antlib:

ivy-download:
  [taskdef] Could not load definitions from resource org/sonar/ant/antlib.xml. It could not be found.
是因為缺少lib包,解決辦法如下(其實可以無視):
下載 sonar-ant-task-2.1.jar,拷貝到 $NUTCH_HOME/lib 目錄下面
修改 $NUTCH_HOME/build.xml,引入上面新增
<!-- Define the Sonar task if this hasn't been done in a common script -->
 <taskdef uri="antlib:org.sonar.ant" resource="org/sonar/ant/antlib.xml">
  <classpath path="${ant.library.dir}" />
  <classpath path="${mysql.library.dir}" />
  <classpath><fileset dir="lib/" includes="sonar*.jar" /></classpath>
 </taskdef>
編譯後的檔案將被放在新生成的資料夾/nutch/runtime中
最後確認nutch已經正確地編譯和執行,輸出如下:
[email protected]:~/nutch/runtime/local$ ./bin/nutch
 Usage: nutch COMMAND
where COMMAND is one of:
 inject         inject new urls into the database
 hostinject     creates or updates an existing host table from a text file
 generate       generate new batches to fetch from crawl db
 fetch          fetch URLs marked during generate
 parse          parse URLs marked during fetch
 updatedb       update web table after parsing
 updatehostdb   update host table after parsing
 readdb         read/dump records from page database
 readhostdb     display entries from the hostDB
 index          run the plugin-based indexer on parsed batches
 elasticindex   run the elasticsearch indexer - DEPRECATED use the index command instead
 solrindex      run the solr indexer on parsed batches - DEPRECATED use the index command instead
 solrdedup      remove duplicates from solr
 solrclean      remove HTTP 301 and 404 documents from solr - DEPRECATED use the clean command instead
 clean          remove HTTP 301 and 404 documents and duplicates from indexing backends configured via plugins
 parsechecker   check the parser for a given url
 indexchecker   check the indexing filters for a given url
 plugin         load a plugin and run one of its classes main()
 nutchserver    run a (local) Nutch server on a user defined port
 webapp         run a local Nutch web application
 junit          runs the given JUnit test
 or
 CLASSNAME      run the class named CLASSNAME
Most commands print help when invoked w/o parameters.
定製你的爬取特性
[email protected]:~$ sudo vim /nutch/runtime/local/conf/nutch-site.xml

< ?xml version="1.0"?>
< ?xml-stylesheet type="text/xsl" href="configuration.xsl"?>

<!-- Put site-specific property overrides in this file. -->

<configuration>
  <property>
    <name>storage.data.store.class</name>
    <value>org.apache.gora.mongodb.store.MongoStore</value>
    <description>Default class for storing data</description>
  </property>

  <property>
    <name>http.agent.name</name>
    <value>Hist Crawler</value>
  </property>

  <property>
    <name>plugin.includes</name>
    <value>protocol-(httphttpclient)urlfilter-regexindex-(basicmore)query-(basicsiteurllang)indexer-elasticnutch-extensionpointsparse-(texthtmlmsexcelmswordmspowerpointpdf)summary-basicscoring-opicurlnormalizer-(passregexbasic)parse-(htmltikametatags)index-(basicanchormoremetadata)</value>
  </property>
  <property>
    <name>elastic.host</name>
    <value>localhost</value>
  </property>

  <property>
    <name>elastic.cluster</name>
    <value>hist</value>
  </property>

  <property>
    <name>elastic.index</name>
    <value>nutch</value>
  </property>

  <property>
    <name>parser.character.encoding.default</name>
    <value>utf-8</value>
  </property>

  <property>
    <name>http.content.limit</name>
    <value>6553600</value>
  </property>

</configuration>
爬取自己第一個網頁
建立一個URL種子列表
gannyee@ubuntu:~$ mkdir -p /nutch/runtime/local/urls
gannyee@ubuntu:~$ echo 'http://www.aossama.com/' >/nutch/runtime/local/urls/seed.txt
編輯conf/regex-urlfilter.txt檔案,並且替換以下內容
/# accept anything else
+.
使用正則表示式匹配你想要爬取的域名
+^http://([a-z0-9]*\.)*aossama.com/初始化crawldb
gannyee@ubuntu:~/nutch/runtime/local$ ./bin/nutch inject urls/從 crawldb生成urls
gannyee@ubuntu:~/nutch/runtime/local$ ./bin/nutch generate -topN 80獲取生成的所有urls
gannyee@ubuntu:~/nutch/runtime/local$ ./bin/nutch fetch -all解析獲取的urls
gannyee@ubuntu:~/nutch/runtime/local$./ bin/nutch parse -all更新database資料庫
gannyee@ubuntu:~/nutch/runtime/local$ ./bin/nutch updatedb -all索引解析的urls
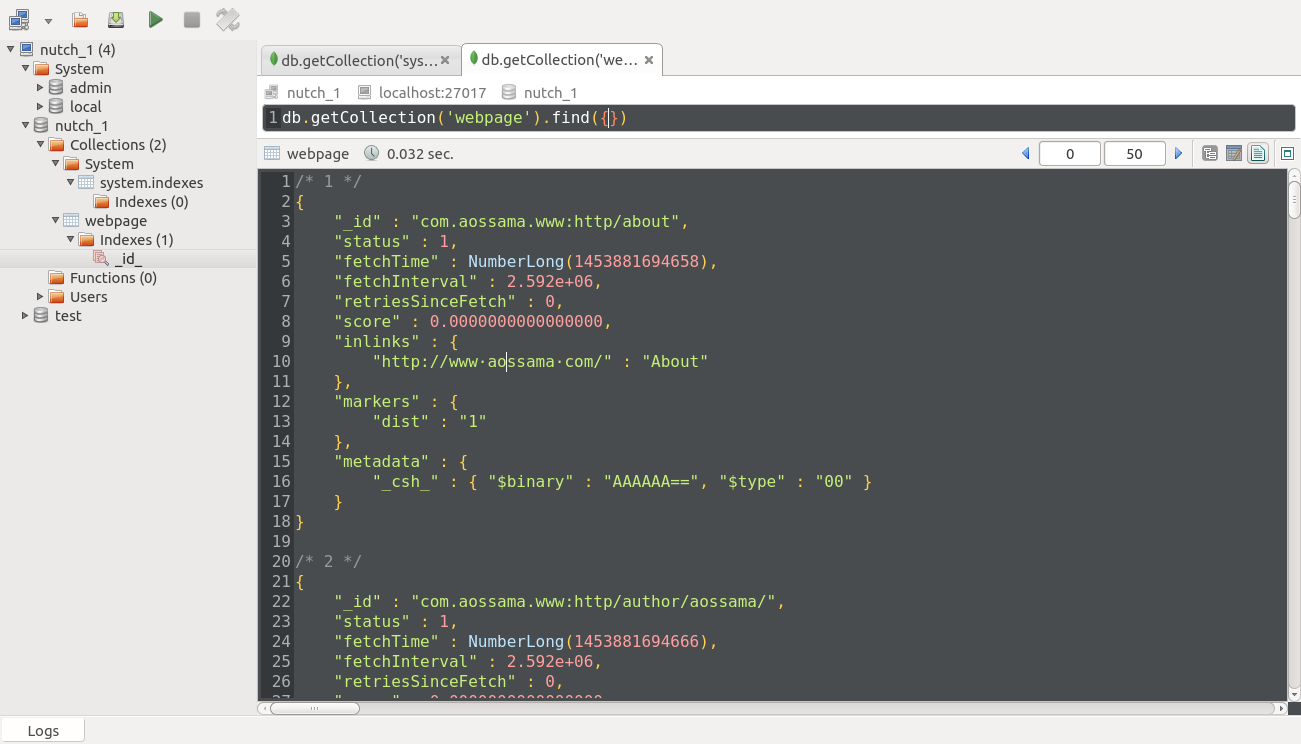
gannyee@ubuntu:~/nutch/runtime/local$ bin/nutch index -all爬取完給定網頁,mongoDB會生成一個新的資料庫:nutch_1
[email protected]:~/mongodb$ ./bin/mongo
MongoDB shell version: 2.6.11
connecting to: test
> show dbs
admin    (empty)
local    0.031GB
nutch_1  0.031GB
test     (empty)
> use nutch_1
switched to db nutch_1
> show tables
system.indexes
webpage
具體資料可以在terminal下用指令或在圖形介面下直接點選檢視!
相關推薦
Nutch+MongoDB+ElasticSearch+Kibana 搭建搜尋引擎
前言: 文章講述如何通過Nutch、MongoDB、ElasticSearch、Kibana搭建網路爬蟲,其中Nutch用於網頁資料爬取,MongoDB用於儲存爬蟲而來的資料,ElasticSearch用來作Index索引,Kibana用來形象化檢視索引
logstash+elasticsearch+kibana搭建日誌收集分析系統
input { file { type => "api_log" path => "/home/jws/app/nginxserver/logs/apiaccess.log" debug
【Elasticsearch全文搜索引擎實戰】之Kibana搭建
att 進入 界面 全文搜索 host 終端 數據分析 數據 目錄 1. Kibana介紹 Kibana是一個針對Elasticsearch的開源分析及可視化平臺,用來搜索、查看交互存儲在Elasticsearch索引中的數據。使用Kibana,可以通過各種圖表進行高級數據
ELK日誌系統:Elasticsearch+Logstash+Kibana搭建教程
htpasswd ins 4.2 httpd 2.3 ted location parser oracle ELK日誌系統:Elasticsearch + Logstash + Kibana 搭建教程 安裝配置JDK環境 JDK安裝(不能安裝JRE) JDK下載地址:htt
快速搭建ELK 叢集日誌收集工具Centos7 +Logstash +Elasticsearch+Kibana 環境
應用場景: 伺服器叢集,如果程式報錯,不懂從哪一臺伺服器上檢視日誌;想更加直接了當的看到日誌,什麼伺服器,什麼錯誤。 學到什麼 通過這篇文章可以傻瓜式的安裝程式,並且瞭解分散式應用日誌收集的場景。 環境 嶄新的一臺centos7虛擬機器; 介紹 介紹就算了, 搜得到這個的大概知道是幹嘛的
ELASTICSEARCH、LOGSTASH、KIBANA 搭建高效率日誌管理系統
ELK (ElasticSearch、LogStash以及Kibana)三者組合是一個非常強大的工具,這裡我們來實現監控日誌檔案並且收到日誌到ElasticSearch搜尋引擎,利用Kibana視覺化工具實現ElasticSearch查詢. ElasticS
filebeat + kafka + logstash + Elasticsearch + Kibana日誌收集系統搭建
一、介紹 在日常運維工作中,對於系統和業務日誌的處理尤為重要。今天,在這裡分享一下自己部署的filebeat + kafka + ELK開源實時日誌分析平臺的記錄過程。 1、ELK介紹 &nbs
ELK(ElasticSearch, Logstash, Kibana)搭建實時日誌分析平臺筆記
1.ELK注意事項 1.1要求jdk1.8+ 1.2Elsearch不允許使用root啟動 1.3ELK三個包版本要一致 2.ELK下載地址 https://www.elastic.co/cn/downloads elasticsearch-6.1.1.tar.gz
Elasticsearch、Logstash、Kibana 搭建統一日誌分析平臺 ( 第一篇 )
ELKstack是Elasticsearch、Logstash、Kibana三個開源軟體的組合。目前都在Elastic.co公司名下。 ELK是一套常用的開源日誌監控和分析系統,包括一個分散式索引與搜尋服務Elasticsearch, 一個管理日誌和事件的工
CentOS 6.5搭建ELK環境ElasticSearch+Kibana+Logstash
CentOS 6.5搭建ELK環境 ELK工作流程 多個獨立的Agent(Shipper)負責收集不同來源的資料,一箇中心Agent(Indexer)負責彙總和分析資料,在中心Agent前的Broker(使用Redis實現)作為緩衝區,中心Agent後的Elasti
ELK(ElasticSearch, Logstash, Kibana)搭建實時日誌分析平臺
摘要: ELK平臺介紹 在搜尋ELK資料的時候,發現這篇文章比較好,於是摘抄一小段: 以下內容來自:http://baidu.blog.51cto.com/71938/1676798 日誌主要包括系統日誌、應用程式日誌和安全日誌。 ELK平臺介紹 在搜尋ELK資料的時候,
Logstash+Elasticsearch+Kibana 聯合使用搭建日誌分析系統(Windows系統)
最近在做日誌分析這塊兒,要使用 Logstash+Elasticsearch+Kibana 實現日誌的匯入、過濾及視覺化管理,官方文件寫的不夠詳細,網上的文章大多要麼是針對Linux系統的用法,要麼就是抄襲別人的配置大都沒法執行。費了很大勁才搞定了這仨東西,
logstash、elasticsearch、kibana搭建日誌平臺
1、下載logstash b、解壓:tar -xzvf logstash-5.1.1.tar.gz c、設定使用者測試的配置檔案:vim logstatsh_test.conf,編輯內容如下:input { stdin { } } outp
elasticsearch + kibana 叢集環境搭建
mysql 作為成熟穩定的資料持久化解決方案,廣泛地應用在各種領域,但是在資料分析方面稍有不足,而 elasticsearch 作為資料分析領域的佼佼者,剛好可以彌補這項不足,而我們要做的只需要將 mysql 中的資料同步到 elasticsearch 中即可,
filebeat+kafkaLogstash+ElasticSearch+Kibana windows搭建 日誌分析系統
1. 瞭解各個元件的作用Filebeat是一個日誌檔案託運工具,在你的伺服器上安裝客戶端後,filebeat會監控日誌目錄或者指定的日誌檔案,追蹤讀取這些檔案(追蹤檔案的變化,不停的讀)Kafka是一種高吞吐量的分散式釋出訂閱訊息系統,它可以處理消費者規模的網站中的所有動作流
Elasticsearch+Logstash+Kibana搭建分布式日誌平臺
esc oct index ads 虛擬 mini eat 需要 artifact 一、前言 編譯安裝 1、ELK簡介 下載相關安裝包地址:https://www.elastic.co/cn/downloads ELK是Elasticsearch+Logstas
mongodb 副本集搭建
mongodb 搭建 副本集 排錯 mongodb的副本集模式較早前的master-slave模式有了很大的改進,由於之前的master-slave模式不支持主機宕機之後切換到從機,已經逐漸被淘汰。而現在官方推薦的副本集模式,支持多個節點並存,當主節點宕機後從權重最高的副節點開始,依次切換為主
Ubuntu16.04下安裝elasticsearch+kibana實現php客戶端的中文分詞
lba 實例 exc common adding creat 啟動服務 uid dbms 1.下載安裝elasticsearch和kibana wget https://artifacts.elastic.co/downloads/elasticsearch/elasti
mongodb分片集搭建
不能 -c tex 這就是 mkdir -p 團隊 exe dds png 拓撲圖如下: 從圖中可以看到有四個組件:mongos、config server、shard、replica set。mongos,數據庫集群請求的入口,所有的請求都通過mongos進行協調,不需
ELK 學習筆記之 elasticsearch環境搭建
發現 匯總 tex 索引 零配置 1-1 nbsp 日誌分析 com ELK概述: ElasticSearch是個開源分布式搜索引擎,它的特點有:分布式,零配置,自動發現,索引自動分片,索引副本機制,restful風格接口,多數據源,自動搜索負載等 Logstash是一個