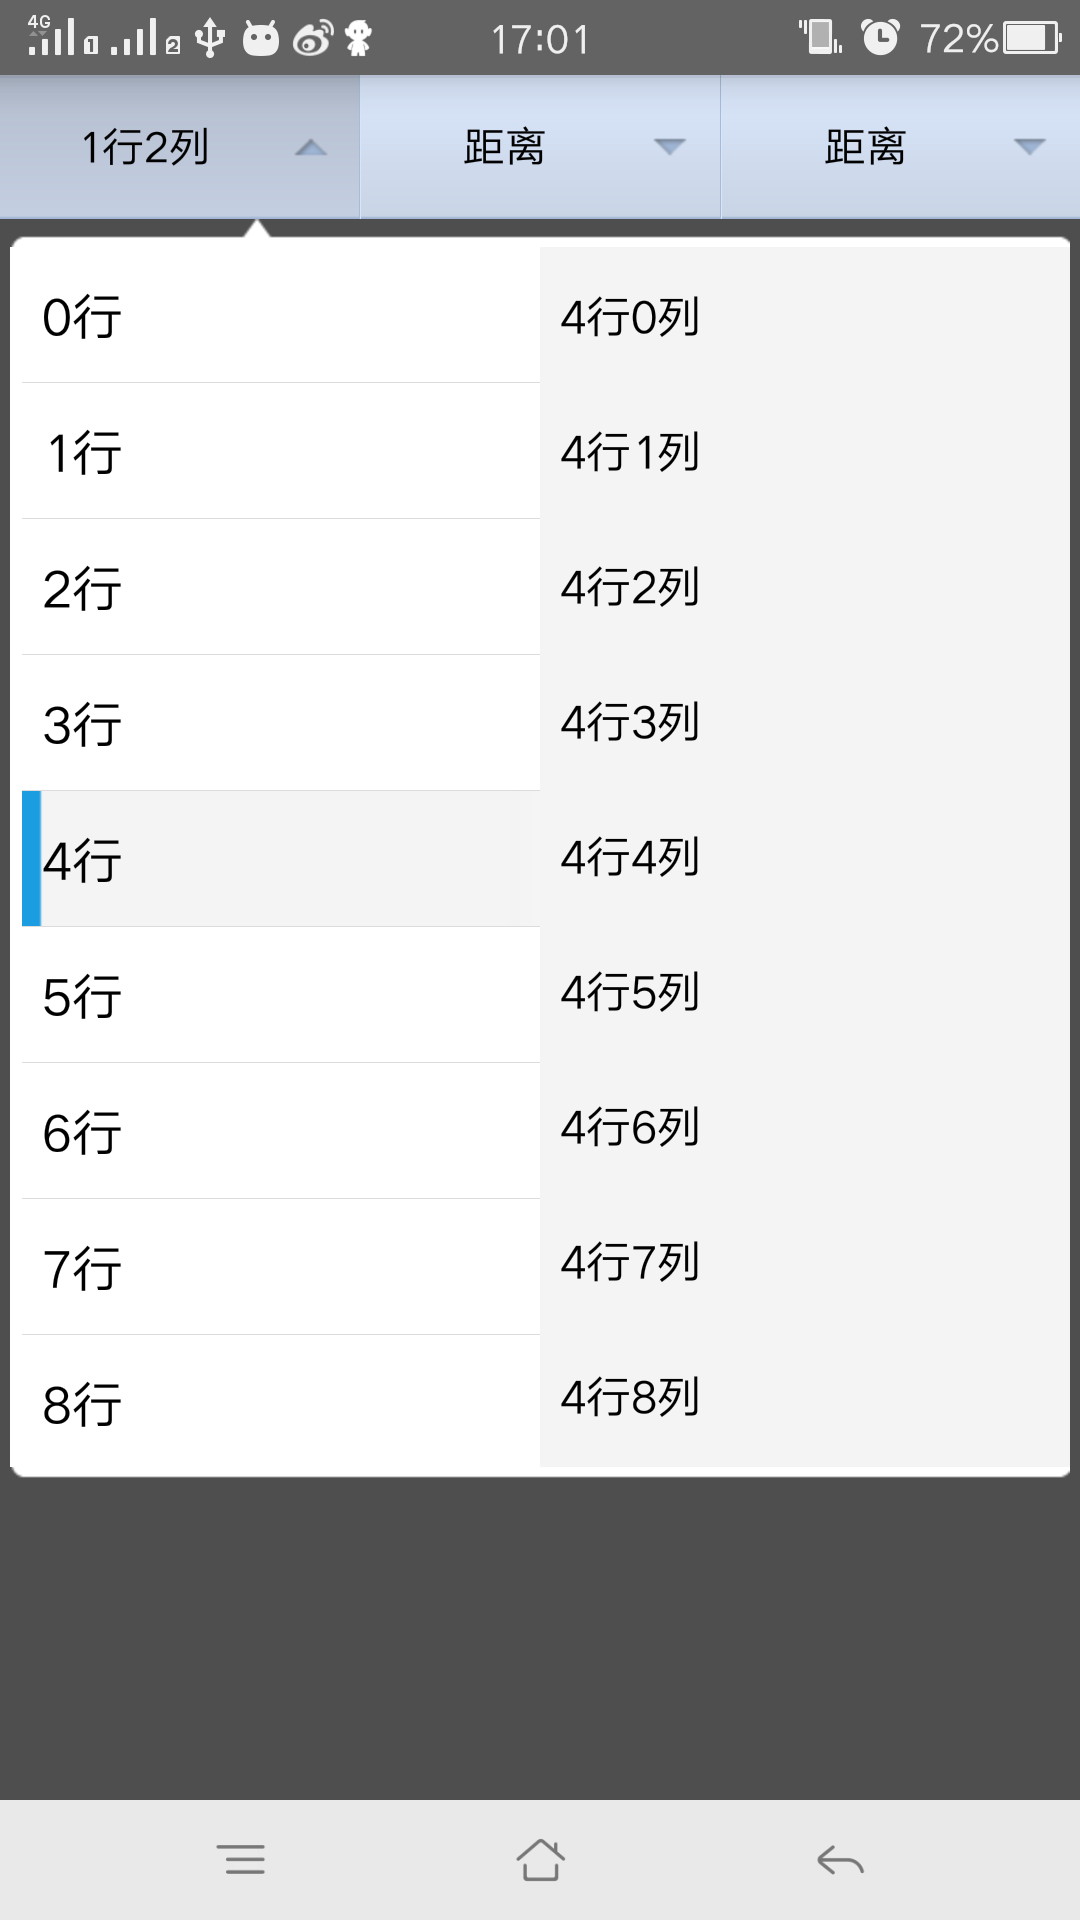
一款簡單靈活的Android下拉篩選框
最近接到一個新的專案 專案時間比較緊張,有一個功能類似於58同城,京東的一個下拉篩選框,為了節省時間,從網上面拷貝了一份封裝好的程式碼,進行的自己的一些修改,感覺靈活性還挺高的,分享出來給大家看一看
大致效果如下 可以自己加入自己的佈局

先看一下這個ExpandTabView這個類 程式碼比較簡單 我就不做具體介紹了 有不懂的可以私信我
這個程式碼基本就是對popupwindow進行了封裝 通過對ToggleButton按鈕的監聽來實現popupwindow的彈出和收回public class ExpandTabView extends LinearLayout implements OnDismissListener { private ToggleButton selectedButton; private ArrayList<String> mTextArray = new ArrayList<String>(); private ArrayList<RelativeLayout> mViewArray = new ArrayList<RelativeLayout>(); private ArrayList<ToggleButton> mToggleButton = new ArrayList<ToggleButton>(); private Context mContext; private final int SMALL = 0; private int displayWidth; private int displayHeight; private PopupWindow popupWindow; private int selectPosition; public ExpandTabView(Context context) { super(context); init(context); } public ExpandTabView(Context context, AttributeSet attrs) { super(context, attrs); init(context); } /** * 根據選擇的位置設定tabitem顯示的值 */ public void setTitle(String valueText, int position) { if (position < mToggleButton.size()) { mToggleButton.get(position).setText(valueText); } } public void setTitle(String title){ } /** * 根據選擇的位置獲取tabitem顯示的值 */ public String getTitle(int position) { if (position < mToggleButton.size() && mToggleButton.get(position).getText() != null) { return mToggleButton.get(position).getText().toString(); } return ""; } /** * 設定tabitem的個數和初始值 */ public void setValue(ArrayList<String> textArray, ArrayList<View> viewArray) { if (mContext == null) { return; } LayoutInflater inflater = (LayoutInflater) mContext.getSystemService(Context.LAYOUT_INFLATER_SERVICE); mTextArray = textArray; for (int i = 0; i < viewArray.size(); i++) { final RelativeLayout r = new RelativeLayout(mContext); int maxHeight = (int) (displayHeight * 0.7); RelativeLayout.LayoutParams rl = new RelativeLayout.LayoutParams(RelativeLayout.LayoutParams.FILL_PARENT, maxHeight); rl.leftMargin = 10; rl.rightMargin = 10; r.addView(viewArray.get(i), rl); mViewArray.add(r); r.setTag(SMALL); ToggleButton tButton = (ToggleButton) inflater.inflate(R.layout.toggle_button, this, false); addView(tButton); View line = new TextView(mContext); line.setBackgroundResource(R.drawable.choosebar_line); if (i < viewArray.size() - 1) { LayoutParams lp = new LayoutParams(2, LayoutParams.FILL_PARENT); addView(line, lp); } mToggleButton.add(tButton); tButton.setTag(i); tButton.setText(mTextArray.get(i)); r.setOnClickListener(new OnClickListener() { @Override public void onClick(View v) { onPressBack(); } }); r.setBackgroundColor(mContext.getResources().getColor(R.color.popup_main_background)); tButton.setOnClickListener(new OnClickListener() { @Override public void onClick(View view) { // initPopupWindow(); ToggleButton tButton = (ToggleButton) view; if (selectedButton != null && selectedButton != tButton) { selectedButton.setChecked(false); } selectedButton = tButton; selectPosition = (Integer) selectedButton.getTag(); startAnimation(); if (mOnButtonClickListener != null && tButton.isChecked()) { mOnButtonClickListener.onClick(selectPosition); } } }); } } private void startAnimation() { if (popupWindow == null) { popupWindow = new PopupWindow(mViewArray.get(selectPosition), displayWidth, displayHeight); popupWindow.setAnimationStyle(R.style.PopupWindowAnimation); popupWindow.setFocusable(false); popupWindow.setOutsideTouchable(true); } if (selectedButton.isChecked()) { if (!popupWindow.isShowing()) { showPopup(selectPosition); } else { popupWindow.setOnDismissListener(this); popupWindow.dismiss(); hideView(); } } else { if (popupWindow.isShowing()) { popupWindow.dismiss(); hideView(); } } } private void showPopup(int position) { View tView = mViewArray.get(selectPosition).getChildAt(0); if (tView instanceof ViewBaseAction) { ViewBaseAction f = (ViewBaseAction) tView; f.show(); } if (popupWindow.getContentView() != mViewArray.get(position)) { popupWindow.setContentView(mViewArray.get(position)); } popupWindow.showAsDropDown(this, 0, 0); } /** * 如果選單成展開狀態,則讓選單收回去 */ public boolean onPressBack() { if (popupWindow != null && popupWindow.isShowing()) { popupWindow.dismiss(); hideView(); if (selectedButton != null) { selectedButton.setChecked(false); } return true; } else { return false; } } private void hideView() { View tView = mViewArray.get(selectPosition).getChildAt(0); if (tView instanceof ViewBaseAction) { ViewBaseAction f = (ViewBaseAction) tView; f.hide(); } } private void init(Context context) { mContext = context; displayWidth = ((Activity) mContext).getWindowManager().getDefaultDisplay().getWidth(); displayHeight = ((Activity) mContext).getWindowManager().getDefaultDisplay().getHeight(); setOrientation(LinearLayout.HORIZONTAL); } @Override public void onDismiss() { showPopup(selectPosition); popupWindow.setOnDismissListener(null); } private OnButtonClickListener mOnButtonClickListener; /** * 設定tabitem的點選監聽事件 */ public void setOnButtonClickListener(OnButtonClickListener l) { mOnButtonClickListener = l; } /** * 自定義tabitem點選回撥介面 */ public interface OnButtonClickListener { public void onClick(int selectPosition); } }
外部設定的話 也特別簡單,只需要將自己定義好的佈局傳入到list集合中就可以
下面是MainActivity中的程式碼
以上就是這個篩選選單欄的大致用法 個人感覺還是比較簡單的,也比較靈活,修改起來也比較方便public class MainActivity extends AppCompatActivity { private ExpandTabView expandTabView; private ArrayList<View> mViewArray = new ArrayList<View>(); private ViewLeft viewLeft; private ViewMiddle viewMiddle; private ViewRight viewRight; @Override protected void onCreate(Bundle savedInstanceState) { super.onCreate(savedInstanceState); setContentView(R.layout.activity_main); initView(); initVaule(); initListener(); } private void initView() { expandTabView = (ExpandTabView) findViewById(R.id.expandtab_view); viewLeft = new ViewLeft(this); viewMiddle = new ViewMiddle(this); viewRight = new ViewRight(this); } private void initVaule() { mViewArray.add(viewMiddle); mViewArray.add(viewLeft); mViewArray.add(viewRight); ArrayList<String> mTextArray = new ArrayList<String>(); mTextArray.add("區域"); mTextArray.add("距離"); mTextArray.add("距離"); expandTabView.setValue(mTextArray, mViewArray); // expandTabView.setTitle(viewLeft.getShowText(), 0); // expandTabView.setTitle(viewMiddle.getShowText(), 1); // expandTabView.setTitle(viewRight.getShowText(), 2); } private void initListener() { viewLeft.setOnSelectListener(new ViewLeft.OnSelectListener() { @Override public void getValue(String distance, String showText) { onRefresh(viewLeft, showText); } }); viewMiddle.setOnSelectListener(new ViewMiddle.OnSelectListener() { @Override public void getValue(String showText) { onRefresh(viewMiddle,showText); } }); viewRight.setOnSelectListener(new ViewRight.OnSelectListener() { @Override public void getValue(String distance, String showText) { onRefresh(viewRight, showText); } }); } private void onRefresh(View view, String showText) { expandTabView.onPressBack(); int position = getPositon(view); if (position >= 0 && !expandTabView.getTitle(position).equals(showText)) { expandTabView.setTitle(showText, position); } // Toast.makeText(MainActivity.this, showText, Toast.LENGTH_SHORT).show(); } private int getPositon(View tView) { for (int i = 0; i < mViewArray.size(); i++) { if (mViewArray.get(i) == tView) { return i; } } return -1; } @Override public void onBackPressed() { if (!expandTabView.onPressBack()) { finish(); } } }
但是在專案中使用的時候碰到了一個問題,就是popupwindow在7.0的手機上彈出位置異常的問題,查了一下,是因為手機狀態列高度的問題
於是重寫了一下popupwindow的showAsDropDown方法就解決了 下面是具體程式碼
    @Override
    public void showAsDropDown(View anchor, int xoff, int yoff) {
        if(Build.VERSION.SDK_INT >= 24) {
            Rect rect = new Rect();
            anchor.getGlobalVisibleRect(rect);
            int h = anchor.getResources().getDisplayMetrics().heightPixels - rect.bottom;
            setHeight(h);
        }
        super.showAsDropDown(anchor, xoff, yoff);
    }
通過對SDK版本來進行判斷 大於24的話就執行這個方法 解決了popupwindow在7.0手機上異常彈出的問題
相關推薦
一款簡單靈活的Android下拉篩選框
最近接到一個新的專案 專案時間比較緊張,有一個功能類似於58同城,京東的一個下拉篩選框,為了節省時間,從網上面拷貝了一份封裝好的程式碼,進行的自己的一些修改,感覺靈活性還挺高的,分享出來給大家看一看 大致效果如下 可以自己加入自己的佈局 先看一下
一款好用的下拉選擇外掛select2
select2 gives you a customizable select box with support for searching, tagging, remote data sets, infinite scrolling, and many other highly used options.
Android下拉重新整理完全解析 教你如何一分鐘實現下拉重新整理功能
最近專案中需要用到ListView下拉重新整理的功能,一開始想圖省事,在網上直接找一個現成的,可是嘗試了網上多個版本的下拉重新整理之後發現效果都不怎麼理想。有些是因為功能不完整或有Bug,有些是因為使用起來太複雜,十全十美的還真沒找到。因此我也是放棄了在網上找現成程式碼的想法,
兩款 非常不錯的Android 下拉重新整理,上拉載入的框架
https://github.com/chrisbanes/Android-PullToRefresh https://github.com/liaohuqiu/android-Ultra-Pull-To-Refresh
Android 下拉刷新上拉載入效果功能
使用方式 blank 新建 ann out hlist tar sha mstr 應用場景: 在App開發中,對於信息的獲取與演示。不可能所有將其獲取與演示。為了在用戶使用中,給予用戶以友好、方便的用戶體驗,以滑動、下拉的效果動態載入數據的要求就會出現。為此,該效果功能
一款簡單實用的上傳文件圖片插件並且兼容移動端zyupload.js
png http ext 選中 nis blog onf 1-1 text 1.下載zyupload插件包 包含的文件如下圖: 2.在/images/fileType文件夾下定義上傳文件的顯示圖標 如下圖所示: 3.打開zyupload.js,修改上傳後顯示文件圖標
使用element-ui是下拉篩選選擇
獲取 mode 選中行 const sync del IT rem 數組 後臺獲取的數組中每一個對象必須要有一個value字段, 因為autocomplete只識別value字段並在下拉列中顯示 為什麽選擇input組件群下的el-autocomplete 而不是sel
Android Studio 第七十八期 - Android下拉懸停collapsinglayout
app master style https normal bsp ont geek hub 代碼已經整理好,效果如下圖: 地址:https://github.com/geeklx/myapplication2018/tree/master/p048_
Android下拉刷新控件android-Ultra-Pull-To-Refresh 使用
com 過程 kcon ava false design cube can out 一.gitHub地址及介紹 https://github.com/liaohuqiu/android-Ultra-Pull-To-Refresh android-Ultra-Pull-
android下拉列表(spinner)
<RelativeLayout xmlns:android="http://schemas.android.com/apk/res/android" xmlns:tools="http://schemas.android.com/tools" android:layout_
WaveSwipeRefreshLayout +RecyclerView 實現簡單的水滴下拉重新整理
第一步: 1.在app build.gradle中加入依賴: implementation 'com.github.recruit-lifestyle:WaveSwipeRefreshLayout:1.6' 2.AndroidManifest中新增網路許可權
Android ---------- 下拉刷新,上拉加載
oid content android data emp ram empty state ref 視圖布局部分: <com.Widget.StateFrameLayout android:layout_width="match_parent" androi
UI標籤庫專題十一 JEECG智慧開發平臺 DictSelect 資料字典下拉選擇框
分享一下我老師大神的人工智慧教程!零基礎,通俗易懂!http://blog.csdn.net/jiangjunshow 也歡迎大家轉載本篇文章。分享知識,造福人民,實現我們中華民族偉大復興!
android下拉重新整理,上拉載入更多
public class MainActivity extends AppCompatActivity { private RecyclerView mRecyclerview; private ArrayList<Integer> mList = new ArrayL
打造通用的Android下拉重新整理元件 適用於ListView GridView等各類View
分享一下我老師大神的人工智慧教程!零基礎,通俗易懂!http://blog.csdn.net/jiangjunshow 也歡迎大家轉載本篇文章。分享知識,造福人民,實現我們中華民族偉大復興!
fragment實現仿美團下拉篩選功能
1、前言 在開發APP中,大家基本都會用到篩選功能,而美團、房天下、淘寶等都會有一個下拉篩選功能,其實實現起來並不是很難,先上圖看一看,樣式可能不太好看,還請見諒。頁面篩選時有動畫效果。 2、思路總結和原始碼 (1)首先是一個xml頁面,整體思路就是上方按鈕正常佈局,下方通過f
利用二叉樹設計一款簡單的huffman編碼器
從磁碟讀入一個僅包括英文字母及標點符號的文字檔案(如f1.txt),統計各字元的頻度,據此構建huffman樹,對各字元進行編碼,並將字符集,頻度集及相應編碼碼字集輸出在顯示器或儲存在另一個文字檔案(如 f1_code.txt)中. 思路: Void Huffman
Android下拉框帶圖片
MainActivity 類 package com.example.android_06; /** * 上課程式碼 */ import android.support.v7.app.AppCompatActivity; import android.os.Bundle; i
Android 下拉重新整理
匯入PullToRefresh 1.1 修改library的build.gradle中的sdk版本 //修改前 compileSdkVersion 16 buildToolsVersion “27.0.3” defaultConfig {
android下拉放大圖片
private void setImage() { // 獲取螢幕寬高 metric = new DisplayMetrics(); getWindowManager().getDefaultDisplay().getMetrics(metric);

