
Vue原始碼--深入模板渲染
原文連結:https://geniuspeng.github.io/2018/02/07/vue-compile/
之前整理了vue的響應式原理,在這裡有一點是一直很模糊的,就是何時去new一個watcher,當data變化時又如何通知檢視去進行怎樣的更新…這裡面涉及到了模板渲染和虛擬DOM的diff以及更新操作。其實模板渲染過程在實際使用vue的過程可能並不需要太深理解,但就vue來說,這些底層思想可以更好地讓我們理解這個框架,以及瞭解為什麼Vue的API要如此設計…
上一次也提過,vue2+與vue1+的模板渲染過程完全不同,vue1使用的是DocumentFragment API,具體就不介紹了(可以直接跳到MDN去了解),而vue2開始則使用了Virtual DOM,基於Virtual DOM,vue2支援了服務端渲染SSR,以及JSX語法。介紹渲染流程之前,先說明兩個資料結構:抽象語法樹AST,以及VNode。
AST資料結構
AST 的全稱是 Abstract Syntax Tree(抽象語法樹),是原始碼的抽象語法結構的樹狀表現形式,計算機學科中編譯原理的概念。而vue就是將模板程式碼對映為AST資料結構,進行語法解析。這裡採用了flow的語法,flow是一個JS靜態型別檢查工具。
首先看一下 Vue 2.0 原始碼中 AST 資料結構 的定義:
1 2 3 4 5 6 7 8 9 10 11 12 13 14 15 16 17 18 19 20 21 22 23 24 25 26 27 | declare type ASTNode = ASTElement | ASTText | ASTExpression declare type ASTElement = { // 有關元素的一些定義 |
VNODE資料結構
VNODE就是vue中的虛擬dom節點,VNODE 資料結構 如下:
1 2 3 4 5 6 7 8 9 10 11 12 13 14 15 16 17 18 19 20 21 22 23 24 25 26 27 28 29 30 31 32 33 34 | constructor ( tag?: string, data?: VNodeData, children?: ?Array<VNode>, text?: string, elm?: Node, context?: Component, componentOptions?: VNodeComponentOptions, asyncFactory?: Function ) { this.tag = tag this.data = data this.children = children this.text = text this.elm = elm this.ns = undefined this.context = context this.fnContext = undefined this.fnOptions = undefined this.fnScopeId = undefined this.key = data && data.key this.componentOptions = componentOptions this.componentInstance = undefined this.parent = undefined this.raw = false this.isStatic = false this.isRootInsert = true this.isComment = false this.isCloned = false this.isOnce = false this.asyncFactory = asyncFactory this.asyncMeta = undefined this.isAsyncPlaceholder = false } |
真實DOM存在什麼問題,為什麼要用虛擬DOM
我們為什麼不直接使用原生 DOM 元素,而是使用真實 DOM 元素的簡化版 VNode,最大的原因就是 document.createElement 這個方法建立的真實 DOM 元素會帶來效能上的損失。我們來看一個 document.createElement 方法的例子
1 2 3 4 | let div = document.createElement('div'); for(let k in div) { console.log(k); } |
開啟 console 執行一下上面的程式碼,會發現打印出來的屬性多達 228 個,而這些屬性有 90% 多對我們來說都是無用的。VNode 就是簡化版的真實 DOM 元素,關聯著真實的dom,比如屬性elm,只包括我們需要的屬性,並新增了一些在 diff 過程中需要使用的屬性,例如 isStatic。
模板渲染流程
先來一張圖: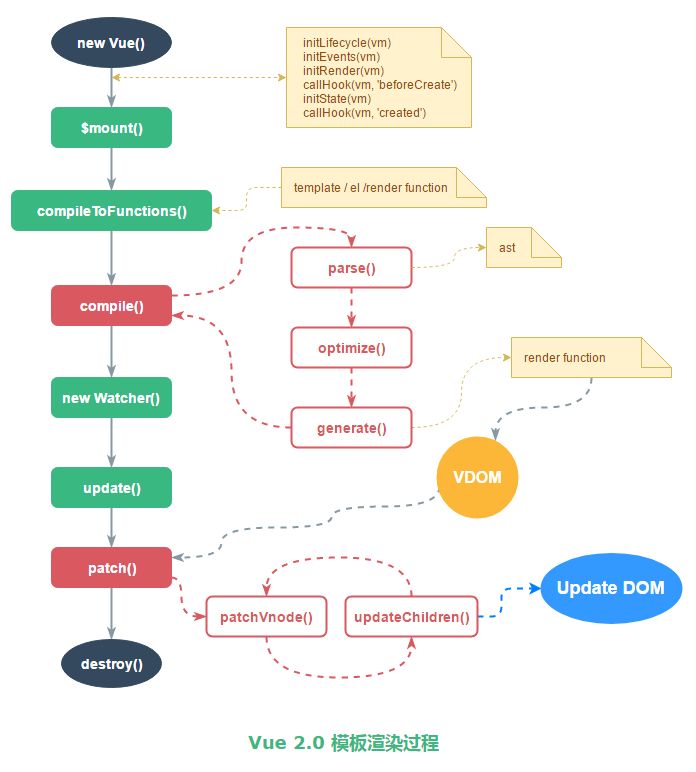
首先從$mount開始,可以看到,mount其實就是拿到了html模板作為template,然後將這個template通過compileToFunctions方法編譯成render函式:
1 2 3 4 5 6 7 8 9 10 11 12 13 14 15 16 17 18 19 20 21 | if (template) { /* istanbul ignore if */ if (process.env.NODE_ENV !== 'production' && config.performance && mark) { mark('compile') } const { render, staticRenderFns } = compileToFunctions(template, { //對獲取到的template進行編譯 shouldDecodeNewlines, shouldDecodeNewlinesForHref, delimiters: options.delimiters, comments: options.comments }, this) options.render = render options.staticRenderFns = staticRenderFns /* istanbul ignore if */ if (process.env.NODE_ENV !== 'production' && config.performance && mark) { mark('compile end') measure(`vue ${this._name} compile`, 'compile', 'compile end') } } |
那麼這個compileToFunctions做了什麼呢?主要將 template 編譯成 render 函式。首先讀快取,沒有快取就呼叫 compile 方法拿到 render 函式 的字串形式,再通過 new Function 的方式生成 render 函式。
1 2 3 4 5 6 7 8 9 10 11 12 13 14 15 16 17 18 | // 有快取的話就直接在快取裡面拿 const key = options && options.delimiters ? String(options.delimiters) + template : template if (cache[key]) { return cache[key] } const res = {} const compiled = compile(template, options) // compile 後面會詳細講 res.render = makeFunction(compiled.render) //通過 new Function 的方式生成 render 函式並快取 const l = compiled.staticRenderFns.length res.staticRenderFns = new Array(l) for (let i = 0; i < l; i++) { res.staticRenderFns[i] = makeFunction(compiled.staticRenderFns[i]) } ...... } return (cache[key] = res) // 記錄至快取中 |
現在我們具體看一下compile方法,上文中提到 compile 方法就是將 template 編譯成 render 函式 的字串形式。
1 2 3 4 5 6 7 8 9 10 11 12 13 | export function compile ( template: string, options: CompilerOptions ): CompiledResult { const AST = parse(template.trim(), options) //1. parse optimize(AST, options) //2.optimize const code = generate(AST, options) //3.generate return { AST, render: code.render, staticRenderFns: code.staticRenderFns } } |
這個函式主要有三個步驟組成:parse,optimize 和 generate,分別輸出一個包含 AST,staticRenderFns 的物件和 render函式 的字串。
parse 函式,主要功能是將 template字串解析成 AST,採用了 jQuery 作者 John Resig 的 HTML Parser。前面定義了ASTElement的資料結構,parse 函式就是將template裡的結構(指令,屬性,標籤等)轉換為AST形式存進ASTElement中,最後解析生成AST。
optimize 函式(src/compiler/optimizer.js)主要功能就是標記靜態節點,為後面 patch 過程中對比新舊 VNode 樹形結構做優化。被標記為 static 的節點在後面的 diff 演算法中會被直接忽略,不做詳細的比較。
generate 函式(src/compiler/codegen/index.js)主要功能就是根據 AST 結構拼接生成 render 函式的字串。
1 2 3 4 5 6 7 8 9 10 11 | export function generate ( ast: ASTElement | void, options: CompilerOptions ): CodegenResult { const state = new CodegenState(options) const code = ast ? genElement(ast, state) : '_c("div")' return { render: `with(this){return ${code}}`, staticRenderFns: state.staticRenderFns } } |
其中 genElement 函式(src/compiler/codegen/index.js)是會根據 AST 的屬性呼叫不同的方法生成字串返回。
1 2 3 4 5 6 7 8 9 10 11 12 13 14 15 16 17 18 19 20 21 22 23 24 25 26 27 28 29 30 31 32 33 34 35 | export function genElement (el: ASTElement, state: CodegenState): string { if (el.staticRoot && !el.staticProcessed) { return genStatic(el, state) } else if (el.once && !el.onceProcessed) { return genOnce(el, state) } else if (el.for && !el.forProcessed) { return genFor(el, state) } else if (el.if && !el.ifProcessed) { return genIf(el, state) } else if (el.tag === 'template' && !el.slotTarget) { return genChildren(el, state) || 'void 0' } else if (el.tag === 'slot') { return genSlot(el, state) } else { // component or element let code if (el.component) { code = genComponent(el.component, el, state) } else { const data = el.plain ? undefined : genData(el, state) const children = el.inlineTemplate ? null : genChildren(el, state, true) code = `_c('${el.tag}'${ data ? `,${data}` : '' // data }${ children ? `,${children}` : '' // children })` } // module transforms for (let i = 0; i < state.transforms.length; i++) { code = state.transforms[i](el, code) } return code } } |
以上就是 compile 函式中三個核心步驟的介紹,compile 之後我們得到了 render 函式 的字串形式,後面通過 new Function 得到真正的渲染函式。資料發現變化後,會執行 Watcher 中的 _update 函式(src/core/instance/lifecycle.js),_update 函式會執行這個渲染函式,輸出一個新的 VNode 樹形結構的資料。然後在呼叫 patch 函式,拿這個新的 VNode 與舊的 VNode 進行對比,只有發生了變化的節點才會被更新到真實 DOM 樹上。
mount後續
通過compile生成render方法之後,會進一步執行mount方法,在$mount中可以看到最後一句話:return mount.call(this, el, hydrating),這個mount實際上就是runtime中的mount,執行的就是lifecycle中的mountComponent方法,看一下基本邏輯:
1 2 3 4 5 6 7 8 9 10 11 12 13 14 15 16 17 18 19 20 21 22 23 24 25 26 27 28 29 30 31 32 33 34 35 36 37 38 39 40 41 42 | // 觸發 beforeMount 生命週期鉤子 callHook(vm, 'beforeMount') let updateComponent //updateComponent是watcher更新時的回撥,用於更新檢視操作 /* istanbul ignore if */ if (process.env.NODE_ENV !== 'production' && config.performance && mark) { updateComponent = () => { const name = vm._name const id = vm._uid const startTag = `vue-perf-start:${id}` const endTag = `vue-perf-end:${id}` mark(startTag) const vnode = vm._render() mark(endTag) measure(`vue ${name} render`, startTag, endTag) mark(startTag) vm._update(vnode, hydrating) mark(endTag) measure(`vue ${name} patch`, startTag, endTag) } } else { updateComponent = () => { vm._update(vm._render(), hydrating) } } // 以前是直接new Watch賦值給vm._watcher,現在這一步放到了watcher的建構函式中 // we set this to vm._watcher inside the watcher's constructor // since the watcher's initial patch may call $forceUpdate (e.g. inside child // component's mounted hook), which relies on vm._watcher being already defined new Watcher(vm, updateComponent, noop, null, true /* isRenderWatcher */) hydrating = false // manually mounted instance, call mounted on self // mounted is called for render-created child components in its inserted hook if (vm.$vnode == null) { vm._isMounted = true callHook(vm, 'mounted') } return vm |
首先會new一個watcher物件(主要是將模板與資料建立聯絡),在watcher物件建立後,會執行傳入的方法 vm._update(vm._render(), hydrating) 。其中的vm._render()主要作用就是執行前面compiler生成的render方法,並返回一個vNode物件。vm.update() 則會對比新的 vdom 和當前 vdom,並把差異的部分渲染到真正的 DOM 樹上。
patch
patch.js 就是新舊 VNode 對比的 diff 函式,主要是為了優化dom,通過演算法使操作dom的行為降到最低,diff 演算法來源於 snabbdom,是 VDOM 思想的核心。snabbdom 的演算法為了 DOM 操作跨層級增刪節點較少的這一目標進行優化,它只會在同層級進行, 不會跨層級比較。
文末福利:
福利二:微信小程式入門與實戰全套詳細視訊教程。
【領取方法】
關注 【程式設計微刊】微信公眾號:
回覆【小程式demo】一鍵領取130個微信小程式原始碼demo資源。
回覆【領取資源】一鍵領取前端,Java,產品經理,微信小程式,Python等資源合集10G資源大放送。
相關推薦
Vue原始碼--深入模板渲染
原文連結:https://geniuspeng.github.io/2018/02/07/vue-compile/之前整理了vue的響應式原理,在這裡有一點是一直很模糊的,就是何時去new一個watcher,當data變化時又如何通知檢視去進行怎樣的更新…這裡面涉及到了模板渲
[Vue原始碼分析] 模板的編譯
最近小組有個關於vue原始碼分析的分享會,提前準備一下… 前言: Vue有兩個版本:Runtime + Compiler 、 Runtime only ,前者是包含編譯程式碼的版本,後者不包含編譯程式碼,編譯過程需要藉助webpack的vue-loader,接下來分析的是Runtime
Vue原始碼探究-虛擬DOM的渲染
Vue原始碼探究-虛擬DOM的渲染 在虛擬節點的實現一篇中,除了知道了 VNode 類的實現之外,還簡要地整理了一下DOM渲染的路徑。在這一篇中,主要來分析一下兩條路徑的具體實現程式碼。 按照建立 Vue 例項後的一般執行流程,首先來看看例項初始化時對渲染模組的初始處理。這也是開始 mount 路徑的前一
Vue.js原始碼學習四 —— 渲染 Render 初始化過程學習
今天我們來學習下Vue的渲染 Render 原始碼~ 還是從初始化方法開始找程式碼,在 src/core/instance/index.js 中,先執行了 renderMixin 方法,然後在Vue例項化的時候執行了 vm._init 方法,在這個 v
Python Web Flask原始碼解讀(三)——模板渲染過程
關於我 一個有思想的程式猿,終身學習實踐者,目前在一個創業團隊任team lead,技術棧涉及Android、Python、Java和Go,這個也是我們團隊的主要技術棧。 Github:https://github.com/hylinux1024 微信公眾號:終身開發者(angrycode) 前面對Fla
深入vue原始碼,瞭解vue的雙向資料繫結原理
大家都知道vue是一種MVVM開發模式,資料驅動檢視的前端框架,並且內部已經實現了雙向資料繫結,那麼雙向資料繫結是怎麼實現的呢? 先手動擼一個最最最簡單的雙向資料繫結 1 <div> 2 <input type="text" name="" id="te
[Vue原始碼]一起來學Vue模板編譯原理(一)-Template生成AST
本文我們一起通過學習Vue模板編譯原理(一)-Template生成AST來分析Vue原始碼。預計接下來會圍繞Vue原始碼來整理一些文章,如下。 一起來學Vue雙向繫結原理-資料劫持和釋出訂閱 一起來學Vue模板編譯原理(一)-Template生成AST 一起來學Vue模板編譯原理(二)-AST生成Rende
[Vue原始碼]一起來學Vue模板編譯原理(二)-AST生成Render字串
本文我們一起通過學習Vue模板編譯原理(二)-AST生成Render字串來分析Vue原始碼。預計接下來會圍繞Vue原始碼來整理一些文章,如下。 一起來學Vue雙向繫結原理-資料劫持和釋出訂閱 一起來學Vue模板編譯原理(一)-Template生成AST 一起來學Vue模板編譯原理(二)-AST生成Rende
vue-lazy-render: 延遲渲染大組件,增強頁面切換流暢度
頁面 性能 script string boolean 設定 默認 重新 節點 最近用element來做項目,在開發的過程中,突然發現頁面的操作和切換在數據量大的時候相當卡,後來提了個issue,在furybean解答後才知道,我每個單元格都加了tooltip,會生成大量的
出位的template.js 基於jquery的模板渲染插件,簡單、好用
oid 易懂 light ~~ 支持 jin explore tro inux 找了好幾款基於jquery的模板渲染插件,無一感覺很難用(教程較少、綁定不統一),也可能我智商問題,比如jquery template.js 、jtemplate.js。 然後在github上
Django之模板渲染
web spa django stat 原生 oda alert 數據顯示 splay 前言 Django的工作流程 1、客戶端發送請求到達 URL2、URL把客戶端請求轉發給請求函數3、視圖函數 使用原生SQL或者ORM去數據庫拿到數據 和模板(HTML文件)二者進行渲染
vue組件-模板
body itl one emp eth orange bower tle char 1 <!DOCTYPE html> <html lang="en"> <head> <meta charset="UTF-8">
追求極致的用戶體驗ssr(基於vue的服務端渲染)
這樣的 console ports modules 為我 返回 意思 mage nop 首先這篇博客並不是ssr建議教程,需要ssr入門的我建議也不要搜索博客了,因為官網給出了詳細的入門步驟,只需要step by step就可以了,這篇博客的意義是如何使用ssr,可能不同的
如何用模板渲染後臺返回不確定的data
銀行 amt con string bsp 需要 工商銀行 對象 農業 工作中遇到一個需求,要求把後臺返回的所有數據依次渲染出來,數據的key、value都是不確定的。剛開始覺得不行,後來想了下還是可以實現的,那就是通過二維數組。 假設後臺傳來的是json數據: var
vscode添加vue文件模板
lan 文件 body log tps text spa rip ack 文件-》首選項-》用戶代碼片段-》輸入vue,打開vue.json 添加模板json "Print to console": { "prefix": "vuec", "
vue 使用Jade模板寫html,stylus寫css
模板 開發 tex 默認 如果 round 簡化 lock mark vue 使用Jade模板寫html,stylus寫css 日常工作都是使用vue開發頁面和webApp,寫的多了就想偷懶簡化各種書寫方式,所以使用了jade寫html,stylus寫css,省了很多的步驟
vue 組件 模板input雙向數據數據
inpu tms 組件 data msg tle pro scrip 模板 <!DOCTYPE html><html> <head> <meta charset="UTF-8"> <title>Title o
vue 組件 模板中根數據綁定需要指明路徑並通信父
scom mode OS 綁定 .com ivr 必須 pro input <!DOCTYPE html><html> <head> <meta charset="UTF-8"> <title>Title o
vue學習筆記初識vue——使用HTML模板
selector emp dom節點 dom clas vue php 學習筆記 app 在創建Vue實例時,如果聲明了el配置項,那麽你也可以省略template 選項。這時候,Vue.js將提取錨點元素的HTML內容,做為模板。 我們可以使用單一的el配置項來創建Vue
Vue框架深入使用(V客學院知識分享)
contex 使用 培訓機構 函數 const 方案 PE 它的 得到 隨著JS框架的廣泛運行,三大JS框架均分天下(angular、vue、react),目前國內市場VUE的使用比例還是占著相當的份額,所有我們今天主要來討論下VUE框架的經典使用,以下展示五個特殊用法。