Android 4 學習(18):搜尋
參考《Professional Android 4 Development》
搜尋
通過下面這幾種方式可以給應用程式新增搜尋功能:
- Search Bar

- Search View

- Quick Search Box

可搜尋的Content Provider
首先,要在res./xml目錄下建立一個xml檔案,例如:
<?xml version=”1.0” encoding=”utf-8”?> <searchable xmlns:android=”http://schemas.android.com/apk/res/android”android:label=”@string/app_name” android:hint=”@string/search_hint”> </searchable>
其中,Label一般是應用程式的名稱。
為應用程式建立Search Activity
Search Activity和普通的Activity不同,它是一直在back stack的棧頂,每次有新的search activity建立時,不會有將其簡單的入棧,因為使用者是不會希望按返回鍵時返回自己前面的查詢結果。為了表明該Activity可以被搜尋,需要將android.intent.action.SEARCH加入到自己的Intent Filter
<activity android:name=”.DatabaseSkeletonSearchActivity” android:label=”Element Search” android:launchMode=”singleTop”> <intent-filter> <action android:name=”android.intent.action.SEARCH” /> <category android:name=”android.intent.category.DEFAULT” /> </intent-filter> <meta-data android:name=”android.app.searchable” android:resource=”@xml/searchable” /> </activity>
使用者進行搜尋後,可以在搜尋結果中繼續搜尋,而這種操作會生成新的Intent,而這些Intent可以通過onNewIntent handler來處理:
@Override
public void onCreate(Bundle savedInstanceState) {
  super.onCreate(savedInstanceState);
  // Get the launch Intent
  parseIntent(getIntent());
}
@Override
protected void onNewIntent(Intent intent) {
  super.onNewIntent(intent);
  parseIntent(getIntent());
}
private void parseIntent(Intent intent) {
  // If the Activity was started to service a Search request, extract the search query.
  if (Intent.ACTION_SEARCH.equals(intent.getAction())) {
    String searchQuery = intent.getStringExtra(SearchManager.QUERY);
    // Perform the search
    performSearch(searchQuery);
  }
}
設定預設的Serach Provider
在應用程式中,最好設定一個Activity,讓所有的搜尋結果都從這個Activity中出來,設定方法也簡單,將下面的配置加到程式配置中就可以了:
<meta-data android:name=”android.app.default_searchable” android:value=”.DatabaseSkeletonSearchActivity” />
使用Cursor Loader的Search Activity示例
import android.app.ListActivity;
import android.app.LoaderManager;
import android.app.SearchManager;
import android.content.ContentUris;
import android.content.CursorLoader;
import android.content.Intent;
import android.content.Loader;
import android.database.Cursor;
import android.net.Uri;
import android.os.Bundle;
import android.view.View;
import android.widget.ListView;
import android.widget.SimpleCursorAdapter;
public class DatabaseSkeletonSearchActivity extends ListActivity implements LoaderManager.LoaderCallbacks<Cursor> {
  private static String QUERY_EXTRA_KEY = “QUERY_EXTRA_KEY”;
  private SimpleCursorAdapter adapter;
  @Override
  public void onCreate(Bundle savedInstanceState) {
    super.onCreate(savedInstanceState);
    // Create a new adapter and bind it to the List View
    adapter = new SimpleCursorAdapter(this, android.R.layout.simple_list_item_1, null, new String[] { MyContentProvider.KEY_COLUMN_1_NAME }, new int[] { android.R.id.text1 }, 0);
    setListAdapter(adapter);
    // Initiate the Cursor Loader
    getLoaderManager().initLoader(0, null, this);
    // Get the launch Intent
    parseIntent(getIntent());
  }
  @Override
  protected void onNewIntent(Intent intent) {
    super.onNewIntent(intent);
    parseIntent(getIntent());
  }
  private void parseIntent(Intent intent) {
    // If the Activity was started to service a Search request, extract the search query.
    if (Intent.ACTION_SEARCH.equals(intent.getAction())) {
      String searchQuery = intent.getStringExtra(SearchManager.QUERY);
      // Perform the search
      performSearch(searchQuery);
    }
  }
  // Execute the search.
  private void performSearch(String query) {
    // Pass the search query as an argument to the Cursor Loader
    Bundle args = new Bundle();
    args.putString(QUERY_EXTRA_KEY, query);
    // Restart the Cursor Loader to execute the new query.
    getLoaderManager().restartLoader(0, args, this);
  }
  public Loader<Cursor> onCreateLoader(int id, Bundle args) {
    String query = “0”;
    // Extract the search query from the arguments.
    if (args != null)
      query = args.getString(QUERY_EXTRA_KEY);
    // Construct the new query in the form of a Cursor Loader.
    String[] projection = {MyContentProvider.KEY_ID, MyContentProvider.KEY_COLUMN_1_NAME};
    String where = MyContentProvider.KEY_COLUMN_1_NAME + “ LIKE \”%” + query + “%\””;
    String[] whereArgs = null;
    String sortOrder = MyContentProvider.KEY_COLUMN_1_NAME + “ COLLATE LOCALIZED ASC”;
    // Create the new Cursor loader.
    return new CursorLoader(this, MyContentProvider.CONTENT_URI, projection, where, whereArgs, sortOrder);
  }
  public void onLoadFinished(Loader<Cursor> loader, Cursor cursor) {
    // Replace the result Cursor displayed by the Cursor Adapter with the new result set.
    adapter.swapCursor(cursor);
  }
  public void onLoaderReset(Loader<Cursor> loader) {
    // Remove the existing result Cursor from the List Adapter.
    adapter.swapCursor(null);
  }
}
大部分情況下,我們需要響應對搜尋結果的click事件,因此需要重寫onListItemClick方法:
@Override
protected void onListItemClick(ListView listView, View view, int position, long id) {
  super.onListItemClick(listView, view, position, id);
  // Create a URI to the selected item.
  Uri selectedUri = ContentUris.withAppendedId(MyContentProvider.CONTENT_URI, id);
  // Create an Intent to view the selected item.
  Intent intent = new Intent(Intent.ACTION_VIEW);
  intent.setData(selectedUri);
  // Start an Activity to view the selected item.
  startActivity(intent);
}
使用Search View Widget
Android 3.0後推出了Search View Widget以替代Search Activity。將Search View繫結到searchable activity中,首先要獲取searchableInfo:
// Use the Search Manager to find the SearchableInfo related  to this Activity.
SearchManager searchManager = (SearchManager)getSystemService(Context.SEARCH_SERVICE);
SearchableInfo searchableInfo = searchManager.getSearchableInfo(getComponentName());
// Bind the Activity’s SearchableInfo to the Search View
SearchView searchView = (SearchView)findViewById(R.id.searchView);
searchView.setSearchableInfo(searchableInfo);
本地Android Content Provider
Android中提供了一些本地的Content Provider,包括下面這些:
- Media Store
- Browser
- Contacts Contract
- Calendar
- Call Log
使用Media Store Content Provider
MediaStore類有Audio,Video和Image子類,這些子類又有含有uri資訊的子類。每個子類中uri資訊是這麼儲存的:
- MediaStore.<mediatype>.Media.EXTERNAL_CONTENT_URI
- MediaStore.<mediatype>.Media.INTERNAL_CONTENT_URI
下面是一個示例:
// Get a Cursor over every piece of audio on the external volume,
// extracting the song title and album name.
String[] projection = new String[] {
  MediaStore.Audio.AudioColumns.ALBUM,
  MediaStore.Audio.AudioColumns.TITLE
};
Uri contentUri = MediaStore.Audio.Media.EXTERNAL_CONTENT_URI;
Cursor cursor = getContentResolver().query(contentUri, projection, null, null, null);
// Get the index of the columns we need.
int albumIdx = cursor.getColumnIndexOrThrow(MediaStore.Audio.AudioColumns.ALBUM);
int titleIdx = cursor.getColumnIndexOrThrow(MediaStore.Audio.AudioColumns.TITLE);
// Create an array to store the result set.
String[] result = new String[cursor.getCount()];
// Iterate over the Cursor, extracting each album name and song title.
while (cursor.moveToNext()) {
  // Extract the song title.
  String title = cursor.getString(titleIdx);
  // Extract the album name.
  String album = cursor.getString(albumIdx);
  result[cursor.getPosition()] = title + “ (“ + album + “)”;
}
// Close the Cursor.
cursor.close();
使用Contacts Contract Content Provider
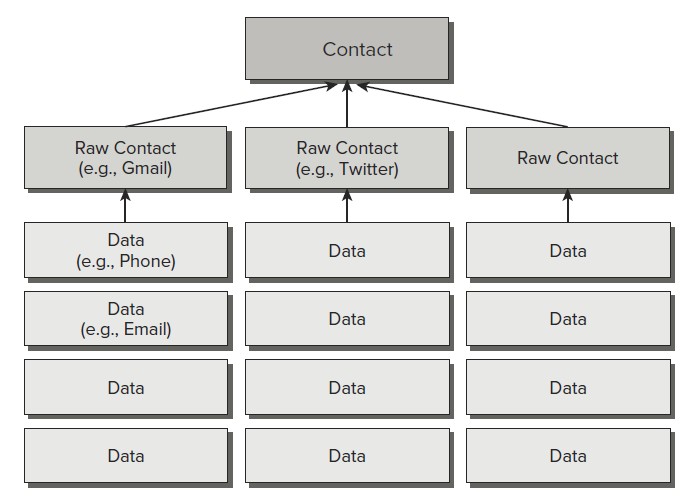
Contacts Contract Provider使用三層模型儲存資料:

相關推薦
Android 4 學習(18):搜尋
參考《Professional Android 4 Development》 搜尋 通過下面這幾種方式可以給應用程式新增搜尋功能: Search Bar Search View Quick Search Box 可搜尋的Content Provider 首
Android 4 學習(21):對話方塊
對話方塊 建立Dialog的兩種方式: 1. 使用Dialog類或其子類,包括DialogFragment 2. 在Activity中使用Dialog主題(theme) 下面是使用Dialog類的一個例子: // Create the new Dialog.Dialog dialog = n
Android 4 學習(17):使用Content Resolver
Content Resolver簡介 每個應用程式都有一個ContentResolver例項,通過getContentResolver()方法可以獲取: ContentResolver cr = getContentResolver(); 與Content Provider對應,Cont
Android 4 學習(20):ActionBar
參考《Pro Android 4.0》 ActionBar 11.0之後,ActionBar在Activity中預設存在,可以在程式碼中設定其顯示與否: ActionBar actionBar = getActionBar(); // Hide the Action Bar actionBa
Android 4 學習(19):Services
參考《Professional Android 4 Development》 Services Service是invisible的,因此其優先順序不高於visible的Activity,之所以說不高於,是因為我們可以設定Service為在前臺執行。 建立Service Android提供了Ser
Android 4學習(7):使用者介面
參考《Professional Android 4 Development》 Android UI基本元素 下面這些概念是Android UI設計的基礎,深入學習和理解它們是Android UI設計的基礎: View:View是所有UI元素,包括Layout在內,的父
Android 4學習(6):概述
參考:《Professional Android 4 Application Development》 深入瞭解Android Activity 每一個Android Activity都對應於一個使用者介面(UI)。每個Android Application都有一個m
Android BLE學習(一): Android搜尋BLE裝置
背景 總結一下最近ble的學習情況。自從入手ble 51822開發板後就開始不停加班,中途出於好奇,業餘時間寫了一些微控制器上json解析相關的東西,妄圖使用藍芽傳輸json資料,不知道是否實用,既然開始寫了,得寫出點樣子,晃晃蕩蕩,2016年的1月份就過去了
Android NDK學習(二):編譯腳本語法Android.mk和Application.mk
GC make files 文件的 包括 一次 opengl aries 基本語法 一、Android.mk Android.mk分為一下幾部分: LOCAL_PATH:= $(call my-dir), 返回當前文件在系統中的路徑,Android.mk文件開始時必須定義
Android Camera學習(一):如何實現轉動螢幕介面選單跟著轉動效果
最近公司在做車載專案,需要把照相機原本豎向顯示改為橫向顯示。所以研究了下camera選單朝向的問題。 系統提供了一個監聽sensor狀態變化的類OrientationEventListener。在系統程式碼CameraActivity中就是繼承的這個類。 private
Android BLE學習(三):編寫自己的 BLE藍芽讀寫工具(功能仿照nrf master control panel)
背景 由於nordic官方的nrf master control panel只提供了apk,很多同學學習起來都得自己摸索藍芽的讀寫,專案中整理了BLE模組的基本讀寫方法以及一些常用的UUID,並且抽取了一些藍芽操作的流程,方便Android app程式碼開發,
Pro Android學習筆記(五十):ActionBar(3):搜尋條
ActionBar中的搜尋條 我們同樣可以在Action Bar中嵌入搜尋條。在小例子中,我們在action bar中嵌入一個搜尋框的widget(稱為search view)。當我們輸入搜尋內容,能夠在指定的activity中開啟(稱為searchable activitiy),本例不做實質的搜尋,只是
android Bluetooth 開發(二):開啟、關閉、搜尋、允許搜尋、檢視
相關專案的下載連結繼本專案之後實現了語音識別:點選開啟連結1.承接上一篇文章,本篇文章主要實現了藍芽的開啟 關閉 允許搜尋 檢視配對裝置2. BluetoothInit,主要實現了部件的初始化,按鈕的點選事件,通過ListVIew顯示本地配對的藍芽裝置,ListView的點選
ElasticStack學習(六):ElasticSearch搜尋初探
一、ElasticSearch搜尋介紹 1、ElasticSearch搜尋方式主要分為以下兩種: 1)、URI Search:此種查詢主要是使用Http的Get方法,在URL中使用查詢引數進行查詢; 如:http://localhost:9200/kibana_sample
ElasticStack學習(九):深入ElasticSearch搜尋之詞項、全文字、結構化搜尋及相關性算分
一、基於詞項與全文的搜尋 1、詞項 Term(詞項)是表達語意的最小單位,搜尋和利用統計語言模型進行自然語言處理都需要處理Term。 Term的使用說明: 1)Term Level Query:Term Query、Range Query、Exists Query
ElasticStack學習(十):深入ElasticSearch搜尋之QueryFiltering、多/單字串的多欄位查詢
一、複合查詢 1、在ElasticSearch中,有Query和Filter兩種不同的Context。Query Context進行了相關性算分,Filter Context不需要進行算分,同時可以利用Cache,獲取更好的效能。 2、bool Query:一個布林查詢,是一個或者多個查詢子
linux命令學習(6):ps命令
bytes 釋放 ice cti width kthread hellip 名稱 pts Linux中的ps命令是Process Status的縮寫。ps命令用來列出系統中當前運行的那些進程。ps命令列出的是當前那些進程的快照,就是執行ps命令的那個時刻的那些進程,如果想要
ActiveMQ(18):Message之延遲和定時消息投遞
jms activemq 延遲和定時消息投遞 一、簡介延遲和定時消息投遞(Delay and Schedule Message Delivery) 有時候我們不希望消息馬上被broker投遞出去,而是想要消息60秒以後發給消費者,或者我們想讓消息沒隔 一定時間投遞一次,一共投遞指定的次數。。。
JAVA學習(七):方法重載與方法重寫、thiskeyword和superkeyword
格式 hello new 初始 per 而且 方法重寫 學習 方式 方法重載與方法重寫、thiskeyword和superkeyword 1、方法重載 重載可以使具有同樣名稱但不同數目和類型參數的類傳遞給方法。 註: 一是重載方法的參數列表必須與被重載的方法不同
藍的成長記——追逐DBA(18):小機上WAS集群故障,由一次更換IP引起
linu 是我 單點 看到了 做事 window 可能 fontsize error_log 原創作品。出自 “深藍的blog” 博客,歡迎轉載,轉載時請務必註明出處。否則追究版權法律責任。 深藍的blog:http://blog.csdn.net/huangyanlo
