
spring-cloud-sleuth+zipkin追蹤服務
本文簡單介紹瞭如何利用Zipkin對SpringCloud應用進行服務分析在實際的應用場景中,Zipkin可以結合壓力測試工具一起使用,分析系統在大壓力下的可用性和效能。
設想這麼一種情況,如果你的微服務數量逐漸增大,服務間的依賴關係越來越複雜,怎麼分析它們之間的呼叫關係及相互的影響?
spring boot對zipkin的自動配置可以使得所有RequestMapping匹配到的endpoints得到監控,以及強化了RestTemplate,對其加了一層攔截器,使得由它發起的http請求也同樣被監控。
sleuth與Zipkin關係?
spring cloud提供了spring-cloud-sleuth-zipkin來方便整合zipkin實現(指的是Zipkin Client,而不是Zipkin伺服器),該jar包可以通過spring-cloud-starter-zipkin依賴來引入。
Zipkin原理
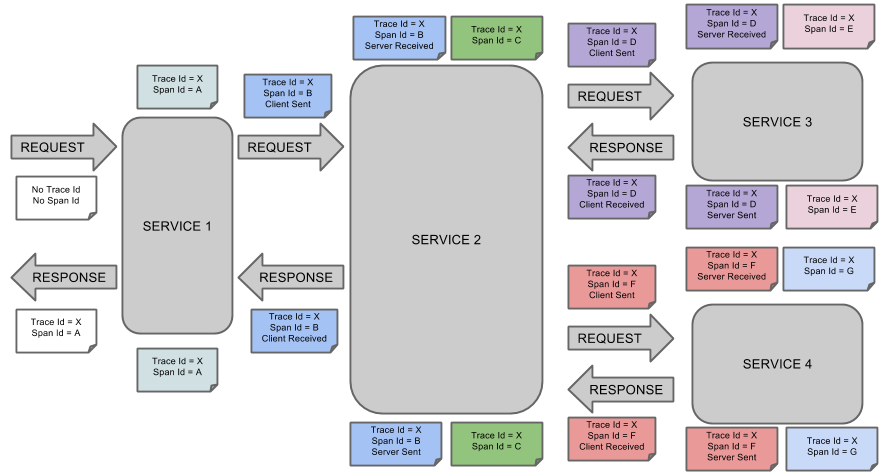
針對服務化應用全鏈路追蹤的問題,Google發表了Dapper論文,介紹了他們如何進行服務追蹤分析。其基本思路是在服務呼叫的請求和響應中加入ID,標明上下游請求的關係。利用這些資訊,可以視覺化地分析服務呼叫鏈路和服務間的依賴關係。
對應Dpper的開源實現是Zipkin,支援多種語言包括JavaScript,Python,Java, Scala, Ruby, C#, Go等。其中Java由多種不同的庫來支援
Spring Cloud Sleuth是對Zipkin的一個封裝,對於Span、Trace等資訊的生成、接入HTTP Request,以及向Zipkin Server傳送採集資訊等全部自動完成。這是Spring Cloud Sleuth的概念圖
入門例項
追蹤服務包含下面幾個服務:
1、註冊中心 Eureka Server(可選的,只用於服務生產者和呼叫者註冊)
2、Zipkin伺服器
3、服務的生產者及服務的呼叫者:
1)服務的生產者、呼叫者是相對的,兩者之間可以互相呼叫,即可以同時作為生產者和呼叫者,兩者都是Eureka Client;
2)兩者都要註冊到註冊中心上,這樣才可以相互可見,才能通過服務名來呼叫指定服務,才能使用Feign或RestTemplate+Ribbon來達到負載均衡
3)兩者都要註冊到Zipkin伺服器上,這樣Zipkin才能追蹤服務的呼叫鏈路
一、Zipkin伺服器
1、新建一個普通的Spring Boot專案,新增如下依賴:
		<dependency>
		    <groupId>io.zipkin.java</groupId>
		    <artifactId>zipkin-server</artifactId>
		</dependency>
		<!-- Zipkin視覺化介面依賴 -->
		<dependency>
			<groupId>io.zipkin.java</groupId>
			<artifactId>zipkin-autoconfigure-ui</artifactId>
			<scope>runtime</scope>
		</dependency>
2、在啟動類加上如下註解開啟Zipkin功能
@EnableZipkinServer3、配置Zipkin服務埠、名稱等:
server.port=11008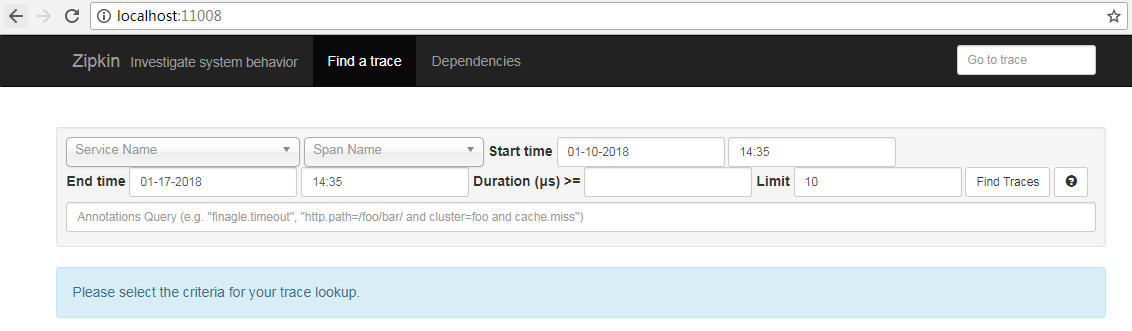
spring.application.name=my-zipkin-server啟動後開啟http://localhost:11008/可以看到如下圖,什麼內容都沒有,因為還沒有任何服務註冊到Zipkin,一旦有服務註冊到Zipkin便在Service Name下拉列表中可以看到服務名字,當有服務被呼叫,則可以在Span Name中看到被呼叫的介面名字
這裡為了測試方便,我們可以將資料儲存到記憶體中,但是生產環境還是需要將資料持久化的,原生支援了很多產品,例如ES、資料庫等。
二、服務生產者、呼叫者
1、新增Zipkin依賴
		<!-- 服務追蹤 -->
 		<dependency>
			<groupId>org.springframework.cloud</groupId>
			<artifactId>spring-cloud-starter-zipkin</artifactId>
		</dependency>
或
 		<dependency>
		    <groupId>org.springframework.cloud</groupId>
		    <artifactId>spring-cloud-sleuth-zipkin</artifactId>
		</dependency>
		<dependency>
		    <groupId>org.springframework.cloud</groupId>
		    <artifactId>spring-cloud-starter-sleuth</artifactId>
		</dependency>
2、配置Zipkin伺服器的地址
#Zipkin伺服器地址
spring.zipkin.baseUrl=http://localhost:11008
至此,可以開始測試Zipkin追蹤服務了
啟動順序:註冊中心(可選)->配置中心(可選)->Zipkin伺服器->服務生產者及呼叫者
我們可以嘗試呼叫生產者或呼叫者的介面,然後重新整理Zipkin伺服器頁面,可以看到如下結果:
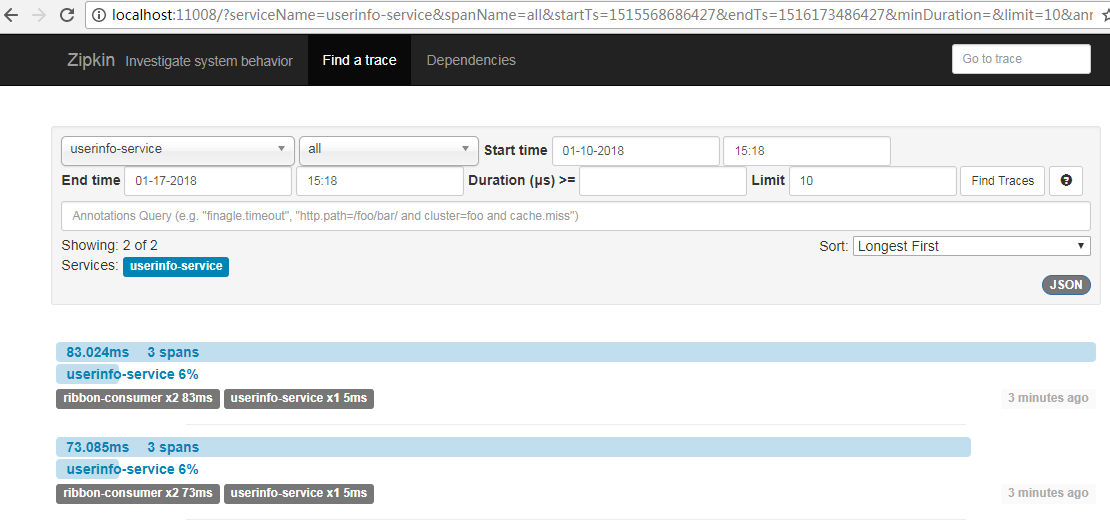
可以看到,呼叫消費者(ribbon-consumer)耗時83ms,其中消費者呼叫生產者佔了5ms,佔比6%。
在測試的過程中我們會發現,有時候,程式剛剛啟動後,重新整理幾次,並不能看到任何資料,原因就是我們的spring-cloud-sleuth收集資訊是有一定的比率的,預設的取樣率是0.1,配置此值的方式在配置檔案中增加spring.sleuth.sampler.percentage引數配置(如果不配置預設0.1),如果我們調大此值為1,可以看到資訊收集就更及時。但是當這樣調整後,我們會發現我們的rest介面呼叫速度比0.1的情況下慢了很多,即使在0.1的取樣率下,我們多次重新整理consumer的介面,會發現對同一個請求兩次耗時資訊相差非常大,如果取消spring-cloud-sleuth後我們再測試,會發現並沒有這種情況,可以看到這種方式追蹤服務呼叫鏈路會給我們業務程式效能帶來一定的影響。
#sleuth取樣率,預設為0.1,值越大收集越及時,但效能影響也越大
spring.sleuth.sampler.percentage=1
其實,我們仔細想想也可以總結出這種方式的幾種缺陷
缺陷1:zipkin客戶端向zipkin-server程式傳送資料使用的是http的方式通訊,每次傳送的時候涉及到連線和傳送過程。
缺陷2:當我們的zipkin-server程式關閉或者重啟過程中,因為客戶端收集資訊的傳送採用http的方式會被丟失。
針對以上兩個明顯的缺陷,改進的辦法是
1、通訊採用socket或者其他效率更高的通訊方式。
2、客戶端資料的傳送儘量減少業務執行緒的時間消耗,採用非同步等方式傳送收集資訊。
3、客戶端與zipkin-server之間增加快取類的中介軟體,例如redis、MQ等,在zipkin-server程式掛掉或重啟過程中,客戶端依舊可以正常的傳送自己收集的資訊。
相信採用以上三種方式會很大的提高我們的效率和可靠性。其實spring-cloud已經為我們提供採用MQ或redis等其他的採用socket方式通訊,利用訊息中介軟體或資料庫快取的實現方式。
spring-cloud-sleuth-zipkin-stream方式的實現請看下面內容!
將HTTP通訊改成MQ非同步方式通訊
springcloud官方按照傳輸方式分成了三種啟動服務端的方式:Sleuth with Zipkin via HTTP,Sleuth with Zipkin via Spring Cloud Stream,Spring Cloud Sleuth Stream Zipkin Collector。只需要新增相應的依賴,之後配置相應的註解,如@EnableZipkinStreamServer即可。具體配置參考官方文件:
(http://cloud.spring.io/spring-cloud-static/spring-cloud-sleuth/1.2.1.RELEASE/#_adding_to_the_project)
1、加入依賴
要將http方式改為通過MQ通訊,我們要將依賴的原來依賴的io.zipkin.java:zipkin-server換成spring-cloud-sleuth-zipkin-stream和spring-cloud-starter-stream-rabbit
		<dependency>
		    <groupId>org.springframework.cloud</groupId>
		    <artifactId>spring-cloud-sleuth-zipkin-stream</artifactId>
		</dependency>
		<dependency>
		    <groupId>org.springframework.cloud</groupId>
		    <artifactId>spring-cloud-starter-stream-rabbit</artifactId>
		</dependency>
2、在啟動類中開啟Stream通訊功能
package com.zipkinServer.ZipkinServer;

import org.springframework.boot.SpringApplication;
import org.springframework.boot.autoconfigure.SpringBootApplication;
import org.springframework.cloud.sleuth.zipkin.stream.EnableZipkinStreamServer;
import zipkin.server.EnableZipkinServer;

/*
 * @EnableZipkinServer、@EnableZipkinStreamServer兩者二選一
 * 通過原始碼可看到,@EnableZipkinStreamServer包含了@EnableZipkinServer,同時
 * 還建立了一個rabbit-mq的訊息佇列監聽器,所以也支援原來的HTTP通訊方式
 */
//@EnableZipkinServer//預設採用HTTP通訊方式啟動ZipkinServer
@EnableZipkinStreamServer//採用Stream通訊方式啟動ZipkinServer,也支援HTTP通訊方式
@SpringBootApplication
public class ZipkinServerApplication {
	public static void main(String[] args) {
		SpringApplication.run(ZipkinServerApplication.class, args);
	}
}
3、配置訊息中介軟體rabbit mq地址等資訊
#連線rabbitmq伺服器配置
spring.rabbitmq.host=localhost
spring.rabbitmq.port=5672
spring.rabbitmq.username=guest
spring.rabbitmq.password=guest
至此,ZipkinServer配置完成,下面是Zipkin客戶端的配置
1、將原來的spring-cloud-starter-zipkin替換為如下依賴即可
		<dependency>
		       <groupId>org.springframework.cloud</groupId>
		       <artifactId>spring-cloud-sleuth-zipkin-stream</artifactId>
		   </dependency>
		   <dependency>
		       <groupId>org.springframework.cloud</groupId>
		       <artifactId>spring-cloud-starter-stream-rabbit</artifactId>
		   </dependency>

		   <dependency>
		       <groupId>org.springframework.cloud</groupId>
		       <artifactId>spring-cloud-starter-sleuth</artifactId>
		   </dependency>
2、此外,在配置檔案中也加上連線MQ的配置
#連線rabbitmq伺服器配置
spring.rabbitmq.host=localhost
spring.rabbitmq.port=5672
spring.rabbitmq.username=guest
spring.rabbitmq.password=guest
至此全部配置完成,可以開始測試。
另外,由於要連線到rabbitmq伺服器,所以,還要安裝及啟動rabbitmq伺服器!
加了MQ之後,通訊過程如下圖所示:

可以看到如下效果:
1)請求的耗時時間不會出現突然耗時特長的情況
2)當ZipkinServer不可用時(比如關閉、網路不通等),追蹤資訊不會丟失,因為這些資訊會儲存在Rabbitmq伺服器上,直到Zipkin伺服器可用時,再從Rabbitmq中取出這段時間的資訊
持久化到資料庫
Zipkin目前只支援mysql資料庫,ZipkinServer服務做如下修改,其它服務不需做任何修改
1、加入資料庫依賴
		<dependency>
		    <groupId>mysql</groupId>
		    <artifactId>mysql-connector-java</artifactId>
		</dependency>
		<dependency>
		    <groupId>org.springframework.boot</groupId>
		    <artifactId>spring-boot-starter-jdbc</artifactId>
		</dependency>
2、在application.properties中配置資料庫屬性
#zipkin資料儲存到資料庫中需要進行如下配置
#表示當前程式不使用sleuth
spring.sleuth.enabled=false
#表示zipkin資料儲存方式是mysql
zipkin.storage.type=mysql
#資料庫指令碼建立地址,當有多個時可使用[x]表示集合第幾個元素,指令碼可到官網下載,需要先手動到資料庫執行
spring.datasource.schema[0]=classpath:/zipkin.sql
#spring boot資料來源配置
spring.datasource.url=jdbc:mysql://localhost:3306/zipkin?autoReconnect=true&useUnicode=true&characterEncoding=UTF-8&zeroDateTimeBehavior=convertToNull&useSSL=false
spring.datasource.username=root
spring.datasource.password=123456
spring.datasource.driver-class-name=com.mysql.jdbc.Driver
spring.datasource.initialize=true
spring.datasource.continue-on-error=true
3、zipkin.sql
資料庫指令碼檔案放到resources目錄下,且需要先手動到資料庫執行一次,內容如下:
CREATE TABLE IF NOT EXISTS zipkin_spans (
  `trace_id_high` BIGINT NOT NULL DEFAULT 0 COMMENT 'If non zero, this means the trace uses 128 bit traceIds instead of 64 bit',
  `trace_id` BIGINT NOT NULL,
  `id` BIGINT NOT NULL,
  `name` VARCHAR(255) NOT NULL,
  `parent_id` BIGINT,
  `debug` BIT(1),
  `start_ts` BIGINT COMMENT 'Span.timestamp(): epoch micros used for endTs query and to implement TTL',
  `duration` BIGINT COMMENT 'Span.duration(): micros used for minDuration and maxDuration query'
) ENGINE=InnoDB ROW_FORMAT=COMPRESSED CHARACTER SET=utf8 COLLATE utf8_general_ci;

ALTER TABLE zipkin_spans ADD UNIQUE KEY(`trace_id_high`, `trace_id`, `id`) COMMENT 'ignore insert on duplicate';
ALTER TABLE zipkin_spans ADD INDEX(`trace_id_high`, `trace_id`, `id`) COMMENT 'for joining with zipkin_annotations';
ALTER TABLE zipkin_spans ADD INDEX(`trace_id_high`, `trace_id`) COMMENT 'for getTracesByIds';
ALTER TABLE zipkin_spans ADD INDEX(`name`) COMMENT 'for getTraces and getSpanNames';
ALTER TABLE zipkin_spans ADD INDEX(`start_ts`) COMMENT 'for getTraces ordering and range';

CREATE TABLE IF NOT EXISTS zipkin_annotations (
  `trace_id_high` BIGINT NOT NULL DEFAULT 0 COMMENT 'If non zero, this means the trace uses 128 bit traceIds instead of 64 bit',
  `trace_id` BIGINT NOT NULL COMMENT 'coincides with zipkin_spans.trace_id',
  `span_id` BIGINT NOT NULL COMMENT 'coincides with zipkin_spans.id',
  `a_key` VARCHAR(255) NOT NULL COMMENT 'BinaryAnnotation.key or Annotation.value if type == -1',
  `a_value` BLOB COMMENT 'BinaryAnnotation.value(), which must be smaller than 64KB',
  `a_type` INT NOT NULL COMMENT 'BinaryAnnotation.type() or -1 if Annotation',
  `a_timestamp` BIGINT COMMENT 'Used to implement TTL; Annotation.timestamp or zipkin_spans.timestamp',
  `endpoint_ipv4` INT COMMENT 'Null when Binary/Annotation.endpoint is null',
  `endpoint_ipv6` BINARY(16) COMMENT 'Null when Binary/Annotation.endpoint is null, or no IPv6 address',
  `endpoint_port` SMALLINT COMMENT 'Null when Binary/Annotation.endpoint is null',
  `endpoint_service_name` VARCHAR(255) COMMENT 'Null when Binary/Annotation.endpoint is null'
) ENGINE=InnoDB ROW_FORMAT=COMPRESSED CHARACTER SET=utf8 COLLATE utf8_general_ci;

ALTER TABLE zipkin_annotations ADD UNIQUE KEY(`trace_id_high`, `trace_id`, `span_id`, `a_key`, `a_timestamp`) COMMENT 'Ignore insert on duplicate';
ALTER TABLE zipkin_annotations ADD INDEX(`trace_id_high`, `trace_id`, `span_id`) COMMENT 'for joining with zipkin_spans';
ALTER TABLE zipkin_annotations ADD INDEX(`trace_id_high`, `trace_id`) COMMENT 'for getTraces/ByIds';
ALTER TABLE zipkin_annotations ADD INDEX(`endpoint_service_name`) COMMENT 'for getTraces and getServiceNames';
ALTER TABLE zipkin_annotations ADD INDEX(`a_type`) COMMENT 'for getTraces';
ALTER TABLE zipkin_annotations ADD INDEX(`a_key`) COMMENT 'for getTraces';
ALTER TABLE zipkin_annotations ADD INDEX(`trace_id`, `span_id`, `a_key`) COMMENT 'for dependencies job';

CREATE TABLE IF NOT EXISTS zipkin_dependencies (
  `day` DATE NOT NULL,
  `parent` VARCHAR(255) NOT NULL,
  `child` VARCHAR(255) NOT NULL,
  `call_count` BIGINT
) ENGINE=InnoDB ROW_FORMAT=COMPRESSED CHARACTER SET=utf8 COLLATE utf8_general_ci;

ALTER TABLE zipkin_dependencies ADD UNIQUE KEY(`day`, `parent`, `child`);
至此,ZipkinServer採用資料庫儲存配置完成。
測試時發現,要用MQ非同步方式通訊的pom.xml配置及@EnableZipkinStreamServer註解才可以(@EnableZipkinServer貌似只能儲存到記憶體),否則啟動報錯,不明白為什麼。
elasticsearch儲存
前面講了利用mq的方式傳送資料,儲存在mysql,實際生產過程中呼叫資料量非常的大,mysql儲存並不是很好的選擇,這時我們可以採用elasticsearch進行儲存
配置過程也很簡單
1、mysql依賴改成elasticsearch依賴
    <!-- 新增 spring-data-elasticsearch的依賴 -->
    <dependency>
        <groupId>io.zipkin.java</groupId>
        <artifactId>zipkin-autoconfigure-storage-elasticsearch-http</artifactId>
        <version>1.24.0</version>
        <optional>true</optional>
    </dependency>
2、資料庫配置改成elasticsearch配置
#表示當前程式不使用sleuth
spring.sleuth.enabled=false
#表示zipkin資料儲存方式是elasticsearch
zipkin.storage.StorageComponent = elasticsearch
zipkin.storage.type=elasticsearch
zipkin.storage.elasticsearch.cluster=elasticsearch-zipkin-cluster
zipkin.storage.elasticsearch.hosts=127.0.0.1:9300
# zipkin.storage.elasticsearch.pipeline=
zipkin.storage.elasticsearch.max-requests=64
zipkin.storage.elasticsearch.index=zipkin
zipkin.storage.elasticsearch.index-shards=5
zipkin.storage.elasticsearch.index-replicas=1
3、安裝elasticsearch
其它程式碼完全不變
具體見:
參考資料:
相關推薦
spring-cloud-sleuth+zipkin追蹤服務
本文簡單介紹瞭如何利用Zipkin對SpringCloud應用進行服務分析在實際的應用場景中,Zipkin可以結合壓力測試工具一起使用,分析系統在大壓力下的可用性和效能。設想這麼一種情況,如果你的微服務數量逐漸增大,服務間的依賴關係越來越複雜,怎麼分析它們之間的呼叫關係及相互
spring-cloud-sleuth+zipkin追蹤服務實現(二)
1. 簡述 在上一節《spring-cloud-sleuth+zipkin追蹤服務實現(一)》中,我們使用microservice-zipkin-server、microservice-zipkin-client、microservice-zipkin-client-backend 三個程式實現了使用http
spring-cloud-sleuth+zipkin追蹤服務實現(四)
1.前言 在上一篇spring-cloud-sleuth+zipkin追蹤服務實現(三)的處理實現後,很多朋友告訴我,在zipkin server的管理頁面無法看到專案依賴關係。 當時也沒有多想,以為是spring cloud zipkin的一個bug,後來發現是自己看文件的疏忽。 文中寫到對於Cassan
spring-cloud-sleuth+zipkin追蹤服務實現(三)
1.前言 在上一篇spring-cloud-sleuth+zipkin追蹤服務實現(二)中我們講述了利用mq的方式傳送資料,儲存在mysql,實際生產過程中呼叫資料量非常的大,mysql儲存並不是很好的選擇,這時我們可以採用elasticsearch進行儲存。 我們還是使用之前上一節中的三個程式做修改,方便大
spring-cloud-sleuth+zipkin追蹤服務實現(一)
1.簡述 最近在學習spring cloud構建微服務,研究追蹤微服務rest服務呼叫鏈路的問題,接觸到zipkin,而spring cloud也提供了spring-cloud-sleuth來方便整合zipkin實現。 我們準備了三個必要的程式來做測試,分別是 1、microservice-zipkin-se
Spring Cloud Sleuth + zipkin 實現服務追蹤
工作 process image -o 唯一id dep 單元 圖片 zipkin 服務追蹤 Spring Cloud Sleuth實現了一種分布式的服務鏈路跟蹤解決方案,通過使用Sleuth可以讓我們快速定位某個服務的問題。 官方文檔地址如下: http://cloud
全鏈路追蹤spring-cloud-sleuth-zipkin
authorize 采樣 quest child 手機號 main rgs lin oot 微服務架構下 多個服務之間相互調用,在解決問題的時候,請求鏈路的追蹤是十分有必要的,鑒於項目中采用的spring cloud架構,所以為了方便使用,便於接入等 項目中采用了sprin
全鏈路spring cloud sleuth+zipkin
arc owa version public kafka 分享 cli self 兩個 http://blog.csdn.net/qq_15138455/article/details/72956232 版權聲明:@入江之鯨 一、About ZipKi
Spring Cloud 應用篇 之 Spring Cloud Sleuth + Zipkin(三)修改資料儲存方式
(一)簡介預設情況下,Zipkin Server 會將跟蹤資訊儲存在記憶體中,每次重啟 Zipkin Server 都會使之前收集的跟蹤資訊丟失,並且當有大量跟蹤資訊時,記憶體儲存也會造成效能瓶頸,所以通常我們都需要將跟蹤資訊儲存到外部元件中,如 Mysql。由於 Sprin
spring-cloud-sleuth+zipkin原始碼探究
1.1. 前言 粗略看了下spring cloud sleuth core原始碼,發現內容真的有點多,它支援了很多型別的鏈
Spring Cloud Alibaba學習筆記(23) - 呼叫鏈監控工具Spring Cloud Sleuth + Zipkin
隨著業務發展,系統拆分導致系統呼叫鏈路愈發複雜一個前端請求可能最終需要呼叫很多次後端服務才能完成,當整個請求陷入效能瓶頸或不可用時,我們是無法得知該請求是由某個或某些後端服務引起的,這時就需要解決如何快讀定位服務故障點,以對症下藥。於是就有了分散式系統呼叫跟蹤的誕生。 Spring Cloud Sleuth
springcloud服務追蹤Zipkin和spring cloud Sleuth
參考文章一: 摘要: 本文簡單介紹瞭如何利用Zipkin對SpringCloud應用進行服務分析。在實際的應用場景中,Zipkin可以結合壓力測試工具一起使用,分析系統在大壓力下的可用性和效能。 設想這麼一種情況,如果你的微服務數量逐漸增大,服務間的依賴關係越來越複雜,怎麼分析它們
Spring Cloud(九)Sleuth+ZipKin 實現服務追蹤
注:本文Spring Cloud 版本 Finchley.SR1 為什麼需要服務追蹤 微服務架構是一個分散式架構,它按業務劃分服務單元,一個分散式系統往往有很多個服務單元。由於服務單元數量眾多,業務的複雜性,如果出現了錯誤和異常,很難去定位。主要體現在,一個請求
Spring Cloud(十)Sleuth+ZipKin 實現服務追蹤(續)
注:本文Spring Cloud 版本 Finchley.SR1 本節是對上一篇的延續,沒有檢視上一篇的請先檢視 Spring Cloud(九)Sleuth+ZipKin 實現服務追蹤 相信細心的網友也發現了,以上的配置方式使用的是 http 傳送鏈路資料,並且
spring cloud 入門系列八:使用spring cloud sleuth整合zipkin進行服務鏈路追蹤
好久沒有寫部落格了,主要是最近有些忙,今天忙裡偷閒來一篇。 =======我是華麗的分割線========== 微服務架構是一種分散式架構,微服務系統按照業務劃分服務單元,一個微服務往往會有很多個服務單元,一個請求往往會有很多個單元參與,一旦請求出現異常,想要去定位問題點真心不容易,因此需要有個東西去跟蹤
Spring Cloud應用進行服務追蹤分析(Zipkin和spring cloud Sleuth)
參考文章二:(我參考的這個) 最近在學習spring cloud構建微服務,很多大牛都提供很多入門的例子幫助我們學習,對於我們這種英語不好的碼農來說,效率著實提高不少。這兩天學習到追蹤微服務rest服務呼叫鏈路的問題,接觸到zipkin,而spring cloud也提供了spring-cloud-sleu
業余草 SpringCloud教程 | 第九篇: 服務鏈路追蹤(Spring Cloud Sleuth)(Finchley版本)
描述 -s util ont packaging tdd res [] 新建 這篇文章主要講述服務追蹤組件zipkin,Spring Cloud Sleuth集成了zipkin組件。 一、簡介 Add sleuth to the classpath of a Spr
SpringCloud2.0版本入門 | 服務鏈路追蹤(Spring Cloud Sleuth)簡單入門
本文出自 [ 慌途L ] 最近開始寫部落格,一些問題可能瞭解也不夠透徹,寫一下快速入門並且踩過的坑,希望大家少踩坑。本文簡單介紹一下springcloud的服務鏈路追蹤,不足之處希望大家指出,我改正。不喜勿噴! 這篇文章主要講述服務追蹤元件zipkin,Spr
Spring Cloud Sleuth服務鏈路追蹤(mysql儲存鏈路資料)(Finchley版本)
在Spring Cloud Sleuth服務鏈路追蹤(Finchley版本)中,我們使用Spring Cloud Sleuth和zipkin的整合實現了服務鏈路的追蹤,但是遺憾的是鏈路資料儲存在記憶體中,無法持久化。zipkin的持久化可以結合Elasticsearch,MySQL實現。本節
SpringCloud微服務雲架構構建B2B2C電子商務平臺之-(九)服務鏈路追蹤(Spring Cloud Sleuth)
這篇文章主要講述服務追蹤元件zipkin,Spring Cloud Sleuth集成了zipkin元件。 一、簡介Add sleuth to the classpath of a Spring Boot application (see below for Maven and Gradle examples