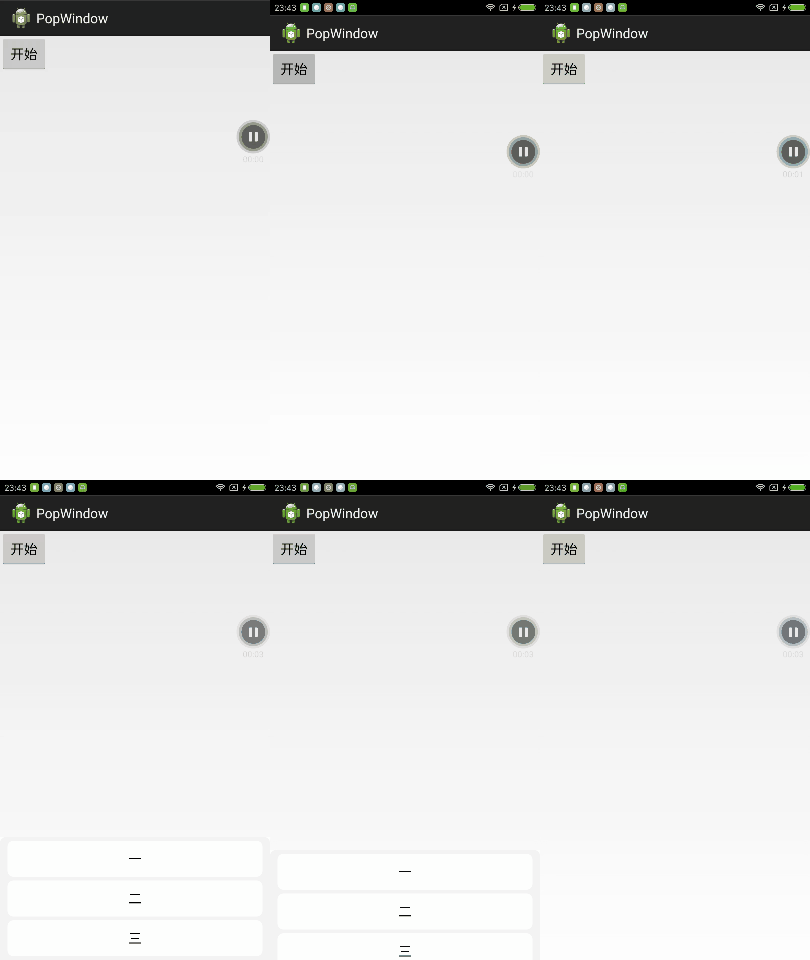
Android簡單PopWindow的實現方法。
直接上程式碼。
首先是佈局:
activity_main.xml中:
<RelativeLayout xmlns:android="http://schemas.android.com/apk/res/android"
xmlns:tools="http://schemas.android.com/tools"
android:layout_width="match_parent"
android:layout_height="match_parent"
>
<Button
android:id="@+id/start"
android:layout_width 然後popwindowlayout.xml中程式碼:
<?xml version="1.0" encoding="utf-8"?>
<LinearLayout xmlns:android="http://schemas.android.com/apk/res/android"
android:layout_width="match_parent" 然後,兩個動畫:
popshow_anim.xml
<set xmlns:android="http://schemas.android.com/apk/res/android">
     <translate
        android:duration="1000"
        android:fromYDelta="100%p"
        android:toYDelta="0" />

    <alpha
        android:duration="1000"
        android:fromAlpha="0.0"
        android:toAlpha="1.0" />
</set>
pophidden_anim.xml:
<set xmlns:android="http://schemas.android.com/apk/res/android">

     <translate
        android:duration="1000"
        android:fromYDelta="0"
        android:toYDelta="50%p" />

    <alpha
        android:duration="1000"
        android:fromAlpha="1.0"
        android:toAlpha="0.0" />
</set>
再次。兩個shape檔案:
btn_shape.xml
<shape xmlns:android="http://schemas.android.com/apk/res/android">
    <corners android:topLeftRadius="8dp"
                    android:topRightRadius="8dp"
                android:bottomRightRadius="8dp"
                android:bottomLeftRadius="8dp"/>
</shape>
layout_shape.xml:
<shape xmlns:android="http://schemas.android.com/apk/res/android">
    <solid android:color="#f4f4f4" />
    <corners android:topLeftRadius="8dp"
                    android:topRightRadius="8dp"
                />
</shape>
最後,MainActivity程式碼:
public class MainActivity extends Activity {

    @Override
    protected void onCreate(Bundle savedInstanceState) {
        super.onCreate(savedInstanceState);
        setContentView(R.layout.activity_main);
        Button start = (Button) findViewById(R.id.start);
        start.setOnClickListener(new OnClickListener() {

            @Override
            public void onClick(View v) {
                showPopwindow();
            }

        });

    }
    private void showPopwindow() {
        LayoutInflater inflater = (LayoutInflater) getSystemService(Context.LAYOUT_INFLATER_SERVICE);
        View view = inflater.inflate(R.layout.popwindowlayout, null);
        PopupWindow window = new PopupWindow(view,
                WindowManager.LayoutParams.MATCH_PARENT,
                WindowManager.LayoutParams.WRAP_CONTENT);
        window.setFocusable(true);

        ColorDrawable dw = new ColorDrawable(0xffffffff);
        window.setBackgroundDrawable(dw);

        window.setAnimationStyle(R.style.PopupAnimation);
        window.showAtLocation(MainActivity.this.findViewById(R.id.start),
                Gravity.BOTTOM, 0, 0);
        Button first = (Button) view.findViewById(R.id.first);
        first.setOnClickListener(new OnClickListener() {

            @Override
            public void onClick(View v) {


            }
        });

        window.setOnDismissListener(new OnDismissListener() {

            @Override
            public void onDismiss() {

            }
        });

    }
}
當然,還需要在style.xml檔案中定義動畫樣式。
<style name="PopupAnimation">
        <item name="android:windowEnterAnimation">@anim/popshow_anim</item>
        <item name="android:windowExitAnimation">@anim/pophidden_anim</item>
    </style>
完。效果如下
相關推薦
Android簡單PopWindow的實現方法。
直接上程式碼。 首先是佈局: activity_main.xml中: <RelativeLayout xmlns:android="http://schemas.android.com/apk/res/android" xmlns:too
Android中Button的onClick實現方法。
Android中Button的onClick實現方法大概是這樣的吧! 剛剛是看到有程式碼將一個介面傳給了一個函式(是一個建構函式,沒考證是不是也可以傳給一個普通函式),之後我不懂為什麼,就百度了一下。 發現了這樣一個文章:http://blog.csdn.net/suns
Android ListView動畫實現方法
rri pan 自己 data- src def popu 動畫 onclick 在Android中listview是最經常使用的控件之中的一個,可是有時候我們會認為千篇一律的listview看起來過於單調,於是就產生了listView動畫,listview載入了動畫會
android 軟件實現架構。
nag 抽象 layout 側滑菜單 ogr 教程 page 初步 ID (待續)粗略整理了一下楊廣福的視頻教程,將軟件架構整理如下。 1. 首先引入側滑菜單,和主內容頁面。 側滑菜單在軟件的第一個onCreate裏實現註冊。並且設置好參數,比如側滑方式和滑動的像素數。
js h5頁面調起App(IOS 和android)的實現方法
js h5頁面調起App(IOS 和android)的實現方法 第一次寫這個:我們的app是由原聲和h5組成的,當用戶使用瀏覽器開啟我們的頁面時我們會引導使用者使:開啟App 下載App 剛開始我是使用定時器來實現的,當用戶點選了開啟App經過一定時間之後沒有反應,則我們認為她調起App
js簡單購物車實現方法
這個是之前寫的專案HTML css 和js 寫的 點選結算後 HTML程式碼 <div class="shenti8"> <span style="color: #000000; font-size: 15px;">您以選購以下商品
C# interface 類簡單案例實現方法
今天沒什麼事,突然想起來java 的interface介面類 。在C# 我寫程式的時候很少用,今天突然想起來研究了一下! 邏輯方法幾乎一樣的 ,簡單的一個三成架構 可能以後還會忘記先留一個筆記吧! 軟體:vs2008 動軟程式碼生成器自動資料sql 架構 窗體載入
【微信授權】極其簡單的實現方法
強烈推薦使用一個工具包,在maven的中心倉庫中搜索"weixin-java"就可以搜尋到,感謝這位大佬的作品,大大簡化了微信端開發的難度。 接下來是一個簡單例子,是我在我的實際專案中抽取出來的一部分,專案使用的是springboot框架,但是無論使用什麼框架微信授權的步驟
如何將linq查詢的結果 轉換為DataTable,最簡單的實現方法
public static DataTable CopyToDataTable<T>(this IEnumerable<T> array) { var ret = new DataTable(); foreach (PropertyDescrip
Android 利用popwindow實現類似下拉框效果
1.實現思路。 利用popwindow的showAsDropDown方法,結合自定義background樣式。 2.java程式碼 PopupWindow searchConditionPopwind
C語言四捨五入的實現方法。
今天在oj上看到了一道看起來很簡單的題目,結果四捨五入竟然找不到很好的演算法實現,百度了一下發現...這麼簡單!!!所以還是要繼續努力啊,加油! 以下是oj上的題目 Description 在我們的
android 搜尋框實現方法,還在手寫搜尋框?out了!附加Toast及時改變內容
效果圖: 教程:: 如圖,之前用到搜尋框都是自己寫,裡面的EditText還得設定內容改變監聽來實現實時搜尋,偶然間發現V7包中存在有搜尋控制元件 <android.support.v7.widget.SearchView android
java呼叫webservice,比較簡單方便的方法。
首先,請同學們自行了解webservice的基礎知識。 個人理解,webservice約等於使用http+xml技術進行跨平臺的資料互動。 http和xml我們都很熟悉了,把他們兩個組合到一起就是webservice了,http負責資訊傳輸,xm
Android平臺Camera實時濾鏡實現方法探討(十)--代碼地址以及簡單介紹(20160118更新)
div iss 將在 spa 方法 target 用途 net dsm 簡單做了個相機和圖片編輯模塊,時間原因非常多功能還沒有做。尚有BUG,見諒,將在以後抽時間改動 代碼地址 PS:請點個Star^-^ -----------------------
【JAVA】java中實現map集合的資料存取詳解三種方法。Android程式設計師也是要會寫的
長期維護的Android專案,裡面包括常用功能實現,以及知識點詳解, 當然還有java中的知識點。具體請看github: https://github.com/QQ986945193/DavidAndroidProjectTools 好了,說正題
Android簡單塗鴉以及撤銷、重做的實現方法
前段時間研究了下塗鴉功能的實現,其實單獨的塗鴉實現起來還是挺簡單的,關鍵的技術難點是撤銷與重做功能的實現。但是這裡暫時只說明下塗鴉功能的實現,高手勿噴哈,而且該功能在Android SDK提供的APIDemo當中就有的,但是如果能夠將該地方的知識點搞懂的話,我認為View
PHP 實現簡單的樹形列表。
開發 記錄 動態 數據庫設計 在線 最近在為公司開發一個在線瀏覽PDF文檔的小web系統。在構建動態列表的時候犯了愁,很久沒寫代碼了,手有些生了,搞了半天才搞出來,寫篇博文記錄一下。首先是數據庫設計我設計的一個列數為三列的表Treenodes,這三列分別用來存儲當前節點的id、節點名稱、父
android縮放動畫的兩種實現方法
get odi omx rac tor Coding eight rpo odin 在android開發。我們會常常使用到縮放動畫,普通情況下縮放動畫有兩種實現方式。一種是直接通過java代碼去實現,第二種是通過配置文件實現動畫,以下是兩種動畫的基本是用法: Ja
Android簡單實現將手機圖片上傳到server中
sdk etc mov 創建 ast bmi 以及 lena ews 在本例中。將會簡單的實現安卓手機將圖片上傳到server中。本例使用到了 server端:PHP+APACHE 客戶端:JAVA 先簡單實現一下server端的上傳並測試上傳
Android平臺Camera實時濾鏡實現方法探討(十一)--實時美顏濾鏡
.net 兩個 其它 強人 突出 pad eight 地址 模式 上一章完畢了對圖片的磨皮處理。經過簡單算法流程優化,能夠達到非常快的速度。可是不能用於實時美顏。經實驗,若採用僅僅處理Y信號的方案。半徑極限大約是5-10,超過10則明顯感受到卡頓。但對於1920X1

