
Securing React Redux Apps With JWT Tokens
Securing React Redux Apps With JWT Tokens
JSON Web Token (JWT) is a way to generate auth tokens.It’s is an open standard (RFC 7519) that defines a simple way for securely transmitting information between client and server as a JSON object.
JWT Tokens V/S Cookies
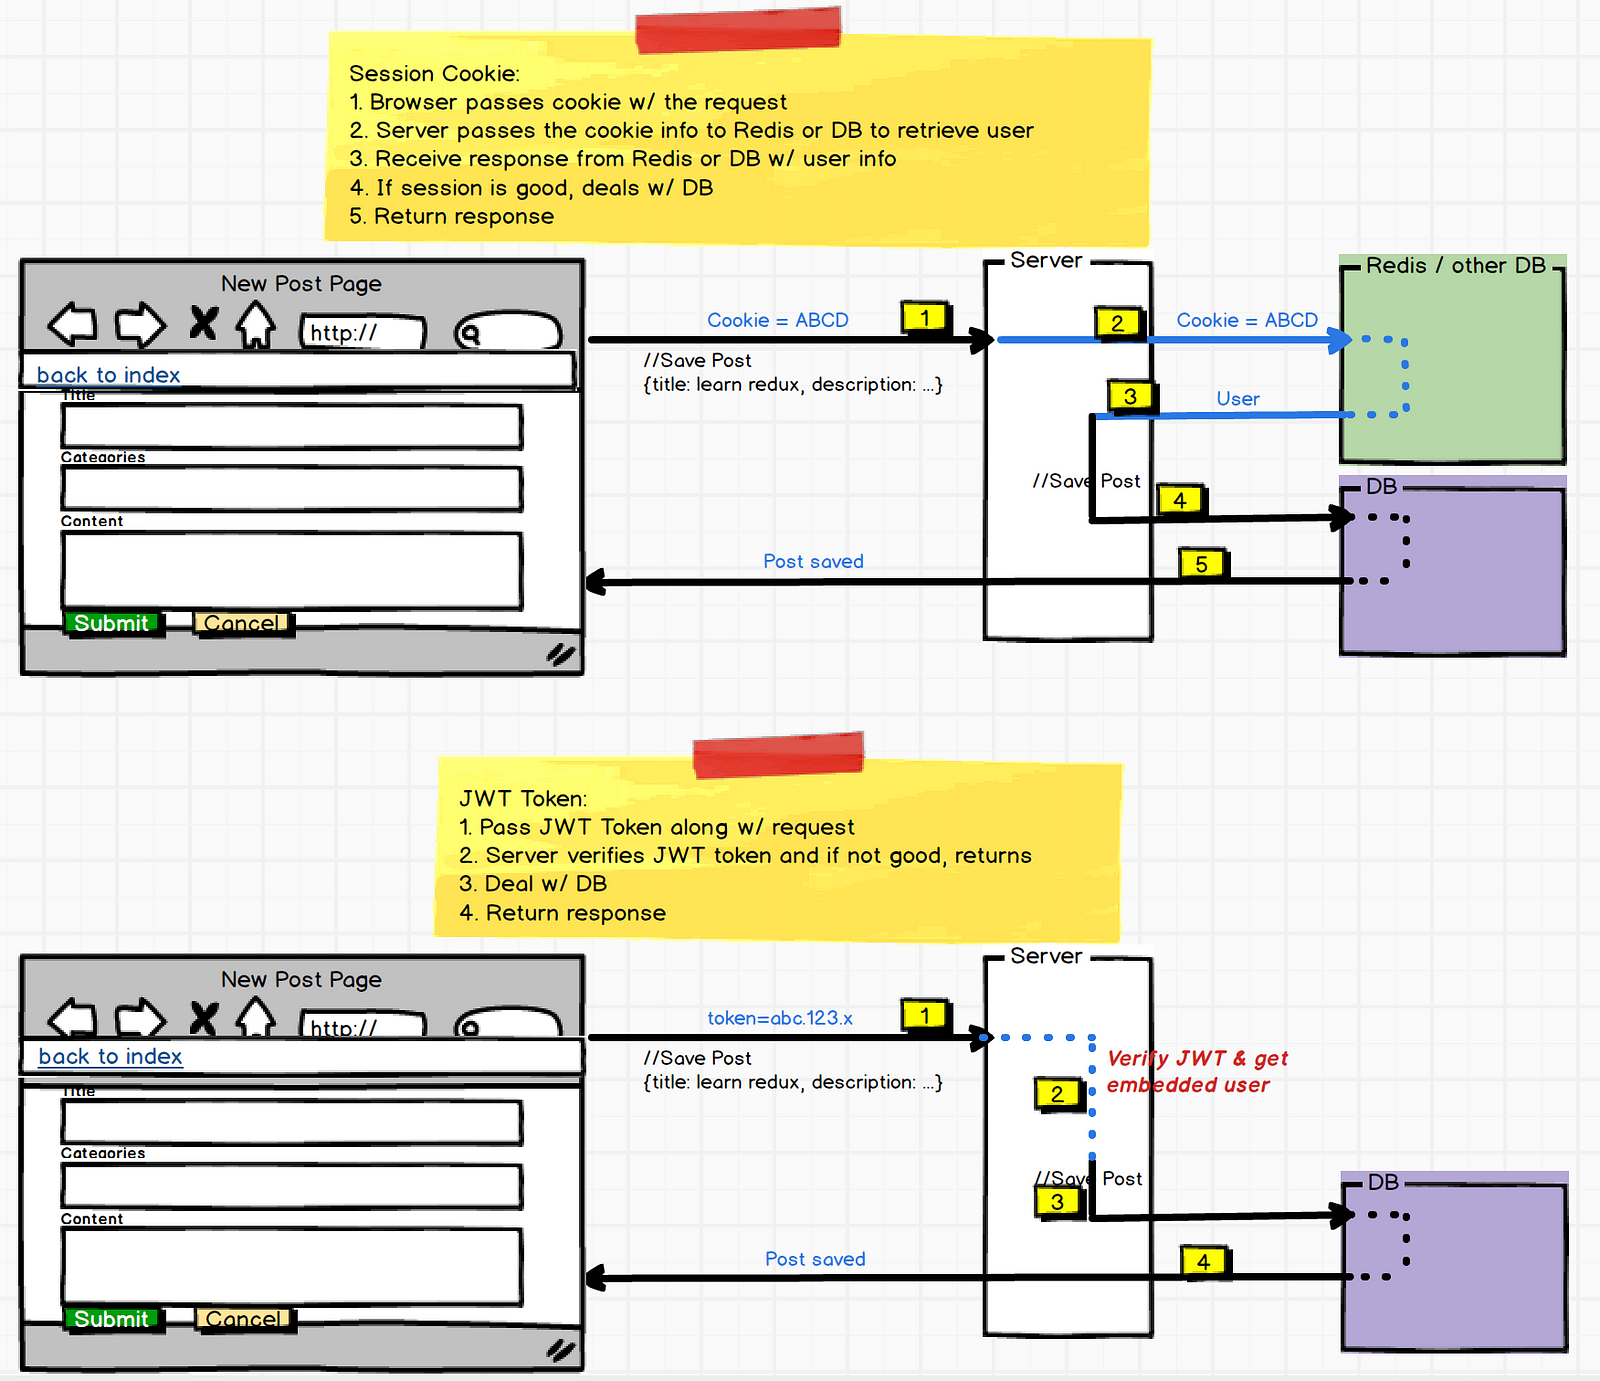
Since HTTP is a stateless protocol, after you login (via username/password, OAuth 2 etc), for every future request to the server, you need to keep telling the server that you have already logged in so it can allow you to perform authenticated/authorized actions. One way to do this is via “session” cookies and other way is to use “auth” tokens.
JWT offers many benefits over using session cookies but the 2 major ones are:
- Server doesn’t need to ask DB to know who the user is because the user info is embedded inside the token itself! #performance!
- It works the same for both native mobile apps and browser clients. i.e. servers don’t need to implement two different mechanisms (browser v/s native).
Note: You can click on the picture to zoom and read

Note: I’ll be using the same blog-post Redux app in here as well.
What Does A JWT Token look like?
The token has 3 parts: <header>.<payload>.<signature>
- Header: A JSON(Base64 encoded) that has info about algorithm used(like HS256, RSA) and so on.
- Payload: A JSON(Base64 encoded) that has info about the user.
- Signature: A String that was generated using #1 + #2 + “a secret” (that only the server knows), using the algorithm mentioned in #1.
Below is the picture fromhttps://jwt.iothat shows the JWT token used in our blog appin both encoded and decoded manners.

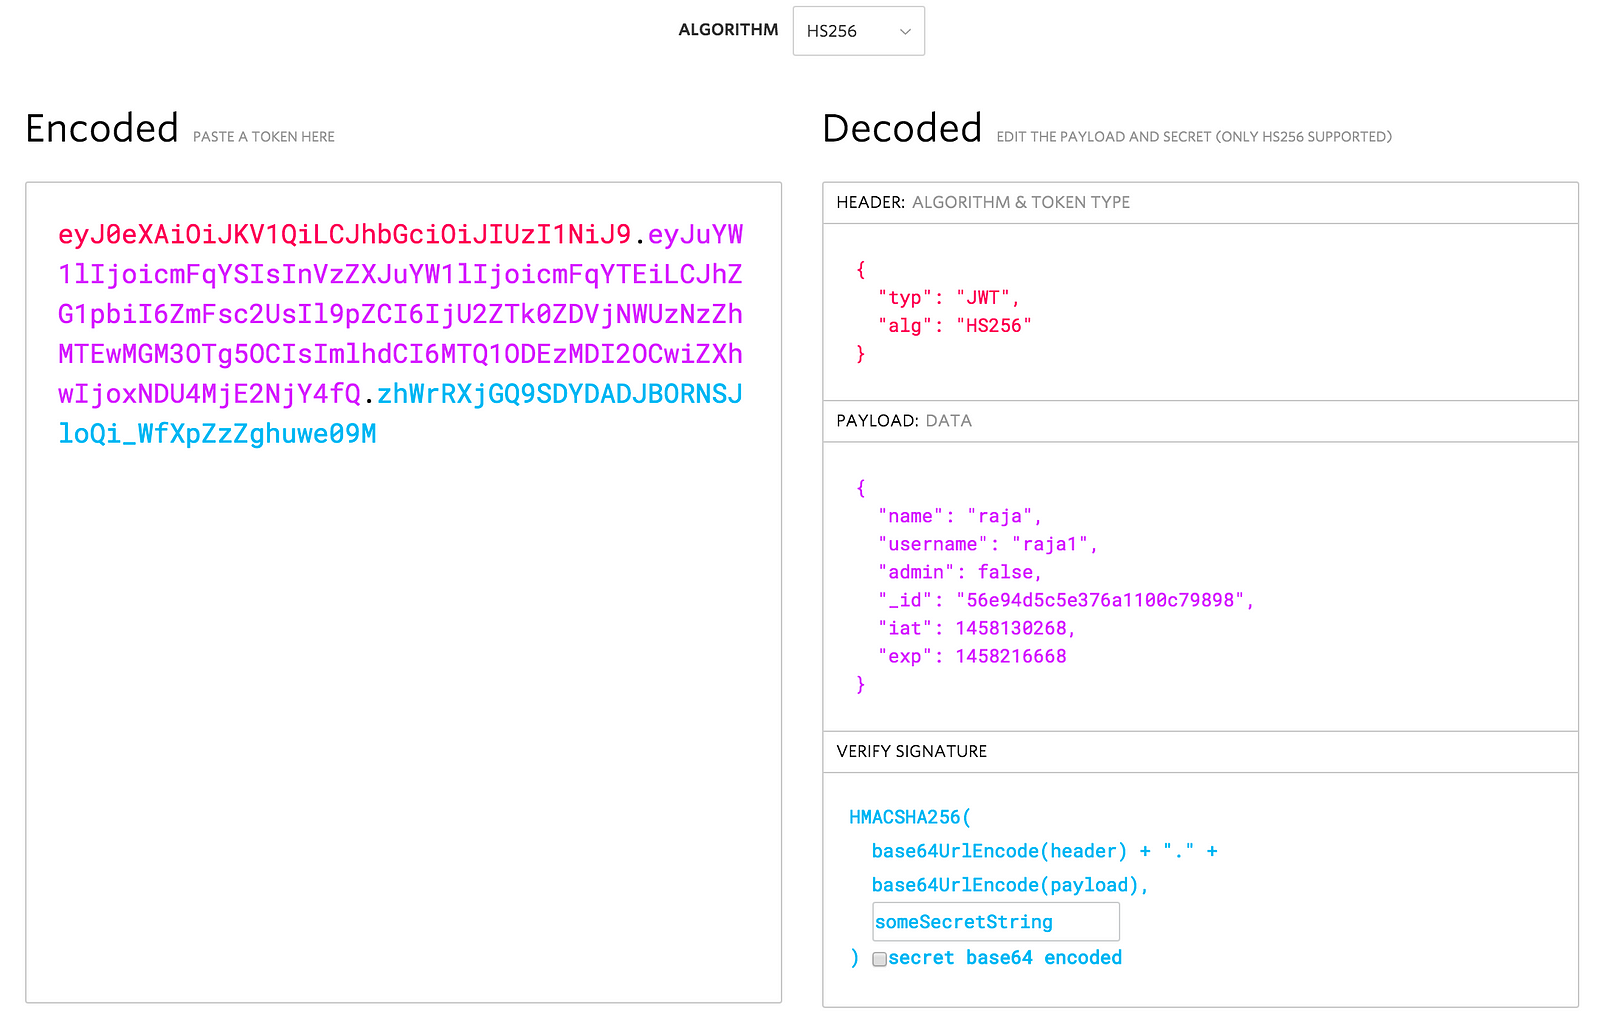
As you can imagine, if the signature is valid and can be verified using the secret, we can simply decode the payload and get the user info w/o going to DB!
JWT Payload
Payload is just a JSON should contain anything that your app needs to identify user.
Typically this is:
- User Id, Username, Email, Image URL
- Any ACL like: isAdmin, isManager etc.
Note: JWT provides formal JSON keys like sub(subject = user), scope(string or array)that you can use to pass data as well (optional).
In the blog app, after the user logs in and tries to create a new post, we want to store authorId, authorName, authorUsername and authorImage along w/ Post’s own details and that’s why I’m using those fields in the payload. And when the user tries to create the post, we can verify the token and get access to all of those fields related to the user w/o going to the DB.
Implementing JWT Token In The Server
Irrespective of how the user signed up or logged in (via email, OAuth 2), all we need to do is:
- Generate JWT token and return it to the client
- Verify JWT token for protected routes in future requests
1. Generate JWT Token And Return It
Look at all the routes that users get authenticated. In our app user is authenticated when:
- User Signs Up (using email or Social network)
- User Signs In (after Sign up)
- Tries to Re-Authenticate using existing token (Browser Refresh)
1.1 Token Generator Function
Token is generated using useful fields from user model and secret (JWT_SECRET environment variable)
//Generate Token using secret from process.env.JWT_SECRET
var jwt = require(‘jsonwebtoken’);
function generateToken(user) {
  //1. Dont use password and other sensitive fields
  //2. Use fields that are useful in other parts of the
  //app/collections/models
  var u = {
   name: user.name,
   username: user.username,
   admin: user.admin,
   _id: user._id.toString(),
   image: user.image
  };
return token = jwt.sign(u, process.env.JWT_SECRET, {
expiresIn: 60 * 60 * 24 // expires in 24 hours
});
}1.2 Generate JWT Token: Signup Route
router.post(‘/users/signup’, function(req, res, next) {
 var body = req.body;
var hash = bcrypt.hashSync(body.password.trim(), 10);
var user = new User({
name: body.name.trim(),
username: body.username.trim(),
email: body.email.trim(),
password: hash,
admin: false,
isEmailVerified: false
});
 user.save(function(err, user) { <-- Save User
    if (err) throw err;
var token = utils.generateToken(user); <----- Generate Token
res.json({
user: user, <----- Return both user and token
token: token
});
});
});
1.3 Generate JWT Token: SignIn Route
router.post(‘/users/signin’, function(req, res) {
  User
  .findOne({username: req.body.username})    <-- Check username
  .exec(function(err, user) {
        if (err) throw err;
if (!user) {
return res.status(404).json({
error: true,
message: ‘Username or Password is Wrong’
});
}bcrypt.compare(req.body.password, user.password, <-- check pwd
function(err, valid) {
if (!valid) {
return res.status(404).json({
error: true,
message: ‘Username or Password is Wrong’
});
}
var token = utils.generateToken(user); <-- Generate token
user = utils.getCleanUser(user);
        res.json({
           user: user,    <--- Return both user and token
           token: token
         });
       });
   });
});
1.4 Generate JWT Token: Re-Authenticate Route
This route is called when the user refreshes the browser to re-authenticate the user. The assumption here is that the app has stored the token in localstorage or sessionStorage.
How it works:
- When the browser is refreshed, the app checks if there is a token, if so, it asks the server to verify the token and send the user info back (as though the user just signed in)
2. The server receives the token, decodes it using secret (JWT_SECRET environment variable), if it’s valid,
//get current user from token
router.get(‘/me/from/token’, function(req, res, next) {
  // check header or url parameters or post parameters for token
  var token = req.body.token || req.query.token;
  if (!token) {
   return res.status(401).json({message: ‘Must pass token’});
  }
// Check token that was passed by decoding token using secret
 jwt.verify(token, process.env.JWT_SECRET, function(err, user) {
    if (err) throw err;
   //return user using the id from w/in JWTToken
    User.findById({
    ‘_id’: user._id
    }, function(err, user) {
       if (err) throw err;
user = utils.getCleanUser(user);
         //Note: you can renew token by creating new token(i.e.
         //refresh it)w/ new expiration time at this point, but I’m
         //passing the old token back.
         // var token = utils.generateToken(user);
        res.json({
            user: user, <--- return both user and token
            token: token
        });
});
});
});
2. Verify JWT Token For Protected Routes
In the blog app, we are protecting creating posts and deleting posts from non authenticated user.
Easiest way to verify token is to do what we did in the re-authenticate route. But we need a middleware function to protect various routes. All we do is to check if the request has “Authorization” header. If it does, and if we can successfully decode it using our JWT_SECRET stored in the server, then we store the user into the req.user so that other routes /posts can use it.
Front End: Storing And Using JWT In React Redux App
We need to implement:
- Sign In page
- Sign Up page
- Logout
- Browser Refresh
Implementing Sign Up and Sign In pages are similar to building any other pages. To keep this blog short, I suggest you go though:
One new thing that’s different from regular CRUD app is implementing browser refresh.
Storing JWT Token
We need to store this token somewhere. We can store it as a client-side cookie or in a localStorage or sessionStorage. There are pros and cons in each option but for this app, we’ll store it in sessionStorage.
In our blog app, both SignUpFormContainer component and SignInFormContainer component contains code to store jwtToken in sessionStorage
dispatch(signUpUser(values))
 .then((response) => {
 let data = response.payload.data;
 //if any one of these exist, then there is a field error
 if(response.payload.status != 200) {
   //let other components know
   dispatch(signUpUserFailure(response.payload));
   reject(data); //this is for redux-form itself
 } else {
   //store JWT Token to browser session storage
   //If you use localStorage instead of sessionStorage, then this w/
   //persisted across tabs and new windows.
   //sessionStorage = persisted only in current tab

  sessionStorage.setItem(‘jwtToken’, response.payload.data.token);

  //let other components know that we got user and things are fine
  dispatch(signUpUserSuccess(response.payload));
  resolve();//this is for redux-form itself
 }
});
Browser Refresh — JWT ReAuthentication
The AppContainer component (parent component to all pages) implements the browser refresh code.
When the browser is refreshed,
- "loadUserFromToken” is called.
- If there is no token, nothing happens
- If there is token, we call “meFromToken” action to ask server if the token is valid.
- If the token is valid, we store it back as jwtToken in sessionStorage.
- And let other components know by dispatching meFromTokenSuccess, this helps other components that depends on if the user is loggedIn vs not-loggedIn to display themselves properly.
const mapDispatchToProps = (dispatch) => {
 return {
  loadUserFromToken: () => {
   let token = sessionStorage.getItem(‘jwtToken’);
   if(!token || token === ‘’) {//if there is no token, dont bother
    return;
   }
//fetch user from token (if server deems it’s valid token)
dispatch(meFromToken(token))
.then((response) => {
if (!response.error) {
//store token
sessionStorage.setItem(‘jwtToken’, response.payload.data.token);
dispatch(meFromTokenSuccess(response.payload))
} else {
//remove token from storage
sessionStorage.removeItem(‘jwtToken’);
dispatch(meFromTokenFailure(response.payload));
}
});
},
resetMe: () =>{ // logout
sessionStorage.removeItem(‘jwtToken’); //remove token from storage
dispatch(resetToken());
}
}
}
That’s it!