Handling Transactional Emails In React Redux Apps
Handling Transactional Emails In React Redux Apps
Transactional Emails are emails sent by apps when the user does something in the app, or, sent when the app wants to let the user know about something important. For example: Emails such as “Verify Registered Email”, “Item Shipped”, “Password Expired” and so on.
Handling Transactional Emails can be tricky as it involves a 3rd party app(Email) and us having a 2nd page(e.g. “validateEmail” page)that’s the starting point (in addition to the regular “Index” page).
Let’s see how to implement it.
Please Note: I’ll be using the same blog-post app that I’ve been using in my previous posts but add new features.
Scenario: User has signed up to our app with an email and we need to verify that email.
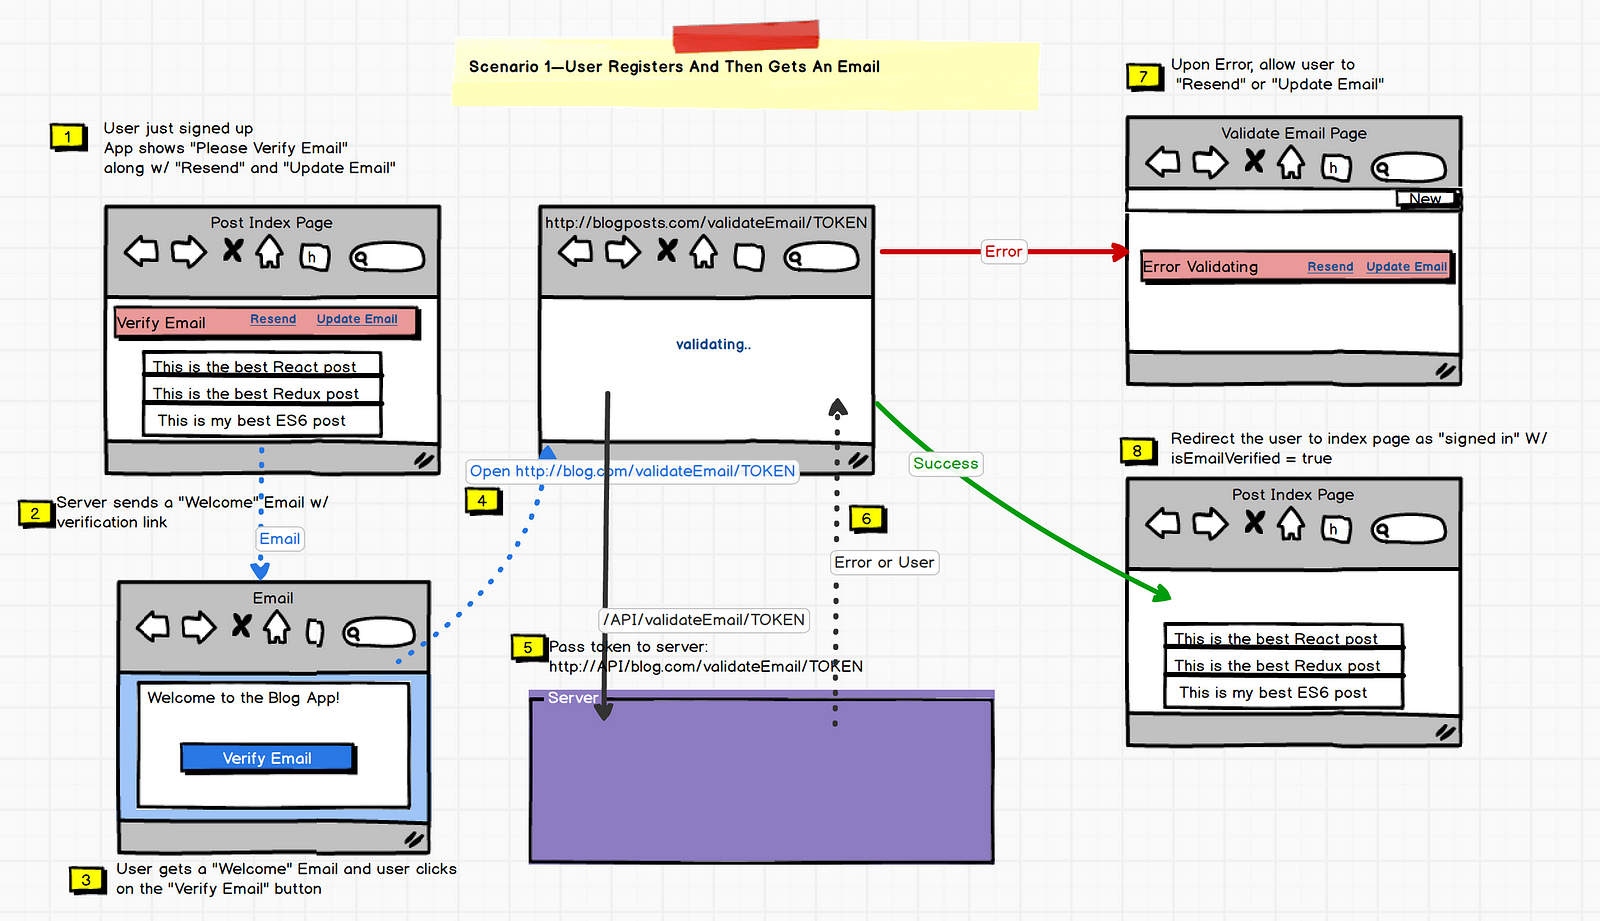
Scenario 1 — User Registers And Then Gets An Email:
You can click on the picture to zoom and read


- User Registers
- Server sends a “welcome” email from the server w/ an url that has some token (like: http://myapp.com/verifyToken/?token=abcd)
- User clicks on the link in the email.
- That link takes the user to a specific route /verifyEmail/:token (front-end Redux route)
- App(client) in turn passes the token(abcd) to a specific route in the server (/api/verifyEmail/:token).
- If the token is valid, then the server returns the user and JWTToken (see previous post), which is equivalent to “signing in”.
- If the token is NOT valid, then the server returns an error, and the Redux App shows the Error.
- If the token is valid, The Redux App need to redirect to “index” page as if the user has signed in.
Note: As some people have asked, “Why not directly validate the token on the server instead of going through a React page in the middle?” i.e. Go from Step 3(User clicks on the link) to validate on the server to Step 6/7(login or show error).
The reason is: we want to keep the server an “API”-only server. This becomes important when we want to build a native-iOS or android app against the same server where we can’t redirect or re-render on the server.
Scenario 2 — Resend Email
- User Registers
- User doesn’t get the email for some reason, have a link to “Resend” Welcome Email.
- Server resends the Email again
- Redux App shows “Email was Resent, Please verify”
- Continues from: Scenario #1, Step 3
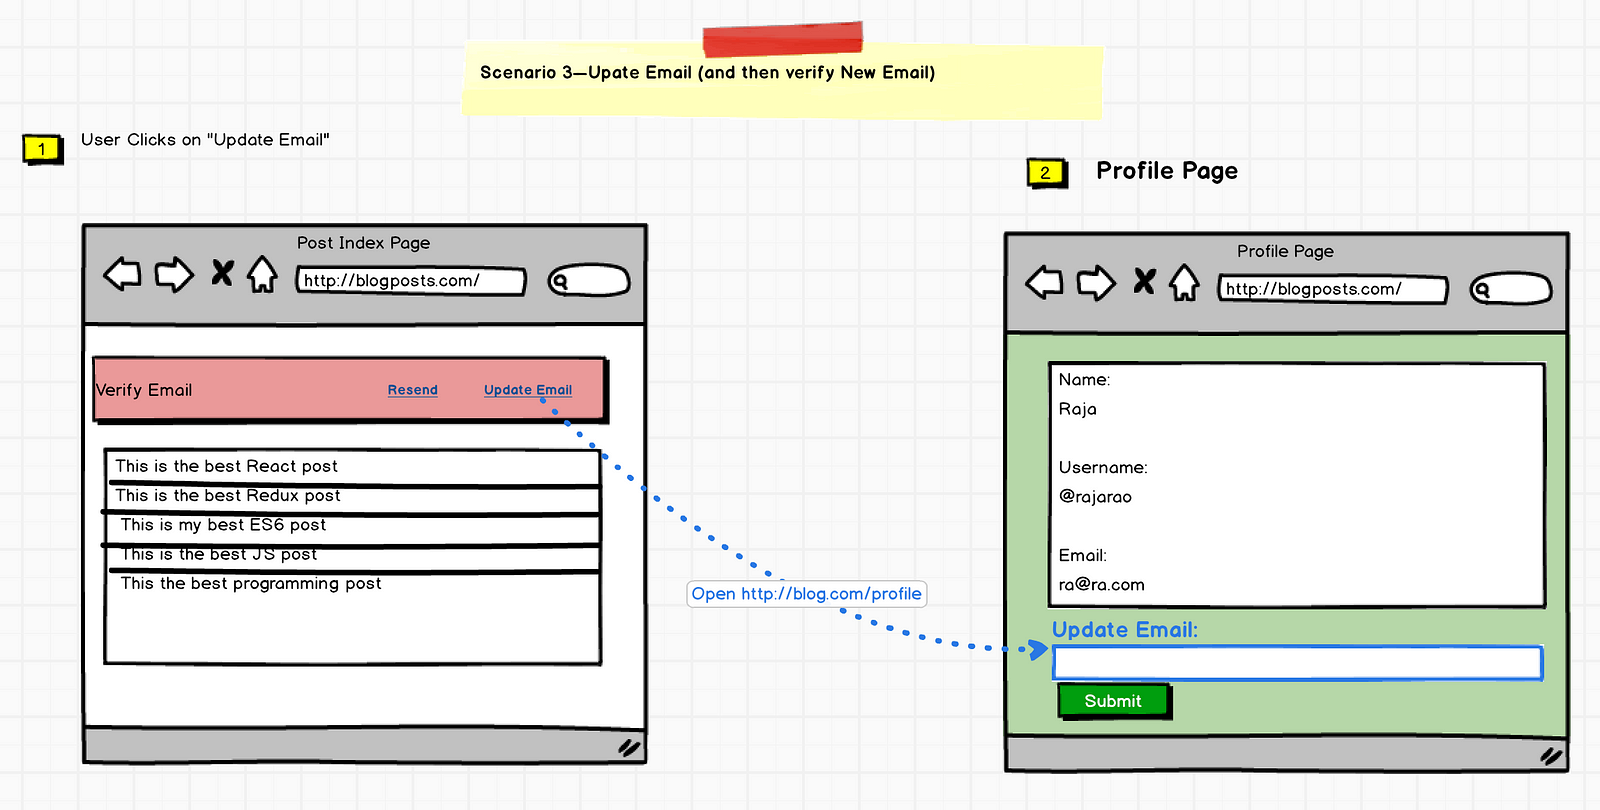
Scenario 3 — Update Email


- User Registers (but has entered wrong email)
- User Clicks on “Update Email” link
- User is taken to a route(in our case “Profile”) where the user can update email.
- User updates Email
- Continues from: Scenario #1, Step 2
So, where do you start?
Handling Transactions emails needs us to implement two things:
- An Alert Component that shows up when the user has not validated the email and display error messages. In our case it’s: ValidateEmailAlert component
- We need a new landing page(new route) that handles urls w/ token from the Welcome emails. In our case it’s: ValidateEmail Page
1. Alert Component — ValidateEmailAlert Component
This components job is:
- Show Alert and Error message when the email is not verified
- Hide when the email is validated
- Pass the token to the server to see if the token is valid
- Have two Links, 1. Resend Email and 2. Update Email
The component looks like:
<ValidateEmailAlertContainer token={someToken} autoValidateToken={true}/>From the previous blog, Step by Step Guide To Building React Redux Apps , we can list out the following “State” and “Actions” for the component.
ValidateEmailAlert — List Of States:
State — user:
- validationError — A String. that’s part of User’s state when the validation fails. e.g. “Token from the email has expired or not valid”
- initialMessage — A String. Part of User’s state when the email is not validated. E.g. “Please verify email”
//validate email, if success, then load user and login
export const VALIDATE_EMAIL = ‘VALIDATE_EMAIL’;
export const VALIDATE_EMAIL_SUCCESS = ‘VALIDATE_EMAIL_SUCCESS’;
export const VALIDATE_EMAIL_FAILURE = ‘VALIDATE_EMAIL_FAILURE’;
State — resendEmail:
- resentEmailError —A String. “Could not resend email because the email itself is invalid”
- resentEmailSuccess —A String. “Resent Email. Please verify”
State — autoValidateToken
autoValidatetoken: A boolean. The ValidateEmailAlert component is reused in various pages like, PostList, PostNew and so on where it simply shows an alert message. But also does the additional duty of asking the server to validate token when it’s in “ValidateEmail” page.To distinguish this, we pass autoValidatetoken=true when this component is used in the ValidateEmail page and false everywhere else.
State — token
token — A String. It’s the token that should be passed to the server for validation.
ValidateEmailAlert — List Of Actions:
- validateEmail — Called when “autoValidatetoken” is true. This action asks server to validate the token.
- resend — Called when the user clicks on the “Resend” link. this action asks server to resend “welcome” email
- updateEmail —Called when user clicks on “Update Email” link. This simply opens “Profile” page.
- resetMe — Called by the component to cleanup all the states so the component can be reused.
Note: All the Async Actions that talk to server has more than one “Action” to represent various Ajax status. For example: “validateEmail” actually has 3: validateEmail, validateEmailSuccess and validateFailure.
//validate email, if success, then load user and login
export const VALIDATE_EMAIL = ‘VALIDATE_EMAIL’;
export const VALIDATE_EMAIL_SUCCESS = ‘VALIDATE_EMAIL_SUCCESS’;
export const VALIDATE_EMAIL_FAILURE = ‘VALIDATE_EMAIL_FAILURE’;
ValidateEmailAlertContainer Component:
This is the wrapper component where all the logic is implemented. It also connects and passes state from Redux’ global state to ValidateEmailAlert “Presentational” component.
//ValidateEmailAlertContainer component
const mapDispatchToProps = (dispatch, ownProps) => {
 return {
 validateEmail: () => {
   dispatch(validateEmail(ownProps.token)).then((response) => {
    if(!response.error) {
     sessionStorage.setItem(‘jwtToken’, response.payload.token);
     dispatch(validateEmailSuccess(response.payload))
    } else {
     sessionStorage.removeItem(‘jwtToken’);
     dispatch(validateEmailFailure(response.payload));
   }
  });
 },
 resend: () => {
  let jwtToken = sessionStorage.getItem(‘jwtToken’);
  if (!jwtToken || jwtToken === ‘’) {
    alert(‘Please Log In’);
    return;
   }
  dispatch(resendValidationEmail(jwtToken))
  .then((response) => {
   !response.error ?
     dispatch(resendValidationEmailSuccess(response.payload)) :
     dispatch(resendValidationEmailFailure(response.payload));
  });
 },
  resetMe: () => {
   dispatch(resetResendEmailState());
  }
 }
ValidateEmailAlert — Automatically Validating Token
As mentioned earlier, the ValidateEmailAlert component is reused in various pages like, PostList, PostNew and so on where is simply shows alert message. But when we are in the “ValidateEmail” page, we know that the user has come to this page from the Welcome email and we also have “token”. So we set autoValidateToken=true in this page in order to ask server to validate the page.
componentDidMount() {
  //automatically verify for token if autoValidateToken
  //is set to true (e.g. in ValidateEmail *page*)
  if(this.props.autoValidateToken) {
   this.props.validateEmail(this.props.token);
  }
 }
Implement ValidateEmail Landing Page
This is a simple page that simply loads ValidateEmailAlert component and acts like a starting point to urls from “Welcome” emails.
class ValidateEmail extends Component {
 render() {
  return (
   <div>
     <HeaderContainer type=”posts_new”/>
     <ValidateEmailAlertContainer
          token={this.props.params.token} <-- pass token from router
          autoValidateToken={true} <-- pass this "true"
     />
   </div>
  );
 }
}
export default ValidateEmail;
Implement Profile Page For Update Email
Implementing this is similar to implementing Sign In or Sign Up page as described in previous posts. I recommend you go through 1. A Guide For Building A React Redux CRUD App to learn how to implement it, and 2. A Robust Form Validation To React Redux Apps to learn about how to add form validations.
That’s It!
