
安卓自定義Dialog之BaseDialog
專案裡用到的dialog越來越多,樣式也各式各樣,為了方便,所以就考慮寫一個BaseDialog。
新建BaseDialog繼承Dialog
public class BaseDialog extends Dialog {
public BaseDialog(Context context) {
super(context);
}
public BaseDialog(Context context, int themeResId) {
super(context, themeResId);
}
protected 我們也仿造dialog的來設計,利用Builder模式
靜態成員類(巢狀類)
public static class Builder {
private Context context;
private boolean cancelable = false R.layout.common_base_dialog
長這樣
<?xml version="1.0" encoding="utf-8"?>
<LinearLayout xmlns:android="http://schemas.android.com/apk/res/android"
    android:layout_width="match_parent"
    android:layout_height="match_parent"
    android:background="@drawable/common_shape_dialog_round_white"
    android:divider="@drawable/common_divider_pale"
    android:orientation="vertical"
    android:showDividers="middle" >

    <LinearLayout
        android:id="@+id/lay_title"
        android:layout_width="match_parent"
        android:layout_height="wrap_content"
        android:gravity="center_vertical"
        android:orientation="horizontal" >

        <TextView
            android:id="@+id/tv_title"
            android:layout_width="0dp"
            android:layout_height="wrap_content"
            android:layout_weight="1"
            android:padding="10dp"
            android:text=""
            android:textColor="#333333"
            android:textSize="16sp" />

        <ImageView
            android:id="@+id/iv_cancel"
            android:layout_width="wrap_content"
            android:layout_height="match_parent"
            android:background="@drawable/common_selector_default"
            android:paddingLeft="10dp"
            android:paddingRight="10dp"
            android:src="@mipmap/common_dialog_icon_cancel"/>
    </LinearLayout>

    <LinearLayout
        android:id="@+id/lay_center"
        android:layout_width="match_parent"
        android:layout_height="wrap_content"
        android:orientation="vertical" >
    </LinearLayout>

    <LinearLayout
        android:id="@+id/lay_bottom"
        android:layout_width="match_parent"
        android:layout_height="wrap_content"
        android:divider="@drawable/common_divider_pale"
        android:gravity="center_horizontal"
        android:orientation="horizontal"
        android:showDividers="middle"
        android:visibility="gone"
        android:weightSum="2" >

        <Button
            android:id="@+id/btn_negative"
            android:layout_width="0dp"
            android:layout_height="wrap_content"
            android:layout_weight="1"
            android:text="取消"
            android:textColor="#333333"
            android:textSize="14sp"
            android:visibility="gone" />

        <Button
            android:id="@+id/btn_positive"
            android:layout_width="0dp"
            android:layout_height="wrap_content"
            android:layout_weight="1"
            android:text="確定"
            android:textColor="@color/white"
            android:textSize="14sp"
            android:visibility="gone" />
    </LinearLayout>

</LinearLayout>
對外的create方法
    public Dialog create() {
        final Dialog dialog = new Dialog(getContext(), theme);
        dialog.setCancelable(cancelable);
        dialog.setOnCancelListener(cancelListener);
        View view = View.inflate(getContext(), R.layout.common_base_dialog, null);
        dialog.setContentView(view);
        TextView tv_title = (TextView) view.findViewById(R.id.tv_title);
        if (!TextUtils.isEmpty(title)) {
            tv_title.setText(title);
        }
        ImageView iv_cancel = (ImageView) view.findViewById(R.id.iv_cancel);
        if (cancelable) {
            iv_cancel.setVisibility(View.VISIBLE);
            iv_cancel.setOnClickListener(new View.OnClickListener() {

                @Override
                public void onClick(View v) {
                    dialog.cancel();
                    if (cancelListener != null) {
                        cancelListener.onCancel(dialog);
                    }
                }
            });
        } else {
            iv_cancel.setVisibility(View.GONE);
        }
        if (TextUtils.isEmpty(positionText) && TextUtils.isEmpty(negativeText)) {
                view.findViewById(R.id.lay_bottom).setVisibility(View.GONE);
            } else {
                View bottomView = view.findViewById(R.id.lay_bottom);
                bottomView.setVisibility(View.VISIBLE);
                Button btn_positive = (Button) bottomView.findViewById(R.id.btn_positive);
                Button btn_negative = (Button) bottomView.findViewById(R.id.btn_negative);
                if (TextUtils.isEmpty(positionText)) {
                    btn_positive.setVisibility(View.GONE);
                } else {
                    btn_positive.setVisibility(View.VISIBLE);
                    btn_positive.setText(positionText);
                    btn_positive.setOnClickListener(new View.OnClickListener() {

                        @Override
                        public void onClick(View v) {
                            dialog.dismiss();
                            if (positiveListener != null) {
                                positiveListener.onClick(dialog, BUTTON_POSITIVE);
                            }
                        }
                    });
                }

                if (TextUtils.isEmpty(negativeText)) {
                    btn_negative.setVisibility(View.GONE);
                } else {
                    btn_negative.setVisibility(View.VISIBLE);
                    btn_negative.setText(negativeText);
                    btn_negative.setOnClickListener(new View.OnClickListener() {

                        @Override
                        public void onClick(View v) {
                            dialog.dismiss();
                            if (negativeListener != null) {
                                negativeListener.onClick(dialog, BUTTON_NEGATIVE);
                            }
                        }
                    });
                }
                if (!TextUtils.isEmpty(positionText) && !TextUtils.isEmpty(negativeText)) {
                    btn_negative.setBackgroundResource(R.drawable.common_selector_dialog_press_white);
                    btn_positive.setBackgroundResource(R.drawable.common_selector_dialog_press_blue);
                }
            }
            ViewGroup centerLay = (ViewGroup) view.findViewById(R.id.lay_center);
            centerView = getCenterView(centerView, centerLay);
            if (centerView != null) {
                centerView.setLayoutParams(centerLP);
                centerLay.addView(centerView);
            }
            initDialogSize(dialog);
            return dialog;
    }

    private void initDialogSize(Dialog dialog) {
        DisplayMetrics metrics = getContext().getResources().getDisplayMetrics();
        android.view.WindowManager.LayoutParams params = dialog.getWindow().getAttributes();
        params.width = (int) (metrics.widthPixels - 10 * 2 * metrics.density);
        params.height = android.view.WindowManager.LayoutParams.WRAP_CONTENT;
    }

    protected View getCenterView(View centerView, ViewGroup container) {
        return centerView;
    }
好了,BaseDialog的程式碼就這麼多
在activity使用
public class DialogActivity extends AppCompatActivity {

    @Override
    protected void onCreate(Bundle savedInstanceState) {
        super.onCreate(savedInstanceState);
        setContentView(R.layout.activity_dialog);
    }


    public Dialog connectDeviceWarn(final Context context, final DialogInterface.OnClickListener onClickListener) {
        return normal(context, "標題", "要提示的msg", "確定按鈕的text", "取消按鈕的text", onClickListener);
    }

    public Dialog normal(final Context context, String title, String msg, String okText,
                                String cancelText, final DialogInterface.OnClickListener onClickListener) {
        BaseDialog.Builder builder = new BaseDialog.Builder(context) {
            @Override
            protected View getCenterView(View centerView, ViewGroup container) {
                return centerView;
            }
        };
        View view = View.inflate(context, R.layout.common_warn_dialog, null);
        ((TextView) view.findViewById(R.id.dialog_hint)).setText(msg);
        builder.setCenterView(view);
        if (!TextUtils.isEmpty(okText)) {
            builder.setPositiveButton(okText, onClickListener);
        }
        builder.setNegativeButton(cancelText, null);
        builder.setTitle(title);
        return builder.create();
    }

    public void baseDialog(View view){
        connectDeviceWarn(DialogActivity.this, new DialogInterface.OnClickListener() {
            @Override
            public void onClick(DialogInterface dialog, int which) {
                //
            }
        }).show();
    }

}
實際使用時可以把一種dialog寫成一個工具類,那就可以隨便使用了,如下
public class WarnDialog {
/**
* 確認提交警告
**/
public static Dialog submitWarn(final Context context, Spanned wareDesc,
final DialogInterface.OnClickListener onClickListener) {
BaseDialog.Builder builder = new BaseDialog.Builder(context) {
@Override
protected View getCenterView(View centerView, ViewGroup container) {
return centerView;
}
};
View view = View.inflate(context, R.layout.common_warn_dialog, null);
((TextView) view.findViewById(R.id.dialog_hint)).setText(wareDesc);
builder.setCenterView(view)
.setPositiveButton("確定", new DialogInterface.OnClickListener() {
@Override
public void onClick(DialogInterface dialog, int which) {
onClickListener.onClick(dialog, which);
}
})
.setNegativeButton("取消", null);
builder.setTitle("提示");
return builder.create();
}
public static Dialog submitWarn(final Context context, String wareDesc,
final DialogInterface.OnClickListener onClickListener) {
return normal(context, "提示", wareDesc, "確定", "取消", onClickListener);
}
/**
* 確認退出登入警告
**/
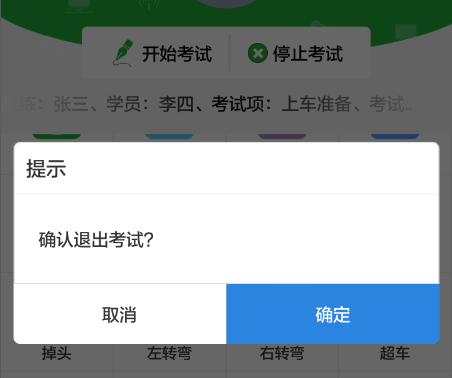
public static Dialog logout(final Activity context, final DialogInterface.OnClickListener onClickListener) {
return normal(context, "提示", "確認退出登入?", "確定", "取消", onClickListener);
}
/**
* 未連線裝置警告對話方塊
**/
public static Dialog connectDeviceWarn(final Context context, final DialogInterface.OnClickListener onClickListener) {
return normal(context, "提示", "當前未連線到裝置,是否設定連線裝置?", "去連線", "取消", onClickListener);
}
/**
* 確認通用警告
**/
public static Dialog normal(final Context context, String title, String msg, String okText,
String cancelText, final DialogInterface.OnClickListener onClickListener) {
BaseDialog.Builder builder = new BaseDialog.Builder(context) {
@Override
protected View getCenterView(View centerView, ViewGroup container) {
return centerView;
}
};
View view = View.inflate(context, R.layout.common_warn_dialog, null);
((TextView) view.findViewById(R.id.dialog_hint)).setText(msg);
builder.setCenterView(view);
if (!TextUtils.isEmpty(okText)) {
builder.setPositiveButton(okText, onClickListener);
}
builder.setNegativeButton(cancelText, null);
builder.setTitle(title);
return builder.create();
}
/**
* 退出編輯警告
**/
public static Dialog exitEdit(final Activity context) {
return normal(context, "提示", "確認退出編輯?", "確定", "取消", new DialogInterface.OnClickListener() {
@Override
public void onClick(DialogInterface dialog, int which) {
context.finish();
}
});
}
}上面activity的程式碼就可以改為:
public class DialogActivity extends AppCompatActivity {
@Override
protected void onCreate(Bundle savedInstanceState) {
super.onCreate(savedInstanceState);
setContentView(R.layout.activity_dialog);
}
public void baseDialog(View view){
WarnDialog.connectDeviceWarn(DialogActivity.this, new DialogInterface.OnClickListener() {
@Override
public void onClick(DialogInterface dialog, int which) {
showWarnDialog("確認退出?");
}
}).show();
}
private void showWarnDialog(String warnDesc) {
WarnDialog.submitWarn(context, warnDesc, new DialogInterface.OnClickListener() {
@Override
public void onClick(DialogInterface dialog, int which) {
//做處理
}
}).show();
}
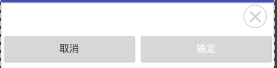
}看效果
就這麼多了。用起來也很方便了。
相關推薦
安卓自定義Dialog之BaseDialog
專案裡用到的dialog越來越多,樣式也各式各樣,為了方便,所以就考慮寫一個BaseDialog。 新建BaseDialog繼承Dialog public class BaseDialog extends Dialog {
去除安卓自定義Dialog黑色背景,設置無邊框,透明
isf window bsp 希望 nbsp tle -name rep lan 我們在自定義Dialog的時候,往往會希望除去安卓系統定義背景和標題,以便於更好的顯示我們自己想要的效果。 其實我們只需要註意幾個地方就行了。 1.在Style文件的中定義Dialog的主題
安卓自定義dialog
MyDialog.java public class MyDialog extends Dialog { public MyDialog(@NonNull Context context) { super(context); se
解決安卓自定義Dialog不能水平填滿螢幕
問題描述: UI設計,需要展示一個底部充滿螢幕的彈出框,但是發現下面和左右都沒有充滿。 預期: 實際: 解決方案: 自定義的Dialog中呼叫父類建構函式時,需要設定style 完整自定義dialog程式碼如下: 1.CustDialog.java pa
安卓自定義Dialog的實現
一、Dialog佈局檔案 <?xml version="1.0" encoding="utf-8"?> <FrameLayout xmlns:android="http://schemas.android.com/apk/res/andr
安卓自定義view之打造滾動的通知欄
閒談: 這段時間一直忙著做畢業設計,沒什麼時間寫blog,但是秉著分享的原則,還是要和小夥伴們分享所學的東西,如果可以的話,也希望我的部落格能夠幫助到需要的人。(打個廣告吧,有興趣的同學可以加一下我的安卓QQ群279031247,一起討論安卓開發遇到的問題)。 前言: 最近
安卓自定義Dialog(一)
這個自定義Dialog主要是提醒使用者一些資訊:該環境沒有網,登入賬號是提示密碼錯誤.... 話不多說直接上程式碼: 一.實現功能的.java類 public static Dialog CreatDialog(Context context, String s,
安卓自定義View進階-Path之貝塞爾曲線
在上一篇文章Path之基本操作中我們瞭解了Path的基本使用方法,本次瞭解Path中非常非常非常重要的內容-貝塞爾曲線。 一.Path常用方法表 為了相容性(偷懶) 本表格中去除了在API21(即安卓版本5.0)以上
安卓自定義View進階-Path之基本操作
在上一篇Canvas之圖片文字中我們瞭解瞭如何使用Canvas中繪製圖片文字,結合前幾篇文章,Canvas的基本操作已經差不多完結了,然而Canvas不僅僅具有這些基本的操作,還可以更加炫酷,本次會了解到path(路徑)這個Canvas中的神器,有了這個神器,就能創造出更多炫(zhu
安卓自定義View進階-Canvas之圖片文字
在上一篇文章Canvas之畫布操作中我們瞭解了畫布的一些基本操作方法,本次瞭解一些繪製圖片文字相關的內容。如果你對前幾篇文章講述的內容熟練掌握的話,那麼恭喜你,本篇結束之後,大部分的自定義View已經難不倒你了,當然了,這並不是終點,接下來還會有更加炫酷的技能。 一.Canva
安卓自定義View進階-Path之完結篇
經歷過前兩篇 Path之基本操作 和 Path之貝塞爾曲線 的講解,本篇終於進入Path的收尾篇,本篇結束後Path的大部分相關方法都已經講解完了,但Path還有一些更有意思的玩法,應該會在後續的文章中出現。 一.Path常用方法表 為了相容性(偷懶) 本表格中去除
安卓自定義彈框(Dialog)
1.在style檔案中建立一個style <style name="dialog" parent="@android:style/Theme.Dialog"> <item name="android:windowFrame">@null</
安卓自定義View進階-Canvas之畫布操作
Canvas之畫布操作 上一篇Canvas之繪製基本形狀中我們瞭解瞭如何使用Canvas繪製基本圖形,本次瞭解一些基本的畫布操作。 本來想把畫布操作放到後面部分的,但是發現很多圖形繪製都離不開畫布操作,於是先講解一下畫布的基本操作方法。
安卓自定義列表dialog
前言 這個形式也是最常用的,不過最近需要用到列表資訊Dialog,原生的不光樣式不能滿足需求,而且是開發電視端的APP,需要對焦點進行特殊處理,所以就需要自定義Dialog 我們先來看一下系統自帶的列表Dialog。 系統自帶列表Dialog
安卓自定義View進階:Path之玩出花樣(PathMeasure)
PS:不要問我為什麼不講 PathEffect,因為這個方法在後面的Paint系列中。 先放一個圖鎮樓,省的下面無聊的內容把你們都嚇跑了Σ( ̄。 ̄ノ)ノ Path & PathMeasure 顧名思義,PathMeasure是一個用來測量Path的類,主要有以下方法: 構造方法 方法名 釋
安卓自定義:Toast 以及Toast的出場動畫 以及Toast上新增圖片 以及點選事件
安卓自定義Toast: 1.自定義一個類:CustomToast 繼承自:Toast 2.在CustomToast類中 新增一個靜態 mCustomToast 物件 private static CustomToast mCustomToast; 3.在CustomToast類中 新
安卓自定義switch樣式
榮耀手機鬧鐘開關的switch樣式,最近簡單的方法可以直接設定兩張圖片,根據按鈕狀態來進行切換。 這裡主要說另外一種方式 首先建立兩個track的資原始檔,也就是後面的背景 建立未開啟狀態下的track起名為track_bg_gray <?xml version="1.0
Android安卓自定義由底部彈出對話方塊
努力不一定立刻會有好的結果,但一定是朝著好的方向 ——李尚龍 《你所謂的穩定,不過是在浪費生命》
安卓自定義View進階-手勢檢測(GestureDecetor)
Android 手勢檢測,主要是 GestureDetector 相關內容的用法和注意事項,本文依舊屬於事件處理這一體系,部分內容會涉及到之前文章提及過的知識點,如果你沒看過之前的文章,可以到 自定義 View 系列 來檢視這些內容。 在開發 Android 手機應用過程中,可
安卓自定義View進階-多點觸控詳解
Android 多點觸控詳解,在前面的幾篇文章中我們大致瞭解了 Android 中的事件處理流程和一些簡單的處理方案,本次帶大家瞭解 Android 多點觸控相關的一些知識。 多點觸控 ( Multitouch,也稱 Multi-touch ),即同時接受螢幕上多個點的人機互動