使用Intent實現頁面跳轉
本節引言:
在上一節結束後意味著Android的四大元件我們都已經學習完畢了~,而本節我們要學習的是四大元件間的 樞紐——Intent(意圖),Android通訊的橋樑,比如我們可以通過:
- startActivity(Intent)/startActivityForResult(Intent):來啟動一個Activity
- startService(Intent)/bindService(Intent):來啟動一個Service
- sendBroadcast:傳送廣播到指定BroadcastReceiver
- 另外別忘了我們在註冊四大元件時,寫得很多的Intent-Filter
哦~
好吧,話不多說,開始本節內容!另外前面我們已經用過Intent了,就不在講述概念性的東西了~ 老規矩,官方API:Intent
1.顯式Intent與隱式Intent的區別
- 顯式Intent:通過元件名指定啟動的目標元件,比如startActivity(new Intent(A.this,B.class)); 每次啟動的元件只有一個~
- 隱式顯式Intent:不指定元件名,而指定Intent的Action,Data,或Category,當我們啟動元件時, 會去匹配AndroidManifest.xml相關元件的Intent-filter,逐一匹配出滿足屬性的元件,當不止一個滿足時, 會彈出一個讓我們選擇啟動哪個的對話方塊~
2.Intent的七個屬性:
1)ComponentName(元件名稱)

2)Action(動作)

3)Category(類別)

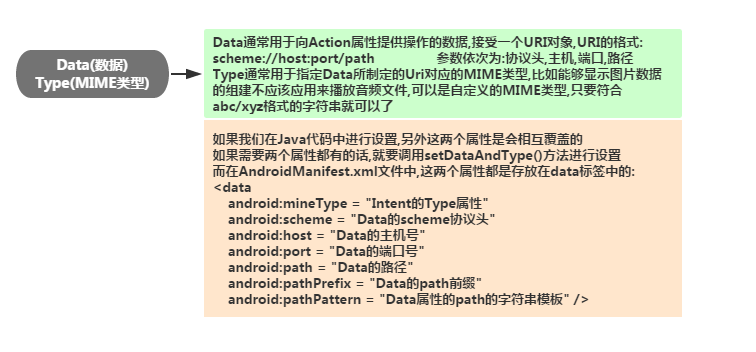
4)Data(資料),Type(MIME型別)
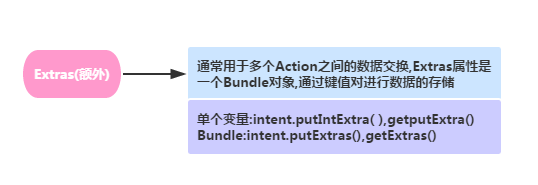
5)Extras(額外)
6)Flags(標記)

3.顯式Intent使用示例:
這個用得很多,直接就上例子了:
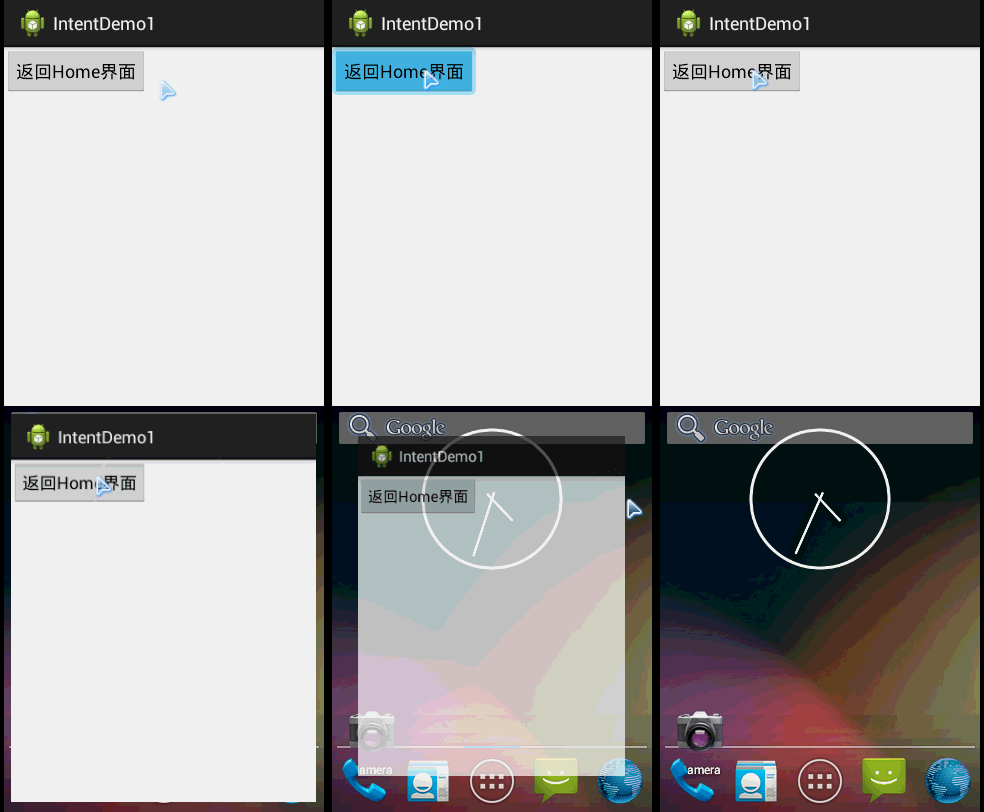
例子1:點選按鈕返回Home介面: 執行效果圖:
核心程式碼:
Intent it =newIntent(); it.setAction(Intent.ACTION_MAIN); it.addCategory(Intent.CATEGORY_HOME); startActivity(it);
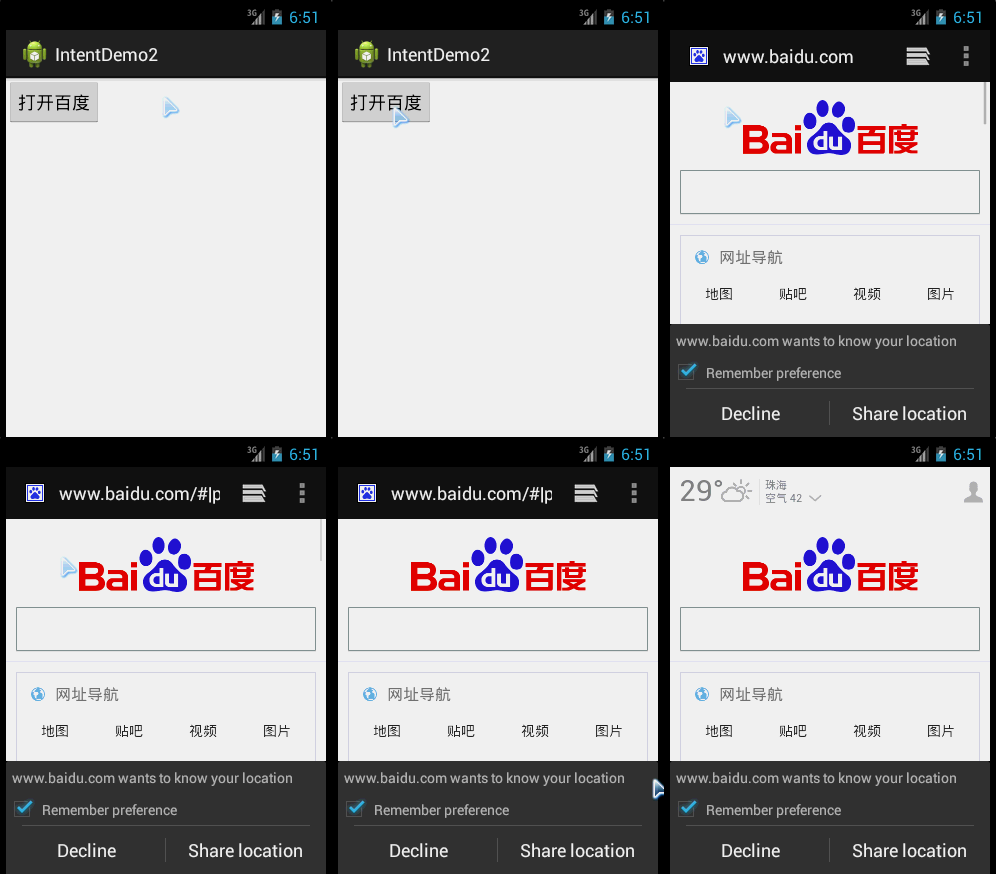
例子2:點選按鈕開啟百度頁面: 執行效果圖:
核心程式碼:
Intent it =newIntent();
it.setAction(Intent.ACTION_VIEW);
it.setData(Uri.parse("http://www.baidu.com"));
startActivity(it);
4.隱式Intent詳解
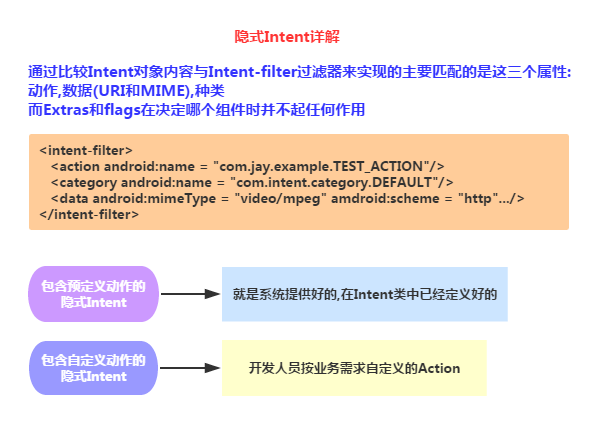
1)預定義動作的隱式Intent示例:
程式碼示例:點選按鈕後,所有Action為VIEW的Activity被篩選出來,由使用者進一步選擇:
核心程式碼:
建立第二個Activity的佈局,與對應的Activity,在第一個Activity的按鈕點選事件中新增一下程式碼:
Intent it =newIntent();
it.setAction(Intent.ACTION_VIEW);
startActivity(it);
最後在第二個Activity的Intent中新增以下程式碼:
<activityandroid:name=".SecondActivity"android:label="第二個Activity"><intent-filter><actionandroid:name="android.intent.action.VIEW"/><categoryandroid:name="android.intent.category.DEFAULT"/></intent-filter></activity>
執行效果圖:
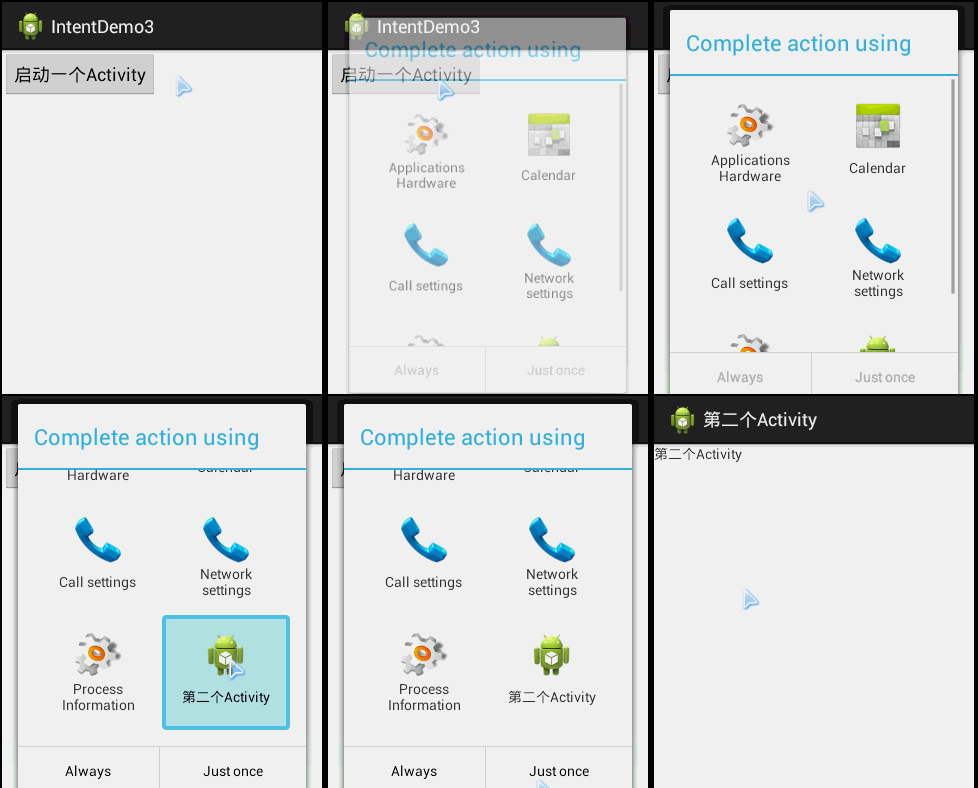
2)自定義動作的隱式Intent示例:
程式碼示例:使用自定義的Action與category來啟用另一個Activity
核心程式碼: 建立第二個Activity的佈局,與對應的Activity,在第一個Activity的按鈕點選事件中新增一下程式碼:
Intent it =newIntent();
it.setAction("my_action");
it.addCategory("my_category");
startActivity(it);
最後在第二個Activity的Intent中新增以下程式碼:
<activityandroid:name=".SecondActivity"android:label="第二個Activity"><intent-filter><actionandroid:name="my_action"/><categoryandroid:name="my_category"/><categoryandroid:name="android.intent.category.DEFAULT"/></intent-filter></activity>
注意雖然我們自定義了一個category,但是還是要把這個預設的加上,不然會報錯的:
<categoryandroid:name="android.intent.category.DEFAULT"/>
5.常用系統Intent合集
大家貼下常用的系統Intent的合集吧,上面沒有的歡迎提出~
//===============================================================//1.撥打電話// 給移動客服10086撥打電話Uri uri =Uri.parse("tel:10086");Intent intent =newIntent(Intent.ACTION_DIAL, uri); startActivity(intent);//===============================================================//2.傳送簡訊// 給10086傳送內容為“Hello”的簡訊Uri uri =Uri.parse("smsto:10086");Intent intent =newIntent(Intent.ACTION_SENDTO, uri); intent.putExtra("sms_body","Hello"); startActivity(intent);//3.傳送彩信(相當於傳送帶附件的簡訊)Intent intent =newIntent(Intent.ACTION_SEND); intent.putExtra("sms_body","Hello");Uri uri =Uri.parse("content://media/external/images/media/23"); intent.putExtra(Intent.EXTRA_STREAM, uri); intent.setType("image/png"); startActivity(intent);//===============================================================//4.開啟瀏覽器:// 開啟百度主頁Uri uri =Uri.parse("http://www.baidu.com");Intent intent =newIntent(Intent.ACTION_VIEW, uri); startActivity(intent);//===============================================================//5.傳送電子郵件:(閹割了Google服務的沒戲!!!!)// 給[email protected]發郵件Uri uri =Uri.parse("mailto:[email protected]");Intent intent =newIntent(Intent.ACTION_SENDTO, uri); startActivity(intent);// 給[email protected]發郵件傳送內容為“Hello”的郵件Intent intent =newIntent(Intent.ACTION_SEND); intent.putExtra(Intent.EXTRA_EMAIL,"[email protected]"); intent.putExtra(Intent.EXTRA_SUBJECT,"Subject"); intent.putExtra(Intent.EXTRA_TEXT,"Hello"); intent.setType("text/plain"); startActivity(intent);// 給多人發郵件Intent intent=newIntent(Intent.ACTION_SEND);String[] tos ={"[email protected]","[email protected]"};// 收件人String[] ccs ={"[email protected]","[email protected]"};// 抄送String[] bccs ={"[email protected]","[email protected]"};// 密送 intent.putExtra(Intent.EXTRA_EMAIL, tos); intent.putExtra(Intent.EXTRA_CC, ccs); intent.putExtra(Intent.EXTRA_BCC, bccs); intent.putExtra(Intent.EXTRA_SUBJECT,"Subject"); intent.putExtra(Intent.EXTRA_TEXT,"Hello"); intent.setType("message/rfc822"); startActivity(intent);//===============================================================//6.顯示地圖:// 開啟Google地圖中國北京位置(北緯39.9,東經116.3)Uri uri =Uri.parse相關推薦
使用Intent實現頁面跳轉
本節引言: 在上一節結束後意味著Android的四大元件我們都已經學習完畢了~,而本節我們要學習的是四大元件間的 樞紐——Intent(意圖),Android通訊的橋樑,比如我們可以通過: startActivity(Intent)/startAc
intent實現頁面跳轉閃退
主頁面實現跳轉的語句: btn_query_goto.setOnClickListener(new View.OnClickListener(){ @Override public void onClick(View v){ Intent inte
實現頁面跳轉——Intent
Intent可以理解為信使(意圖),由Intent來協作完成Android各個元件之間的通訊。 Intent實現頁面跳轉 1.直接實現A頁面跳轉到B頁面:startActivity(intent) 2.直接A啟動B頁面,切B頁面可以把資料回傳給A:startActivi
安卓——Intent(實現頁面跳轉的兩種方法)
下圖中兩個不同的方法就是兩種頁面之間跳轉的情況1>跳轉不返回資料2>跳轉返回資料例項:第一種啟動方式(跳轉不返回資料)第二種啟動方式(跳轉返回資料)先看第一種:點選第一種啟動方式按鈕會出現右邊的圖,然後再點選Button按鈕返回左邊的介面,TextView中的內容
php中實現頁面跳轉的幾種方式
腳本 timeout location clas replace asc idt lee 實現 親測,not復制粘貼 PHP中實現頁面跳轉有一下幾種方式,看了幾個人寫的不是很條理,自己整理一下 在PHP腳本代碼中實現 <?php header("locati
ui li 形式的菜單 實現頁面跳轉
頁面跳轉 app /*跳轉*/ jumpEditRectificatBill:function(){ $("#getEquipLegerFrom li").each(function(){ //var jumpid=$(this).attr("id")
用js實現頁面跳轉的幾種方式
head 註意 ont rem text pla http bsp cat 通過js或者html或者PHP等動態程序都可以方便的實現跳轉,這裏搜集了幾種頁面跳轉的方式js方式的頁面跳轉1.window.location.href方式 <script langua
ASP.NET MVC中如何實現頁面跳轉
pub ring 項目 再見 name ati 方法 技術 mod 1,最簡單的方式:超鏈接 以下分別是連接到HomeController控制器下的SharpL動作方法,以及百度首頁。代碼如下: 1 <a href="Home\SharpL">打開S
php實現頁面跳轉方法彙總
一共有三種方法實現頁面跳轉,分別利用php提供的header()、html meta標籤、JavaScript指令碼。 header() header()方法通過設定http響應頭中的location域實現跳轉。這種跳轉實現對使用者是不可見的,有瀏覽器直接執行
Axure中實現頁面跳轉倒計時
在瀏覽一個頁面時,如果跳轉到下一個頁面,一般需要等待幾秒,有些網站就會產生倒計時等待的狀態,這樣一個效果暫且稱為Axure頁面跳轉倒計時。在Axure(http://www.axurechina.cc/)中要實現這樣一個效果需要用到幾個簡單的互動效果,以下將是具體操作流程。關於頁面跳轉的設定
AngularJS進階 八 實現頁面跳轉並進行參數傳遞
res 初始化 .get web js進階 頁面 city 過程 元素 angularjs實現頁面跳轉並進行參數傳遞 註:請點擊此處進行充電! Angular頁面傳參有多種辦法,我在此列舉4種最常見的: 1. 基於ui-router的頁面跳轉傳參 (1) 在Angular
AngularJS進階 八 實現頁面跳轉並進行引數傳遞
angularjs實現頁面跳轉並進行引數傳遞 注:請點選此處進行充電! Angular頁面傳參有多種辦法,我在此列舉4種最常見的: 1. 基於ui-router的頁面跳轉傳參 (1) 在AngularJS的app.js中用ui-router定義路由,比如現在
微信小程式例子——點選文字實現頁面跳轉
1、效果展示 .w 2、關鍵程式碼 index.js檔案 Page({ data:{ // text:"這是一個頁面" }, onLoad:function(options){
使用AJAX實現頁面跳轉
$.ajax({ type:"POST", url: //你的請求程式頁面隨便啦 async:false,//同步:意思是當有返回值以後才會進行後面的js程式。 dat
Springboot中使用thymeleaf模板引擎實現頁面跳轉
1、建立一個Springboot專案2、在pom.xml中加入thymeleaf模板引擎的依賴 <!-- springboot web開發thymeleaf模板 --> <depend
Java後端實現頁面跳轉
頁面跳轉分類有兩種:重定向和轉發,即redirect和forward。具體區別和含義最後介紹,先給出使用方法。一:重定向redirect 第一種方式:controller中返回值為Stringpublic String login(HttpServletRequest
Vue整合vue-router實現頁面跳轉出現的問題
1、配置router資料夾下index.js,配置方式一 import Vue from 'vue' import Router from 'vue-router' Vue.use(Router) const routes = [ { path: '/', // 首頁
Laravel通過ajax的POST方式傳值並實現頁面跳轉
1.新增測試按鈕 <button class='test' >ajax測試</button> 2.ajax部分程式碼 @section('js') <scr
vue三種不同方式實現頁面跳轉
Vue:router-lin <router-link to="/">[跳轉到主頁]</router-link> <router-link to="/login">[登入]</router-link> <router-li
js實現頁面跳轉選單選中
<div class="headerpanel"> <div class="headerlist"> <ul> <li class="active" role="cashierMenu
