spring boot 系列之六:深入理解spring boot的自動配置
我們知道,spring boot自動配置功能可以根據不同情況來決定spring配置應該用哪個,不應該用哪個,舉個例子:
- Spring的JdbcTemplate是不是在Classpath裡面?如果是,並且DataSource也存在,就自動配置一個JdbcTemplate的Bean
- Thymeleaf是不是在Classpath裡面?如果是,則自動配置Thymeleaf的模板解析器、檢視解析器、模板引擎
那個這個是怎麼實現的呢?原因就在於它利用了Spring的條件化配置,條件化配置允許配置存在於應用中,但是在滿足某些特定條件前會忽略這些配置。
要實現條件化配置我們要用到@Conditional條件化註解。
本篇隨便講從如下三個方面進行展開:
- @Conditional小例子,來說明條件化配置的實現方式
- spring boot 的條件化配置詳解
- spring boot 自動配置原始碼分析
- 自己動手實現spring boot starter pom
一、@Conditional小例子
我們知道在windows下顯示列表的命令是dir,而在linux系統下顯示列表的命令是ls,基於條件配置,我們可以實現在不同的作業系統下返回不同的值。
- 判斷條件定義
- )windows下的判定條件

/**
 * 實現spring 的Condition介面,並且重寫matches()方法,如果作業系統是windows就返回true
 *
 */
public class WindowsCondition implements Condition{

    @Override
    public boolean matches(ConditionContext context, AnnotatedTypeMetadata metadata) {

        return context.getEnvironment().getProperty("os.name").contains("Windows");
    }


}
- )linux下的判定條件

/**
 * 實現spring 的Condition介面,並且重寫matches()方法,如果作業系統是linux就返回true
 *
 */
public class LinuxCondition implements Condition{

    @Override
    public boolean matches(ConditionContext context, AnnotatedTypeMetadata metadata) {

        return context.getEnvironment().getProperty("os.name").contains("Linux");
    }


}
- )windows下的判定條件
- 不同系統下的Bean的類
- )介面
public interface ListService { public String showListLine(); } - )windows下的Bean類

public class WindowsListService implements ListService{

    @Override
    public String showListLine() {
        return "dir";
    }

}
- )linux下的Bean的類

public class LinuxListService implements ListService{

    @Override
    public String showListLine() {
        return "ls";
    }

}
- )介面
- 配置類

@Configuration
public class ConditionConfig {

    /**
     * 通過@Conditional 註解,符合windows條件就返回WindowsListService例項
     *
     */
    @Bean
    @Conditional(WindowsCondition.class)
    public ListService windonwsListService() {
        return new WindowsListService();
    }

    /**
     * 通過@Conditional 註解,符合linux條件就返回LinuxListService例項
     *
     */
    @Bean
    @Conditional(LinuxCondition.class)
    public ListService linuxListService() {
        return new LinuxListService();
    }
}
- 測試類

public class ConditionTest {

    public static void main(String[] args) {

        AnnotationConfigApplicationContext context = new AnnotationConfigApplicationContext(ConditionConfig.class);
        ListService listService = context.getBean(ListService.class);
        System.out
                .println(context.getEnvironment().getProperty("os.name") + " 系統下的列表命令為: " + listService.showListLine());
    }
}
- 執行測試類,由於我的是windows7 系統,因此結果是
Windows 7 系統下的列表命令為: dir
如果你的是linux系統,則結果就會是
Linux 系統下的列表命令為: ls
二、spring boot 的條件化配置
在spring boot專案中會存在一個名為spring-boot-autoconfigure的jar包

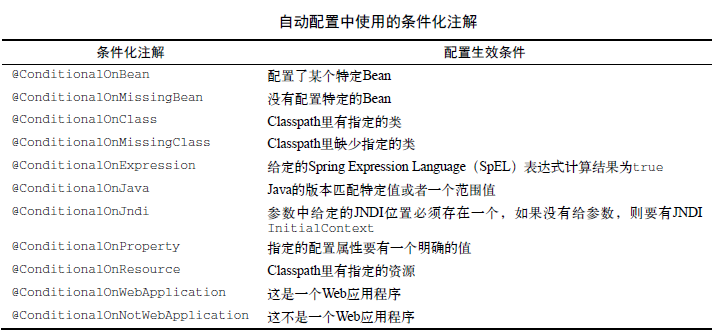
條件化配置就是在這個jar裡面實現的,它用到了如下的條件化註解,這些註解都是以@ConditionalOn開頭的,他們都是應用了@Conditional的組合註解:

接下來我們看個原始碼的列子:
以JdbcTemplateAutoConfiguration為例,它裡面有這段程式碼:
@Bean
    @Primary
    @ConditionalOnMissingBean(JdbcOperations.class)
    public JdbcTemplate jdbcTemplate() {
        return new JdbcTemplate(this.dataSource);
    }
只有在不存在JdbcOperations(如果檢視JdbcTemplate的原始碼,你會發現JdbcTemplate類實現了JdbcOperations介面)例項的時候,才會初始化一個JdbcTemplate 的Bean。
基於以上內容,我們就可以閱讀自動配置相關的原始碼了。
三、spring boot 自動配置原始碼分析
spring boot專案的啟動類用的註解[email protected]是一個組合註解,其中@EnableAutoConfiguration是自動配置相關的。
而這個@EnableAutoConfiguration註解裡面有個@Import註解匯入了EnableAutoConfigurationImportSelector用來實現具體的功能

(注:由於我本地的spring boot版本不是最新的,這裡的EnableAutoConfigurationImportSelector已經不建議使用了,新版本可能已經換成了其他類,但是不影響我們看程式碼)
這個類繼承了AutoConfigurationImportSelector

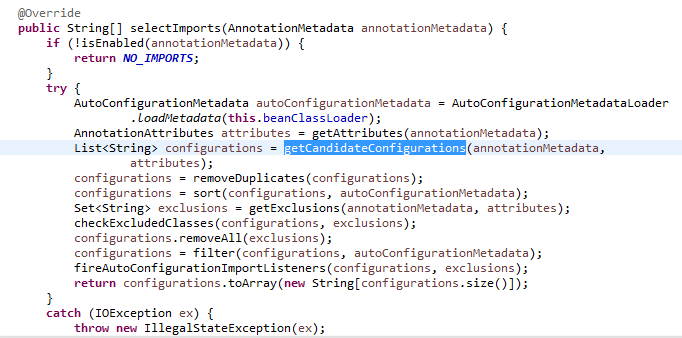
進入父類,裡面有個方法selectImports()呼叫了方法getCandidateConfigurations(),進而呼叫了SpringFactoriesLoader.loadFactoryNames()方法


在SpringFactoriesLoader.loadFactoryNames()方法裡面,我們看到會查詢META-INF/spring.factories這個配置檔案

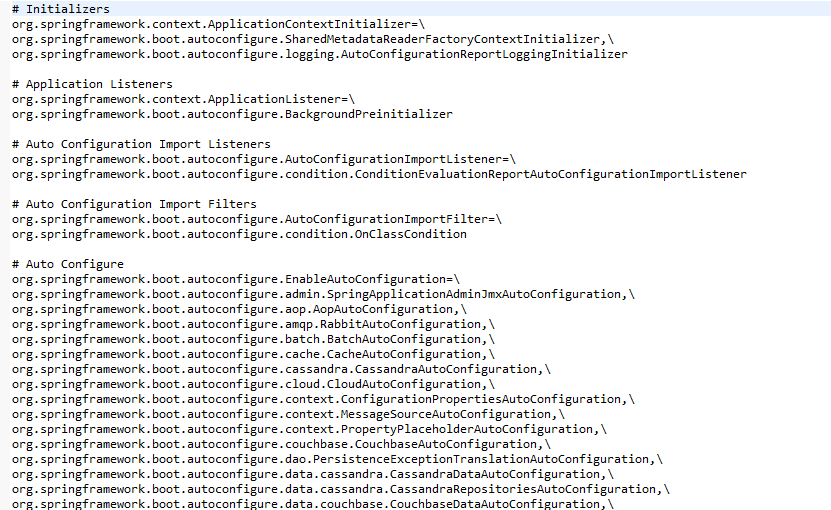
SpringFactoriesLoader.loadFactoryNames方法會掃描具有META-INF/spring.factories檔案的jar包,而我們的spring-boot-autoconfigure.jar裡面就有一個這樣的檔案,此檔案中聲明瞭具體有哪些自動配置:

我們上面提到的JdbcTemplateAutoConfiguration自動配置類就在裡面。
四、編寫自己的spring boot starter pom
接下來,我們就來寫一個簡單的spring boot starter pom。
步驟如下:
- 新建starter maven專案spring-boot-starter-hello
- 修改pom檔案

<project xmlns="http://maven.apache.org/POM/4.0.0"
    xmlns:xsi="http://www.w3.org/2001/XMLSchema-instance"
    xsi:schemaLocation="http://maven.apache.org/POM/4.0.0 http://maven.apache.org/xsd/maven-4.0.0.xsd">
    <modelVersion>4.0.0</modelVersion>
    <groupId>com.sam</groupId>
    <artifactId>spring-boot-starter-hello</artifactId>
    <version>0.0.1-SNAPSHOT</version>
    <packaging>jar</packaging>

    <dependencies>
        <!-- 這裡需要引入spring boot的自動配置作為依賴 -->
        <dependency>
            <groupId>org.springframework.boot</groupId>
            <artifactId>spring-boot-autoconfigure</artifactId>
            <version>1.5.1.RELEASE</version>
        </dependency>


    </dependencies>
</project>
- 屬性配置

/**
 * @ConfigurationProperties
 * 自動匹配application.properties檔案中hello.msg的值,然後賦值給類屬性msg,這裡的msg預設值為“spring boot”
 *
 */
@ConfigurationProperties(prefix="hello")
public class HelloServiceProperties {

    private static final String MSG = "spring boot";

    private String msg = MSG;

    public String getMsg() {
        return msg;
    }

    public void setMsg(String msg) {
        this.msg = msg;
    }


}
- 判定依據類

/**
 * 後面的程式碼會依據此類是否存在,來決定是否生產對應的Bean
 *
 */
public class HelloService {

    private String msg;

    public String getMsg() {
        return msg;
    }

    public void setMsg(String msg) {
        this.msg = msg;
    }

    public String sayHello() {
        return "hello " + msg;
    }
}
- 自動配置類

@Configuration
@EnableConfigurationProperties(HelloServiceProperties.class)
@ConditionalOnClass(HelloService.class)
@ConditionalOnProperty(prefix = "hello", matchIfMissing = true, value = "enabled")
public class HelloServiceAutoConfiguration {

    @Autowired
    HelloServiceProperties helloServiceProperties;

    @Bean
    @ConditionalOnMissingBean(HelloService.class)
    public HelloService helloService() {
        HelloService service = new HelloService();
        service.setMsg(helloServiceProperties.getMsg());
        return service;
    }
}
根據HelloServiceProperties提供的引數,並通過@ConditionalOnClass(HelloService.class)判定HelloService這個類在Classpath中是否存在,存在並且還沒有對應的Bean,就生成對應的helloService Bean
- 註冊配置,需要到META-INF/spring.factories檔案中註冊改自動配置類:在src/main/source目錄下新建改檔案,然後進行配置。
org.springframework.boot.autoconfigure.EnableAutoConfiguration=\
com.sam.spring_boot_starter_hello.HelloServiceAutoConfiguration
- 對該工程進行mvn clean install,將jar推送到本地maven倉庫,供後續使用。 使用starter ,使用我們這個starter 需要新建一個或使用既存的一個spring boot工程(這裡我用的是既存的),然後
- )修改pom,引入上述的依賴
<dependency> <groupId>com.sam</groupId> <artifactId>spring-boot-starter-hello</artifactId> <version>0.0.1-SNAPSHOT</version> </dependency> - )實現controller

@RestController
public class HelloController {
  //程式碼中沒有配置這個helloService Bean,但是自動配置能夠幫忙例項化,因此可以直接注入
    @Autowired
    HelloService helloService;

    @RequestMapping(value="/helloService")
    public String sayHello() {
        return helloService.sayHello();
    }
}
- )頁面訪問/helloService介面

- )在application.properties裡面配置hello.msg=sam,然後再次訪問/helloService介面

相關推薦
spring boot 系列之六:深入理解spring boot的自動配置
我們知道,spring boot自動配置功能可以根據不同情況來決定spring配置應該用哪個,不應該用哪個,舉個例子: Spring的JdbcTemplate是不是在Classpath裡面?如果是,並且DataSource也存在,就自動配置一個JdbcTemplate的Bean Thymeleaf是不
spring boot 系列之三:spring boot 整合JdbcTemplate
closed com context boot pin pan url wired ace 前面兩篇文章我們講了兩件事情: 通過一個簡單實例進行spring boot 入門 修改spring boot 默認的服務端口號和默認context path 這篇文章我們來看下怎
spring boot 系列之四:spring boot 整合JPA
rom prop pos output UNC actor href ali div 上一篇我們講了spring boot 整合JdbcTemplate來進行數據的持久化, 這篇我們來說下怎麽通過spring boot 整合JPA來實現數據的持久化。 一、代碼實現 修改
Spring Boot 系列之五:Spring Boot 通過devtools進行熱部署
前面已經分享過四篇學習文章: 1、Spring Boot 系統之一:Spring Boot 入門 2、Spring Boot 系統之二:Spring Boot 修改預設埠號和context path 3、Spring Boot 系統之三:Spring Boot 整合JdbcTemplat
Spring Boot系列教程六:日誌輸出配置log4j2
一.前言 spring boot支援的日誌框架有,logback,Log4j2,Log4j和Java Util Logging,預設使用的是logback日誌框架,筆者一直在使用log4j2,並且看過某博主寫的一篇這幾個日誌框架的效能比對,決定仍使用log4j2,本文章
spring boot 系列之二:spring boot 如何修改預設埠號和contextpath
上一篇檔案我們通過一個例項進行了spring boot 入門,我們發現tomcat埠號和上下文(context path)都是預設的, 如果我們對於這兩個值有特殊需要的話,需要自己制定的時候怎麼辦呢? 一、問題解決: 在src/main/resources目錄下新建檔案application.pro
Spring系列之六:AOP的代理詳解
Aop是面向切片的程式設計,首先先用圖解釋AOP的程式設計這是沒有用aop的情況,程式碼中存在大量的重複的程式碼:使用aop就是採用一個切片,對封裝好的程式進行切開,減少重複的程式碼,對重複的程式碼進行復用:那麼如何實現這種aop的切片程式設計了?就是使用動態代理的方式,為方
C中異步IO淺析之三:深入理解異步IO的基本數據結構
c 異步io libaio 一個函數庫或一段代碼的數據結構之間的關系,既展示了數據的行蹤,同時又隱含了函數的調用順序和使用方法。libaio內部的多個數據結構尤其如此,哪怕我們找不到文檔或者幫助手冊,只要深刻領悟頭文件中定義的數據結構及其內在聯系,再加一點代碼的驗證,就可以達到對libaio的A
Office 365 系列之六:通過管理中心批量導入用戶
office365 創建賬號、分配許可 本章節跟大家介紹通過 Office 365 管理中心批量導入用戶並分配許可。 登陸 Office 365 管理中心,切換到“活動用戶”頁面,點擊“批量添加” 點擊“下載僅具有標頭的 CSV 文件”或“下載具有標頭和示例用戶信息的 CSV
mongo 3.4分片集群系列之六:詳解配置數據庫
初始化 kpi 更新 並且 color tag 成員 gin sha 這個系列大致想跟大家分享以下篇章(我會持續更新的↖(^ω^)↗): 1、mongo 3.4分片集群系列之一:淺談分片集群 2、mongo 3.4分片集群系列之二:搭建分片集群--哈希分片 3、mongo
Exchange 2013系列之六:郵箱高可用DAG部署
Exchange AD Windows Server 數據庫可用性組 (DAG) 是內置於 Microsoft Exchange Server中的高可用性和站點恢復框架的基礎組件。DAG 是一組郵箱服務器(最多可包含 16 個郵箱服務器),其中承載了一組數據庫,可提供從影響單個服務器或數據庫的故障
碼農裝13寶典系列之六:更換流暢的國內映象源
編輯配置檔案:/etc/apt/sources.list deb https://mirrors.tuna.tsinghua.edu.cn/ubuntu/ bionic main restricted universe multiverse deb https://mirrors.tun
skyfans之每天一個Liunx命令系列之六:free
今天我們繼續來學習linux基本命令 今天學習的是什麼命令呢,那就是PERFORMANCE MONITORING AND STATISTICS(效能監測與統計)中的 free (記憶體)命令。 此命令是我們作為一個運維人員必須要知道並且會的命令。 Ready
Docker系列之六:Volume 卷的使用——在Dockerfile中的用法
系列連結 Docker系列之一:Docker介紹及在Ubuntu上安裝 Docker系列之二:Docker 入門 Docker系列之三:使用Docker映象和倉庫 Docker系列之四:Dockerfile的使用 Docker系列之五:Volume 卷的使用——以Redis為例
.Neter玩轉Linux系列之六:Linux下MySQL的安裝、配置、使用
基礎篇 實戰篇 一、Linux安裝MySQL (1)下載安裝包:https://dev.mysql.com/downloads/mysql/ (2)解壓並安裝 命令:tar zxvf 檔名 解壓完成之後,重名一下資料夾名字。 命令:mv 檔名1
Thinking in SQL系列之六:資料探勘Apriori關聯分析再現啤酒尿布神話
原創: 牛超 2017-03-19 Mail:[email protected] 說起資料探勘機器學習,印象中很早就聽說過關於啤酒尿布的神話,這個問題經常出現在資料倉庫相關的文章中,由此可見啤酒尿布問題對資料探勘領域影響的深遠端度。先看看它的成因:“啤酒
ZooKeeper系列之六:ZooKeeper四字命令
ZooKeeper 支援某些特定的四字命令字母與其的互動。它們大多是查詢命令,用來獲取 ZooKeeper 服務的當前狀態及相關資訊。使用者在客戶端可以通過 telnet 或 nc 向 ZooKeeper 提交相應的命令。 ZooKeeper 常用四字命令見下表 1 所示:
DPDK系列之六:qemu-kvm網路後端的加速技術
一、前言在文章《DPDK系列之五:qemu-kvm網路簡介》中可以看到qemu-kvm為不同需求的虛擬機器提供了不同的網路方案,這些網路方案的效能最終都取決於位於宿主機上的網路backend的實現方式。本文對於不同的backend技術進行分析。轉載自https://blog.
f2fs系列之六:checkpoint
rev ++ sid then bit all int opp 操作 f2fs 的checkpoint 維護data、node和meta data(SIT,NAT)的數據一致性,把一起寫到SSA區域的數據分別寫回到SIT/NAT區域。 checkpoint 相關數據結構 s
Java分析系列之六:JVM Heap Dump(堆轉儲檔案)的生成和MAT的使用
前面的文章詳細講述了分析Thread Dump檔案,實際在處理Java記憶體洩漏問題的時候,還需要分析JVM堆轉儲檔案來進行定位。 目錄 [隱藏] JVM Heap Dump(堆轉儲檔案)的生成 正如Thread Dump檔案記錄了當時JVM中執行緒執行的情況一樣,He
