CSS3和jQuery實現的自定義美化Checkbox
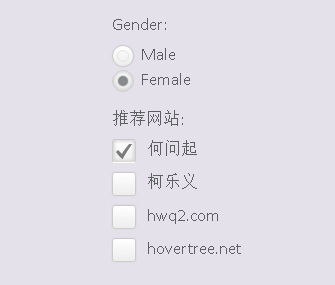
效果圖:
是不是比預設的好看多了,個人的審美觀應該還是可以的。
接下來我們一起來看看實現這款美化版Checkbox的原始碼。主要思路是利用隱藏原來的checkbox和radiobox,用一個div來模擬checkbox/radiobox,並使用jQuery來完成選擇切換時的動畫效果。
先來看看HTML程式碼:
<div class="wrapper"> <ul> <li> <p>Gender:</p> </li><li> <input type="radio" name="radio-btn" />Male </li> <li> <input type="radio" name="radio-btn" />Female </li> </ul> <ul> <li> <p>推薦網站:</p> </li> <li> <input type="checkbox" name="check-box" /> <span>何問起</span> </li> <li> <input type="checkbox" name="check-box" /> <span>柯樂義</span></li> <li> <input type="checkbox" name="check-box" /> <span>hwq2.com</span> </li> <li> <input type="checkbox" name="check-box" /> <span>hovertree.net</span> </li> </ul> </div>
然後我們用jQuery程式碼來為每一個checkbox和radiobox建立一個div,這個div的classname為check-box和radio-btn。
$("input[name="radio-btn"]").wrap("<div class="radio-btn"><i></i></div>");
$("input[name="check-box"]").wrap("<div class="check-box"><i></i></div>");
那麼我們接下來要讓原來的checkbox隱藏,同時設定模擬div的樣式:
.radio-btn input[type="radio"], .check-box input[type="checkbox"] {
visibility: hidden;
}
.check-box {
    width: 22px;
    height: 22px;
    cursor: pointer;
    display: inline-block;
    margin: 2px 7px 0 0;
    position: relative;
    overflow: hidden;
    box-shadow: 0 0 1px #ccc;
    -webkit-border-radius: 3px;
    -moz-border-radius: 3px;
    border-radius: 3px;
    background: rgb(255, 255, 255);
    background: -moz-linear-gradient(top, rgba(255, 255, 255, 1) 0%, rgba(246, 246, 246, 1) 47%, rgba(237, 237, 237, 1) 100%);
    background: -webkit-gradient(linear, left top, left bottom, color-stop(0%, rgba(255, 255, 255, 1)), color-stop(47%, rgba(246, 246, 246, 1)), color-stop(100%, rgba(237, 237, 237, 1)));
    background: -webkit-linear-gradient(top, rgba(255, 255, 255, 1) 0%, rgba(246, 246, 246, 1) 47%, rgba(237, 237, 237, 1) 100%);
    background: -o-linear-gradient(top, rgba(255, 255, 255, 1) 0%, rgba(246, 246, 246, 1) 47%, rgba(237, 237, 237, 1) 100%);
    background: -ms-linear-gradient(top, rgba(255, 255, 255, 1) 0%, rgba(246, 246, 246, 1) 47%, rgba(237, 237, 237, 1) 100%);
    background: linear-gradient(to bottom, rgba(255, 255, 255, 1) 0%, rgba(246, 246, 246, 1) 47%, rgba(237, 237, 237, 1) 100%);
    filter: progid:DXImageTransform.Microsoft.gradient(startColorstr="#ffffff", endColorstr="#ededed", GradientType=0);
    border: 1px solid #ccc;
}
.check-box i {
    background: url("http://hovertree.com/texiao/html5/32/css/check_mark.png") no-repeat center center;
    position: absolute;
    left: 3px;
    bottom: -15px;
    width: 16px;
    height: 16px;
    opacity: .5;
    -webkit-transition: all 400ms ease-in-out;
    -moz-transition: all 400ms ease-in-out;
    -o-transition: all 400ms ease-in-out;
    transition: all 400ms ease-in-out;
    -webkit-transform:rotateZ(-180deg);
    -moz-transform:rotateZ(-180deg);
    -o-transform:rotateZ(-180deg);
    transform:rotateZ(-180deg);
}
.checkedBox {
    -moz-box-shadow: inset 0 0 5px 1px #ccc;
    -webkit-box-shadow: inset 0 0 5px 1px #ccc;
    box-shadow: inset 0 0 5px 1px #ccc;
    border-bottom-color: #fff;
}
.checkedBox i {
    bottom: 2px;
    -webkit-transform:rotateZ(0deg);
    -moz-transform:rotateZ(0deg);
    -o-transform:rotateZ(0deg);
    transform:rotateZ(0deg);
}
/*Custom radio button*/
 .radio-btn {
    width: 20px;
    height: 20px;
    display: inline-block;
    float: left;
    margin: 3px 7px 0 0;
    cursor: pointer;
    position: relative;
    -webkit-border-radius: 100%;
    -moz-border-radius: 100%;
    border-radius: 100%;
    border: 1px solid #ccc;
    box-shadow: 0 0 1px #ccc;
    background: rgb(255, 255, 255);
    background: -moz-linear-gradient(top, rgba(255, 255, 255, 1) 0%, rgba(246, 246, 246, 1) 47%, rgba(237, 237, 237, 1) 100%);
    background: -webkit-gradient(linear, left top, left bottom, color-stop(0%, rgba(255, 255, 255, 1)), color-stop(47%, rgba(246, 246, 246, 1)), color-stop(100%, rgba(237, 237, 237, 1)));
    background: -webkit-linear-gradient(top, rgba(255, 255, 255, 1) 0%, rgba(246, 246, 246, 1) 47%, rgba(237, 237, 237, 1) 100%);
    background: -o-linear-gradient(top, rgba(255, 255, 255, 1) 0%, rgba(246, 246, 246, 1) 47%, rgba(237, 237, 237, 1) 100%);
    background: -ms-linear-gradient(top, rgba(255, 255, 255, 1) 0%, rgba(246, 246, 246, 1) 47%, rgba(237, 237, 237, 1) 100%);
    background: linear-gradient(to bottom, rgba(255, 255, 255, 1) 0%, rgba(246, 246, 246, 1) 47%, rgba(237, 237, 237, 1) 100%);
    filter: progid:DXImageTransform.Microsoft.gradient(startColorstr="#ffffff", endColorstr="#ededed", GradientType=0);
}
.checkedRadio {
    -moz-box-shadow: inset 0 0 5px 1px #ccc;
    -webkit-box-shadow: inset 0 0 5px 1px #ccc;
    box-shadow: inset 0 0 5px 1px #ccc;
}
.radio-btn i {
    border: 1px solid #E1E2E4;
    width: 10px;
    height: 10px;
    position: absolute;
    left: 4px;
    top: 4px;
    -webkit-border-radius: 100%;
    -moz-border-radius: 100%;
    border-radius: 100%;
}
.checkedRadio i {
    background-color: #898A8C;
}/* 何問起 hovertree.com */
上面這段CSS3程式碼就是用樣式來自定義div,讓div的樣式和checkbox和radiobox一樣。
最後我們來模擬點選選中和取消選中,這部分也是用jQuery來實現:
$(".radio-btn").on("click", function () {
    var _this = $(this),
        block = _this.parent().parent();
    block.find("input:radio").attr("checked", false);
    block.find(".radio-btn").removeClass("checkedRadio");
    _this.addClass("checkedRadio");
    _this.find("input:radio").attr("checked", true);
});


$.fn.toggleCheckbox = function () {
    this.attr("checked", !this.attr("checked"));
}
$(".check-box").on("click", function () {
    $(this).find(":checkbox").toggleCheckbox();
    $(this).toggleClass("checkedBox");
});/* 何問起 hovertree.com */
相關推薦
CSS3和jQuery實現的自定義美化Checkbox
效果圖: 是不是比預設的好看多了,個人的審美觀應該還是可以的。 接下來我們一起來看看實現這款美化版Checkbox的原始碼。主要思路是利用隱藏原來的checkbox和radiobox,用一個div來模擬checkbox/radiobox,並使用jQuery來完成選擇切換時的動畫效果。 先來看看H
jQuery實現自定義樣式的彈出視窗和確認框
(function () { $.MsgBox = { Alert: function (title, msg) { GenerateHtml("alert", title, msg); btn
jquery實現--自定義視訊播放器
html <!DOCTYPE html> <html lang="en"> <head> <meta charset="UTF-8"> <meta name="viewport" content="wid
fastjson和SpringMVC實現自定義HttpMessageConverter接收和獲取JSON格式的資料
**引言**:Spring MVC 提供了處理JSON格式請求/響應的HttpMessageConverter利用Jackson 開源包處理JSON格式的請求響應訊息。 ```"關鍵技術"```: **RequestBody**註解 :用於讀取Request請求
通過nsis和duilib實現自定義安裝介面
nsis用於實現安裝邏輯,duilib用於實現UI介面 通過nsis呼叫duilib生成的dll庫來實現。現擷取部分duilib程式碼用於展示如何使用duilib編寫程式碼。 cpp檔案如下: #include <windows.h> #i
Jquery實現自定義訊息彈窗
當覺得瀏覽器的alert彈框太難看時,就會想動手自行編輯彈框啦,首先在html頁面0的插入彈框div。 寫在body結束標籤前就行了。 <div id="cjy-maskBox"><
【Unity編輯器】使用反射和Attribute實現自定義右鍵選單
unity提供了許多Attribute,比如[MenuItem]和[ContextMenu],一個是在編輯器選單欄中新增選單按鈕,一個是在檢視面板新增上下文選單,由於其原理是基於C#的Attribute功能,我們自然可以想到,是否可以自己編寫一套自定義Attribute,來
通過純JS和css實現自定義彈出對話方塊
需求: 實現通過一個彈出對話方塊來選擇下拉列表中對應值進行引數設定操作,及彈出對話方塊中需要有一個下拉列表輸入和一個確定按鈕即可,要求彈出對話方塊後,背部介面不能夠操作或者被遮蔽灰掉。 思路: 1.開始以為so so much simple,毫不猶豫考慮prompt彈出對話
【JQuery】控制元件-實現自定義樣式的彈出視窗和確認框
Html程式碼: <!DOCTYPE html PUBLIC "-//W3C//DTD XHTML 1.0 Transitional//EN" "http://www.w3.org/TR/xhtml1/DTD/xhtml1-transitional.dtd"> <html xmlns="h
freemarker實現自定義指令和自定義函數
數據 dir variables macro 內置 引擎 eem fig turn 自定義指令: 1.指令在前臺實現 <#macro name param1,param2,param3...paramN> </#macro> 2.指令在後臺實
Hadoop完全分散式用MapReduce實現自定義排序、分割槽和分組
經過前面一段時間的學習,簡單的單詞統計已經不能實現更多的需求,就連自帶的一些函式方法等也是跟不上節奏了;加上前面一篇MapReduce的底層執行步驟的瞭解,今天學習自定義的排序、分組、分割槽相對也特別容易。 認為不好理解,先參考一下前面的一篇:https://bl
Netty實現自定義協議和原始碼分析
本篇 主要講的是自定義協議是如何實現的,以及自定義協議中會出現的問題和Netty是如何支援的。 分為4個部分 |– 粘包 拆包 資料包不全 和解決方案 |– 程式碼實現 |– ByteToMessageDecoder的原始碼分析 |– 過程流程圖 粘包
jquery-easyui自定義操作列實現方式
jquery-easyui提供的datagrid元件中,沒有明確給出自定義操作列的實現方式,而我們實際的場景中,操作列是不可少的,因此有必要自定義這一列。 jquery-easyui提供了data-options設定列屬性,可以通過formatter屬性,設定列的展示內容,因此可
自定義UITableView實現自定義左滑刪除按鈕及多按鈕,拖拽cell和表頭進行排序
本文介紹了能拖拽cell和表頭進行排序的自定義UITableView,並且能自定義左滑顯示的UIButton樣式。 先看左滑自定義按鈕效果圖 : override func tableView(_ tableView: UITableView, editA
Hadoop完全分散式下實現自定義排序、分割槽和分組
經過前面一段時間的學習,簡單的單詞統計已經不能實現更多的需求,就連自帶的一些函式方法等也是跟不上節奏了;加上前面一篇MapReduce的底層執行步驟的瞭解,今天學習自定義的排序、分組、分割槽相對也特別容易。 自定義排序 自定義的排序有許多許多,根據不同的業務需
jquery mobiscroll 滑動、滾動及實現自定義選擇
mobiscroll : 滑動選擇 2.13.2版本免費,官網(mobiscroll.com)收費 另外官方還有線上例子: .net 可以在程式包管理控制檯輸入安裝:Install-Package Mobiscroll 下載完成後,保留mobiscroll
利用Proxy代理和Reflect物件實現自定義原型鏈
1. 將代理作為原型鏈 用Object.create( )方法建立原型鏈,同時設定自定義的defineProperty上述例子中,在物件上定義屬性的操作不需要操作物件原型,所以代理中的defineProperty陷阱永遠不會被呼叫。自定義get和set方法後,得到下面修
基於ES6和原生nodejs實現自定義路由,靜態檔案伺服器和增刪查改的MVC架構分享
基於ES6和原生nodejs來實現一個基於MVC的增刪查改功能示例分享 自定義路由的解耦實現 首先分別處理不同方式的請求: const http = require('http'); const url = require('url')
利用jquery.print.js實現自定義網頁列印
最近做專案。客戶好些地方需要列印網頁上的表格,研究了好些方法都不太理想。最後找到一個jquery.print.js列印外掛,非常方便就可以實現想要的網頁列印效果,值得推薦。 實現方法 引用jquery和,jqprint到您的頁面 <script la
使用fastjson與SpringMVC實現自定義HttpMessageConverter接收和獲取JSON格式的資料
1.下載Spring、fastjson的jar包以及jQuery和json2的js檔案,向專案的WEB-INF/lib目錄加入Spring和fastjson的jar包,在WebContent目錄下建立一個js資料夾,向js資料夾中加入jQuery和json2的js檔案。 2

