
整個網路可能最完善的 Android 自定義鍵盤 問題彙總以及解決方案
系統自帶的鍵盤,鍵值太多,不符合客戶的需求,需要自定義鍵盤,如下圖:
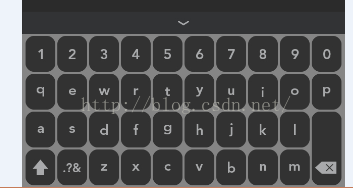

分別是字母和數字的鍵盤,感謝很多前輩提供的例子,朋友們可以到這個連結下載資源:前輩android 自定義鍵盤詳解講的非常清楚,我下了他的程式碼,在這基礎上進行修改,遇到的第一個問題就是第一個圖上的: “ .?&” ,如何在鍵盤上顯示這樣的文字,假設採用樓主設定文字的形式進行設定的時候,會遇到如下錯誤:
<Key android:codes="-2" android:keyLabel=".?&" />
The entity name must immediately follow the ‘&’ in the entity reference
這個錯誤的解決方案是:
主要是xml無法解析 && 這樣一個邏輯符號。所以要將他寫出
<Key android:codes="-2" android:keyLabel=".?&" />這樣就可以了。。
2.好,接著第二個問題:其他特殊符合如“,”之類的都可以使用轉義字元,但遇到“@”,你就不能好好的使用轉義字元來解決了:
<Key android:codes="64" android:keyLabel="@" />
上述程式碼同樣會報一個這樣的錯誤:error: Error: No resource type
specified (at 'keyLabel' with value '@').萬能的百度也沒有搜到解決方
案,我就很奇怪,不是已經轉義了嗎?怎麼還是識別不了呢,後來想想是不是xml
檔案會不會認為@後面還得跟個什麼東西,所以這樣寫就是有錯的,那好我就再用
如下語句:“\”來進行轉義,應該就可以了,我修改成如下的程式碼,儲存,執行
沒有出錯了。
<Key android:codes="64" android:keyLabel="\@" />
<Key android:codes="-5" android:keyEdgeFlags="right" android:isRepeatable="true"android:keyIcon="@drawable/sym_keyboard_delete" />
注意:如果你使用到圖片的話,@drawable/delete這樣的時候,也需要將@進行轉義,這個問題的確很奇怪,我在另外一個xml檔案直接使用是沒有問題的,不知道是什麼原因,大神如果知道的話,麻煩告訴一聲。
3.第三個問題:遇到鍵盤上要顯示反斜槓,也就是“\”的時候,因為\是起轉義
字元的作用,所以要顯示\,需要再進行轉義一次,也就是如下語句:
<Key android:codes="92" android:keyLabel="\\" />
4.在設定了edittext之後,要隱藏系統的軟鍵盤,這時候就會遇到奇怪的問
題,游標消失了並且沒有閃爍,所以百度了一下,將edittext傳入到函式裡面
,然後就可以使用如下方法,就可以使光標出現:
edit = (EditText) this.findViewById(R.id.edit);
// edit.setInputType(InputType.TYPE_NULL);
hideSoftInputMethod(edit);
// 隱藏系統鍵盤
	public void hideSoftInputMethod(EditText ed) {
		getWindow().setSoftInputMode(
				WindowManager.LayoutParams.SOFT_INPUT_STATE_ALWAYS_HIDDEN);

		int currentVersion = android.os.Build.VERSION.SDK_INT;
		String methodName = null;
		if (currentVersion >= 16) {
			// 4.2
			methodName = "setShowSoftInputOnFocus";
		} else if (currentVersion >= 14) {
			// 4.0
			methodName = "setSoftInputShownOnFocus";
		}

		if (methodName == null) {
			ed.setInputType(InputType.TYPE_NULL);
		} else {
			Class<EditText> cls = EditText.class;
			Method setShowSoftInputOnFocus;
			try {
				setShowSoftInputOnFocus = cls.getMethod(methodName,
						boolean.class);
				setShowSoftInputOnFocus.setAccessible(true);
				setShowSoftInputOnFocus.invoke(ed, false);
			} catch (NoSuchMethodException e) {
				ed.setInputType(InputType.TYPE_NULL);
				e.printStackTrace();
			} catch (IllegalAccessException e) {
				// TODO Auto-generated catch block
				e.printStackTrace();
			} catch (IllegalArgumentException e) {
				// TODO Auto-generated catch block
				e.printStackTrace();
			} catch (InvocationTargetException e) {
				// TODO Auto-generated catch block
				e.printStackTrace();
			}
		}
	}
主要是因為各個android系統對於游標的處理是不一樣的,具體的解釋,請大神告知。
5.如果你有如下的需求:在點選介面上任何一個edittext,彈出自定義鍵盤還
有一個按鈕,用來隱藏自定義鍵盤,如下圖:
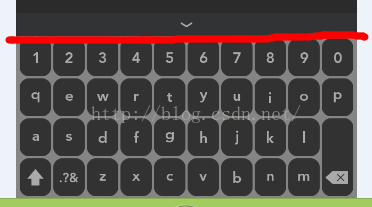
也就是點選隱藏的圖示,隱藏掉自定義鍵盤,這個需求其實蠻簡單的:就是需要
給顯示鍵盤的佈局一個id,當點選隱藏按鈕之後,將佈局Visibility的屬性設定
為Gone或者InVisibility,其中gone表示不佔空間和記憶體。示例如下(部分代
碼:
private RelativeLayout relakey;
	@Override
	public void onCreate(Bundle savedInstanceState) {
		super.onCreate(savedInstanceState);
		setContentView(R.layout.main);
		ctx = this;
		act = this;
		relakey = (RelativeLayout) this.findViewById(R.id.relakey);

		hideshow = (TextView) this.findViewById(R.id.hideshow);
		hideshow.setOnClickListener(new OnClickListener() {

			@Override
			public void onClick(View v) {
				relakey.setVisibility(View.GONE);

			}
		});
		edit = (EditText) this.findViewById(R.id.edit);
		// edit.setInputType(InputType.TYPE_NULL);
		hideSoftInputMethod(edit);

		edit.setOnTouchListener(new OnTouchListener() {
			@Override
			public boolean onTouch(View v, MotionEvent event) {
				relakey.setVisibility(View.VISIBLE);
				hideshow.setVisibility(View.VISIBLE);

				new KeyboardUtil(act, ctx, edit).showKeyboard();
				return false;
			}
		});</span>
在佈局檔案中,一開始設定佈局檔案為gone或者invisible,都是可以的,我的佈局檔案如下:
<?xml version="1.0" encoding="utf-8"?>
<LinearLayout xmlns:android="http://schemas.android.com/apk/res/android"
    android:layout_width="fill_parent"
    android:layout_height="fill_parent"
    android:orientation="vertical" >

    <EditText
        android:id="@+id/edit"
        android:layout_width="fill_parent"
        android:layout_height="wrap_content" />

    <EditText
        android:id="@+id/edit1"
        android:layout_width="fill_parent"
        android:layout_height="wrap_content" />

    <View
        android:layout_width="wrap_content"
        android:layout_height="270dp" />

   <span style="color:#ff0000;"><strong> <RelativeLayout
        android:id="@+id/relakey"
        android:layout_width="fill_parent"
        android:layout_height="wrap_content"
        android:padding="3dp"
        android:visibility="invisible">   <!-- 這個其實就是需要隱藏的佈局,用來控制鍵盤是否顯示與隱藏-->
        <TextView
            android:id="@+id/hideshow"
            android:layout_width="fill_parent"
            android:layout_height="wrap_content"
            android:background="@drawable/ret"
            android:visibility="invisible" />

        <android.inputmethodservice.KeyboardView
            android:id="@+id/keyboard_view"
            android:layout_width="fill_parent"
            android:layout_height="wrap_content"
            android:layout_alignParentBottom="true"
            android:background="@color/white"
            android:focusable="true"
            android:focusableInTouchMode="true"
            android:keyBackground="@drawable/d"
            android:keyTextColor="@color/white"
            android:keyTextSize="20sp"
            android:labelTextSize="15sp"
            android:padding="3dp"
android:visibility="invisible" /></span>
    </RelativeLayout>

</LinearLayout>
只需要在程式碼中對該屬性進行控制,就可以完成上述需求。
6.其他的問題如給key按鍵設定自己的圖片,我會遇到莫名其妙的問題,就是圖片太大,把鍵盤擠出去了,而我使用系統預設的比如刪除、切換大小寫之類的圖片就不會出現這樣的問題,期待大神給予幫助,目前為止還未解決。
7.最後一個問題,如果看過這篇博文的人,android 自定義鍵盤(前輩)應該都知道如果要自定義鍵盤的話,需要重寫裡面的鍵盤佈局xml檔案,其實是很簡單,就是一行一行的進行配置即可,下面對於一些屬性我加上自己的使用經驗和理解,希望給菜鳥一些幫助。
<?xml version="1.0" encoding="UTF-8"?>
<Keyboard android:keyWidth="9.55%p" android:keyHeight="@dimen/key_height2"
	android:horizontalGap="1px" android:verticalGap="3px"
	xmlns:android="http://schemas.android.com/apk/res/android">
	<Row>
		<Key android:codes="49"  android:keyEdgeFlags="left" android:keyLabel="1" />
		<Key android:codes="50" android:keyLabel="2" />
		<Key android:codes="51" android:keyLabel="3" />
		<Key android:codes="52" android:keyLabel="4" />
		<Key android:codes="53" android:keyLabel="5" />
		<Key android:codes="54" android:keyLabel="6" />
		<Key android:codes="55" android:keyLabel="7" />
		<Key android:codes="56" android:keyLabel="8" />
		<Key android:codes="57" android:keyLabel="9" />
		<Key android:codes="48" android:keyLabel="0" android:keyEdgeFlags="right" />
    </Row>
</Keyboard> (1)android:keyWidth="9.55%p":該屬性表示每個鍵盤上的單個按鍵佔據的寬度百分比,舉個例子是:鍵盤總共有3行,每行有10個的話,那麼每個按鍵就是10%。 (2)android:keyHeight="@dimen/key_height2":該屬性用來設定每個單個按鍵所佔的高度,具體的就不細說了,可以用dimen進行靈活配置。
(3)android:horizontalGap="1px" android:verticalGap="3px":這兩個屬性表示:每個按鍵之間在水平和豎直方向的間距,為了美觀,該屬性是必須設定的否則你會發現你的鍵盤醜死了,都擠到一塊去了。
(4)android:keyEdgeFlags="left":表示對於整個鍵盤這一行來說,這個按鍵是居於最左邊的,也可以設定成最右邊,這個屬性我發現如果不設定的話,也不影響鍵盤的正常顯示。
(5android:keyLabel="3":該屬性表示按鍵顯示的文字,可以隨意填,但如果碰到一些xml檔案中不能直接顯示的字元如&、@、‘等需要轉義,如何轉義可以參考上面的第一條建議。
(6)android:codes="48":這個對於該自定義鍵盤來說是非常重要的一個屬表示對於一些數字、字母、標點符號等所有能在鍵盤找到的,必須用ascii碼來對應,對於這些char字元對應的ascii的對應關係,好吧,我就告訴你們,連結如下:ascii碼轉換表ascii轉換對應表當然了,如果想輸入一些奇怪的東西,建議你的codes值不要與ascii碼相同,可以取得很大,就不會有衝突了。
(7)android:keyIcon="@drawable/sym_keyboard_shift":該屬性表示對於該按鍵,你可以自定義自己的圖片放上去。
(8)android:isRepeatable="true":表示對於該按鍵長按是否會連續輸入,這個屬性對於刪除鍵來說極其有效。
如果你用心的閱讀完上述的內容,你肯定也可以設計出自己的自定義鍵盤,有問題隨時與我交流,可以在下方評論,我會及時給與解答。
真的要放大福利了,我的android 自定義鍵盤(包含字母、標點符號)的完善版本已經上傳到csdn,連結如下:android 自定義鍵盤 (nihaoqiulinhe所有)
==================================分割線,更新日期2015年12月21日11:13:55==========================================
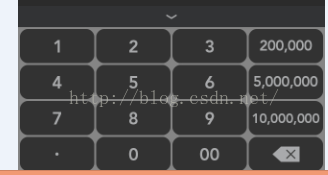
當輸入自定義的鍵盤上的數字時,比如說如果是300000,有這樣一個需求,當點選300000時,要清除掉之前的資料,切換時也需要清除掉,如下鍵盤程式碼:
package client.verbank.mtp.allone.util;

import java.lang.reflect.Field;
import java.lang.reflect.Method;
import java.security.SecureRandom;
import java.util.ArrayList;
import java.util.LinkedList;
import java.util.List;
import java.util.Random;

import android.annotation.TargetApi;
import android.app.Activity;
import android.content.Context;
import android.content.res.TypedArray;
import android.graphics.Rect;
import android.inputmethodservice.Keyboard;
import android.inputmethodservice.Keyboard.Key;
import android.inputmethodservice.KeyboardView;
import android.inputmethodservice.KeyboardView.OnKeyboardActionListener;
import android.os.Build;
import android.os.SystemClock;
import android.text.Editable;
import android.util.AttributeSet;
import android.util.DisplayMetrics;
import android.view.ActionMode;
import android.view.Display;
import android.view.Gravity;
import android.view.KeyEvent;
import android.view.LayoutInflater;
import android.view.Menu;
import android.view.MenuItem;
import android.view.MotionEvent;
import android.view.View;
import android.view.ViewGroup;
import android.view.Window;
import android.view.WindowManager;
import android.view.inputmethod.EditorInfo;
import android.view.inputmethod.InputMethodManager;
import android.widget.EditText;
import android.widget.PopupWindow;
import android.widget.PopupWindow.OnDismissListener;
import client.verbank.mtp.allone.R;
import client.verbank.mtp.allone.consts.ISystemCommData;

/**
 * 數字鍵盤:專門針對金額的鍵盤,不能輸入小數位
 *
 * @Project: FEIB_AndroidStation
 * @Title: MyKeyboardDigital.java
 * @Package client.verbank.mtp.allone.util
 * @Description: TODO
 * @author qiulinhe [email protected]
 * @date 2015年10月14日 上午11:04:48
 * @Copyright: 2015 www.allone.cn Inc. All rights reserved.
 * @version V3.0.0
 */
public class MyKeyboardDigitalAmount extends EditText implements
		OnKeyboardActionListener, ISystemCommData {

	private Keyboard k1;// 字母鍵盤
	private Keyboard k2;// 標點符號鍵盤
	private Keyboard k3;// 數字鍵盤
	public boolean isnun = false;// 是否標點符號鍵盤
	public boolean isupper = false;// 是否大寫

	private KeyboardView mKeyboardView;
	private Keyboard mKeyboard;

	private Window mWindow;
	private View mDecorView;
	private View mContentView;

	private PopupWindow mKeyboardWindow;

	private boolean needcustomkeyboard = true; // 是否啟用自定義鍵盤
	private boolean randomkeys = false; // 數字按鍵是否隨機

	private int scrolldis = 100; // 輸入框在鍵盤被彈出時,要被推上去的距離

	public static int screenw = -1;// 未知寬高
	public static int screenh = -1;
	public static int screenh_nonavbar = -1; // 不包含導航欄的高度
	public static int real_scontenth = -1; // 實際內容高度, 計算公式:螢幕高度-導航欄高度-電量欄高度

	public static float density = 1.0f;
	public static int densityDpi = 160;

	// 接收使用者在系統設定介面的自定義金額
	String selfdig20 = "200,000";
	String orgindi20 = "200,000";
	// 接收使用者在系統設定介面的自定義金額
	String selfdig50 = "500,000";
	String orgindi50 = "500,000";
	// 接收使用者在系統設定介面的自定義金額
	String selfdig100 = "1,000,000";
	String orgindi100 = "1,000,000";

	/**
	 * @param context
	 *
	 * @param attrs
	 */
	public MyKeyboardDigitalAmount(Context context, AttributeSet attrs) {
		super(context, attrs);
		initAttributes(context);
		initKeyboard(context, attrs);

		// TODO Auto-generated constructor stub
	}

	/**
	 * @param context
	 * @param attrs
	 * @param defStyle
	 */
	public MyKeyboardDigitalAmount(Context context, AttributeSet attrs,
			int defStyle) {
		super(context, attrs, defStyle);

		selfdig20 = SharepreferencesUtilSystemSettings.getValue(getContext(),
				System_key_SelfAmout2, "200,000");
		selfdig50 = SharepreferencesUtilSystemSettings.getValue(getContext(),
				System_key_SelfAmout5, "500,000");
		selfdig100 = SharepreferencesUtilSystemSettings.getValue(getContext(),
				System_key_SelfAmout10, "1,000,000");
		initAttributes(context);
		initKeyboard(context, attrs);
		// TODO Auto-generated constructor stub
	}

	private void initKeyboard(Context context, AttributeSet attrs) {
		selfdig20 = SharepreferencesUtilSystemSettings.getValue(getContext(),
				System_key_SelfAmout2, "200,000");
		selfdig50 = SharepreferencesUtilSystemSettings.getValue(getContext(),
				System_key_SelfAmout5, "500,000");
		selfdig100 = SharepreferencesUtilSystemSettings.getValue(getContext(),
				System_key_SelfAmout10, "1,000,000");
		TypedArray a = context.obtainStyledAttributes(attrs,
				R.styleable.keyboard);

		if (a.hasValue(R.styleable.keyboard_xml)) {
			needcustomkeyboard = true;

			int xmlid = a.getResourceId(R.styleable.keyboard_xml, 0);

			mKeyboard = new Keyboard(context, xmlid);

			mKeyboardView = (KeyboardView) LayoutInflater.from(context)
					.inflate(R.layout.mykeyboardviewdigit, null);
			if (a.hasValue(R.styleable.keyboard_randomkeys)) {
				boolean random = a.getBoolean(R.styleable.keyboard_randomkeys,
						false);
				randomkeys = random;

				if (random) {
					randomdigkey(mKeyboard);
				}
			}
			selfdig20 = SharepreferencesUtilSystemSettings.getValue(
					getContext(), System_key_SelfAmout2, "200,000");
			selfdig50 = SharepreferencesUtilSystemSettings.getValue(
					getContext(), System_key_SelfAmout5, "500,000");
			selfdig100 = SharepreferencesUtilSystemSettings.getValue(
					getContext(), System_key_SelfAmout10, "1,000,000");
			selfdigkey();
			// mKeyboardView.setKeyboard(mKeyboard);
			mKeyboardView.setEnabled(true);
			mKeyboardView.setPreviewEnabled(false);
			mKeyboardView.setOnKeyboardActionListener(this);

			mKeyboardWindow = new PopupWindow(mKeyboardView,
					ViewGroup.LayoutParams.MATCH_PARENT,
					ViewGroup.LayoutParams.WRAP_CONTENT);
			mKeyboardWindow.setAnimationStyle(R.style.AnimationFade);
			// mKeyboardWindow.setBackgroundDrawable(new BitmapDrawable());
			// mKeyboardWindow.setOutsideTouchable(true);
			mKeyboardWindow.setOnDismissListener(new OnDismissListener() {

				@Override
				public void onDismiss() {
					// TODO Auto-generated method stub
					if (scrolldis > 0) {
						int temp = scrolldis;
						// scrolldis = 0;
						if (null != mContentView) {
							mContentView.scrollBy(0, -temp);
						}
					}
				}
			});
		} else {
			needcustomkeyboard = false;
		}

		a.recycle();

	}

	private void showKeyboard() {
		if (null != mKeyboardWindow) {
			if (!mKeyboardWindow.isShowing()) {
				if (randomkeys) {
					randomdigkey(mKeyboard);
				}

				selfdig20 = SharepreferencesUtilSystemSettings.getValue(
						getContext(), System_key_SelfAmout2, "200,000");
				selfdig50 = SharepreferencesUtilSystemSettings.getValue(
						getContext(), System_key_SelfAmout5, "500,000");
				selfdig100 = SharepreferencesUtilSystemSettings.getValue(
						getContext(), System_key_SelfAmout10, "1,000,000");
				selfdigkey();
				// mKeyboardView.setKeyboard(mKeyboard);

				mKeyboardWindow.setAnimationStyle(R.style.AnimBottom);
				mKeyboardWindow.showAtLocation(this.mDecorView, Gravity.RIGHT
						| Gravity.BOTTOM, 0, 0);
				mKeyboardWindow.update();

				if (null != mDecorView && null != mContentView) {
					int[] pos = new int[2];
					// 計算彈出的鍵盤的尺寸
					getLocationOnScreen(pos);
					float height = dpToPx(getContext(), 240);

					// int []hsmlpos=new int[2];
					// mDecorView.getLocationOnScreen(hsmlpos);

					Rect outRect = new Rect();
					// 然後該View有個getWindowVisibleDisplayFrame()方法可以獲取到程式顯示的區域,
					// * 包括標題欄,但不包括狀態列。
					mDecorView.getWindowVisibleDisplayFrame(outRect);// 獲得view空間,也就是除掉標題欄
					// outRect.top表示狀態列(通知欄)
					int screen = real_scontenth;
					// scrolldis = (int) ((pos[1] + getMeasuredHeight() -
					// outRect.top)
					// - (screen - height) + 500);

					if (scrolldis > 0) {
						mContentView.scrollBy(0, scrolldis);
					}
				}

			}
		}
	}

	private void hideKeyboard() {
		if (null != mKeyboardWindow) {
			if (mKeyboardWindow.isShowing()) {
				mKeyboardWindow.dismiss();
			}
		}
	}

	private void hideSysInput() {
		if (this.getWindowToken() != null) {
			InputMethodManager imm = (InputMethodManager) getContext()
					.getSystemService(Context.INPUT_METHOD_SERVICE);
			imm.hideSoftInputFromWindow(this.getWindowToken(), 0);
		}
	}

	@Override
	public boolean onTouchEvent(MotionEvent event) {
		super.onTouchEvent(event);
		requestFocus();
		requestFocusFromTouch();

		if (needcustomkeyboard) {
			hideSysInput();
			showKeyboard();
		}

		return true;
	}

	@Override
	public boolean onKeyDown(int keyCode, KeyEvent event) {
		if (keyCode == KeyEvent.KEYCODE_BACK) {
			if (null != mKeyboardWindow) {
				if (mKeyboardWindow.isShowing()) {
					mKeyboardWindow.dismiss();
					return true;
				}
			}
		}

		return super.onKeyDown(keyCode, event);

	}

	@Override
	public void onAttachedToWindow() {
		super.onAttachedToWindow();

		this.mWindow = ((Activity) getContext()).getWindow();
		this.mDecorView = this.mWindow.getDecorView();
		this.mContentView = this.mWindow
				.findViewById(Window.ID_ANDROID_CONTENT);

		hideSysInput();
	}

	@Override
	public void onDetachedFromWindow() {
		super.onDetachedFromWindow();

		hideKeyboard();

		mKeyboardWindow = null;
		mKeyboardView = null;
		mKeyboard = null;

		mDecorView = null;
		mContentView = null;
		mWindow = null;
	}

	@Override
	public void onPress(int primaryCode) {
		// TODO Auto-generated method stub

	}

	@Override
	public void onRelease(int primaryCode) {
		// TODO Auto-generated method stub

	}

	@Override
	public void onKey(int primaryCode, int[] keyCodes) {
		// TODO Auto-generated method stub
		Editable editable = this.getText();
		int start = this.getSelectionStart();
		if (primaryCode == Keyboard.KEYCODE_CANCEL) {// 隱藏鍵盤
			hideKeyboard();
		} else if (primaryCode == Keyboard.KEYCODE_DELETE) {// 回退
			if (editable != null && editable.length() > 0) {
				if (start > 0) {
					editable.delete(start - 1, start);
				}
			}
		} else if (primaryCode == Keyboard.KEYCODE_SHIFT) {// 大小寫切換
			changeKey();
			mKeyboardView.setKeyboard(k1);

		}

		else if (primaryCode == Keyboard.KEYCODE_DONE) {// 標點符號鍵盤切換
			if (isnun) {
				isnun = false;
				mKeyboardView.setKeyboard(k1);
			} else {
				isnun = true;
				mKeyboardView.setKeyboard(k2);
			}
		}
		// else if (primaryCode == 46) {
		//
		// // 當用戶輸入.3的時候自動轉換為0.3
		// if (editable != null && editable.length() > 0) {
		// if (start > 0) {
		// editable.insert(start, ".");
		// }
		// } else {
		// editable.insert(start, "0.");
		// }
		//
		// }

		else if (primaryCode == -110) {
			editable.insert(start, "00");
		} else if (primaryCode == -20000) {
			editable.clear();
			editable.insert(0, selfdig20);
		} else if (primaryCode == -50000) {
			editable.clear();
			editable.insert(0, selfdig50);
		} else if (primaryCode == -10000) {
			editable.clear();
			editable.insert(0, selfdig100);
		} else if (0x0 <= primaryCode && primaryCode <= 0x7f) {
			// 可以直接輸入的字元(如0-9,.),他們在鍵盤對映xml中的keycode值必須配置為該字元的ASCII碼
			editable.insert(start, Character.toString((char) primaryCode));
		} else if (primaryCode > 0x7f) {
			Key mkey = getKeyByKeyCode(primaryCode);
			// 可以直接輸入的字元(如0-9,.),他們在鍵盤對映xml中的keycode值必須配置為該字元的ASCII碼
			editable.insert(start, mkey.label);

		} else {
			// 其他一些暫未開放的鍵指令,如next到下一個輸入框等指令
		}
	}

	// 數字鍵盤測試是否改變200,000和500,000讓使用者自定義

	private void selfdigkey() {
		if (mKeyboard == null) {
			return;
		}

		List<Key> keyList = k3.getKeys();

		// 查找出0-9的數字鍵
		for (int i = 0, size = keyList.size(); i < size; i++) {
			Key key = keyList.get(i);

			CharSequence label = key.label;
			// if (label != null && label.toString().equals(orgindi20)) {
			// keyList.get(i).label = selfdig;
			// orgindi20 = selfdig;
			// }

			if (label != null && label.toString().equals(orgindi20)) {
				keyList.get(i).label = selfdig20;
				keyList.get(i).codes[0] = -20000;
				orgindi20 = selfdig20;
			}
			if (label != null && label.toString().equals(orgindi50)) {
				keyList.get(i).label = selfdig50;
				keyList.get(i).codes[0] = -50000;
				orgindi50 = selfdig50;
			}
			if (label != null && label.toString().equals(orgindi100)) {
				keyList.get(i).label = selfdig100;
				keyList.get(i).codes[0] = -10000;
				orgindi100 = selfdig100;
			}
		}

		mKeyboardView.setKeyboard(k3);
	}

	/**
	 * 鍵盤大小寫切換
	 */
	private void changeKey() {
		List<Key> keylist = k1.getKeys();
		if (isupper) {// 大寫切換小寫
			isupper = false;
			for (Key key : keylist) {
				if (key.label != null && isword(key.label.toString())) {
					key.label = key.label.toString().toLowerCase();
					key.codes[0] = key.codes[0] + 32;
				}
			}
		} else {// 小寫切換大寫
			isupper = true;
			for (Key key : keylist) {
				if (key.label != null && isword(key.label.toString())) {
					key.label = key.label.toString().toUpperCase();
					key.codes[0] = key.codes[0] - 32;
				}
			}
		}
	}

	private boolean isword(String str) {
		String wordstr = "abcdefghijklmnopqrstuvwxyz";
		if (wordstr.indexOf(str.toLowerCase()) > -1) {
			return true;
		}
		return false;
	}

	@Override
	public void onText(CharSequence text) {
		// TODO Auto-generated method stub

	}

	@Override
	public void swipeLeft() {
		// TODO Auto-generated method stub

	}

	@Override
	public void swipeRight() {
		// TODO Auto-generated method stub

	}

	@Override
	public void swipeDown() {
		// TODO Auto-generated method stub

	}

	@Override
	public void swipeUp() {
		// TODO Auto-generated method stub

	}

	private Key getKeyByKeyCode(int keyCode) {
		if (null != mKeyboard) {
			List<Key> mKeys = mKeyboard.getKeys();
			for (int i = 0, size = mKeys.size(); i < size; i++) {
				Key mKey = mKeys.get(i);

				int codes[] = mKey.codes;

				if (codes[0] == keyCode) {
					return mKey;
				}
			}
		}

		return null;
	}

	private void initAttributes(Context context) {

		k1 = new Keyboard(context, R.xml.qwerty);
		k2 = new Keyboard(context, R.xml.qwerty2);
		k3 = new Keyboard(context, R.xml.amountinputkeyboard);

		initScreenParams(context);
		this.setLongClickable(false);
		this.setImeOptions(EditorInfo.IME_FLAG_NO_EXTRACT_UI);
		removeCopyAbility();

		if (this.getText() != null) {
			this.setSelection(this.getText().length());
		}

		this.setOnFocusChangeListener(new OnFocusChangeListener() {

			@Override
			public void onFocusChange(View v, boolean hasFocus) {
				// TODO Auto-generated method stub
				if (!hasFocus) {
					hideKeyboard();
				}
			}
		});

	}

	@TargetApi(11)
	private void removeCopyAbility() {
		if (Build.VERSION.SDK_INT >= Build.VERSION_CODES.HONEYCOMB) {
			this.setCustomSelectionActionModeCallback(new ActionMode.Callback() {

				@Override
				public boolean onCreateActionMode(ActionMode mode, Menu menu) {
					return false;
				}

				@Override
				public boolean onPrepareActionMode(ActionMode mode, Menu menu) {
					return false;
				}

				@Override
				public void onDestroyActionMode(ActionMode mode) {

				}

				@Override
				public boolean onActionItemClicked(ActionMode mode,
						MenuItem item) {
					return false;
				}
			});
		}
	}

	private boolean isNumber(String str) {
		String wordstr = "0123456789";
		if (wordstr.indexOf(str) > -1) {
			return true;
		}
		return false;
	}

	private void randomdigkey(Keyboard mKeyboard) {
		if (mKeyboard == null) {
			return;
		}

		List<Key> keyList = mKeyboard.getKeys();

		// 查找出0-9的數字鍵
		List<Key> newkeyList = new ArrayList<Key>();
		for (int i = 0, size = keyList.size(); i < size; i++) {
			Key key = keyList.get(i);
			CharSequence label = key.label;
			if (label != null && isNumber(label.toString())) {
				newkeyList.add(key);
			}
		}

		int count = newkeyList.size();

		List<KeyModel> resultList = new ArrayList<KeyModel>();

		LinkedList<KeyModel> temp = new LinkedList<KeyModel>();

		for (int i = 0; i < count; i++) {
			temp.add(new KeyModel(48 + i, i + ""));
		}

		Random rand = new SecureRandom();
		rand.setSeed(SystemClock.currentThreadTimeMillis());

		for (int i = 0; i < count; i++) {
			int num = rand.nextInt(count - i);
			KeyModel model = temp.get(num);
			resultList.add(new KeyModel(model.getCode(), model.getLable()));
			temp.remove(num);
		}

		for (int i = 0, size = newkeyList.size(); i < size; i++) {
			Key newKey = newkeyList.get(i);
			KeyModel resultmodle = resultList.get(i);
			newKey.label = resultmodle.getLable();
			newKey.codes[0] = resultmodle.getCode();
		}

	}

	class KeyModel {

		private Integer code;
		private String label;

		public KeyModel(Integer code, String lable) {
			this.code = code;
			this.label = lable;
		}

		public Integer getCode() {
			return code;
		}

		public void setCode(Integer code) {
			this.code = code;
		}

		public String getLable() {
			return label;
		}

		public void setLabel(String lable) {
			this.label = lable;
		}

	}

	/**
	 * 密度轉換為畫素值
	 *
	 * @param dp
	 * @return
	 */
	public static int dpToPx(Context context, float dp) {
		final float scale = context.getResources().getDisplayMetrics().density;
		return (int) (dp * scale + 0.5f);
	}

	private void initScreenParams(Context context) {
		DisplayMetrics dMetrics = new DisplayMetrics();
		WindowManager windowManager = (WindowManager) context
				.getSystemService(Context.WINDOW_SERVICE);
		Display display = windowManager.getDefaultDisplay();
		display.getMetrics(dMetrics);

		screenw = dMetrics.widthPixels;
		screenh = dMetrics.heightPixels;
		density = dMetrics.density;
		densityDpi = dMetrics.densityDpi;

		screenh_nonavbar = screenh;

		int ver = Build.VERSION.SDK_INT;

		// 新版本的android 系統有導航欄,造成無法正確獲取高度
		if (ver == 13) {
			try {
				Method mt = display.getClass().getMethod("getRealHeight");
				screenh_nonavbar = (Integer) mt.invoke(display);
			} catch (Exception e) {
			}
		} else if (ver > 13) {
			try {
				Method mt = display.getClass().getMethod("getRawHeight");
				screenh_nonavbar = (Integer) mt.invoke(display);
			} catch (Exception e) {
			}
		}

		real_scontenth = screenh_nonavbar - getStatusBarHeight(context);

	}

	/**
	 * 電量欄高度
	 *
	 * @return
	 */
	public static int getStatusBarHeight(Context context) {
		Class<?> c = null;
		Object obj = null;
		Field field = null;
		int x = 0, sbar = 0;
		try {
			c = Class.forName("com.android.internal.R$dimen");
			obj = c.newInstance();
			field = c.getField("status_bar_height");
			x = Integer.parseInt(field.get(obj).toString());
			sbar = context.getResources().getDimensionPixelSize(x);
		} catch (Exception e1) {
			e1.printStackTrace();
		}

		return sbar;
	}

}
相關推薦
整個網路可能最完善的 Android 自定義鍵盤 問題彙總以及解決方案
系統自帶的鍵盤,鍵值太多,不符合客戶的需求,需要自定義鍵盤,如下圖: 分別是字母和數字的鍵盤,感謝很多前輩提供的例子,朋友們可以到這個連結下載資源:前輩android 自定義鍵盤詳解講的非常清楚,我下了他的程式碼,在這基礎上進行修改,
Android 自定義視訊錄製終極解決方案(翻轉問題)
Android 自定義視訊錄製翻轉問題終極解決方案 自定義視訊錄製 使用系統可用播放器 前後攝像和視訊反轉問題 總結 自定義視訊錄製 mediarecorder = new MediaRecorder();// 建立mediarecorde
Android自定義鍵盤問題記錄
公司為了保障密碼安全,研發了一套自定義鍵盤取代系統鍵盤,原理很簡單,一個PopupWindow,在EditText獲得焦點時show,失去焦點dismiss。 但用在專案組上的時候出現問題。 專案的輸入框 &nbs
Android 自定義鍵盤輸入內容監聽
文章內容結構按照STAR法則展開的: situation: 為何要監聽輸入內容? 一般正常的監聽鍵盤輸入內容,都是用Editext控制元件來實現使用者的輸入
android 自定義鍵盤輸入密碼控制元件
直接上程式碼 public class PwdInputView extends RelativeLayout { private Context mContext; private GridView
Android自定義鍵盤,鍵盤文字模糊問題
自己自定義的鍵盤在手機上面顯示的鍵盤文字非常模糊不清,像是有了陰影效果一樣,如圖: 碰見這種情況,兩種解決辦法: 1.讓美工給你切圖,在key的xml中設定key文字不用keyLabel ,而
android 自定義相機旋轉問題解決及照片自動旋轉問題解決
//自動旋轉180情況下 myCamera = Camera.open(); myCamera .setDisplayOrientation(180); //圖片旋轉180情況下解決方法 par
Android自定義鍵盤詳解、自定義輸入法簡介
概述 Android中有兩個系統類是用來實現鍵盤的,分別是Keyboard和KeyboardView。 Keyboard有個內部類Key,用於記錄每個鍵的資訊,如code、width、height等。而KeyBorad則持有一個List用於儲存所有Key,並
android 自定義鍵盤 游標只在前面無法變動
今天做了一個自定義鍵盤,發現手指無法移動游標。 下面是解決方案: getWindow().setSoftInputMode(WindowManager.LayoutParams.SOFT_INPUT_STATE_ALWAYS_HIDDEN); try {
android自定義鍵盤與更改單個Keys的背景色
@Overridepublic void onDraw(Canvas canvas) { super.onDraw(canvas); List<Key> keys = g
android 自定義圓角ImageView以及鋸齒的處理
看到很多人開發過程中要使用圓角圖片時,解決方法有: 1.重新繪製一張圖片 2.通過佈局來配置 3.通過重寫View來實現 其中1,2在這裡就不講了,重點講講方法三的實現。實現一:通過擷取畫布一個圓形區域與圖片的相交部分進行繪製,缺點:鋸齒明顯,設定Paint,Canvas抗
Android 自定義鍵盤 隨機鍵盤(完全定製,向上頂佈局,點選按鈕進行隱藏)
之前上傳的另外一個自定義鍵盤,並沒有實現鍵盤彈出的時候,佈局向上自動調整。(網路上所有的自定義鍵盤都沒有新增自適應的功能,而且佈局沒這麼好看,上一個例子資源連結為:http://download.csdn.net/detail/omayyouhappy/91118
android自定義鍵盤 限制車牌號碼輸入
執行效果: 核心程式碼: <?xml version="1.0" encoding="utf-8"?> <RelativeLayout xmlns:android="http://schemas.android.com/apk/res/an
iOS11 自定義UIBarButtonItem顯示異常解決方案
使用button載入網路圖片顯示異常 iOS11之前正常: self.leftButton = [UIButton buttonWithType:UIButtonTypeCustom];
企業級自定義表單引擎解決方案(一)--總體介紹
大家回想一下,有多少軟體公司,多少專案,多少初中級程式設計師在做著CRUD方面的一些重複而繁雜的工作呢?對於公司專案來說,可能60-70%的成本都花費在CRUD方面的開發管理上,對於程式設計師職業生涯來說,可能也有60-70%的工作也是在做著一些CRUD方面的工作,無可否認,作者也是。 如果這些CRU
企業級自定義表單引擎解決方案(三)--實體物件模型設計
自定義表單設計的目標是不編寫程式碼,由設計人員在介面設計表單配置,使用者就能使用具體的功能模組了,對於這個目標,首先要解決的就是資料儲存以及資料庫與表單之間的對映問題。 平時如果使用過程式碼生成工具,應該對大體的過程有些認識。要麼從資料庫讀取已經定義好的表結構,工具生成實體部分程式碼,或者是與框架強相
企業級自定義表單引擎解決方案(三)--實體物件模型實現
實體物件模型與資料庫對應實現 主要是解決實體物件模型與資料庫之間的一一對應,在介面上新增實體物件模型,增加欄位,則同步管理業務實體資料庫表結構,主要的思路就是介面上修改了實體模型,同步執行修改資料庫表結構的Sql語句(已經運行了一段時間的業務表,需要DBA實現修改資料庫再修改實體模型),介面大概如下:
android 自定義網路變化時全域性提醒
前言:今天在鴻洋大神的公眾號中看到一篇文章,叫10分鐘讓你實現在APP中對網路狀態變化進行全域性提醒。這在APP開發中是一個硬性需求,雖然我開發的app並沒有要求,但我覺得這個功能有必要親手實現一下。當然我也借鑑了作者的一些思路 參考文章:https://mp.weixin.qq.com/s
Android自定義Movie播放網路gif圖片
之前看到過一些帖子播放gif圖片的,大概看過兩種版本,一種是使用把gif解碼,分為一幀一幀的播放,另一種就是直接播放gif圖片。可以使用Movie類來播放,一種是使用框架,一個是android-gifview,另一個是android-gif-drawable,前者載入小的gif圖片沒問題
Android 自定義橫向進度條(可動態設定最大值)
自定義橫向進度條 主佈局檔案中包 含 <LinearLayout android:id="@+id/linearlayout" android:layout_width="match_parent" androi