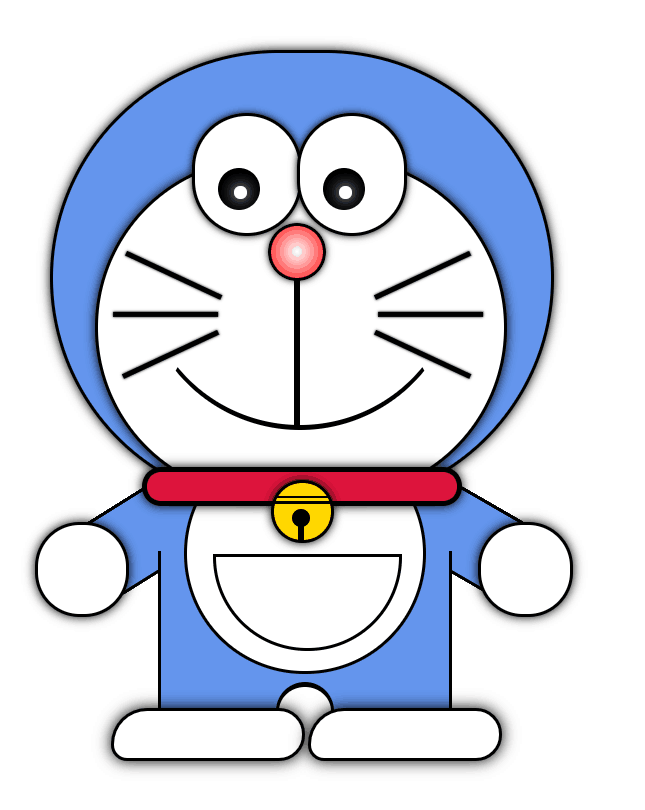
css3+html5——機器貓哆啦A夢+手、腳、頭動起來!
看起來難實則簡單的哆啦A夢設計,調格式需要有耐心哦!
效果如下:
<!DOCTYPE html>
<html lang="en">
<head>
    <meta charset="UTF-8">
    <title>機器貓</title>
    <style type="text/css">
        *{
            margin: 0;
            padding:0;
        }
        .wrap{
            width: 600px;
            margin: 0 auto;
            padding-top: 20px;
            padding-left: 90px;
        }
        /*頭部*/
        .headRadius{
            width: 190px;
            height:172px;
            background: cornflowerblue;
            border:1px solid black;
            border-radius: 120px;
            box-shadow: 0px 0px 6px 0px rgba(0,0,0,5);/*設定陰影*/

        }

        /*眼睛*/
        .eye{
            width: 40px;
            height:45px;
            position:absolute;
            margin-top: 23px;
            background: white;
            border:1px solid black;
            border-radius: 130px;
            box-shadow: 0px 0px 4px 0px rgba(0,0,0,5);/*設定陰影*/
            z-index: 20;
        }
        .eye1{
            margin-left: 53px;
        }
        .eye2{
            margin-left: 93px;
        }
        /*眼球*/
        .eyeball{
            width:16px;
            height:16px;
            position: absolute;
            margin-left: 9px;
            margin-top:20px;
            background: black;
            border-radius: 120px;
            animation: wave 0.5s infinite;/*動畫呼叫*/
            transform-origin: center bottom;/*旋轉中心點*/
        }
        /*動畫效果定義*/
        @keyframes wave {
            0%{
                transform: rotate(-6deg);
            }
            50%{
                transform: rotate(6deg);
            }
            100%{
                transform: rotate(-6deg);
            }
        }
        .eyeball_in{
            width: 5px;
            height:5px;
            position: absolute;
            margin-top: 7px;
            margin-left: 6px;
            background: white;
            border-radius: 12px;
            box-shadow: 0px 0px 9px 0px rgba(255,255,255,5);/*設定陰影*/
        }
        /*臉*/
        .face{
            width: 155px;
            height:128px;
            position: absolute;
            margin-top: 40px;
            margin-left: 16px;
            background: white;
            border:1px solid black;
            border-radius: 120px;
            box-shadow: 0px 0px 6px 0px rgba(0,0,0,5);/*設定陰影*/
            z-index: 4;
        }
        /*鼻子*/
        .nose{
            width:20px;
            height: 20px;
            position: absolute;
            margin-top: 24px;
            margin-left: 65px;
            background: radial-gradient(white 1%,red);
            box-shadow: 0px 0px 4px 0px rgba(0,0,0,5);/*設定陰影*/
            border-radius: 20px;
            border:1px solid black;
        }
        /*鼻子下面的豎線*/
        .nose_vertical{
            width: 2px;
            height: 56px;
            background: black;
            margin-top:45px;
            margin-left:75px;
        }
        /*嘴巴*/
        .mouth{
            width:120px;
            height:120px;
            position: absolute;
            margin-top:21px;
            margin-left: 33px;
            background: transparent;
            /*background: pink;*/
            border-radius: 150px;
            border-top: 1px solid transparent;
            border-left: 1px solid transparent;
            border-right: 1px solid transparent;
            border-bottom: 2px solid black;
            z-index: 5;
        }
        /*鬍鬚*/
        .whisker{
            width: 2px;
            height: 40px;
            position: absolute;
            background: black;
            box-shadow: 0px 0px 1px 0px rgba(0,0,0,5);/*設定陰影*/
            z-index: 5;
        }
        .w1{
            margin-top: 65px;
            margin-left: 45px;
            transform: rotate(115deg);/*傾斜角度*/
        }
        .w2{
            margin-top: 80px;
            margin-left: 42px;
            transform: rotate(90deg);
            /*-webkit-box-reflect: right 50px;!*靠右50px形成對稱*!*/
        }
        .w3{
            margin-top: 95px;
            margin-left: 44px;
            transform: rotate(65deg);
        }
        .w4{
            margin-top: 65px;
            margin-left: 140px;
            transform: rotate(65deg);
        }
        .w5{
            margin-top: 80px;
            margin-left: 143px;
            transform: rotate(90deg);
        }
        .w6{
            margin-top: 95px;
            margin-left: 140px;
            transform: rotate(115deg);
        }
        /*領帶*/
        .necktie{
            width: 118px;
            height: 11px;
            position: absolute;
            margin-top: 158px;
            margin-left: 34px;
            background: crimson;
            border-radius: 10px;
            border:2px solid black;
            box-shadow: 0px 0px 6px 0px rgba(0,0,0,5);/*設定陰影*/
            z-index: 5;
        }
        /*勳章*/
        .medal{
            width:22px;
            height:22px;
            position: absolute;
            margin-top: 163px;
            margin-left: 83px;
            background: gold;
            border-radius: 20px;
            border:1px solid black;
            box-shadow: 0px 0px 6px 0px rgba(0,0,0,5);/*設定陰影*/
            animation: wave 1s infinite;/*動畫呼叫*/
            transform-origin: center top;/*旋轉中心點*/
            z-index: 6;
        }
        /*勳章上的線*/
        .line{
            height:1px;
            position: absolute;
            background: black;
        }
        .L1{
            width: 20px;
            margin-top: 5px;
            margin-left: 1px;
        }
        .L2{
            width: 22px;
            margin-top: 7px;
        }
        /*勳章上的小黑圓點*/
        .blackCir{
            width:7px;
            height:7px;
            position: absolute;
            margin-top: 10px;
            margin-left: 7px;
            background: black;
            border-radius: 120px;
        }
        /*勳章上的第三條線*/
        .line3{
            width: 2px;
            height:6px;
            position: absolute;
            margin-top: 16px;
            margin-left: 9.5px;            /*強迫症很頭疼*/
            background: black;
        }
        /*左邊袖子*/
        .leftSleeve{
            width: 29px;
            height:58px;
            position: absolute;
            margin-top: 150px;
            margin-left: 25px;
            background: cornflowerblue;
            border-radius: 60px 0px 12px 12px;
            border:1px solid black;
            transform: rotate(58deg);/*傾斜角度*/
            z-index: 1;
        }
        /*右邊袖子*/
        .rightSleeve{
            width: 29px;
            height:58px;
            position: absolute;
            margin-top: 150px;
            margin-left: 135px;
            background: cornflowerblue;
            border-radius: 12px 12px 0px 60px;
            border:1px solid black;
            transform: rotate(120deg);
            z-index: 1;
        }
        /*衣服中間矩形*/
        .clothes{
            width: 110px;
            height: 70px;
            position: absolute;
            margin-top: 190px;
            margin-left: 40px;
            background: cornflowerblue;
            border-left: 1px solid black;
            border-right: 1px solid black;
            z-index: 2;
        }
        /*衣服中間的大白圓*/
        .Circular{
            width: 90px;
            height:90px;
            position: absolute;
            margin-top: 145px;
            margin-left: 50px;
            background: white;
            border: 1px solid black;
            border-radius: 120px;
            z-index: 3;
        }
        /*肚子中間半圓*/
        .midCircular{
            width: 70px;
            height:35px;
            position: absolute;
            margin-top: 45px;
            margin-left: 10px;
            border-radius: 0px 0px 100px 100px;/*半圓*/
            background: white;
            border: 1px solid black;

        }
        /*手*/
        .hand{
            width:34px;
            height:34px;
            position: absolute;
            border-radius: 17px;
            background: white;
            border: 1px solid black;
            box-shadow: 0px 0px 6px 0px rgba(0,0,0,5);/*設定陰影*/
            animation: wave 2.5s infinite;/*動畫呼叫*/
            transform-origin: center top;/*旋轉中心點*/
            z-index: 2;
        }
        .leftHand{
            margin-top: 179px;
            margin-left: -7px;
        }
        .rightHand{
            margin-top: 179px;
            margin-left: 162px;
        }
        /*腳*/
        .foot{
            width: 72px;
            height:18px;
            position: absolute;
            background: white;
            border-radius: 18px 13px 13px 8px;
            border: 1px solid black;
            box-shadow: 0px 0px 9px 0px rgba(0,0,0,5);/*設定陰影*/
            animation: wave 2s infinite;/*動畫呼叫*/
            transform-origin: center right;/*旋轉中心點*/
            z-index: 4;
        }
        .leftFoot{
            margin-top: 250px;
            margin-left: 22px;
        }
        .rightFoot{
            margin-top: 250px;
            margin-left: 97px;
        }
        /*腳上的小圓*/
        .cirOnFoot{
            width: 20px;
            height:20px;
            position: absolute;
            margin-top: 240px;
            margin-left: 85px;
            background: white;
            border-radius: 12px;
            border-top: 2px solid black;
            border-left: 1px solid black;
            border-right: 1px solid black;
            border-bottom: 1px solid white;
            z-index: 3;
        }
    </style>
</head>
<body>
<div class="wrap">
    <!--頭部-->
    <div class="headRadius">
        <!--第一個眼睛-->
        <div class=" eye eye1">
            <div class="eyeball">
                <div class="eyeball_in"></div>
            </div><!--眼球-->
        </div>
        <!--第二個眼睛-->
        <div class=" eye eye2">
            <div class="eyeball">
                <div class="eyeball_in"></div>
            </div><!--眼球-->
        </div>
        <!--臉-->
        <div class="face">
            <div class="nose"></div><!--鼻子-->
            <div class="nose_vertical"></div><!--鼻子下面的豎線-->
        </div>
        <div class="mouth"></div><!--嘴巴-->
        <!--鬍鬚-->
        <div class="whisker w1"></div>
        <div class="whisker w2"></div>
        <div class="whisker w3"></div>
        <div class="whisker w4"></div>
        <div class="whisker w5"></div>
        <div class="whisker w6"></div>
        <!--領帶-->
        <div class="necktie"></div>
        <!--勳章-->
        <div class="medal">
            <!--勳章上的線-->
            <div class="line L1"></div>
            <div class="line L2"></div>
            <!--勳章上的小黑圓點-->
            <div class="blackCir"></div>
            <div class="line3"></div>
        </div>

        <!--衣服-->
        <div class="leftSleeve"></div>
        <div class="rightSleeve"></div>
        <div class="clothes"></div>

        <!--手-->
        <div class="hand leftHand"></div>
        <div class="hand rightHand"></div>
        <!--衣服上中間的圓-->
        <div class="Circular">
            <!--衣服上中間的半圓-->
            <div class="midCircular"></div>
        </div>

        <!--腳-->
        <div class="foot leftFoot"></div>
        <div class="foot rightFoot"></div>
        <!--腳上的圓-->
        <div class="cirOnFoot"></div>
    </div>
</div>
</body>
</html>
相關推薦
css3+html5——機器貓哆啦A夢+手、腳、頭動起來!
看起來難實則簡單的哆啦A夢設計,調格式需要有耐心哦!效果如下:<!DOCTYPE html> <html lang="en"> <head> <meta charset="UTF-8"> <title>
哆啦A夢藍胖子來啦,html5+div+css3程式碼繪製機器貓
哆啦A夢藍胖子來啦,之前就有大神畫過藍胖子。本站隆重推出機器貓超盟版。現在主流瀏覽器對css3支援良好,您可以通過Chrome,Firfox,Safari,IE9+等瀏覽器完美預覽。本站後期將推出動畫版本,盡請期待! 其他主題推薦:
Windows程序設計畫圖實現哆啦A夢
erl object rbac eight number spa raw jpg date 在看雪論壇上看到的一個帖子,很喜歡,轉載一下。原文地址:http://bbs.pediy.com/showthread.php?t=138630哆啦A夢是畫出來的,不知道作者算這些坐
實驗吧-隱寫-大雄和哆啦A夢 -WP
一個 繼續 dd命令 win es2017 ctf .com blog 通過 鏈接:http://ctf5.shiyanbar.com/stega/base.jpg 老套路 binwalk 發現裏面有一個RAR壓縮文件 通過dd命令把它分離出來 dd if=base.j
[css]我要用css畫幅畫(七) - 哆啦A夢
順序 tar car 輸入 url bsp 完成 難度 tool 原文鏈接 接著之前的[css]我要用css畫幅畫(六),今天畫的有所不同,畫的是哆啦A夢,我們小時候對他的稱呼其實是小叮當機器貓。 (PS:這次我要做的事情,很多人已經做過,這並不是什麽創新,我只是在學習並記
用AR造出哆啦A夢任意門,QQ如何在世界杯賽場上“秀肌肉”
品牌 text 創造性 神經網絡 ai技術 道具 str 實驗室 以及 在這個世界杯刷屏的夏天,相信有不少球迷苦於無法去現場又不滿足隔著屏幕觀戰,暗暗祈禱能有一個哆啦A夢的“任意門”,瞬間就來到千裏之外的俄羅斯。現在,這扇任意門已經被創造出來了,不過創造者不是哆啦A夢這個“
#哆啦A夢
ear pri rac 3.6 goto pos ext 技術分享 dong !/usr/bin/env python3 -- coding: utf-8 -- @Author: dong dong @Env: python 3.6 from turtle import *
《windows程序設計》哆啦A夢(10)
use inf rect 菜單 wm_paint toc arc begin col 代碼如下: program Project2; {$APPTYPE CONSOLE} {$R *.res} uses System.SysUtils, windows,
Word神器!輸入幾個字你想要啥都能給你!就是哆啦A夢的口袋啊!
今天小編教大家一個word神奇功能,你想要什麼就有什麼,當你輸入幾個字,點選【F3】,就能自動彈出你想要的內容,是不是很神奇,這一款功能,他的名字叫做【自動圖文集】。我們來看看吧! 1. 如圖效果顯示,當我們在word的輸入"個人簡歷,"就能自動彈出一份簡歷模板,輸入"房
教你利用Python把圖片轉字元畫!程式碼哆啦A夢你見過嘛?
圖片轉字元畫的關鍵是把圖片的灰度值與自定義的字符集之間建立對映關係,不同區間的灰度值對應不同的字元,之後將圖片每一個畫素對應的字元打印出來,就是我們要的字元畫。 我們可以使用灰度值公式將畫素的 RGB 值對映到灰度值: gray = 0.2126 * r +
Windows程式設計——畫一隻哆啦A夢
本文為一Windows程式設計API繪圖實戰小例子,學習自嗶哩嗶哩小甲魚的《Windows程式設計SDK》。最終效果展示: 原始碼在最後,跟著小甲魚老師敲一遍程式碼,這些API能記住不少。 一、大體脈絡
大雄和哆啦A夢WP(實驗吧-隱寫術)
前言: 本文是實驗吧訓練題庫裡隱寫術部分的一道題:“大雄和哆啦A夢”的Write Up. 解題檔案: 解題檔案是一張圖片 看到是圖片,首先想到用Stegsolve檢視是不是有隱藏的二維碼——但是並沒有發現二維碼。 之後在Stegsolve中依次開啟”Analyse-&g
調色x愛你最好的距離-哆啦a夢與銅鑼燒
(4) 文字說明這次把二個加分作業的主題融合在一起,因為這二個主題都是使用slider,所以就把哆啦a夢和他最愛的銅鑼燒融合進去了,而操控最下面那條slider,可以讓二張圖片靠近或者遠離,而愛心也會因應著情況顯示完整或者碎裂的心。(5) 重點程式碼講解基本上就是把照片和Label以及Slider拉近程式碼當
canvas--哆啦A夢
學習canvas時畫的一個哆啦A夢,還有不足,以後改進 具體實現程式碼: <!DOCTYPE html> <html lang="en"> <head> <meta charset="UTF-8"> <title
用Python的Turtle畫哆啦A夢
這是我幾年前為了練習python的turtle庫而畫的,今天翻出了程式碼,分享給大家。 這是我初學python時畫的,當時還沒有面向物件的概念,也沒有采取類方法之類,純原始手工,供大家參考。 若有興趣可以自行優化簡潔程式碼,有時間我也會重新寫一遍。 畫出來的效果如下圖:
python3裡tkinter 中 canvas(畫板)案例之哆啦A夢
from tkinter import * window = Tk() window.title("tkinter") #視窗的標題 window.geometry("800x600") #視窗的大小 canvas = Canvas(window,width = 7
python3 turtle 繪製哆啦A夢
是使用pythonde turtle畫的一個小豬佩奇,於是自己跟著畫了一個哆啦A夢,算是隻實現了頭部的部分吧,如果有時間了會把程式碼改進。原始碼附上:import turtle as timport math as m t.pensize(4) # 設定畫筆的大小t.colo
純CSS畫圖——哆啦A夢
最近突然想用前端程式碼畫圖,然後就去百度找了一張哆啦A夢的圖片,用DIV+CSS畫,雖然最後的結果還是有些差異,不過也就差不多可以看啦~ dlam.html <!DOCTYPE html> <html> <head> <me
手把手教你製作一張哆啦A夢的桌布
可愛的桌布總是會受到大家的喜歡,那麼如何製作一個簡單的桌布呢?跟著原始碼時代UI老師一起動起來吧! 最終效果預覽: 使用軟體:Adobe PhotoShop CC2017 方法步驟 第一步:開啟Adobe PhotoShop CC2017軟體並新建畫布,設定檔
哆啦A夢主題樂園,一定要去!
此訊息僅適用於北京和上海的朋友: 哆啦A夢主題樂園暑期來到中國了!7月在上海,8月在北京。已經有參加過釋出會的人放出了圖文介紹~~~ 官方的介紹是這樣的: 樂園依據漫畫、動畫片場景和情節設計,以哆啦A夢的歷險故事為主題,通過立體大型氣墊、動畫播映、動畫片背景攝影等遊戲與活動,


