
管理你的Visual Studio Toolbox
原文連結
The Most Complete Guide to Visual Studio Toolbox Control Integration
Libor Tinka, Lead Developer, ComponentOwl.com
Contents
This tutorial is intended for developers who would like to distribute their WPF or WinForms controls and automatically put them into Visual Studio Toolbox during installation.
I struggled with Toolbox integration earlier because there are several possible approaches (harder to decide between them). Each approach have its own pros and cons and no overall comparison is provided. I wrote this tutorial to shed some light on the topic and spare you hours, maybe days of research and experimenting with aspects of Visual Studio (Toolbox) extensibility.
We will first take a look on Toolbox control integration in general to get a big picture. Each approach will be then discussed in detail and the following question will be answered:
- How to install control in Visual Studio Toolbox?
- How to update the control?
- How to uninstall/remove the control?
- How to support multiple Visual Studio versions?
There are several options on how to integrate your controls with Visual Studio Toolbox:
- Manual installation
- Toolbox Control Installer (TCI)
- Visual Studio Automation Object Model (DTE)
- VSPackage
- VSI package
- VSIX package
Manual installation
The simplest way of adding control into Visual Studio Toolbox is from within the IDE.
This approach have one crucial drawback, which is that you leave Toolbox integration to the user. Many developers are not that experienced with Visual Studio and when your component is shipped, even if you provide appropriate step-by-step guide, they may find it too complicated and rather try another component which "just works". I thought that every developer using Visual Studio is experienced enough to know how to add new items in VS Toolbox, but I received few e-mails from users who uninstalled the product just because the component have not appeared in the Toolbox and they thought it is broken (without reading our documentation, of course). On the other hand, there is a group of users who are not experienced developers, but are in charge of trying some products in a given company (e.g. project managers). These people can install the component, play with it and they would really appreciate if it just works. This increases chance they will actually purchase your product.
Advantages: zero effort
Disadvantages: require experienced users, slows user producitivity, updating controls is not intuitive
Toolbox Control Installer (TCI)
Visual Studio 2005 SDK contained a VSPackage called Toolbox Control Installer. This package comes pre-installed with Visual Studio 2008 and newer. Its job is to simplify the specific task of extending Visual Studio Toolbox. This approach requires you to install your assembly in GAC (Global Assembly Cache) and create a key in Windows Registry.
Advantages: simple and fast component installation, updating and removing
Disadvantages: requires installation in GAC (not always wanted), VS 2005 supported with SDK only
Visual Studio Automation Object Model (DTE)
If you are not afraid of COM, you can try DTE (Development Tools Environment) approach. There is already a project on CodePlex called Visual Studio Toolbox Manager, which solves the toolbox integration problem using a simple command-line application. The project is outdated since it does not support Visual Studio 2010 and newer. I made a project called DteToolboxInstaller, which is also a command-line application and does support Visual Studio 2013, 2012, 2010, 2008 and 2005. You can use the project as you like. The main disadvantage of DTE approach is the speed. The installer have to run devenv.exe using the automation interface, create a fake VS Solution, open Toolbox, add the stuff and then close the Solution. The whole process take no less than 10 seconds. If you want to integrate with two or three versions of Visual Studio, it can take well over a minute.
Advantages: does not require updating registry or GAC, full control over Toolbox
Disadvantages: very slow, separate installation required for every version of Visual Studio
VSPackage
A VSPackage seems to be a natural option. VSPackages allow any type of Visual Studio extension and you can manipulate Toolbox as well. There was a trouble with VSPackages in providing a Package Load Key (PLK) which can be generated only manually using web form. The requirement for PLK vanished with Visual Studio 2010 (hooray!). The nice thing about VSPackage approcach is that it does not slow down the installation process. The package is loaded and the controls are installed on-demand (when the Toolbox is opened for the first time after installation). After trying all the approaches, using VSPackage seems to be fastest and most universal one.
Advantages: quick installation, appearance in About box and other extensibility features
Disadvantages: cmplicated setup, each component requires its own package if shipped separately
VSI Package
VSI packages are quite old but you can use them for integration with Visual Studio 2005 and newer. It have very simple structure and you can create one even without Visual Studio. The only trouble with VSI compared to other approaches is invoking a wizard form which cannot be suppressed. The installation just cannot run in "quiet" mode. Another trouble with VSI is that a digital signature is required in order to get rid of a warning dialog. Your control will be always installed under "My Controls" tab in the Toolbox, which is not always desirable.
Advantages: simple creation, installer provided by Visual Studio, automated creation and signing requires several specific steps
Disadvantages: no quiet mode (extra steps when custom installer is used), manual uninstallation
VSIX Package
VSIX packages came with Visual Studio 2010 so you can integrate with 2010 or newer. the .VSI and .VSIX file extensions are associated with Visual Studio so you can simply double-click it or run it via shell. You can also run VsixInstaller.exe utility that performs the installation. Good news: No more nag screens when VSIX is not signed - the installer only contains a dialog with simple text: "This extension does not contain a digital signature." Even better news: The VsixInstaller supports quiet mode!
Please note that VSI and VSIX package installers contain features like displaying EULA, choosing which components to install or localization. When deploying your controls for use in Visual Studio, you won't need an installer on top of the package.
Advantages: installer provided by Visual Studio, quiet mode, fast installation
Disadvantages: package project required, automated creation is complicated, no support for VS 2005 and 2008
Comparison of Approaches
Here is a table summarizing features of the discussed approaches. As you can see, the VSPackage approach gives you the most freedom, but is also hardest to implement. We will discuss every approach so that you will be able to impement the one that suits you best.
| 2005 | 2008 | 2010 | 2012 | 2013 | Speed | Install Automation | Uninstall automation | |
| Manual installation | depends on user | |||||||
| TCI | fast | |||||||
| EnvDTE | slow | |||||||
| VSI | moderate | |||||||
| VSIX | moderate (faster than VSI) | |||||||
| VSPackage | fast |
We will focus on integration with Visual Studio 2010, 2012 and 2013. Hence you will need:
- Visual Studio 2010 (or 2012, 2013)
- Visual Studio 2010 SDK (or 2012 SDK, 2013 SDK)
- Microsoft Windows SDK
The VS SDK contains regpkg.exe tool and project templates discussed in VSIX and VSPackage approaches.
The Windows SDK contains gacutil.exe, guidgen.exe, signtool.exe and other useful tools.
There are two kinds of versioning used for Visual Studio. One is based on the release name (e.g. Visual Studio 2008) and the other is a classic version number (e.g. 8.0). Both will be used, so it should be noted which version numbers correspond to which versions of Visual Studio:
| Release name | Version number |
| Visual Studio 2005 | 8.0 |
| Visual Studio 2008 | 9.0 |
| Visual Studio 2010 | 10.0 |
| Visual Studio 2012 | 11.0 |
| Visual Studio 2013 | 12.0 |
We will start by creating simple WinForms control for integration in VS Toolbox.
You can start with File - New - Project... (Control+Shift+N) and select Windows Forms Controls Library template.
Of course, you can also create empty Class Library project, add references to System.Drawing and System.Windows.Forms and create a new control. In fact, any DLL containing public classes derived from Control will suffice.
We want to support .NET Runtime version 4.0 and 4.5, so the control should be built against .NET 4.0 to ensure compatibility (the lower framework version you use, the wider range of compatible frameworks since they are backward compatible). It should be noted that .NET 4.5 is an in-place update of .NET 4.0 and hence the 4.5 assemblies will work on machines with 4.0 runtime installedunless you use some feature specific to 4.5.
If you have multiple controls in your assembly and don't want to use some of them in Toolbox, decorate them with ToolboxItem attribute with defaultType parameter set to false:
[ToolboxItem(false)]
public class InvisibleControl : UserControl
{
  ...
}
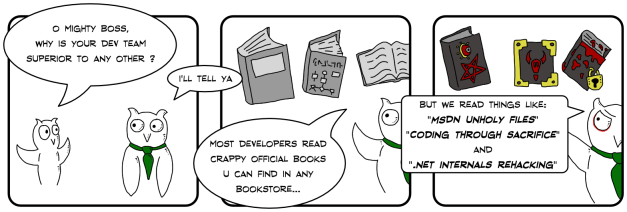
I have created a very simple control called SampleControl:
Finally, I set version of the assembly 3.3.0.0 (I chose just something else than 1.0.0.0 to see where the specific version number appears).
Custom Transparent Icon for the Toolbox
Icons for Toolbox are 16 by 16 pixel images. Various image formats are supported (BMP, JPEG, PNG and ICO). However, you need to create 256-color BMP image to ensure transparency. The transparent color is determined by bottom left pixel of the icon. Transparency works for magenta (#ff00ff):
![]()
The icon file should have same name as the control class (i.e. SampleControl.BMP).
Finally, use ToolboxBitmapAttribute to link icon with the control class:
[ToolboxBitmap(typeof(SampleControl), "Resources.SampleControl.bmp")]
public partial class SampleControl : UserControl
{
	...
}
Note that icon location matters, at least in C#. Since I have added the icon under custom folder namedResources, I need to reference Resources.SampleControl.bmp instead of justSampleControl.bmp.
Here is the resulting transparent icon in Toolbox:
Marking the Control as Toolbox Item
We can mark control as toolbox item by adding a ToolboxItemAttribute with defaultType parameter set to true:
[ToolboxItem(true)]
public partial class SampleControl : UserControl
...
This decoration is optional since the controls within assembly are considered toolbox items by default. However, we can mark certain control classes with ToolboxItem(false) to hide them from Toolbox. This comes in handy when we have multiple projects and there are too many controls in the Toolbox because loaded from all the other projects.
Signing the Assembly
The assembly containing controls (SampleControl.dll in our case) should be strongly named if we want them installed in GAC (Global Assembly Cache) later on. This is optional in most cases, but the Toolbox Controls Installer approach requires the assembly being installed in GAC, hence the strong name is necessary there.
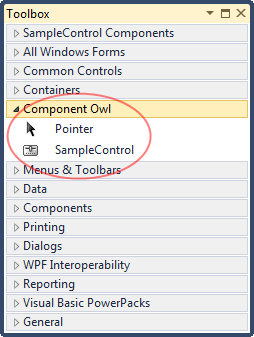
To give an assembly a strong name, open project properties and find Signing tab:
Check the "Sign the assembly" option and select "<New...>" from the combo box. This will create a new .SNK file in your project which will be used to sign the assembly. You can also browse for existing key file. If you want to distribute multiple assemblies with custom controls, it is a best practice to use same strong name key for each assembly (it is possible to have one .SNK file located in Solution folder and put just a link to that file in each project; when we browse for the key under the Signing tab, the link will be used without copying the file).
The SNK (Strong Name Key) file is basically a private key to digitally sign your assembly. There is also a public key which can be used to verify the assembly and its shorter variant called "public key token" for assembly identification.
Installing
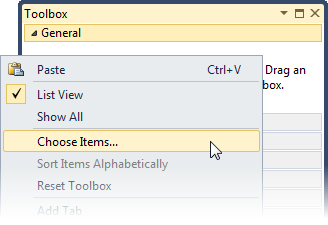
To install component into Visual Studio Toolbox manually, open some form or control in designer, open the Toolbox window (Control+Alt+X), right-click on the Toolbox window and select "Choose Items...":
The "Choose Toolbox Items" dialog will show up:
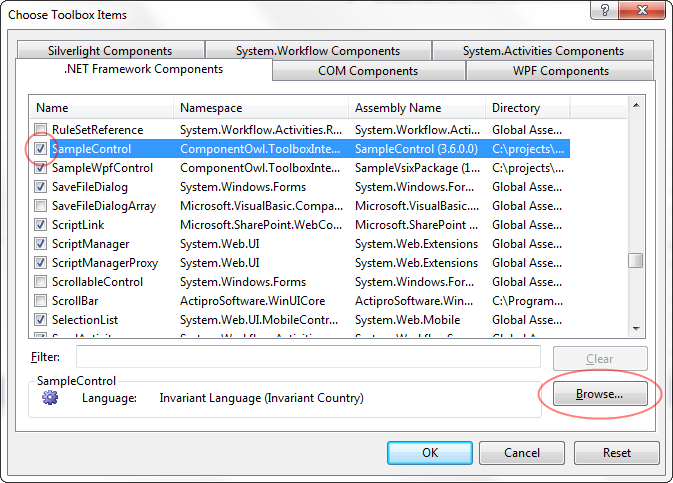
You can browse for DLL file with your component by clicking the "Browse..." button.
This is the simplest way of putting component in the Toolbox without extra actions required.
This can be unpleasant for end-users since it means many clicks they have to perform. I will explain how to integrate a component a little bit more so that it will be visible under the ".NET Framework Components" tab in the above dialog box and possibly show up in Toolbox automatically without extra effort of the user.
Making the Control Visible in "Choose Toolbox Items" Dialog Box
As you can see on the above picture, the SampleControl component is already displayed in the dialog box under ".NET Framework Components" tab.
This is because the folder containing our control is registered as "assembly folder" in the registry and hence is searched when the above dialog is populated.
You can register your own assembly this way by creating a key in registry:
32-bit OS: HKLM\SOFTWARE\Microsoft\.NETFramework\AssemblyFolders\<your control name>
64-bit OS: HKLM\SOFTWARE\Wow6432Node\Microsoft\.NETFramework\AssemblyFolders\<your control name>
You can also create key for specific version of .NET runtime (this comes in handy if you distribute different components for different versions of .NET):
32-bit OS: HKLM\SOFTWARE\Microsoft\.NETFramework\v4.0.30319\AssemblyFoldersEx\<your control name>
64-bit OS: HKLM\SOFTWARE\Wow6432Node\Microsoft\.NETFramework\v4.0.30319\AssemblyFoldersEx\<your control name>
In both cases, the default value for the key is a string with full path to the folder with your assembly.
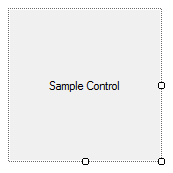
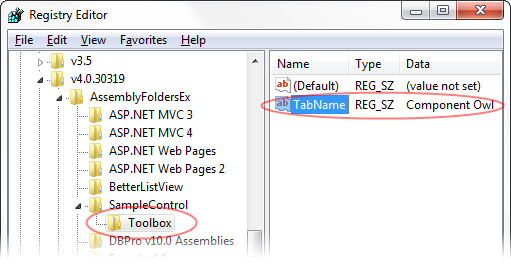
You can specify Toolbox tab in which the component should show up by adding subkey named "Toolbox" with single string value "TabName" this value has Toolbox tab name as data. When you add such control in the Toolbox, it will reside under new tab with the specified name:
The control should also appear in "Choose Toolbox Items" dialog box if it is installed in Global Assembly Cache.
The control pops up in the Toolbox automatically in its own tab in Visual Studio 2012/2013.
Installing the Control in GAC
The benefit of GAC (Global Assembly Cache) is that the user needs not to browse for your control. He will just select it form the above dialog box without having to know where it is actually installed (the dialog is populated by controls from "assembly folders" and from the GAC).
The GAC have one useful feature and disadvantage at the same time: It allows holding multiple versions of the same assembly. When user makes reference to your control from GAC and set "Specific Version" to true in Reference Properties window, it will be tied to that version. When you install an "update", a new version will be added to GAC, but the user will stay with the older one. Of course, the "Choose Toolbox Items" dialog will show both versions, so the user can just replace old reference with the new one.
You can make the installer removing any older versions from GAC during installation and add/keep just the newest one. This will force the user to replace the reference since it breaks the build.
You can work with GAC by using tool called gacutil.exe or from code. We will discuss both approaches.
The gacutil.exe is located in Microsoft Windows SDK directory. There are two such extecutables:
c:\Program Files (x86)\Microsoft SDKs\Windows\v7.0A\Bin\gacutil.exe
c:\Program Files (x86)\Microsoft SDKs\Windows\v7.0A\Bin\NETFX 4.0 Tools\gacutil.exe
The former is for .NET Framework up to version 3.5. The latter is for .NET 4.0 and higher. This is for compatibility reasons as a separate GAC have been introduced with .NET 4.0.
You can install an assembly to GAC by calling:
gacutil.exe /i SampleControl.dll
To uninstall it, we refer to our assembly by its assembly name, not file name:
gacutil.exe /u SampleControl
Finally, you can check if the assembly is installed in GAC by listing any instances of the provided name:
gacutil.exe /l SampleControl
It is not wise, however, to use gacutil.exe from a custom installer as it is located in SDK that user might not have installed. Furthermore, the SDK license does not allow bundling gacutil.exe with your installer.
Some installers like Inno Setup or MSI allow installing in GAC anyway.
You can also work with GAC using System.EnterpriseServices.Internal.Publish class. The class have two methods: GacInstall and GacRemove. Both methods take just path to assembly file as a parameter, so for example:
(new Publish()).GacInstall(assemblyPath);
will install the specified assembly in GAC.
Updating
Updating the control depends on how it is installed and referenced.
If you have added component in the Toolbox manually via "Choose Toolbox Items" dialog box and "Browse..." button, i.e. as a file reference, the default property of such reference is that it simply points to the specified file no matter which version it have (unless user sets "Specific Version" to true in reference properties window; the default is false in this case). Simply replacing the DLL with the control by a newer file will suffice. If the user have specified "Specific Version" to true, the build will break because the reference is no longer valid. He needs to replace the reference by a new one pointing on the same file which now have newer version.
If you have added the component from GAC (these components also appear in the "Choose Toolbox Items" dialog box), the "Specific Version" property of the reference is true by default:
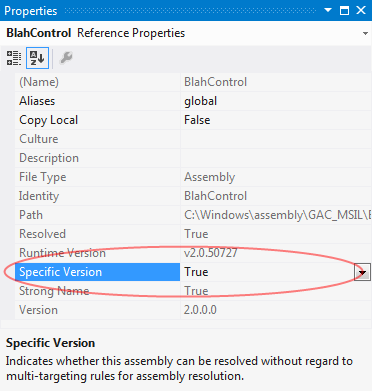
This means that even if you install a newer version of the component in GAC, the project will still reference the older version and both versions will reside in GAC.
If you remove all versions of the component from GAC (e.g. using gacutil.exe) and then install just the newest one, the build will break unless the user changed "Specific Version" property to false.
Removing
Removing the manually installed control consists of just reverting all the steps done during the installation.
In case of file references, deleting the file is sufficient.
In case of tighter integration (GAC, registry), the registry keys need to be deleted and the control can be removed from GAC (e.g. using gacutil.exe).
Resetting Toolbox and Clearing the Toolbox Cache
The Toolbox can fall into state where it does not display some items, some are duplicate and some can be disabled. Sometimes the only remedy is to let Visual Studio rebuild the Toolbox from scratch.
To do that, right-click on the Toolbox window and select "Reset Toolbox". Visual Studio will go through all the installed packages and reloads components into the Toolbox.
If this won't help, you can perform hard reset of the Toolbox. Exit Visual Studio and delete all .TBD files in the following folder:
\Users\<user>\AppData\Local\Microsoft\VisualStudio\10.0\
It should be up to four files:
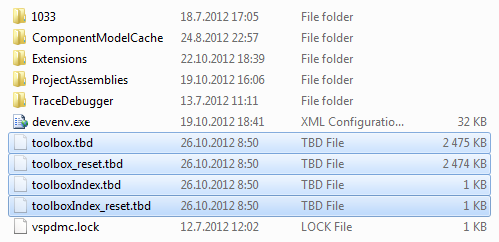
Once removed, start Visual Studio again. After showing the Toolbox, all items should load instead of loading only the cached versions.
Installing
相關推薦
管理你的Visual Studio Toolbox
原文連結The Most Complete Guide to Visual Studio Toolbox Control IntegrationLibor Tinka, Lead Developer, ComponentOwl.comContentsThis tutorial
【Visual Studio】解決方案未保存,請先保存你的解決方案,然後再管理Nuget包
保存 管理 直接 解決方案 自動生成 多個項目 pretty 外包 設置 公司接受的外包項目,文件夾中沒有.sln文件,用VS打開.csproj文件來打開方案。此時可能因為一些引用問題想打開Nuget包管理器,會彈出如下提示: 解決方案未保存,請先保存你的解決方案,然後再管
在Visual Studio for Mac中使用fastlane管理iOS的provision
fas 小時 改變 xamarin 有時 ast 把手 創建 而且 Xamarin開發中,最煩的就是provision的管理了。 全手工的話,要先創建一個key,上傳後生成cert文件,再創建provision。如果在手機上調試,還要把手機加到provision中去。非常的
Visual Studio 2013 更新 NuGet 包管理器
錯誤 使用 studio border http 出現 有時 and mat ? 前言 使用 Visual Studio 中的 NuGet 包管理器下載程序時,有時可能出現類似的錯誤:“Newtonsoft.Json”已擁有為“NETStandard.Library”定義
Visual Studio 6 (VC6)連接Team Foundation Server (TFS 2018),實現源代碼的版本管理
版本管理 優酷視頻 http team 方案 操作 完全 經驗 spm 概述Visual Studio 6(VB6, VC6, Foxpro…)是微軟公司在1998年推出的一款基於Windows平臺的軟件開發工具,也是微軟推出.NET開發框架之前的最後一個IDE工具。在Wi
離開Visual Studio C#的編譯(你不知道的C#)
javac img 一個 microsoft 運用 關系 版本 除了 虛擬 很多人一開始學習.net 第一天必定是安裝Visual studio 或者很多關於C#學習的書上第一章節必定是告訴你要你下載一個vs 其實沒有vs未必就不能開發了,只是可能說vs給我的開
Smobiler 4.4 更新預告 Part 1(Smobiler能讓你在Visual Studio上開發APP)
p s source info 設置 屬性 mbr thum 詳情 thumb 在4.4版本中,大家對產品優化的一些建議和意見進行了相應的優化和修復,同時,還新增了一些令人激動的功能和插件。 下面先為大家介紹4.4版本中Smobiler的優化和修復: 優化 1, P
Smobiler 4.4已正式發布!(Smobiler能讓你在Visual Studio上開發APP)
pre 直接 upd 安裝 組件 data .apk 新的 cat Smobiler 4.4已經正式發布,還不快來看看?原文地址:https://www.smobiler.com/portal.php?mod=view&aid=53這次更新要感謝我們的用戶,在使用s
[VS Tips]Visual Studio 2008 Toolbox裡控制元件消失(#13119)的問題
原文地址:http://www.cnblogs.com/fox23/archive/2009/03/21/solve-visual-studio-toolbox-disappear-13119.html 黃季冬 Making Beautiful Difference
visual studio 團隊管理器 同步 程式碼錯誤記錄
這幾天在熟悉git,gitlab,今天在使用vs2015和vs2012的團隊管理器,除錯把不同的開發人員的開發程式碼同步到git伺服器上。 今天用一個新的developoer使用者在新裝置提取了git伺服器上的程式碼,稍作修改後執行 提交 ,同步 。 在同步時出錯顯示 Errors en
帶你玩轉Visual Studio——帶你理解多位元組編碼與Unicode碼
轉自:http://blog.csdn.net/luoweifu/article/details/49382969 多位元組字元與寬位元組字元 char與wchar_t 我們知道C++基本資料型別中表示字元的有兩種:char、wchar_t。 char叫多位
Visual Studio Code 1.30 釋出,你升級了沒?
Visual Studio Code 1.30 釋出了。 此版本帶來了許多新功能,包括: Multiline search improvements:無需使用正則表示式即可輕鬆建立多行搜尋模式。 Custom title bar on Linux:Linux
Visual Studio 2017中使用Libman管理客戶端庫
什麼是Libman 微軟在Visual Studio 2017 15.8版本中內嵌了一個新的工具Library Manager。 Library Manager(簡稱Libman)是一個客戶端庫管理工具, 使用它可以很容易的管理專案中使用的客戶端js庫, css庫等,Libman相當於一個針對客戶端庫的Nu
Visual Studio 2010——解決方案資源管理器
1 建立一個Visual C#專案時,解決方案資源管理器如下圖所示。 奧 由上圖可見,主要有Properties,引用,*.congfig檔案和*.cs檔案組成。 2 *.cs檔案 *.cs檔案是C#原始碼檔案。要往一個工程裡面新增相應的功能,主要都是在.cs檔案裡新增
帶你玩轉Visual Studio——效能分析與優化
上一篇文章帶你玩轉Visual Studio——VC++的多執行緒開發講了VC++中多執行緒的主要用法。多執行緒是提升效能和解決併發問題的有效途經。在商用程式的開發中,效能是一個重要的指標,程式的效能優化也是一個重要的工作。 找到效能瓶頸 二八法則適
帶你玩轉Visual Studio——帶你高效開發--番茄助手使用
有過Java開發經驗的人都知道Java的常用開發工具(如Eclipse、Intellij IDEA等)都有非常強大的關鍵字高亮、智慧提示、快速追蹤等的功能。那也許你就要問了:進行C++開發的Visual Studio是否也有這個功能呢?首先要說明的是Visual Stu
InstallShield Limited Edition for Visual Studio 2013 圖文教程(教你如何打包.NET程式)
InstallShield Limited Edition for Visual Studio 2013 圖文教程(教你如何打包.NET Framework進去) 從Visual Studio 2012開始,微軟就把自家原來的安裝與部署工具徹底廢掉了,轉而讓大家去安裝使用第三方的打包工具“Install
教你從零開始使用ss代理在windows8.1下使用visual studio編譯chromium
0.操作環境作業系統:win8.1 64位chromium版本:65.0.3325.181 Shadowsocks:代理地址127.0.0.1:1080,確保已翻visual studio版本:vs20171.chromium版本選擇最新的vs配最新的chromium!2.流
【 專欄 】- 帶你玩轉Visual Studio
帶你玩轉Visual Studio 本系列是從事C++開發工作一年半以來對VS用法的經驗和總結,主要內容有:1、Windows下Visual Studio在C++開發方面的功能和使用方法;2、用Visual Studio進行C++
安裝好Visual Studio Code,和npm管理包後, 安裝依賴包, 建立專案骨架:
1、 安裝 express 終端輸入 : npm install express 2、安裝 body-parser - node.js 中介軟體,用於處理 JSON, Raw, Text 和 URL 編碼的資料:終端輸入 : npm i body-parser