
Maven配置檔案的相關總結
<project>
    <profiles>
        <profile>
            <build>
                <defaultGoal>...</defaultGoal>
                <finalName>...</finalName>
                <resources>...</resources>
                <testResources>...</testResources>
                <plugins>...</plugins>
            </build>
            <reporting>...</reporting>
            <modules>...</modules>
            <dependencies>...</dependencies>
            <dependencyManagement>...</dependencyManagement>
            <distributionManagement>...</distributionManagement>
            <repositories>...</repositories>
            <pluginRepositories>...</pluginRepositories>
            <properties>...</properties>
        </profile>
    </profiles>
</project>
profile簡介
profile可以讓我們定義一系列的配置資訊,然後指定其啟用條件。這樣我們就可以定義多個profile,然後每個profile對應不同的啟用條件和配置資訊,從而達到不同環境使用不同配置資訊的效果。比如說,我們可以通過profile定義在jdk1.5以上使用一套配置資訊,在jdk1.5以下使用另外一套配置資訊;或者有時候我們可以通過作業系統的不同來使用不同的配置資訊,比如windows下是一套資訊,linux下又是另外一套資訊,等等。
profile的定義位置
我們可以有多個地方定義profile。定義的地方不同,它的作用範圍也不同。
- 針對於特定專案的profile配置我們可以定義在該專案的pom.xml中。
- 針對於特定使用者的profile配置,我們可以在使用者的settings.xml檔案中定義profile。該檔案在使用者家目錄下的“.m2”目錄下。
- 全域性的profile配置。全域性的profile是定義在Maven安裝目錄下的“conf/settings.xml”檔案中的。
下面寫個案例
1.在專案下pom.xml的project節點下建立了開發環境和線上環境的profile
<profiles>
        <profile>
            <id>dev</id>
            <properties>
                <env>dev</env>
            </properties>
            <activation>
                <activeByDefault>true</activeByDefault>
            </activation>
        </profile>
        <profile>
            <id>prd</id>
            <properties>
                <env>prd</env>
            </properties>
        </profile>
    </profiles>
其中id代表這個環境的唯一標識,下面會用到
properties下我們我們自己自定義了標籤env,內容分別是dev和prd。
activeByDefault=true代表如果不指定某個固定id的profile,那麼就使用這個環境
2.下面是我們resources下的目錄,有兩個目錄,dev和prd,在開發時,我們使用dev下的配置檔案,部署時候使用prd下的配置檔案

3.配置pom.xml,如果直接install,那麼就會找到預設的id為dev的這個profile,然後會在裡面找env的節點的值,
接著就會執行替換,相當於將src/main/resources/dev這個資料夾下的所有的配置檔案打包到classes根目錄下。
 <build>
        <finalName>springmvc2</finalName>
        <resources>
            <resource>
                <directory>src/main/resources/${env}</directory>
            </resource>
        </resources>
    </build>
在idea下指定打包時指定profile的id
1第一步

2第二步

3第三步
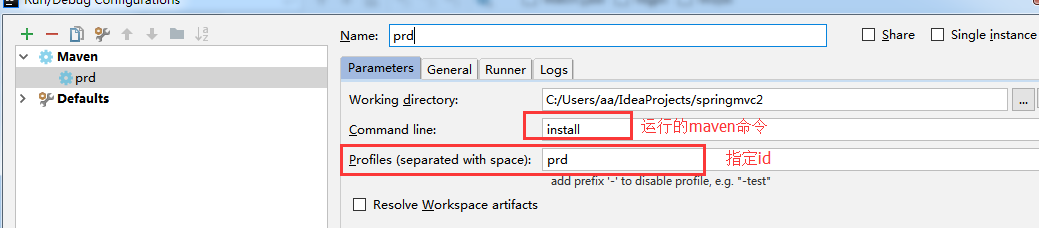
4第四步,執行打包命令

這個時候target下springmvc專案下的classes根目錄下有了env.properties,並且裡面內容是我們指定的那個env.properties,
但是發現resources下的aa.properties檔案沒有被打包進去,那是因為我們只指定了resources/prd下的檔案打包到根目錄下,並沒有指定其他檔案
我們在pom.xml下的resources節點下新增規則
<resource>
    <directory>src/main/resources</directory>
    <excludes>
        <exclude>dev/*</exclude>
        <exclude>prd/*</exclude>
    </excludes>
</resource>
再執行打包就會將resources下的除了dev資料夾和prd資料夾的其他所有檔案打包到classes根目錄下了
最後注意:如果有其他配置檔案在src/main/java目錄下,也是可以這樣指定的,但是要指定
<includes>
    <include>*.xml</include>
</includes>
不然會將java類當配置檔案一塊放到classes根目錄下,加了include就會只匹配符合條件的放到target的classes根目錄下
最後放我的所有的配置
<profiles>
        <profile>
            <id>dev</id>
            <properties>
                <env>dev</env>
            </properties>
            <activation>
                <activeByDefault>true</activeByDefault>
            </activation>
        </profile>
        <profile>
            <id>prd</id>
            <properties>
                <env>prd</env>
            </properties>
        </profile>
    </profiles>


    <build>
        <finalName>springmvc</finalName>
        <resources>
            <resource>
                <directory>src/main/java</directory>
                <includes>
                    <include>*.xml</include>
                </includes>
            </resource>
            <resource>
                <directory>src/main/resources</directory>
                <excludes>
                    <exclude>dev/*</exclude>
                    <exclude>prd/*</exclude>
                </excludes>
            </resource>
            <resource>
                <directory>src/main/resources/${env}</directory>
            </resource>
        </resources>
    </build>
2.Maven build配置
前言: <build >設定,主要用於編譯設定
(1)分類
在Maven的pom.xml檔案中,存在如下兩種<build>:
(1)全域性配置(project build)
針對整個專案的所有情況都有效
(2)配置(profile build)
針對不同的profile配置
<project xmlns="http://maven.apache.org/POM/4.0.0"
  xmlns:xsi="http://www.w3.org/2001/XMLSchema-instance"
  xsi:schemaLocation="http://maven.apache.org/POM/4.0.0 https://maven.apache.org/xsd/maven-4.0.0.xsd">
  ...
  <!-- "Project Build" contains elements of the BaseBuild set and the Build set-->
  <build>...</build>

  <profiles>
    <profile>
      <!-- "Profile Build" contains elements of the BaseBuild set only -->
      <build>...</build>
    </profile>
  </profiles>
</project>
說明:
一種<build>被稱為Project Build,即是<project>的直接子元素。
另一種<build>被稱為Profile Build,即是<profile>的直接子元素。
Profile Build包含了基本的build元素,而Project Build還包含兩個特殊的元素,即各種<...Directory>和<extensions>。
(2) 配置說明
1.基本元素
示例如下
<build>
  <defaultGoal>install</defaultGoal>
  <directory>${basedir}/target</directory>
  <finalName>${artifactId}-${version}</finalName>
  <filters>
   <filter>filters/filter1.properties</filter>
  </filters>
  ...
</build>
1)defaultGoal
執行build任務時,如果沒有指定目標,將使用的預設值。
如上配置:在命令列中執行mvn,則相當於執行mvn install
2)directory
build目標檔案的存放目錄,預設在${basedir}/target目錄
3)finalName
build目標檔案的名稱,預設情況為${artifactId}-${version}
4)filter
定義*.properties檔案,包含一個properties列表,該列表會應用到支援filter的resources中。
也就是說,定義在filter的檔案中的name=value鍵值對,會在build時代替${name}值應用到resources中。
maven的預設filter資料夾為${basedir}/src/main/filters
2. Resources配置
用於包含或者排除某些資原始檔
<build>
        ...
       <resources>
          <resource>
             <targetPath>META-INF/plexus</targetPath>
             <filtering>true</filtering>
            <directory>${basedir}/src/main/plexus</directory>
            <includes>
                <include>configuration.xml</include>
            </includes>
            <excludes>
                <exclude>**/*.properties</exclude>
            </excludes>
         </resource>
    </resources>
    <testResources>
        ...
    </testResources>
    ...
</build>
1)resources
一個resources元素的列表。每一個都描述與專案關聯的檔案是什麼和在哪裡
2)targetPath
指定build後的resource存放的資料夾,預設是basedir。
通常被打包在jar中的resources的目標路徑是META-INF
3)filtering
true/false,表示為這個resource,filter是否啟用
4)directory
定義resource檔案所在的資料夾,預設為${basedir}/src/main/resources
5)includes
指定哪些檔案將被匹配,以*作為萬用字元
6)excludes
指定哪些檔案將被忽略
7)testResources
定義和resource類似,只不過在test時使用
3 plugins配置
用於指定使用的外掛
<build>
    ...
    <plugins>
        <plugin>
            <groupId>org.apache.maven.plugins</groupId>
            <artifactId>maven-jar-plugin</artifactId>
            <version>2.0</version>
            <extensions>false</extensions>
            <inherited>true</inherited>
            <configuration>
                <classifier>test</classifier>
            </configuration>
            <dependencies>...</dependencies>
            <executions>...</executions>
        </plugin>
    </plugins>
</build>
4 pluginManagement配置
pluginManagement的配置和plugins的配置是一樣的,只是用於繼承,使得可以在孩子pom中使用。
父pom:
<build>
    ...
    <pluginManagement>
        <plugins>
            <plugin>
              <groupId>org.apache.maven.plugins</groupId>
              <artifactId>maven-jar-plugin</artifactId>
              <version>2.2</version>
                <executions>
                    <execution>
                        <id>pre-process-classes</id>
                        <phase>compile</phase>
                        <goals>
                            <goal>jar</goal>
                        </goals>
                        <configuration>
                            <classifier>pre-process</classifier>
                        </configuration>
                    </execution>
                </executions>
            </plugin>
        </plugins>
    </pluginManagement>
    ...
</build>
則在子pom中,我們只需要配置:
<build>
    ...
    <plugins>
        <plugin>
            <groupId>org.apache.maven.plugins</groupId>
            <artifactId>maven-jar-plugin</artifactId>
        </plugin>
    </plugins>
    ...
</build>
這樣大大簡化了孩子pom的配置
參考:https://www.cnblogs.com/nfcm/p/7550772.html
相關推薦
Maven配置檔案的相關總結
Profile能讓你為一個特殊的環境自定義一個特殊的構建;profile使得不同環境間構建的可移植性成為可能。Maven中的profile是一組可選的配置,可以用來設定或者覆蓋配置預設值。有了profile,你就可以為不同的環境定製構建。profile可以在pom.xml中
maven配置檔案pom
POM是maven工程的基本工作單元,是一個xml 檔案,包含了專案的基本資訊,由於描述專案如何構建,宣告專案依賴等 當執行任務或專案時,maven會在當前目錄中查詢pom,讀取pom檔案,獲取所需的配置資訊,然後執行目標。 pom中可以指定以下配置: 專案依賴、外掛、執行目標、專案構建
從一道簡單的“SpringBoot配置檔案”相關面試題,我就能知道你的水平
面試要套路,也要技巧。別被背題目的兄弟們給忽悠了。 【你來發揮】你比較喜歡什麼技術,哪一種最熟? 一般自信的面試官都喜歡問這個問題,這次面試的小夥比較年輕,咱也裝回B,不然都對不起自己。 答: 我比較喜歡Spring,比較有趣。目的: 希望應聘者能夠有廣
“SpringBoot配置檔案”相關面試題
面試要套路,也要技巧。別被背題目的兄弟們給忽悠了。 【你來發揮】你比較喜歡什麼技術,哪一種最熟? 一般自信的面試官都喜歡問這個問題,這次面試的小夥比較年輕,咱也裝回B,不然都對不起自己。 答: 我比較喜歡Spring,比較有趣。目的: 希望應聘者能夠有廣
maven配置檔案settings.xml讀取順序
簡介 用maven管理專案時,會通過pom引入需要的jar包,此時開發工具(編譯工具)會去載入maven的配置檔案settings.xml,而該配置檔案可以放在多個地方,我們該如何取捨
Maven配置檔案pom.xml詳解(轉)
什麼是POM? POM是專案物件模型(Project Object Model)的簡稱,它是Maven專案中的檔案,使用XML表示,名稱叫做pom.xml。在Maven中,當談到Project的時候,不僅僅是一堆包含程式碼的檔案。一個Project往往包含一個配置檔案,包括了與開發者有關的,缺陷
系統加固配置檔案相關
Root及普通使用者登陸終端限制 1./etc/security/access.conf 2./etc/securetty 虛擬終端控制 vlock 鎖定虛擬終端功能正常,偽終端部分功能可以使用 密碼控制 cli :chage /
maven配置檔案中警告This expression evaluates to 4.2.4.RELEASE The property is defined in cn.的處理方法
在pom.xml中出現警告如下: This expression evaluates to 4.2.4.RELEASE The property is defined in cn.itcast:web_parent:0.0.1-SNAPSHOT 這句話:This expressi
maven配置檔案pom增加變數取版本號
1.定義版本號 <properties> <spring.version>3.2.2.RELEASE</spring.version> </pro
Maven配置檔案中配置指定JDK版本
1. 在setting.xml檔案中的<profiles>標籤加入如下配置:<profile> <id>jdk-1.8</id>
Maven配置檔案學習筆記
對於maven的具體配置檔案還不是很瞭解,一直都是似懂非懂的狀態,趁著最近專案不緊張,決定學習一下maven的配置檔案. maven的setting.xml檔案最開始介紹了maven的兩個作用域. 在maven配置檔案的開始部分,介紹了maven的兩個作用域,原文大致意思
關於maven配置檔案setting.xml中的配置
前面已經講解了配置nexus共享倉庫。啟動了nexus服務後,本地倉庫下載jar包都是從nexus裡下載,如果nexus裡沒有,nexus會與maven的中央倉庫打交道,然後下載對應的依賴包。當關閉了nexus服務後,本地倉庫就會跳過nexus,直接去maven中央倉庫下
Maven配置檔案pom.xml詳細解讀
基本內容: POM包括了所有的專案資訊 groupId:專案或者組織的唯一標誌,並且配置時生成路徑也是由此生成,如org.myproject.mojo生成的相對路徑為:/org/myproject/mojo artifactId:專案的通用名稱 version:專案的版本 packaging:打
Maven配置檔案pom.xml詳解
什麼是POM? POM是專案物件模型(Project Object Model)的簡稱,它是Maven專案中的檔案,使用XML表示,名稱叫做pom.xml。在Maven中,當談到Project的時候,不僅僅是一堆包含程式碼的檔案。一個Project往往包含一個配置檔案,包
ssh框架配置檔案路徑總結
spring和Struts配置檔案預設路徑 spring 預設配置檔案在Webcontent的WEB-INF下Struts 預設配置檔案在src下Hibernate配置檔案分開整合放在src下spr
maven配置檔案中modules的作用
modules 從字面意思來說,module就是模組,而pom.xml中的modules也正是這個意思,用來管理同個專案中的各個模組;如果maven用的比較簡單,或者說專案的模組在pom.xml沒進行劃分,那麼此元素是用不到的;不過一般大一點的專案是要用到的。
Maven配置檔案中修改預設jre
開啟%maven_home%\conf\setting.xml,只會在新建專案時自動使用1.6的匯入專案不會 在標籤內新增如下配置: <profile> <id>jdk
maven配置檔案setting.xml欄位註釋
maven的配置檔案為settings.xml,在下面路徑中可以找到這個檔案,分別為:$M2_HOME/conf/settings.xml:全域性設定,在maven的安裝目錄下;${user.home}/.m2/settings.xml:使用者設定,需要使用者手動新增,可以
js開啟word檔案相關總結
開啟方法: 一.在IE中,可以通過js建立Word.Application,來開啟,修改伺服器上的文件. var url = "http://localhost/test/a.doc"; //直接開啟word var word = new ActiveXObject("Wo
spring boot配置檔案相關
1.spring boot配置檔案的格式 properties格式 yaml格式 yaml格式的配置檔案在spring中會存在