
如何在Web專案中給沒有新增API核心元件新增APIController的幫助頁HelpPage
原文地址:https://www.cnblogs.com/lxhbky/p/5828593.html
前言:
ASP.NET中的Web專案可以通過APIController控制器來為其他專案提供介面。 而我們在除錯這些介面時,可以選擇單元測試,網頁測試(Get介面),自己寫測試程式碼或者第三方測試工具等等(如:PostMan可以傳送GET/POST請求)。
但這裡為大家介紹一種新的除錯工具:微軟提供的一種關於APIController控制器說明幫助頁+測試(藉助第三方)的方法來幫助開發。
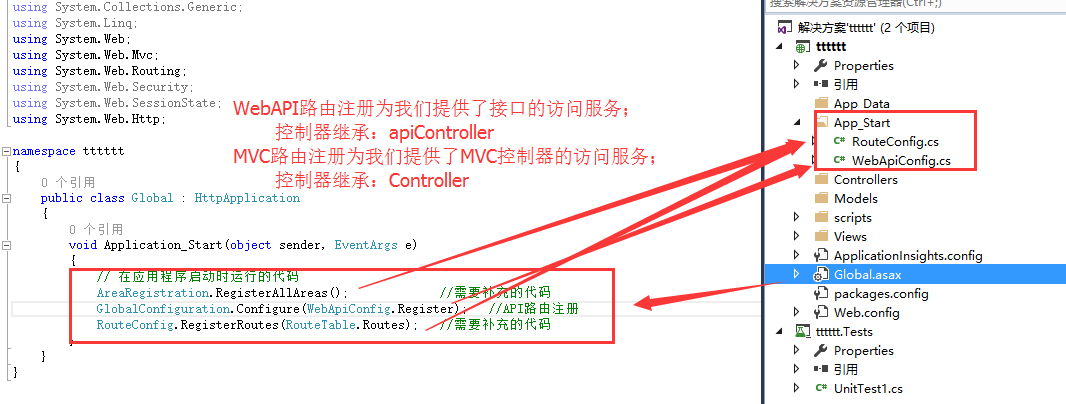
備註:在實際使用過程中,發現了一個問題,我建立的是WebApi專案,在NuGet管理包中添加了API的幫助頁helppage核心元件後,訪問幫助頁首頁Index時(http://localhost:27609/Help)居然報404,經過和能成功訪問幫助頁的專案進行對比發現,少了MVC路由器,因為通過WebAPI專案只添加了API核心元件的專案,並沒有為我們自動新增MVC的核心元件(路由服務),而控制器的幫助頁就是藉助MVC路由核心元件來實現的
1-在App_Start資料夾下新增類:RouteConfig.cs

using System; using System.Collections.Generic; using System.Linq; using System.Web; using System.Web.Mvc; using System.Web.Routing; namespace Lambda_Learn { public class RouteConfig { public static void RegisterRoutes(RouteCollection routes) { routes.IgnoreRoute("{resource}.axd/{*pathInfo}"); routes.MapRoute( name: "Default", url: "{controller}/{action}/{id}", defaults: new { controller = "Home", action = "Index", id = UrlParameter.Optional } ); } } }
2-在專案啟動檔案:Global.asax中註冊註冊並配置路由服務:
using System;
using System.Collections.Generic;
using System.Linq;
using System.Web;
using System.Web.Mvc;
using System.Web.Routing;
using System.Web.Security;
using System.Web.SessionState;
using System.Web.Http;

namespace tttttt
{
    public class Global : HttpApplication
    {
        void Application_Start(object sender, EventArgs e)
        {
            // 在應用程式啟動時執行的程式碼
            AreaRegistration.RegisterAllAreas();             //需要補充的程式碼
            GlobalConfiguration.Configure(WebApiConfig.Register);
            RouteConfig.RegisterRoutes(RouteTable.Routes);   //需要補充的程式碼
        }
    }
}
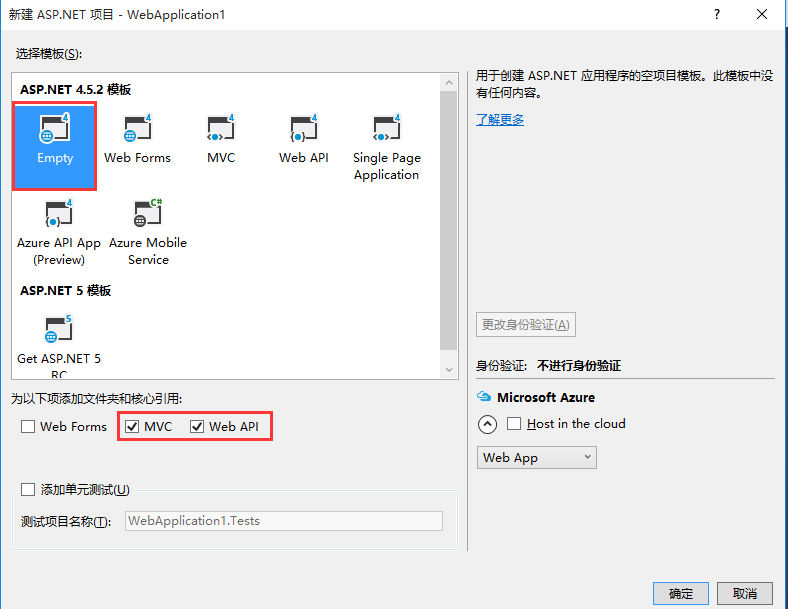
那麼怎麼放在這樣的核心元件缺少的情況呢? 在VS2015中,我們如果新建WebAPI專案時,需要將MVC和API核心元件同時勾上,專案就會自動為我們註冊MVC相關路由和API相關路由。如下圖:
廢話不多說,請看原文:
如何給你的ASP.NET頁面新增HelpPage
最近寫了一些webAPI,所以需要搞一套API的幫助文件,google了一下,發現這是可以自動生成的,以下就是如何自動生成HelpPage的說明。
參考:http://www.asp.net/web-api/overview/creating-web-apis/creating-api-help-pages
其實我也是按照上面的說法一步步走的,只是上面是英文,我進行一個簡單的翻譯,並且,在其中有些地方做了更改,也在這邊記錄一下!
1,新建一個專案:(這裡建立的是MVC web專案,已經為我們添加了mvc核心元件)


確認新建專案,右鍵專案屬性,確保我們當前的專案是Framework4.5的(4.0及其以下的下面的安裝包是安裝不成功的,記住,這是血的教訓)

2,新增引用包
右鍵引用,選擇管理NuGet程式包(你得先配置好這個,具體如何配置百度一下就OK了)

之後搜尋helppage即可,找到的第一個既是我們需要新增的asp.net的helppage程式包

點選安裝即可,這安裝的速度得取決於你的網速,反正我這邊特慢,有的時候還得安裝好多次才可以。

現在Help page就已經生成了,右鍵專案-》除錯-》啟動新例項,之後再頁面URL後面寫上 /Help 看看(注:我們的埠應該不會一樣,無妨)

這時候你會發現,頁面什麼都沒有,不急,往下走。
3,修改配置檔案生成位置
首先需要說明的是,這個程式包會依託於專案生成的XML配置檔案來產生所有的文件,所以你得先讓你的專案生成這個XML檔案
右鍵專案選擇屬性,之後再生成一欄裡面選擇輸出到XML文件檔案,那個路徑和名稱隨你怎麼寫,只要一會和下面的配置對應上就OK,我這邊直接用的是預設的。

之後我們需要做的就是給這個xml的路徑寫到程式裡面,配置好就可以了,開啟Areas/HelpPage/App_Start/HelpPageConfig.cs 頁面,將Register函式裡面的幾段註釋去掉,之後修改成剛才的路徑就ok了。
 1      public static void Register(HttpConfiguration config)
 2         {
 3             // Uncomment the following to use the documentation from XML documentation file.
 4             config.SetDocumentationProvider(new XmlDocumentationProvider(HttpContext.Current.Server.MapPath("~/bin/Service.xml")));  // 注:這裡的路徑就是剛才說的地址,你修改成一樣的就OK了
 5
 6             // Uncomment the following to use "sample string" as the sample for all actions that have string as the body parameter or return type.
 7             // Also, the string arrays will be used for IEnumerable<string>. The sample objects will be serialized into different media type
 8             // formats by the available formatters.
 9             config.SetSampleObjects(new Dictionary<Type, object>    // 這段需要解放出來主要就是做sample的
10             {
11                 {typeof(string), "sample string"},
12                 {typeof(IEnumerable<string>), new string[]{"sample 1", "sample 2"}}
13 }); 

4,新增Controller
OK,現在基本條件已經備齊,只剩下需要顯示的東西了,我們建立一個controller,之後新增一個介面


新增Controller之後,裡面會有一些自動生成的API,現在你可以去重新整理一下那個Help頁面,看看是否有貨了...

是不是發現,API已經顯示出來了,但是並沒有有用的描述在頁面上,我們加上就可以了
我只修改了兩個函式來看看效果:
 1      // GET api/crab
 2         /// <summary>
 3         /// this is get function without parameter
 4         /// </summary>
 5         /// <returns>function return value</returns>
 6         public IEnumerable<string> Get()
 7         {
 8             return new string[] { "value1", "value2" };
 9         }
10
11         // GET api/crab/5
12         /// <summary>
13         /// this is get function with a parameter named id
14         /// </summary>
15         /// <param name="id"></param>
16         /// <returns>function return value</returns>
17         public string Get(int id)
18         {
19             return "value";
20 } 

OK,現在的頁面已經變了,你可以根據你的需求來編寫Help page了。
5,其他風格的API
可以發現,預設生成的都是一些RestAPI,我對這個一點都不感冒,所以,我打算換一種寫法:
 1    public class CrabController : ApiController
 2     {
 3         /// <summary>
 4         /// 測試方法
 5         /// </summary>
 6         /// <param name="msg1">串1</param>
 7         /// <param name="msg2">串2</param>
 8         /// <returns>兩個字串的連線串</returns>
 9         [System.Web.Http.AcceptVerbs("GET")]
10         [System.Web.Http.ActionName("TestMethod")]
11         public string TestMethod(string msg1,string msg2)
12         {
13             return msg1 + msg2;
14         }
15     }
這個時候,我們還需要修改一下配置檔案,否則你會發現,他的API名稱變成了controller的名字

找到路徑 App_Start/WebApiConfig.cs,修改Register函式如下:
1      public static void Register(HttpConfiguration config)
2         {
3             config.Routes.MapHttpRoute(
4                 name: "DefaultApi",
5                 routeTemplate: "{controller}/{action}",    // 此處進行了修改
6                 defaults: new { id = RouteParameter.Optional }
7             );
8         }
現在我們重新整理一下頁面:

OK,這才是我想要的。
6,修改標題顯示的內容
為了個性化,我需要修改一下標題和介紹部分的內容,找到檔案:Area/Views/Help/Index.cshtml,修改部分程式碼為:
 1 @{
 2     ViewBag.Title = "這裡是需要修改的Title";
 3
 4     // Group APIs by controller
 5     ILookup<HttpControllerDescriptor, ApiDescription> apiGroups = Model.ToLookup(api => api.ActionDescriptor.ControllerDescriptor);
 6 }
 7
 8 <link type="text/css" href="~/Areas/HelpPage/HelpPage.css" rel="stylesheet" />
 9 <header class="help-page">
10     <div class="content-wrapper">
11         <div class="float-left">
12             <h1>@ViewBag.Title</h1>
13         </div>
14     </div>
15 </header>
16 <div id="body" class="help-page">
17     <section class="featured">
18         <div class="content-wrapper">
19             <h2>介紹</h2>
20             <p>
21                 我修改了這裡
22             </p>
23         </div>
24     </section>
25     <section class="content-wrapper main-content clear-fix">
26         @foreach (var group in apiGroups)
27         {
28             @Html.DisplayFor(m => group, "ApiGroup")
29         }
30     </section>
31 </div>
現在的頁面:

7,這裡面的坑
我在用的時候發現裡面有個坑,找到檔案:Areas/HelpPage/ModelDescriptions/ModelNameHelper.cs
裡面有一段程式碼:genericTypeName = genericTypeName.Substring(0, genericTypeName.IndexOf('`'));
這段程式碼,如果當genericTypeName字串中沒有'`'的時候,是會出問題的,所以我修改了一下這段程式碼:
1           var index = genericTypeName.IndexOf('`');
2                 genericTypeName = genericTypeName.Substring(0, index != -1 ? index : genericTypeName.Length);
8,不在頁面顯示API
其實很多的函式是不需要對外公佈的,那我們可以通過以下程式碼來設定:
1 [ApiExplorerSettings(IgnoreApi=true)]
2 public HttpResponseMessage Get(int id) {  }