SpringMVC+Spring+Hibernate搭建例項
1. 說明
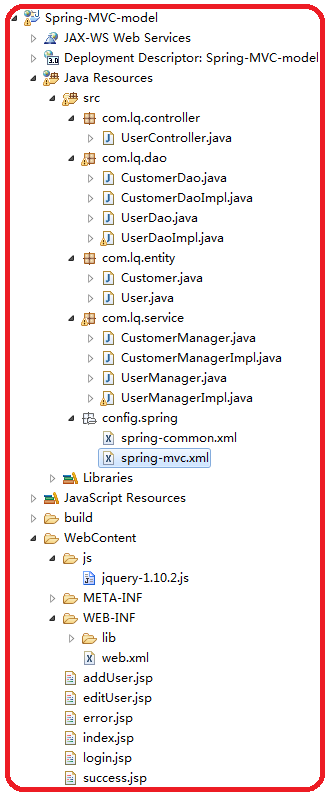
搭建SpringMVC+spring+hibernate的框架,專案結構如圖1所示

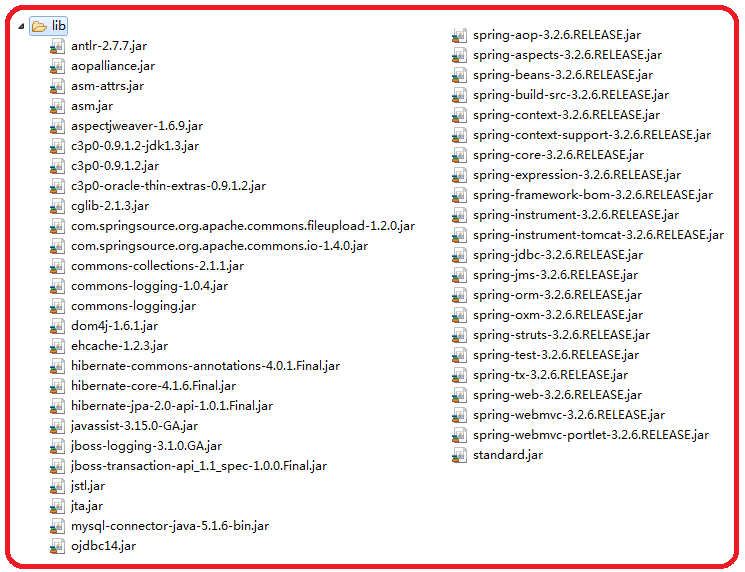
引用的jar包為Spring3.2.6和Hibernate4,如圖2所示
2. 配置檔案
2.1 spring-mvc.xml
注意看其中的註釋內容,寫的比較詳細
<?xml version="1.0" encoding="UTF-8"?>
<beans xmlns="http://www.springframework.org/schema/beans"
xmlns:xsi="http://www.w3.org/2001/XMLSchema-instance" - 1
- 2
- 3
- 4
- 5
- 6
- 7
- 8
- 9
- 10
- 11
- 12
- 13
- 14
- 15
- 16
- 17
- 18
- 19
- 20
- 21
- 22
- 23
- 24
- 25
- 26
- 27
- 28
- 29
- 30
- 31
- 32
- 33
- 34
- 35
- 1
- 2
- 3
- 4
- 5
- 6
- 7
- 8
- 9
- 10
- 11
- 12
- 13
- 14
- 15
- 16
- 17
- 18
- 19
- 20
- 21
- 22
- 23
- 24
- 25
- 26
- 27
- 28
- 29
- 30
- 31
- 32
- 33
- 34
- 35
2.2 spring-common.xml
<?xml version="1.0" encoding="UTF-8"?>
<!-- 注意下面配置中的spring-*.xsd的版本號要與使用的jar包匹配 -->
<beans xmlns="http://www.springframework.org/schema/beans"
    xmlns:xsi="http://www.w3.org/2001/XMLSchema-instance" xmlns:tx="http://www.springframework.org/schema/tx"
    xmlns:aop="http://www.springframework.org/schema/aop" xmlns:context="http://www.springframework.org/schema/context"
    xsi:schemaLocation="http://www.springframework.org/schema/beans
        http://www.springframework.org/schema/beans/spring-beans-3.2.xsd
        http://www.springframework.org/schema/tx
        http://www.springframework.org/schema/tx/spring-tx-3.2.xsd
        http://www.springframework.org/schema/aop
        http://www.springframework.org/schema/aop/spring-aop.xsd
        http://www.springframework.org/schema/context
        http://www.springframework.org/schema/context/spring-context.xsd">
    <!-- 只解析除controller之外的註解(即解析service、dao), 避免重複載入導致事務失效  -->
        <context:component-scan base-package="com.lq">
            <!-- annotation為spting-mvc中解析的內容 -->
            <context:exclude-filter type="annotation" expression="org.springframework.stereotype.Controller"/>
        </context:component-scan>

    <!-- 配置資料來源 -->
    <bean id="dataSource"
        class="org.springframework.jdbc.datasource.DriverManagerDataSource">
        <property name="driverClassName" value="com.mysql.jdbc.Driver"></property>
        <!-- 換成自己的資料庫路徑 -->
        <property name="url" value="jdbc:mysql://localhost/mvctest"></property>
        <property name="username" value="root"></property>
        <property name="password" value="root"></property>
    </bean>
    <!-- 配置SessionFactory -->
    <bean id="sessionFactory"
        class="org.springframework.orm.hibernate4.LocalSessionFactoryBean">
        <property name="dataSource" ref="dataSource" />
        <!-- packagesToScan 掃描包所在路徑(name中的內容其實是個關鍵字,可以掃描一整個包) -->
        <property name="packagesToScan">
            <list>
                <!-- 此處可新增多個entity -->
                <value>com.lq.entity</value>
            </list>
        </property>
        <property name="hibernateProperties">
            <props>
                <prop key="hibernate.dialect">org.hibernate.dialect.MySQLDialect</prop>
                <!-- 第一次生成資料庫的時候用create,之後換成update,否則內容會清空 -->
                <prop key="hibernate.hbm2ddl.auto">create</prop>
                <prop key="hibernate.show_sql">true</prop>
                <prop key="hibernate.format_sql">true</prop>
                <prop key="hibernate.current_session_context_class">org.springframework.orm.hibernate4.SpringSessionContext
                </prop>
            </props>
        </property>
    </bean>
    <!-- 配置一個事務管理器 -->
    <bean id="transactionManager"
        class="org.springframework.orm.hibernate4.HibernateTransactionManager">
        <property name="sessionFactory" ref="sessionFactory" />
    </bean>
    <tx:advice id="txAdvice" transaction-manager="transactionManager">
        <tx:attributes>
            <!-- 攔截的是下段配置aop裡設定的路徑,即txPointcut中配置的路徑 -->
            <!-- 具體的propagation含義請自查 -->
            <tx:method name="save*" propagation="REQUIRED" />
            <tx:method name="add*" propagation="REQUIRED" />
            <tx:method name="create*" propagation="REQUIRED" />
            <tx:method name="insert*" propagation="REQUIRED" />
            <tx:method name="update*" propagation="REQUIRED" />
            <tx:method name="merge*" propagation="REQUIRED" />
            <tx:method name="del*" propagation="REQUIRED" />
            <tx:method name="remove*" propagation="REQUIRED" />
            <tx:method name="put*" propagation="REQUIRED" />
            <tx:method name="use*" propagation="REQUIRED" />
            <!--hibernate4必須配置為開啟事務 否則 getCurrentSession()獲取不到 -->
            <tx:method name="get*" propagation="REQUIRED" read-only="true" />
            <tx:method name="count*" propagation="REQUIRED" read-only="true" />
            <tx:method name="find*" propagation="REQUIRED" read-only="true" />
            <tx:method name="list*" propagation="REQUIRED" read-only="true" />
            <tx:method name="*" read-only="true" />
        </tx:attributes>
    </tx:advice>
    <aop:config expose-proxy="true">
        <!-- 只對業務邏輯層(service層)實施事務 -->
        <aop:pointcut id="txPointcut"
            expression="execution(* com.lq.service.*.*(..))" />
        <aop:advisor advice-ref="txAdvice" pointcut-ref="txPointcut" />
    </aop:config>
</beans>- 1
- 2
- 3
- 4
- 5
- 6
- 7
- 8
- 9
- 10
- 11
- 12
- 13
- 14
- 15
- 16
- 17
- 18
- 19
- 20
- 21
- 22
- 23
- 24
- 25
- 26
- 27
- 28
- 29
- 30
- 31
- 32
- 33
- 34
- 35
- 36
- 37
- 38
- 39
- 40
- 41
- 42
- 43
- 44
- 45
- 46
- 47
- 48
- 49
- 50
- 51
- 52
- 53
- 54
- 55
- 56
- 57
- 58
- 59
- 60
- 61
- 62
- 63
- 64
- 65
- 66
- 67
- 68
- 69
- 70
- 71
- 72
- 73
- 74
- 75
- 76
- 77
- 78
- 79
- 80
- 81
- 82
- 83
- 84
- 85
- 1
- 2
- 3
- 4
- 5
- 6
- 7
- 8
- 9
- 10
- 11
- 12
- 13
- 14
- 15
- 16
- 17
- 18
- 19
- 20
- 21
- 22
- 23
- 24
- 25
- 26
- 27
- 28
- 29
- 30
- 31
- 32
- 33
- 34
- 35
- 36
- 37
- 38
- 39
- 40
- 41
- 42
- 43
- 44
- 45
- 46
- 47
- 48
- 49
- 50
- 51
- 52
- 53
- 54
- 55
- 56
- 57
- 58
- 59
- 60
- 61
- 62
- 63
- 64
- 65
- 66
- 67
- 68
- 69
- 70
- 71
- 72
- 73
- 74
- 75
- 76
- 77
- 78
- 79
- 80
- 81
- 82
- 83
- 84
- 85
2.3 web.xml
<?xml version="1.0" encoding="UTF-8"?>
<web-app xmlns:xsi="http://www.w3.org/2001/XMLSchema-instance"
xmlns="http://java.sun.com/xml/ns/javaee"
xsi:schemaLocation="http://java.sun.com/xml/ns/javaee http://java.sun.com/xml/ns/javaee/web-app_3_0.xsd"
id="WebApp_ID" version="3.0">
<display-name>Spring-MVC-model</display-name>
<welcome-file-list>
<welcome-file>index.jsp</welcome-file>
</welcome-file-list>
<!-- 載入所有的配置檔案 -->
<context-param>
<param-name>contextConfigLocation</param-name>
<param-value>classpath*:config/spring/spring-*.xml</param-value>
</context-param>
<!-- 配置Spring監聽 -->
<listener>
<listener-class>org.springframework.web.context.ContextLoaderListener</listener-class>
</listener>
<!-- 配置SpringMVC -->
<servlet>
<
相關推薦
SpringMVC+Spring+Hibernate搭建例項
1. 說明
搭建SpringMVC+spring+hibernate的框架,專案結構如圖1所示
引用的jar包為Spring3.2.6和Hibernate4,如圖2所示
2. 配置檔案
2.1 spring-mvc.xml
注意
SpringMVC+Spring+HIbernate 簡單增刪改查例項
SpringMVC+Spring+HIbernate 簡單增刪改查例項
HIbernate配置mysql資料庫的方式 和 Structs+spring+HIbernate 是一樣的。 可以理解為SpringMVC 把
Myeclipse搭建SpringMVC-Spring-hibernate框架
最近的工作需求改了又改,麻煩的狠,就暫停更博,之前一週寫的這個框架搭建完成,有點心得,記錄一下
之前網上有搭建的這個框架但是是用eclipse,我們今天就用myeclipse搭建一下框架
原文章eclipse搭建連結地址
說明
1.搭建SpringMVC+spring+hiber
Spring+Mybatis+SpringMVC+Maven+MySql搭建例項
摘要:本文主要講了如何使用Maven來搭建Spring+Mybatis+SpringMVC+MySql的搭建例項,文章寫得很詳細,有程式碼有圖片,最後也帶有執行的效果。
一、準備工作
1. 首先建立一個表:
CREATE TABLE `t_u
Maven搭建SpringMvc+Spring+Hibernate框架
假設你已經在Myeclipse上面建立好啦一個Maven專案,現在我們開始往pom.xml裡面新增jar的配置。
<project xmlns="http://maven.apache.org/POM/4.0.0" xmlns:xsi="http://www.w3.o
框架搭建(SpringMVC+Spring+hibernate )
spring版本:3.0.5
hibernate版本:3.3
簡介:Spring MVC
Spring MVC(Model View Controller)是 Spring 中一個重要的組成部分。
Spring MVC 框架處理請求的流程:
Spring MVC 核心
springMVC+spring+hibernate web項目參考示例
code schema AR HA eth contex nal action prefix web配置
web.xml
<?xml version="1.0" encoding="UTF-8"?>
<web-app
version="3.0"
SpringMVC, Spring, Mybatis 搭建網上商城
目標:非分散式的WEB專案
1.包含面向顧客的前臺(移動端或網站或小程式),面向管理的WEB後臺,保證前後臺通訊的API;
2.使用JAVA,MYSQL;
&nb
springMVC-spring-Hibernate 開發學生管理系統簡單案例-jsp檔案說明(五)
五、jsp檔案說明
原始檔:https://download.csdn.net/download/flyingshadower/10628472
(1)jsp檔案如圖:
(2)addPage.jsp
<%@ page contentType="text/html;char
springMVC-spring-Hibernate 開發學生管理系統簡單案例-配置檔案說明(三)
三、配置檔案說明
原始檔:https://download.csdn.net/download/flyingshadower/10628472
(1)在pom.xml寫入需要的各類依賴,自動下載依賴包。
<?xml version="1.0" encoding="UTF-8"?&g
springMVC-spring-Hibernate 開發學生管理系統簡單案例-java各檔案編寫(四)
四、java各檔案編寫
原始檔:https://download.csdn.net/download/flyingshadower/10628472
(1)工程目錄:
(2)StudentEntity 利用Hibernate自動生成實體類
package com.student
SpringMVC+Spring+Hibernate整合開發
最近突然想認真研究下java web常用框架,雖然現在一直在用,但實現的整體流程不是很瞭解,就在網上搜索資料,嘗試自己搭建,以下是自己的搭建及測試過程。
一、準備工作:
1/安裝並配置java執行環境
2/資料庫的安裝配置(Mysql)
3/安裝並配置伺服器(Tom
SpringMVC + Spring + Hibernate實戰
專案結構
配置檔案 pom.xml
<?xml version="1.0" encoding="UTF-8"?>
<project xmlns="http://maven.apache.org/POM/4.0.0" xmlns:xsi="http://www
springmvc,spring,hibernate框架整合
首先工作是匯入jar包
需要的jar包: 測試需要的jar包 junit
spring系列的jar包 spring-webmvc(spring-aop spring-beans spring-context spring-core spring-expression spring-
Maven 整合 SpringMvc Spring Hibernate +oracle
一、實習已經有大半年了 企業的專案都是搭建好的 自己也學習了去搭建一個 基於SSH的專案整合 其中查閱了很多資料 遇到一些問題也解決了。希望大家可以共同進步。
感謝http://blog.csdn.net/js931178805/article/details/39642
SpringMVC+Spring+Hibernate+Oracle 實現圖書管理(CRUD)
package ssh;
import javax.sql.DataSource;
import org.hibernate.SessionFactory;
import org.springframework.context.annotation.Bean;
import org.springframewo
【整理】SpringMvc+Spring+Hibernate面試題
SpringMVC部分
1、什麼是Spring MVC ?簡單介紹下你對springMVC的理解?
Spring MVC是一個基於MVC架構的用來簡化web應用程式開發的應用開發框架,它是Spring的一個模組,無需中間整合層來整合 ,它和Struts2一樣都屬於表現層
springmvc spring hibernate maven fastjson 配置
內容:
一、引入jastJson包
<!-- json -->
<dependency>
<groupId>com.alibaba</groupId>
springmvc spring hibernate maven pom.xml
<project xmlns="http://maven.apache.org/POM/4.0.0" xmlns:xsi="http://www.w3.org/2001/XMLSchema-instance"
xsi:schemaLocation="http://
用Maven整合SpringMVC+Spring+Hibernate 框架,實現簡單的插入資料庫資料功能
一、搭建開始前的準備
1、我用的MyEclipse2014版,大家也可以用IDEA。
2、下載Tomcat(免安裝解壓包)、MySQL(zip包下載地址 免安裝解壓包,好處就是雙擊啟動,最後我會把bat的啟動發給大家)、用的Navicat for MySQL的MySQL的圖

