windows7+vs+CUDA7.5 編譯caffe+配置matcaffe+配置pycaffe
轉載來自,http://blog.csdn.net/tina_ttl
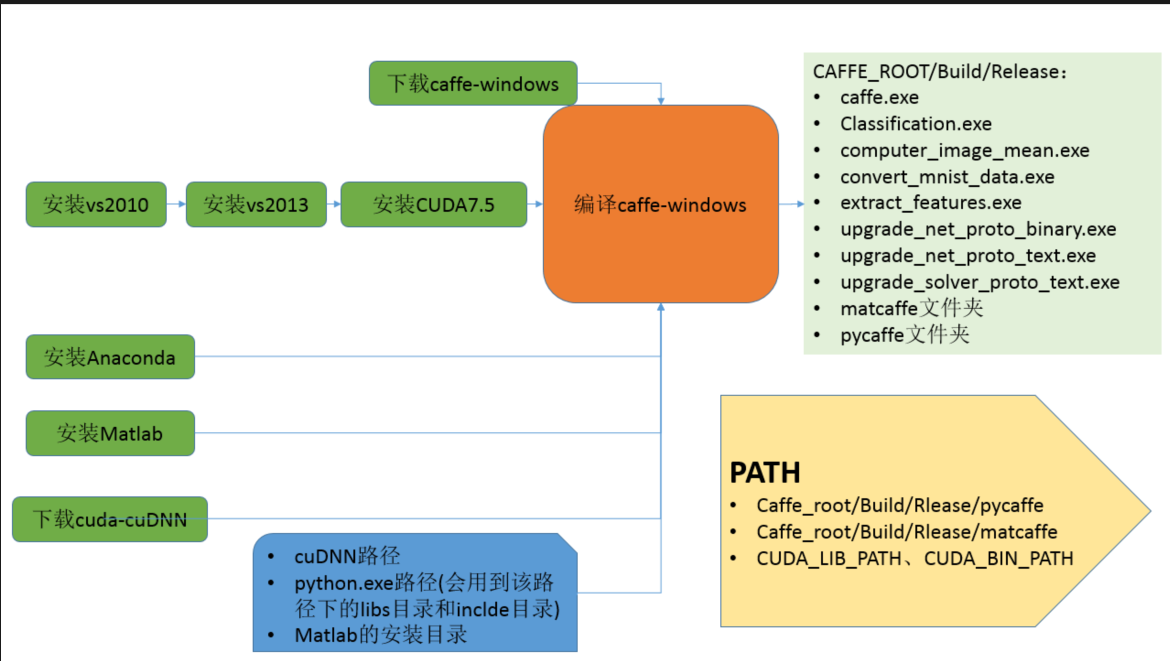
經過朋友指導,終於成功在windows7上成功編譯了caffe,這裡將編譯過程記錄
1. 安裝檔案準備
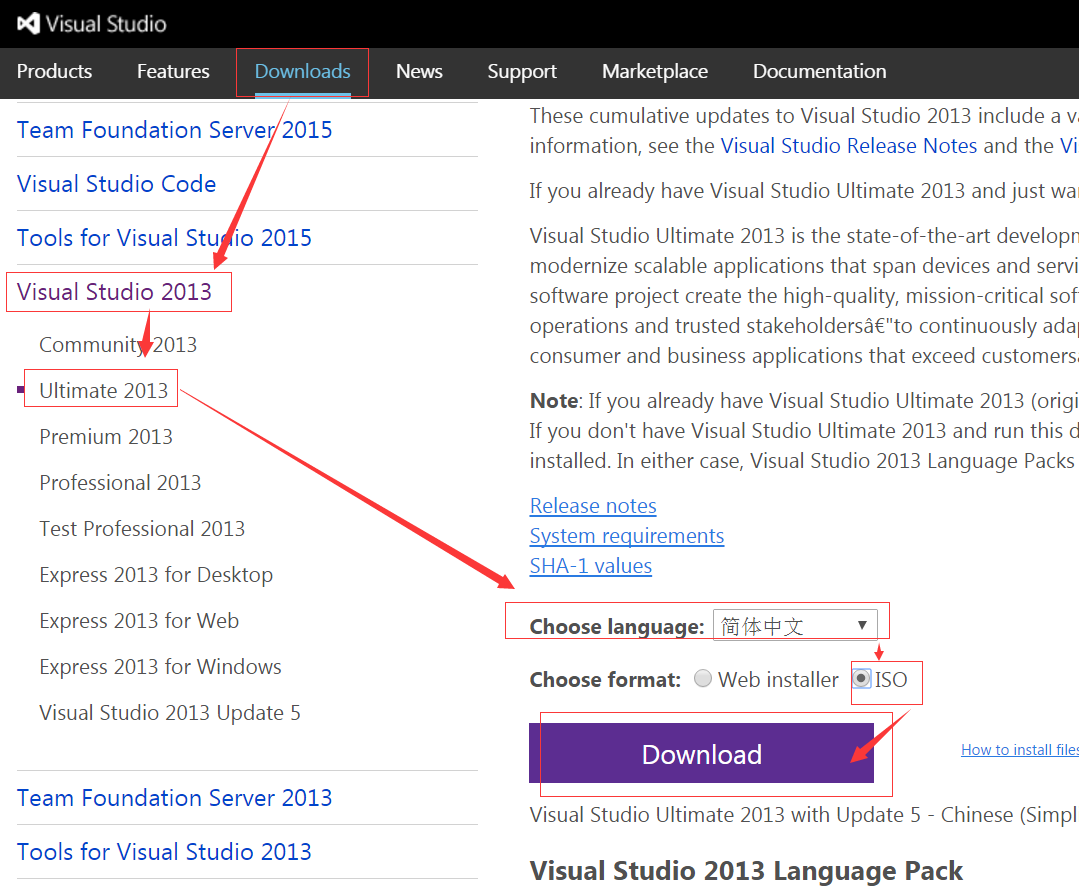
1.1 visual studio 2013安裝包下載
- 選擇Visual Studio 2013–>Ultimate 2013版–>簡體中文iso檔案–>下載
1.2 CUDA7.5 (optional)
如果不需要cuda版本的caffe,本步跳過
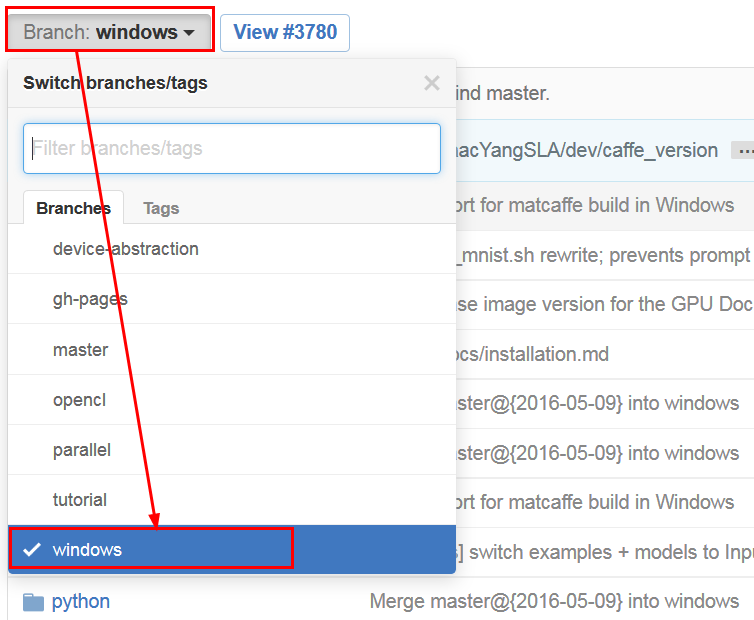
1.3 windows版本caffe
- 一定要注意,brand那裡選擇windows
1.4 下載cuDNN (optional)
- 如果不需要配置cuDNN,該步請跳過
- 從nVidia官網下載cuDNN v3或者是cuDNN
v4,注意,需要註冊才能下載
下載後解壓縮,如下圖所示
1.5 下載Anaconda安裝包 (optional)
- 該安裝包是用來安裝python的,從而可以配置pycaffe
- 這裡選擇的是利用Anaconda的方法按照python,所以才需要下載Anaconda安裝包,當然,也可以按照其他的方法安裝
- 如果不需要配置pycaffe,該步請跳過
- 一般情況下,可能大家的機器上都已經安裝了python,那麼,也請跳過該步
1.6 下載Matlab安裝包 (optional)
- 該安裝包是用來安裝matlab的,從而可以配置matcaffe
- 如果不需要配置matcaffe ,該步請跳過
- 一般情況下,可能大家的機器上都已經安裝了matlab,那麼,也請跳過該步
- matlab下載地址這裡就不列出了,請自行尋找
2.安裝visual studio 2013
3.安裝cuda7.5 (optional)
4. 利用Anaconda安裝python (optional)
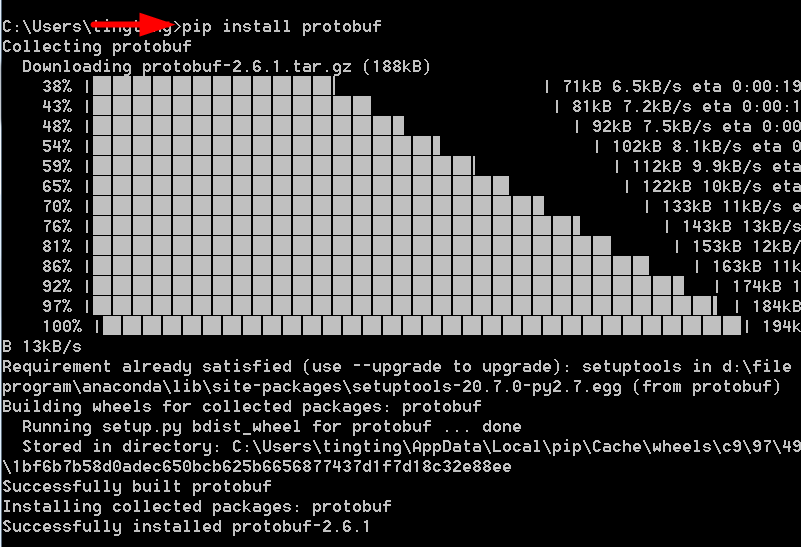
安裝完python後,再安裝一下protobuf,因為後面編譯pycaffe時有需要:
- 利用pip工具安裝protobuf:
pip install protobuf
5. 安裝matlab (optional)
如果你的本機沒有安裝matlab ,並且你需要配置matcaffe,那麼,請安裝matlab,具體安裝方法請自行查閱
6.修改配置檔案
在github上下載的window caffe把呢你自帶一個配置檔案的例子,在進行編譯之前,需要先更改該檔案內容
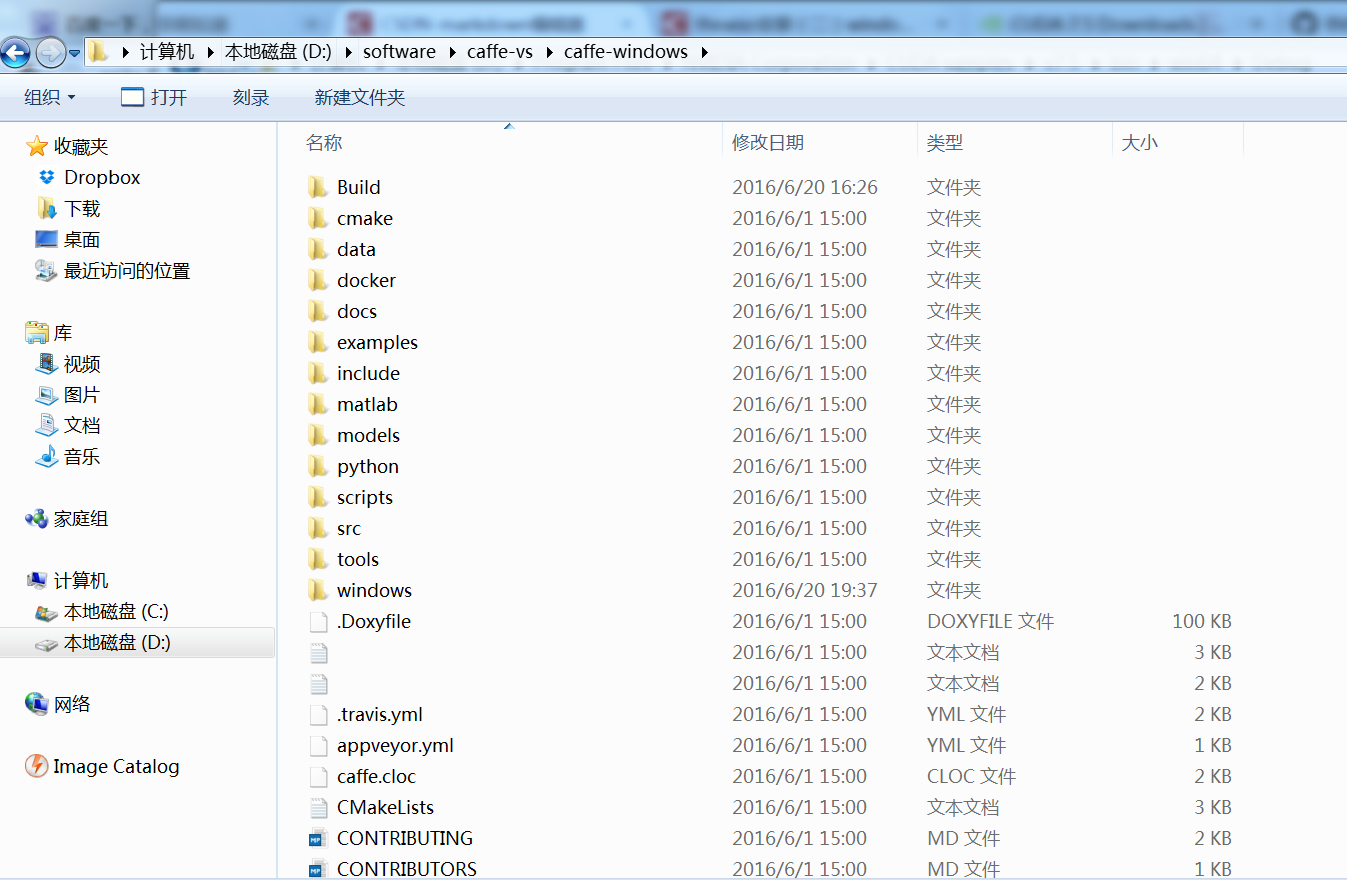
6.1 解壓縮下載的caffe-windows檔案
這裡假設caffe-windows被解壓到了如下的資料夾中
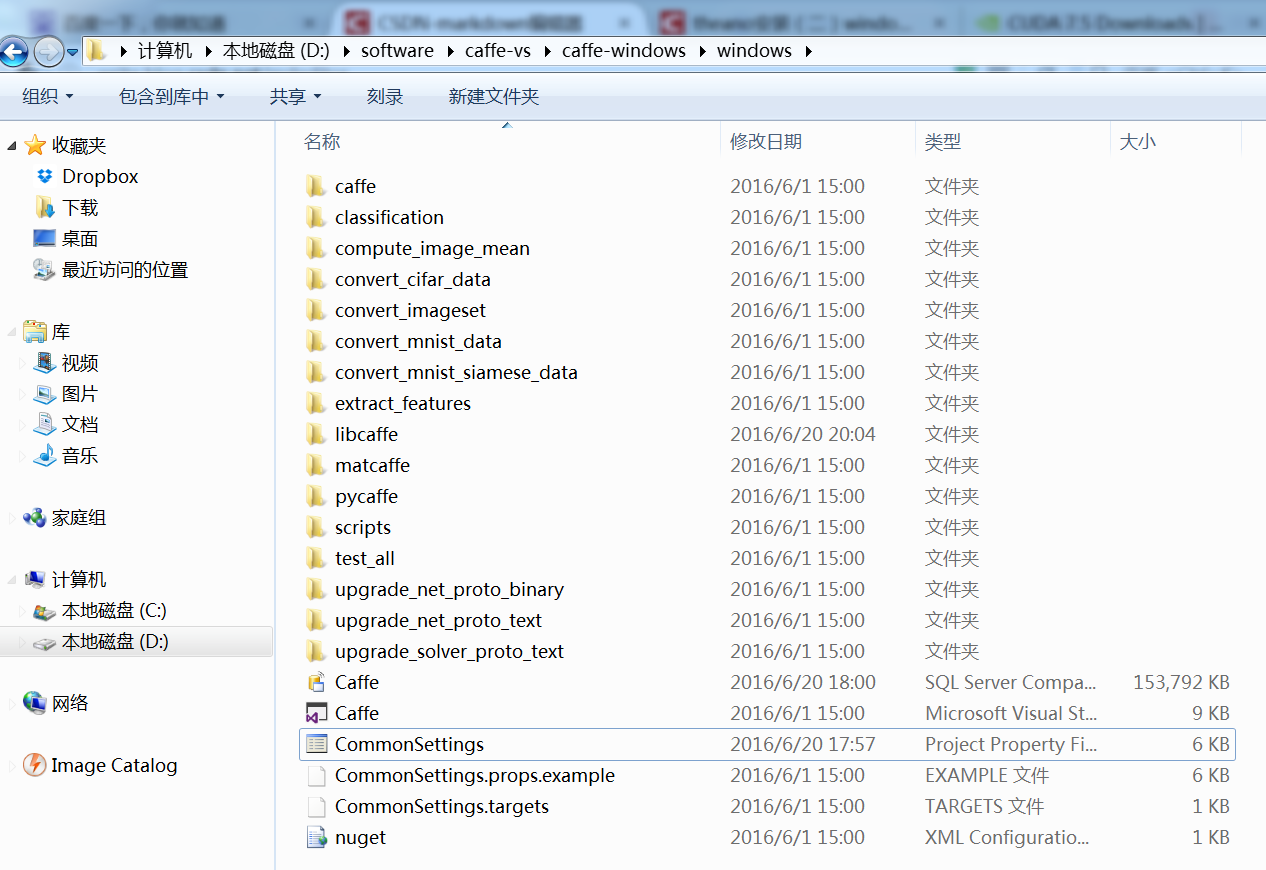
6.2 進入到windows資料夾
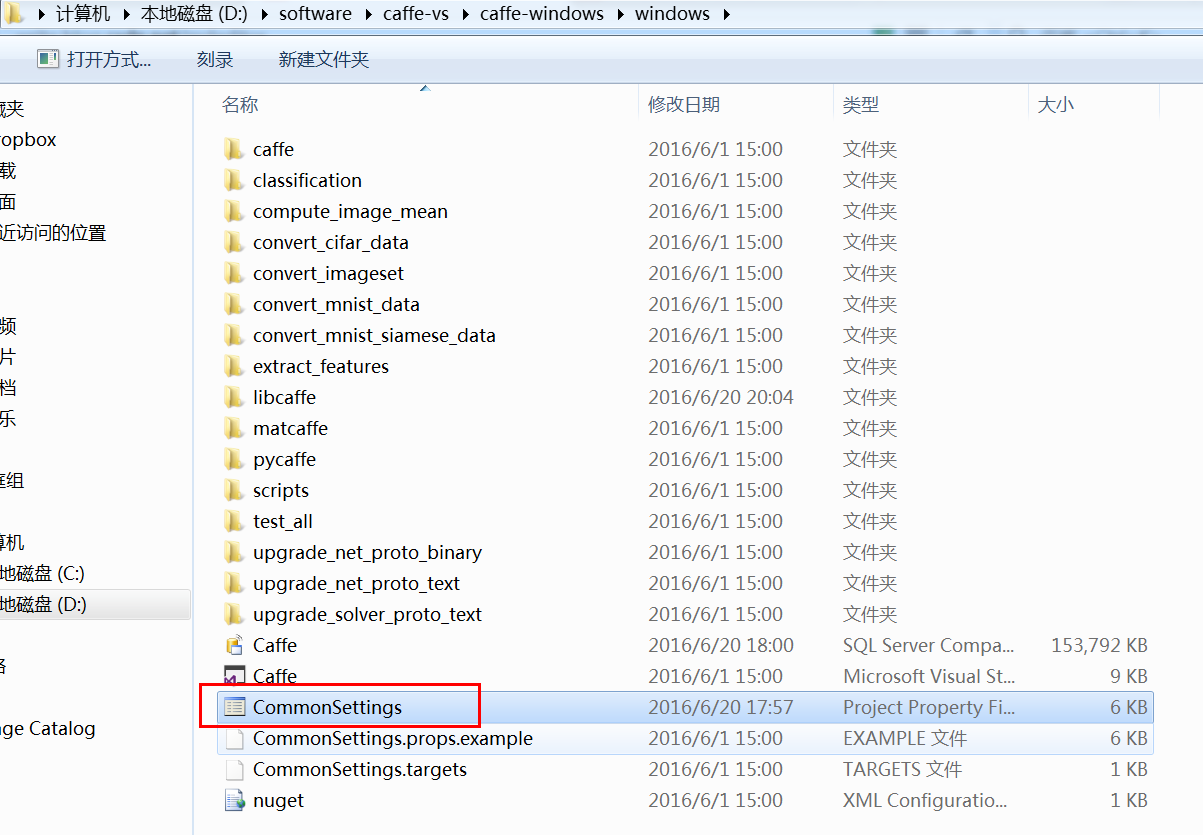
6.3 複製配置檔案,並重命名
將該資料夾(即.\windows)下的CommonSettings.props.example檔案複製一份兒,並將複製的檔案命名為CommonSettings.props
-
6.4 修改配置檔案(修改工程的屬性檔案)
6.4.1 配置檔案說明
-
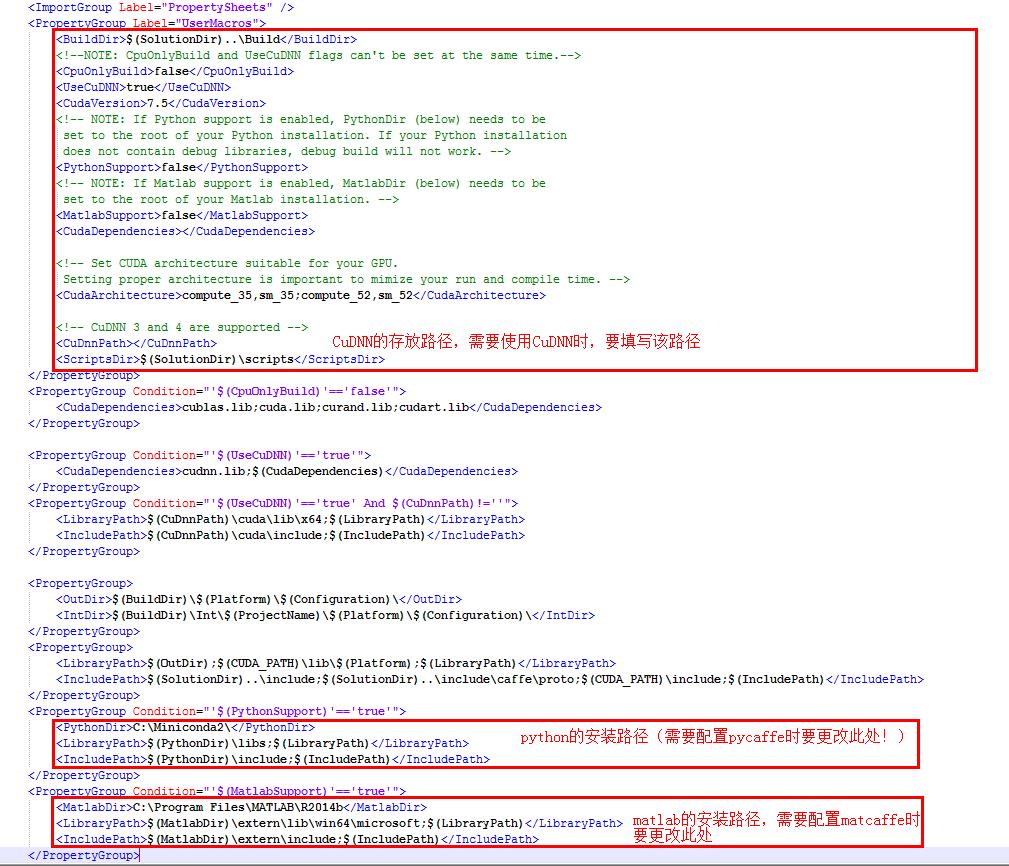
caffe-windows自帶的配置檔案CommonSettings.props.example中與我們後面要進行的編譯密切相關的就是如下部分
-
例子中所有配置引數都是預設值
-
CpuOnlyBuild:是否使用CPU- 預設值為False(即使用GPU編譯)
- 如果本機沒有配置好CUDA,那麼,該值應該賦值為True;
- 如果本機已經配置好CUDA,並且需要編譯CUDA版本的caffe,那麼,該值應該賦值為True、
-
UseCuDNN:是否使用CuDNN- 預設值為True;
- 如果本機沒有配置好CUDA,那麼,該值應該賦值為False;
- 注意:CpuOnlyBuild和CuDNN不能同時為True;
- 如果這裡設定為True,那麼還需要對
<CuDnnPath></CuDnnPath>賦值,即下載的CuDNN的路徑
-
CudaVersion:CUDA的版本 -
PythonSupport:是否支援python- 預設值為False,即後續不編譯pycaffe;
- 如果需要編譯pycaffe,那麼該值設定為True
- 如果這裡設定為true,那麼還需要對
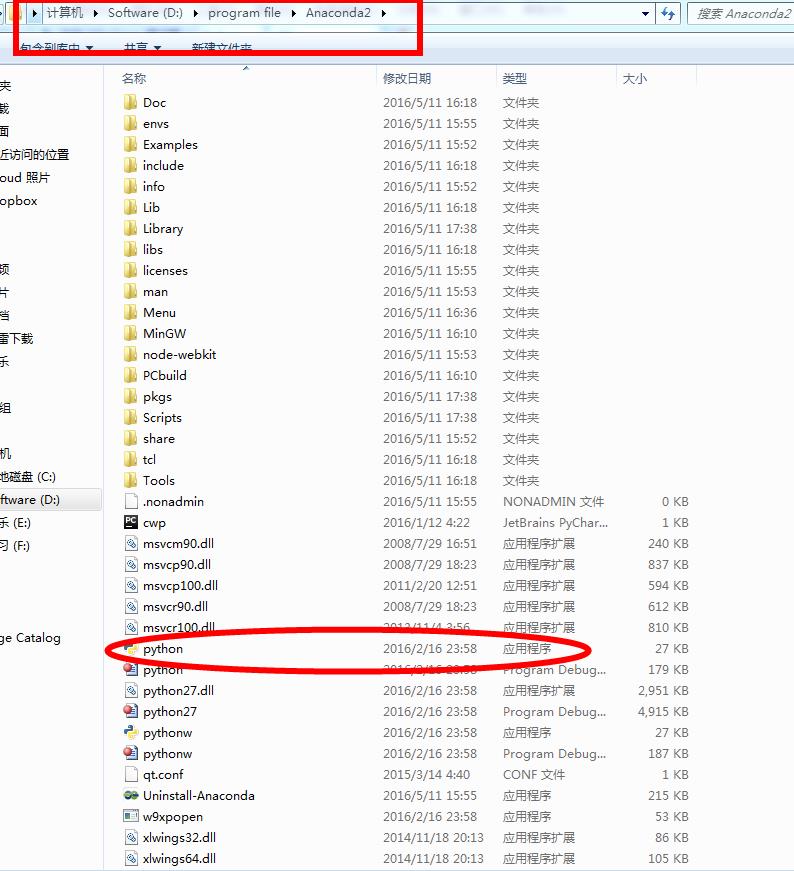
<PythonDir>C:\Miniconda2\</PythonDir>賦值- 上面的值是預設的,應該修改為本機的python安裝路徑,也就是python.exe所在路徑,例如,本機是利用Anaconda安裝的python,路徑如下:
D:\program file\Anaconda2,那麼,應該令<PythonDir>D:\program file\Anaconda2</PythonDir>
- 上面的值是預設的,應該修改為本機的python安裝路徑,也就是python.exe所在路徑,例如,本機是利用Anaconda安裝的python,路徑如下:
-
MatlabSupport:是否支援matlab- 預設值為False;
- 如果需要編譯matcaffe,那麼該值設定為True
- 如果該值設定為true,那麼還需要對
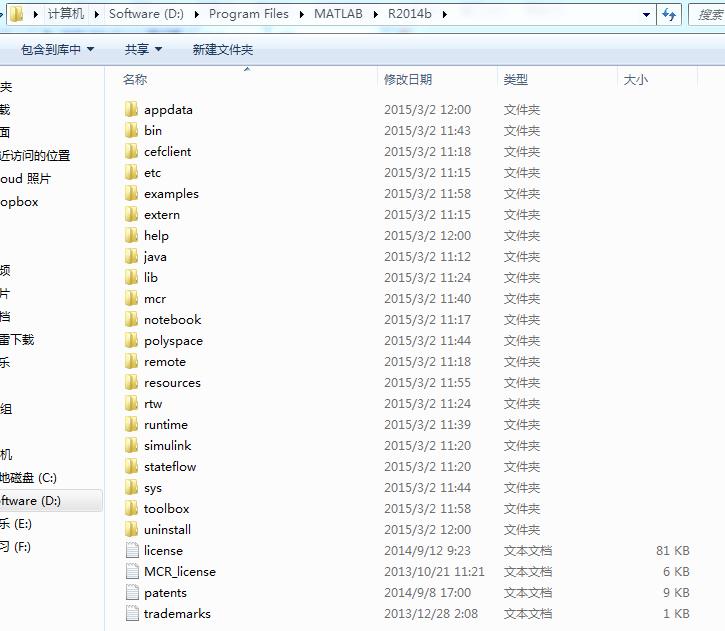
<MatlabDir>C:\Program Files\MATLAB\R2014b</MatlabDir>進行賦值:- 上面的路徑是預設的,需要更改為本機的matlab安裝目錄,例如,本機的matlab安裝路徑如下:
D:\Program Files\MATLAB\R2014b,那麼,<MatlabDir>D:\Program Files\MATLAB\R2014b</MatlabDir>
- 上面的路徑是預設的,需要更改為本機的matlab安裝目錄,例如,本機的matlab安裝路徑如下:
6.4.2 非CUDA版本的caffe
配置檔案部分設定如下:
<PropertyGroup Label="UserMacros">
<BuildDir>$(SolutionDir)..\Build</BuildDir>
<!--NOTE: CpuOnlyBuild and UseCuDNN flags can't be set at the same time.-->
<CpuOnlyBuild>true</CpuOnlyBuild>
<UseCuDNN>false</UseCuDNN>
<CudaVersion>7.5</CudaVersion>
<!-- NOTE: If Python support is enabled, PythonDir (below) needs to be
set to the root of your Python installation. If your Python installation
does not contain debug libraries, debug build will not work. -->
<PythonSupport>false</PythonSupport>
<!-- NOTE: If Matlab support is enabled, MatlabDir (below) needs to be
set to the root of your Matlab installation. -->
<MatlabSupport>false</MatlabSupport>
<CudaDependencies></CudaDependencies>
<!-- Set CUDA architecture suitable for your GPU.
Setting proper architecture is important to mimize your run and compile time. -->
<CudaArchitecture>compute_35,sm_35;compute_52,sm_52</CudaArchitecture>
<!-- CuDNN 3 and 4 are supported -->
<CuDnnPath></CuDnnPath>
<ScriptsDir>$(SolutionDir)\scripts</ScriptsDir>
</PropertyGroup>
<PropertyGroup Condition="'$(CpuOnlyBuild)'=='false'">
<CudaDependencies>cublas.lib;cuda.lib;curand.lib;cudart.lib</CudaDependencies>
</PropertyGroup>
<PropertyGroup Condition="'$(UseCuDNN)'=='true'">
<CudaDependencies>cudnn.lib;$(CudaDependencies)</CudaDependencies>
</PropertyGroup>
<PropertyGroup Condition="'$(UseCuDNN)'=='true' And $(CuDnnPath)!=''">
<LibraryPath>$(CuDnnPath)\cuda\lib\x64;$(LibraryPath)</LibraryPath>
<IncludePath>$(CuDnnPath)\cuda\include;$(IncludePath)</IncludePath>
</PropertyGroup>
<PropertyGroup>
<OutDir>$(BuildDir)\$(Platform)\$(Configuration)\</OutDir>
<IntDir>$(BuildDir)\Int\$(ProjectName)\$(Platform)\$(Configuration)\</IntDir>
</PropertyGroup>
<PropertyGroup>
<LibraryPath>$(OutDir);$(CUDA_PATH)\lib\$(Platform);$(LibraryPath)</LibraryPath>
<IncludePath>$(SolutionDir)..\include;$(SolutionDir)..\include\caffe\proto;$(CUDA_PATH)\include;$(IncludePath)</IncludePath>
</PropertyGroup>
<PropertyGroup Condition="'$(PythonSupport)'=='true'">
<PythonDir>C:\Miniconda2\</PythonDir>
<LibraryPath>$(PythonDir)\libs;$(LibraryPath)</LibraryPath>
<IncludePath>$(PythonDir)\include;$(IncludePath)</IncludePath>
</PropertyGroup>
<PropertyGroup Condition="'$(MatlabSupport)'=='true'">
<MatlabDir>C:\Program Files\MATLAB\R2014b</MatlabDir>
<LibraryPath>$(MatlabDir)\extern\lib\win64\microsoft;$(LibraryPath)</LibraryPath>
<IncludePath>$(MatlabDir)\extern\include;$(IncludePath)</IncludePath>
</PropertyGroup>- 1
- 2
- 3
- 4
- 5
- 6
- 7
- 8
- 9
- 10
- 11
- 12
- 13
- 14
- 15
- 16
- 17
- 18
- 19
- 20
- 21
- 22
- 23
- 24
- 25
- 26
- 27
- 28
- 29
- 30
- 31
- 32
- 33
- 34
- 35
- 36
- 37
- 38
- 39
- 40
- 41
- 42
- 43
- 44
- 45
- 46
- 47
- 48
- 49
- 50
- 51
- 52
- 53
6.4.3 CUDA版本的caffe
配置檔案部分設定如下:
<PropertyGroup Label="UserMacros">
<BuildDir>$(SolutionDir)..\Build</BuildDir>
<!--NOTE: CpuOnlyBuild and UseCuDNN flags can't be set at the same time.-->
<CpuOnlyBuild>false</CpuOnlyBuild>
<UseCuDNN>ture</UseCuDNN>
<CudaVersion>7.5</CudaVersion>
<!-- NOTE: If Python support is enabled, PythonDir (below) needs to be
set to the root of your Python installation. If your Python installation
does not contain debug libraries, debug build will not work. -->
<PythonSupport>true</PythonSupport>
<!-- NOTE: If Matlab support is enabled, MatlabDir (below) needs to be
set to the root of your Matlab installation. -->
<MatlabSupport>true</MatlabSupport>
<CudaDependencies></CudaDependencies>
<!-- Set CUDA architecture suitable for your GPU.
Setting proper architecture is important to mimize your run and compile time. -->
<CudaArchitecture>compute_35,sm_35;compute_52,sm_52</CudaArchitecture>
<!-- CuDNN 3 and 4 are supported -->
<CuDnnPath>D:\software\caffe-vs\cuda-cuDNN</CuDnnPath>
<ScriptsDir>$(SolutionDir)\scripts</ScriptsDir>
</PropertyGroup>
<PropertyGroup Condition="'$(CpuOnlyBuild)'=='false'">
<CudaDependencies>cublas.lib;cuda.lib;curand.lib;cudart.lib</CudaDependencies>
</PropertyGroup>
<PropertyGroup Condition="'$(UseCuDNN)'=='true'">
<CudaDependencies>cudnn.lib;$(CudaDependencies)</CudaDependencies>
</PropertyGroup>
<PropertyGroup Condition="'$(UseCuDNN)'=='true' And $(CuDnnPath)!=''">
<LibraryPath>$(CuDnnPath)\cuda\lib\x64;$(LibraryPath)</LibraryPath>
<IncludePath>$(CuDnnPath)\cuda\include;$(IncludePath)</IncludePath>
</PropertyGroup>
<PropertyGroup>
<OutDir>$(BuildDir)\$(Platform)\$(Configuration)\</OutDir>
<IntDir>$(BuildDir)\Int\$(ProjectName)\$(Platform)\$(Configuration)\</IntDir>
</PropertyGroup>
<PropertyGroup>
<LibraryPath>$(OutDir);$(CUDA_PATH)\lib\$(Platform);$(LibraryPath)</LibraryPath>
<IncludePath>$(SolutionDir)..\include;$(SolutionDir)..\include\caffe\proto;$(CUDA_PATH)\include;$(IncludePath)</IncludePath>
</PropertyGroup>
<PropertyGroup Condition="'$(PythonSupport)'=='true'">
<PythonDir>D:\File Program\Anaconda\</PythonDir>
<LibraryPath>$(PythonDir)\libs;$(LibraryPath)</LibraryPath>
<IncludePath>$(PythonDir)\include;$(IncludePath)</IncludePath>
</PropertyGroup>
<PropertyGroup Condition="'$(MatlabSupport)'=='true'">
<MatlabDir>D:\File Program\Matlab\</MatlabDir>
<LibraryPath>$(MatlabDir)\extern\lib\win64\microsoft;$(LibraryPath)</LibraryPath>
<IncludePath>$(MatlabDir)\extern\include;$(IncludePath)</IncludePath>
</PropertyGroup>- 1
- 2
- 3
- 4
- 5
- 6
- 7
- 8
- 9
- 10
- 11
- 12
- 13
- 14
- 15
- 16
- 17
- 18
- 19
- 20
- 21
- 22
- 23
- 24
- 25
- 26
- 27
- 28
- 29
- 30
- 31
- 32
- 33
- 34
- 35
- 36
- 37
- 38
- 39
- 40
- 41
- 42
- 43
- 44
- 45
- 46
- 47
- 48
- 49
- 50
- 51
- 52
- 53
注:事實上,對cuDNN路徑的配置有兩種方案:
- 方案1:將cuDNN v4的壓縮包內的bin、include、lib中的檔案分別放置在%CUDA_PATH% (即cuda的安裝路徑)的相應目錄中
- 方案2:將 .\windows\CommonSettings.props檔案中的CuDnnPath設定為該解壓縮路徑,例如,將cuDNN解壓後文件放置在D:\software\caffe-vs\cuda-cuDNN中,那麼,在CommonSettings.props中,令<CuDnnPath>D:\software\caffe-vs\cuda-cuDNN\</CuDnnPath>,即上面提到的方法
7 編譯caffe
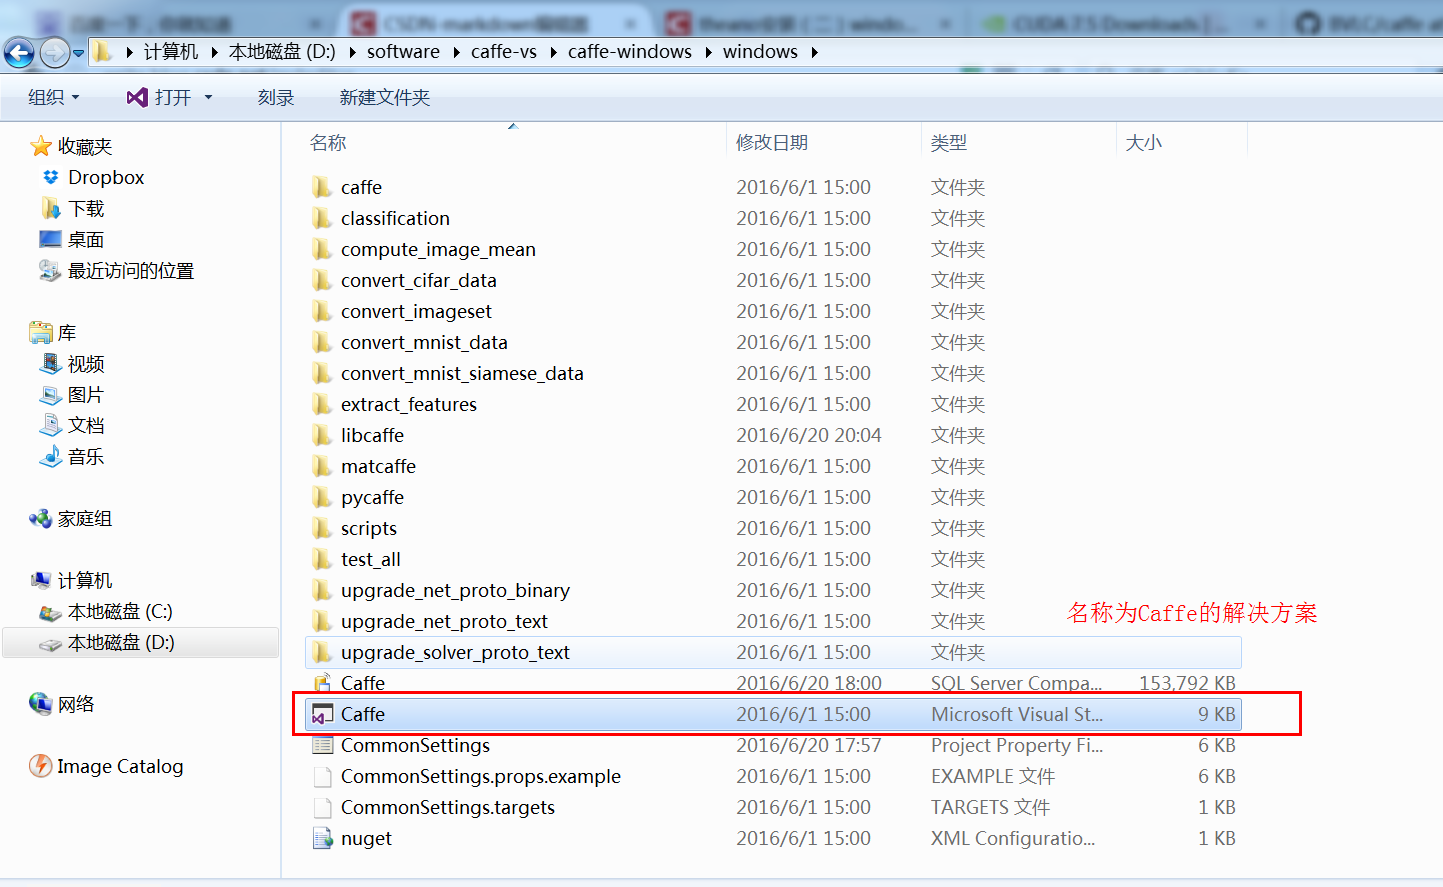
7.1 開啟名稱為Caffe的解決方案
利用VS2013開啟名稱為Caffe的解決方案
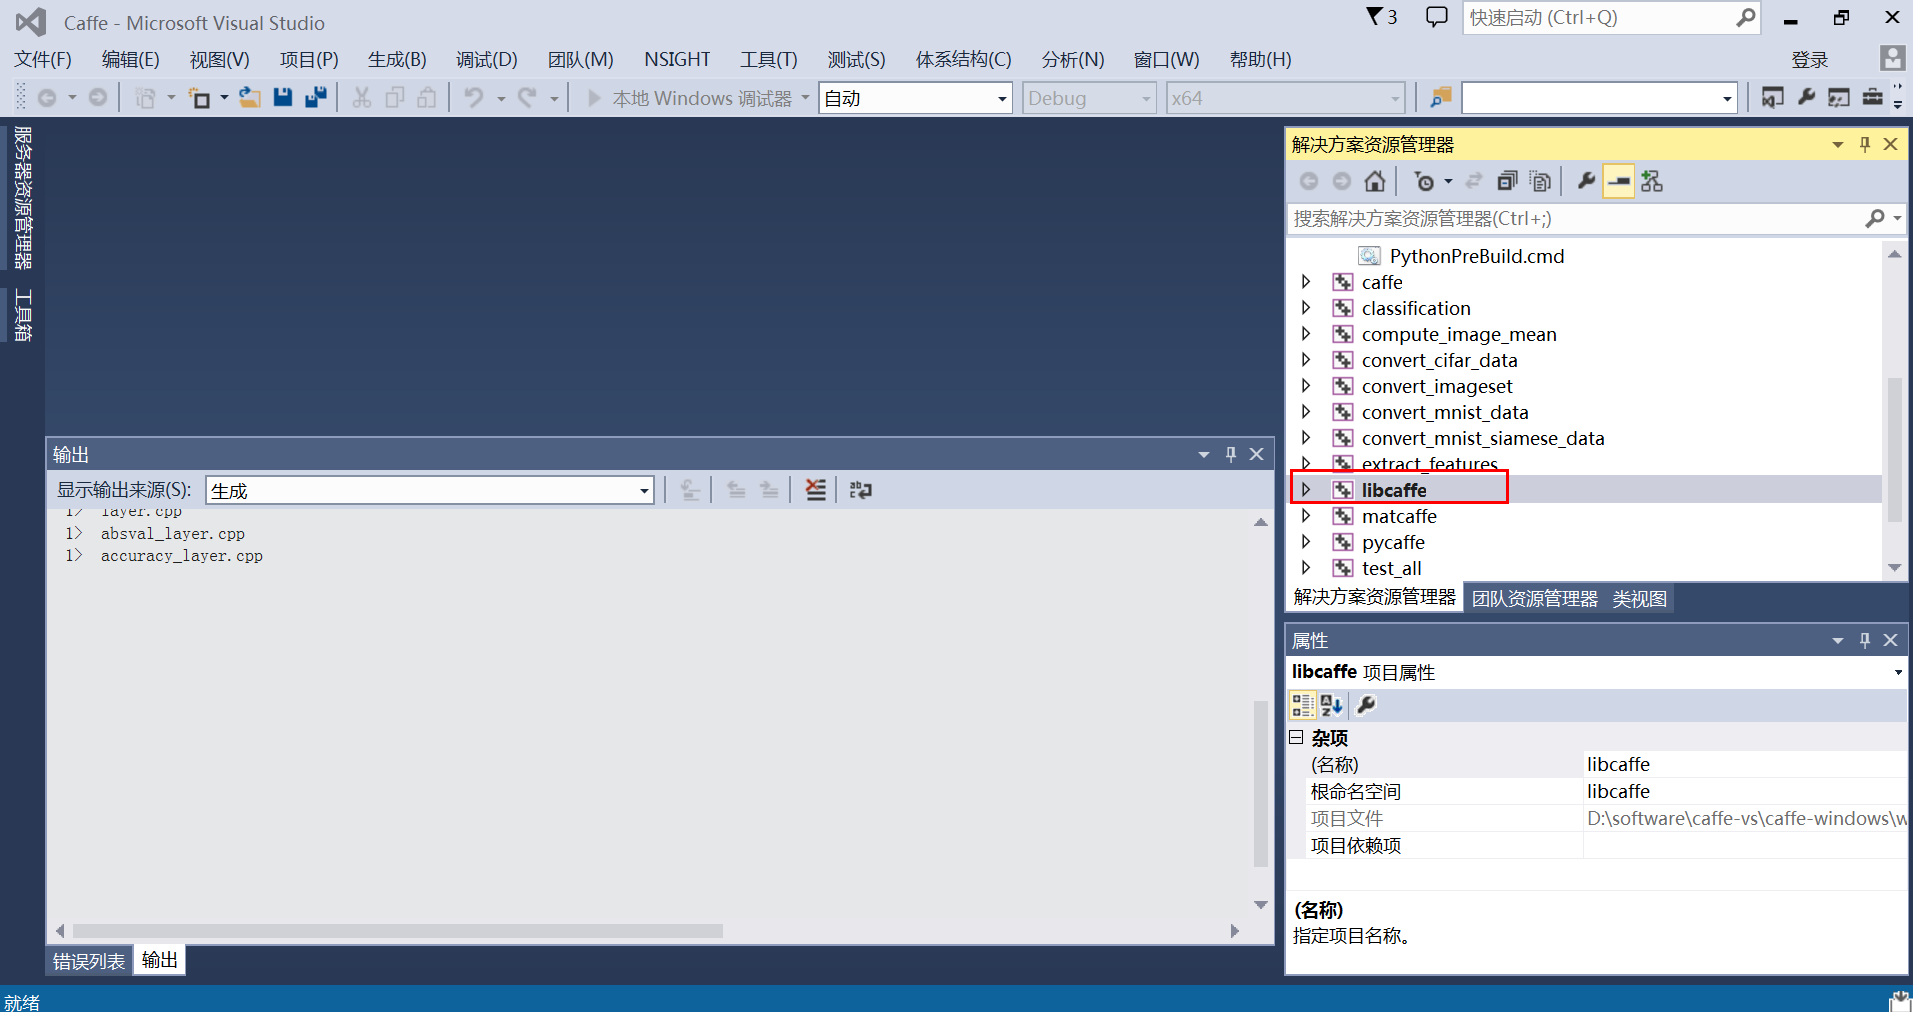
7.2 編譯libcaffe專案
-
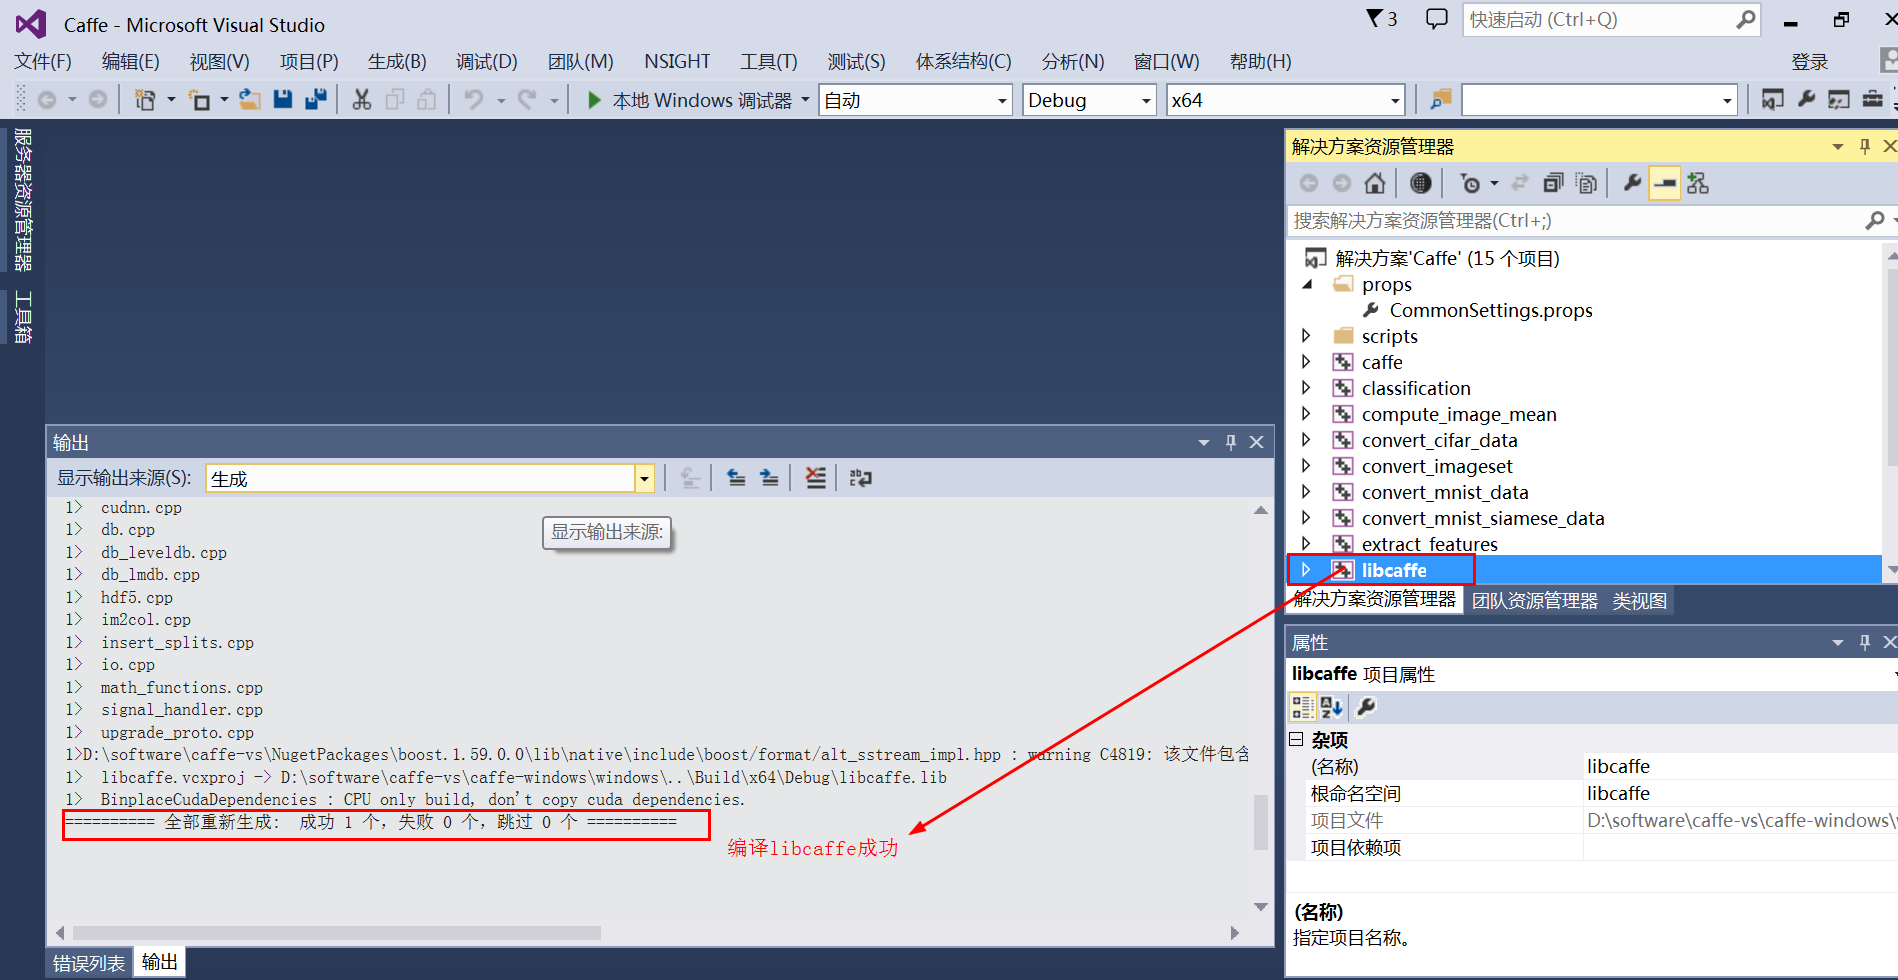
首先編譯libcaffe專案(其他的專案依賴於libcaffe專案)
-
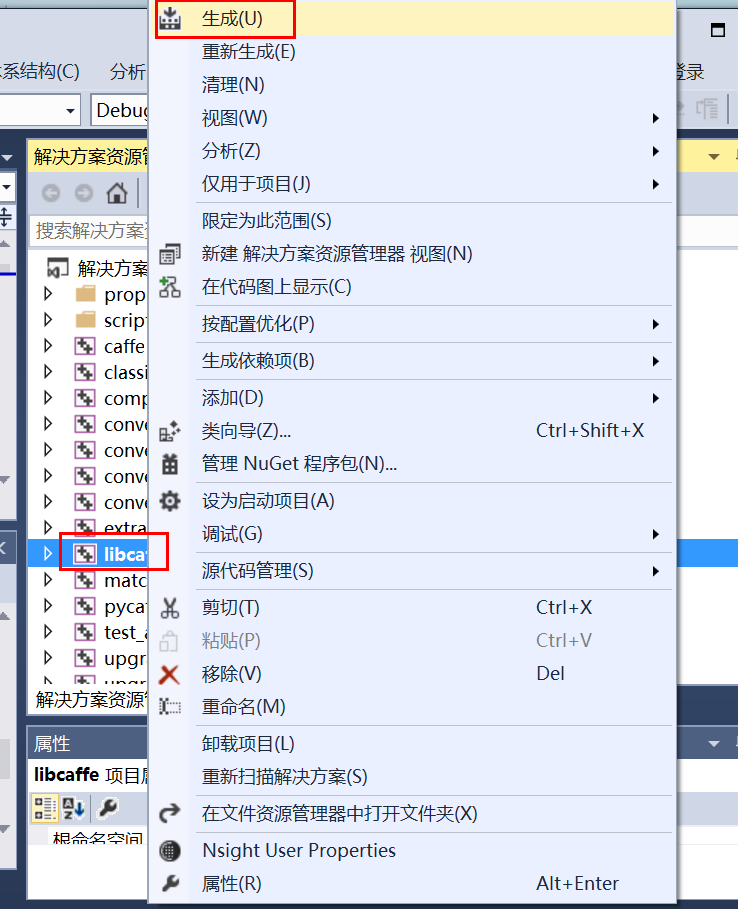
右鍵libcaffe,選擇生成,開始編譯libcaffe
…
… -
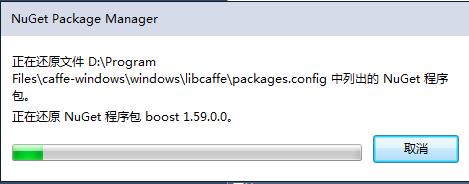
還原NuGet包,即從網路下載編譯需要的各種依賴包
-
經過一段時間等待後,編譯成功
-
這裡有兩個需要注意的地方:
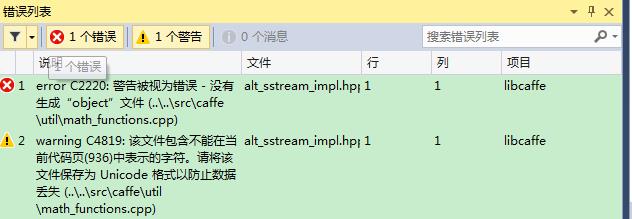
(1)編譯過程中,可能會出現錯誤error C2220: 警告被視為錯誤 - 沒有生成“object”檔案
錯誤的原因是編譯過程中出現了警告,而導致編譯無法進行,此時,需要進行如下修改:
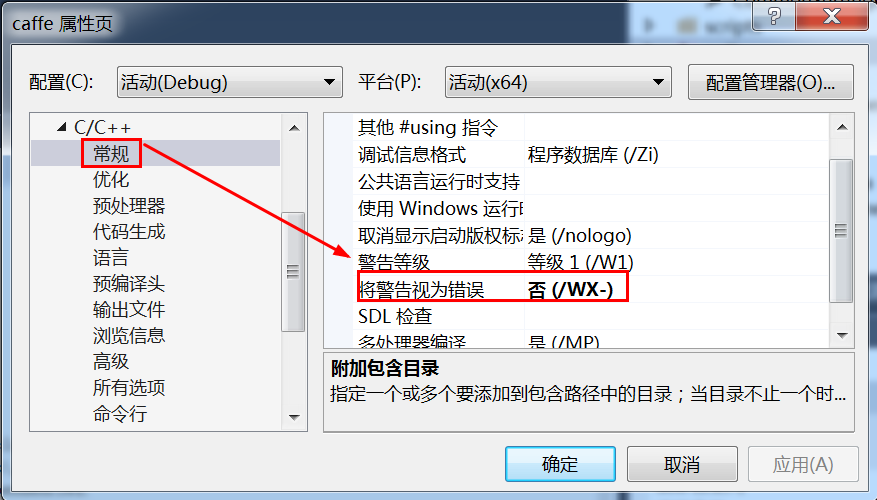
即:設定專案屬性,不要將警告視為錯誤
右鍵->專案屬性->C/C++->常規->將警告視為錯誤 設為否
另外,有一次在另外一個機器上出現了同樣的問題,但按照上述方法卻未解決,是因為檔案的內碼表為英文,而我的系統中的內碼表為中文,解決方案:利用VS打開出錯的檔案->重新儲存->重啟vs->重新編譯libcaffe->問題解決。
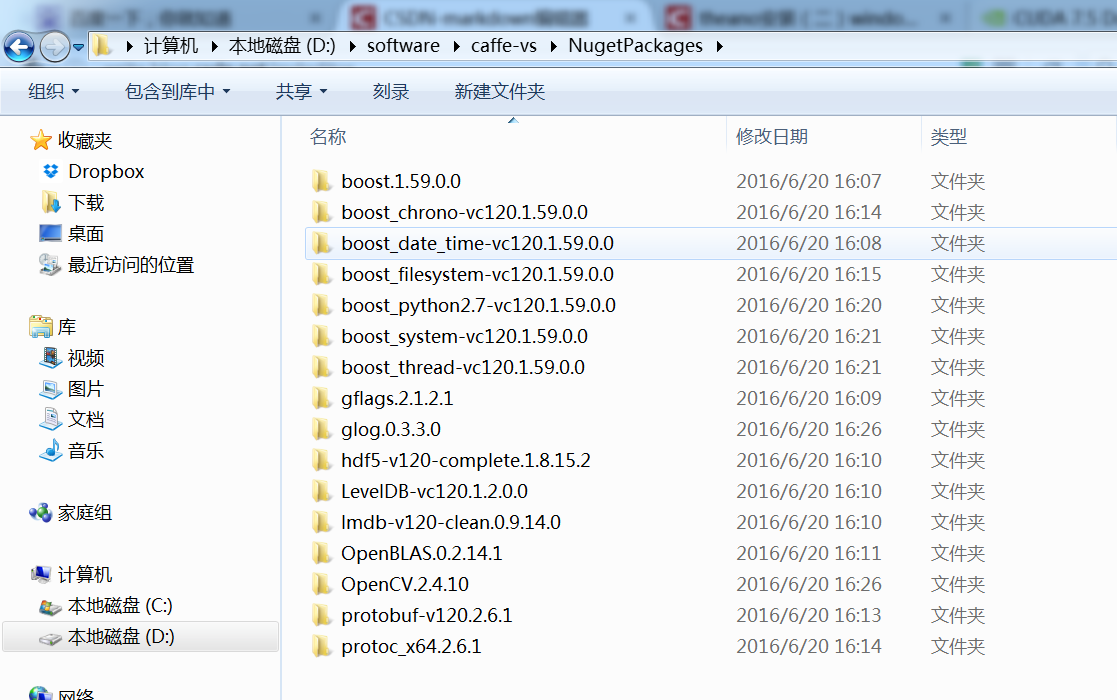
(2)caffe編譯過程中,需要一些依賴包,在有網路的情況下,當編譯第一個專案libcaffe時,程式會自動從網路下載這些依賴包,下載到與caffe-windows資料夾同級的NugetPackages資料夾中,下圖所示即為程式自動下載的依賴包
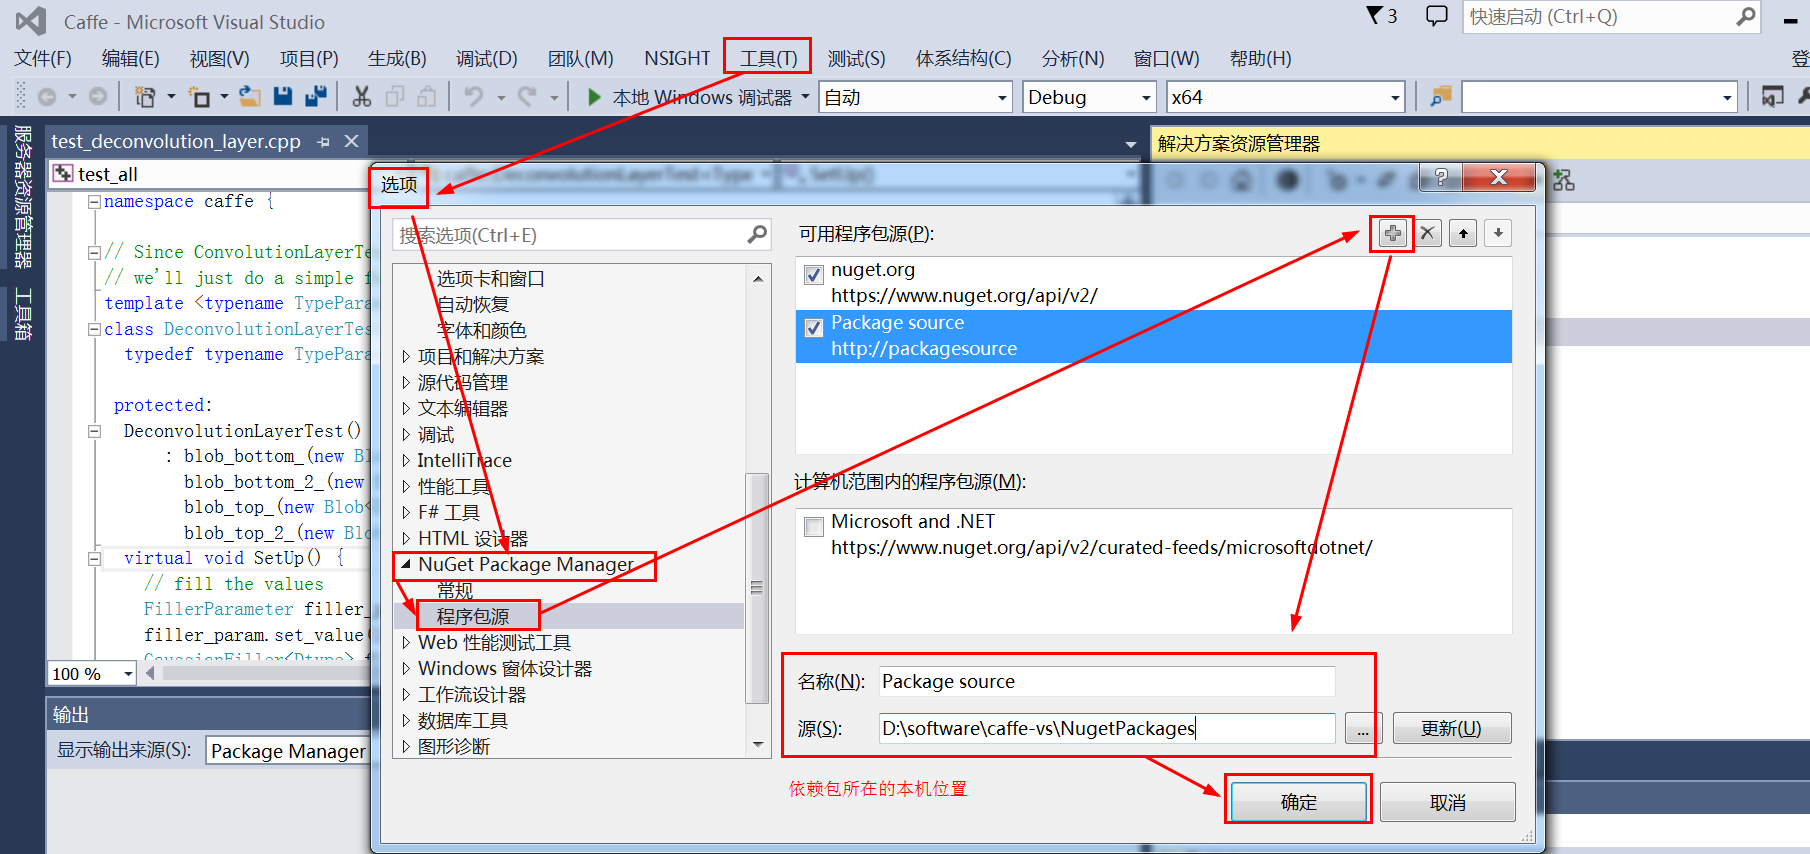
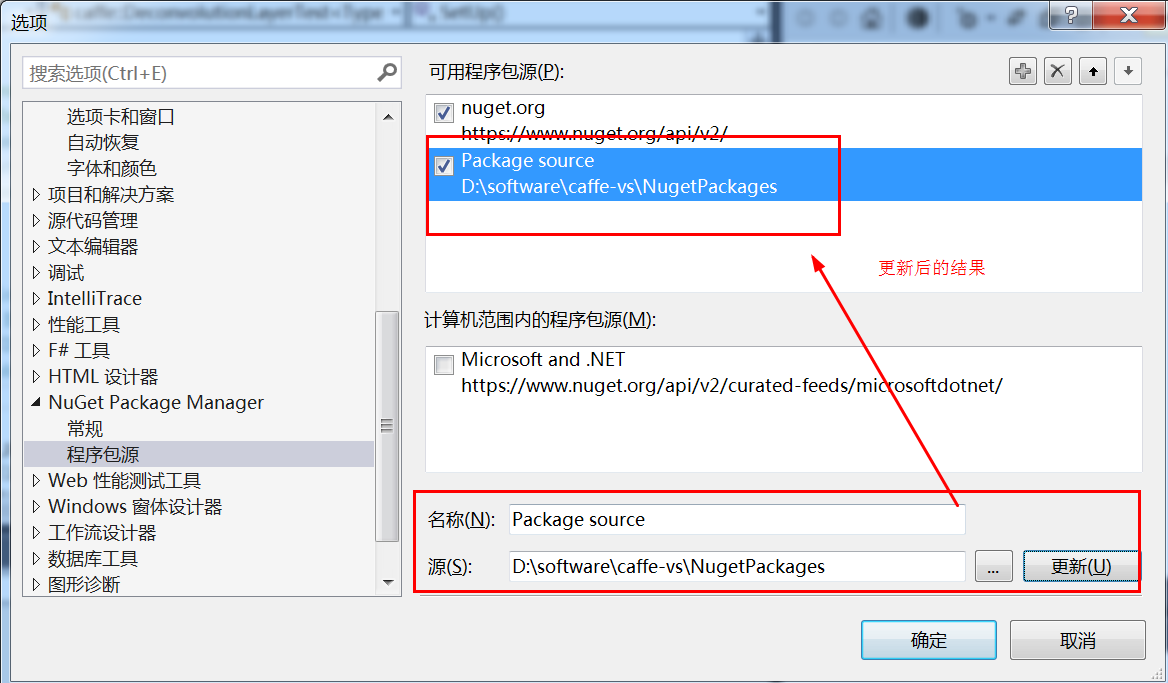
但在沒有網路情況下,需要事先將這些依賴包下載好,並將它們的路徑在vs的管理NuGet程式包中進行設定:工具->選項->NuGet Package Manager->程式包源->利用右側的加號新增本地的package
…
手動新增這些package地址後,還需要手動對這些NuGet Package進行安裝
(3)另外,第二次編譯過程出現如下錯誤
發現是下載的NegetPackages\glog.0.3.3.0下載缺少兩個檔案:glog.overlay-x64_v120_Release_dynamic.0.3.3.0glog.overlay-x64_v120_Debug_dynamic.0.3.3.0
將第一次下載得到的這兩個檔案放入該資料夾,問題解決
注:這裡的“第一次下載得到的這兩個檔案”是指NugetPackages中的glog.0.3.3.0資料夾下的兩個檔案,見下圖
7.3 編譯caffe專案
同樣,在caffe專案處右鍵生成
7.4 編譯pycaffe
直接在專案pycaffe右鍵,點選生成即可
7.5 編譯matcaffe
直接在專案matcaffe右鍵,點選生成即可
-
第二次在編譯matcaffe時,出現如下錯誤:
- 即編譯matcaffe提示說找不到mex.h
- 將matlab_root/extend/include目錄新增到matcaffe專案的include目錄中,問題解決
-
上面這個問題解決後,又出現了另外一個錯誤
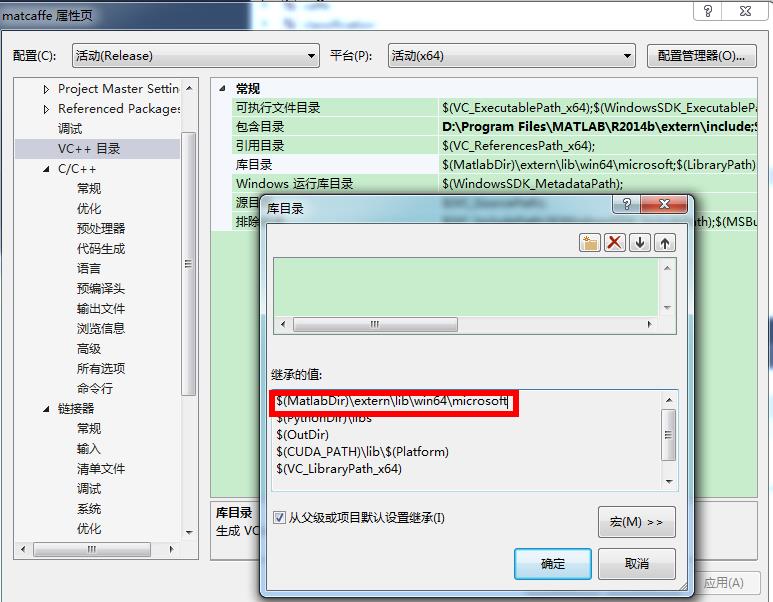
- 即連結器找不到libmx.lib(matlab的靜態連結庫),檢視VC++庫目錄,沒有發現設定問題
- 不知道為什麼會這樣, 想了一個臨時的解決方便,將matlab安裝路徑下的
\extern\lib\win64\microsoft新增到matcaffe專案->連結器->常規->附加目錄中,然後再次編譯,成功;這是因為編譯程式無法找到matlab的相關靜態連結庫的原因;
- 即連結器找不到libmx.lib(matlab的靜態連結庫),檢視VC++庫目錄,沒有發現設定問題
-
後來經過仔細查詢,發現,原來是因為配置檔案CommonSettings中的matlabDir不小心填寫錯誤了,才會導致上面兩個問題!將此處改正,上面2個問題成功解決,matcaffe編譯成功
<PropertyGroup Condition="'$(MatlabSupport)'=='true'">
<MatlabDir>D:\Program
 Files\MATLAB\R2014b</MatlabDir>
<LibraryPath>$(MatlabDir)\extern\lib\win64\microsoft;$(LibraryPath)</LibraryPath>
<IncludePath>$(MatlabDir)\extern\include;$(IncludePath)</IncludePath>
</PropertyGroup>- 1
- 2
- 3
- 4
- 5
7.6 編譯其他專案
接下來,再依次編譯其他專案,同樣的方法
classification:用來分類compute_image_mean:計算均值convert_cifar_dat:對cifat資料集進行轉換convert_mnist_data:對mnist資料集進行轉換
8.執行第一個caffe測試程式
為了測試編譯好的caffe能否正常使用,需要進行測試,主要利用mnist資料集進行分類問題的測試
(1)下載測試資料集
(2)修改配置檔案
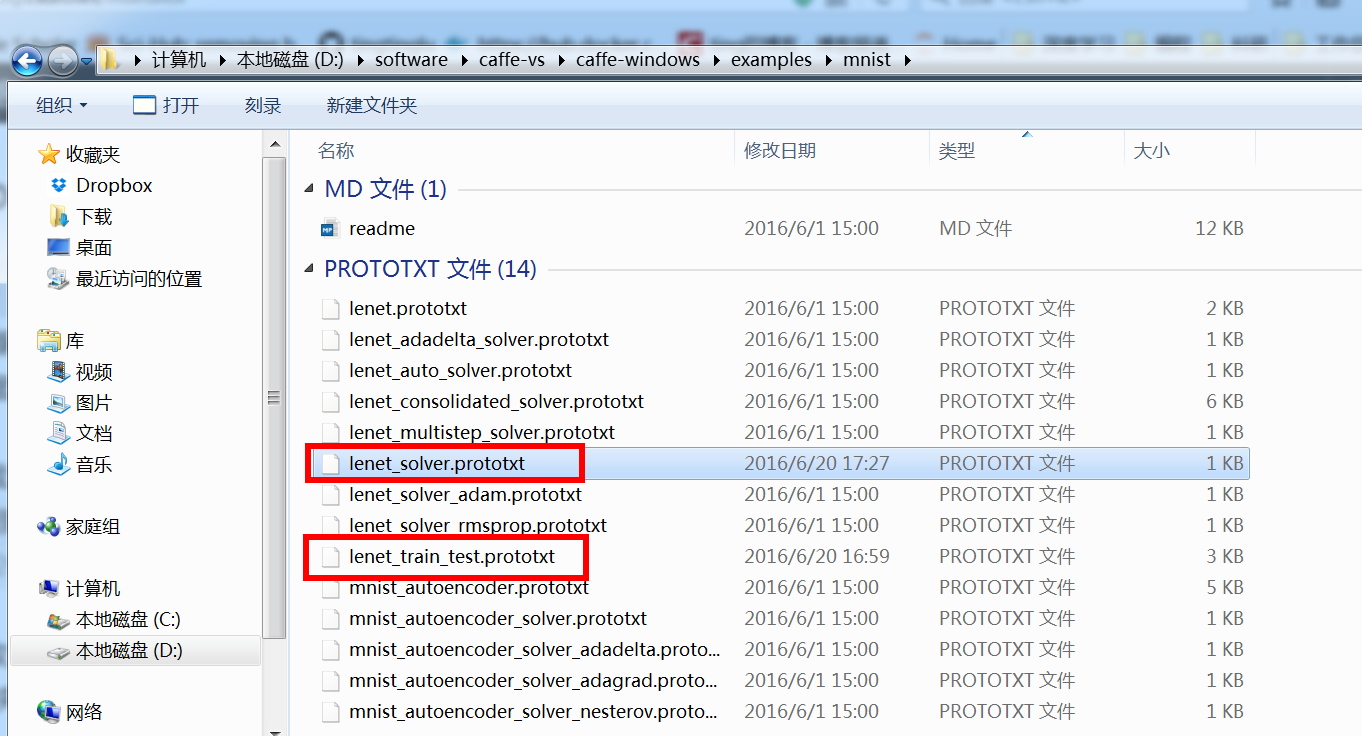
進入資料夾D:\software\caffe-vs\caffe-windows\examples\mnist,即examples路徑下的mnist資料夾
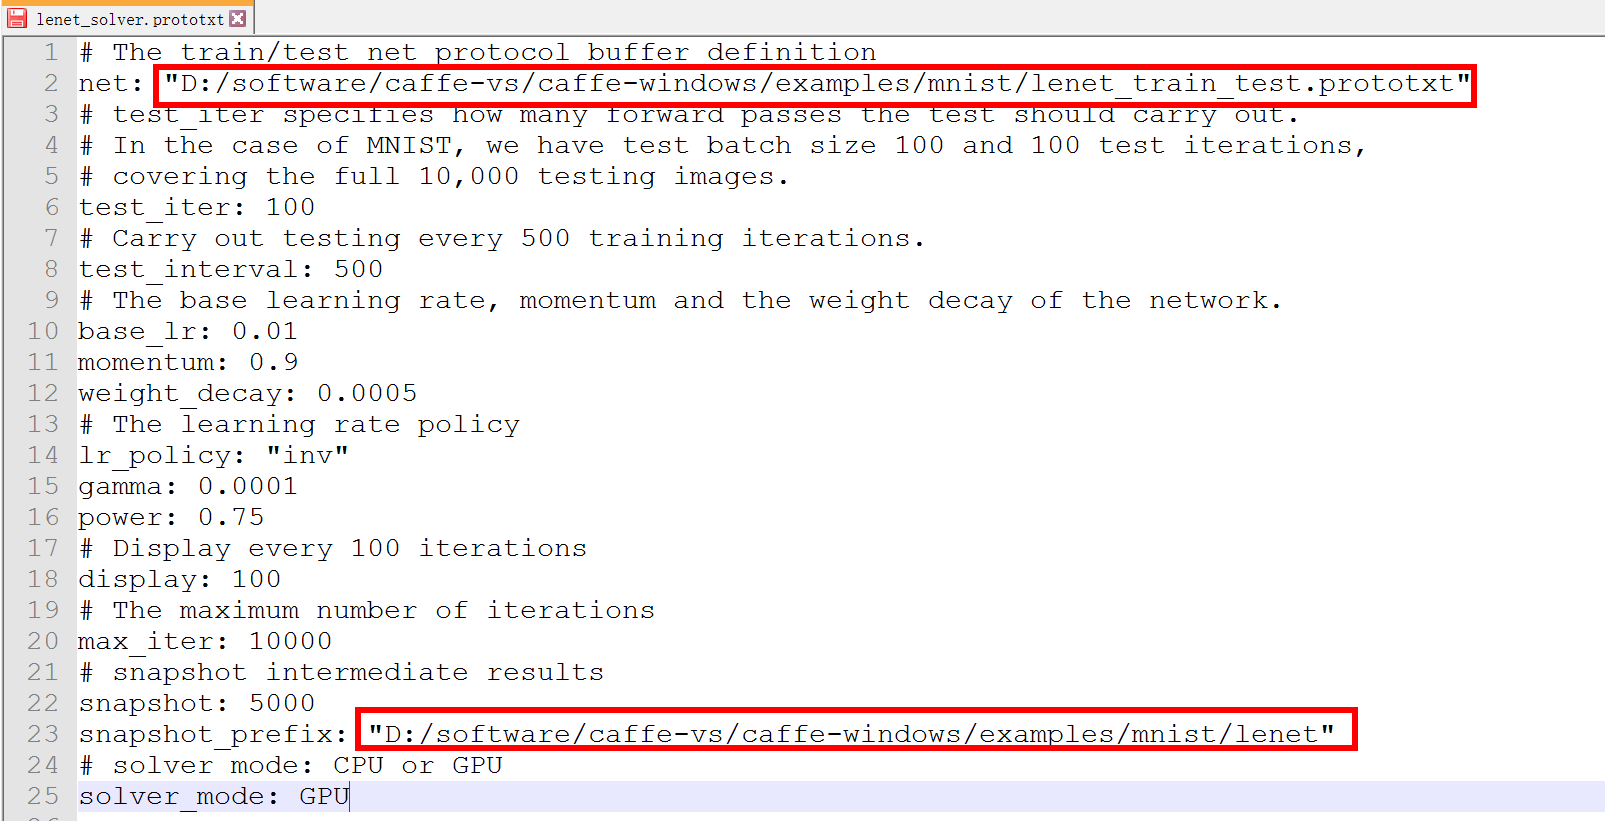
① 開啟lenet_solver.prototxt
設定網路配置檔案路徑,這裡使用了絕對路徑,相對路徑還沒有嘗試
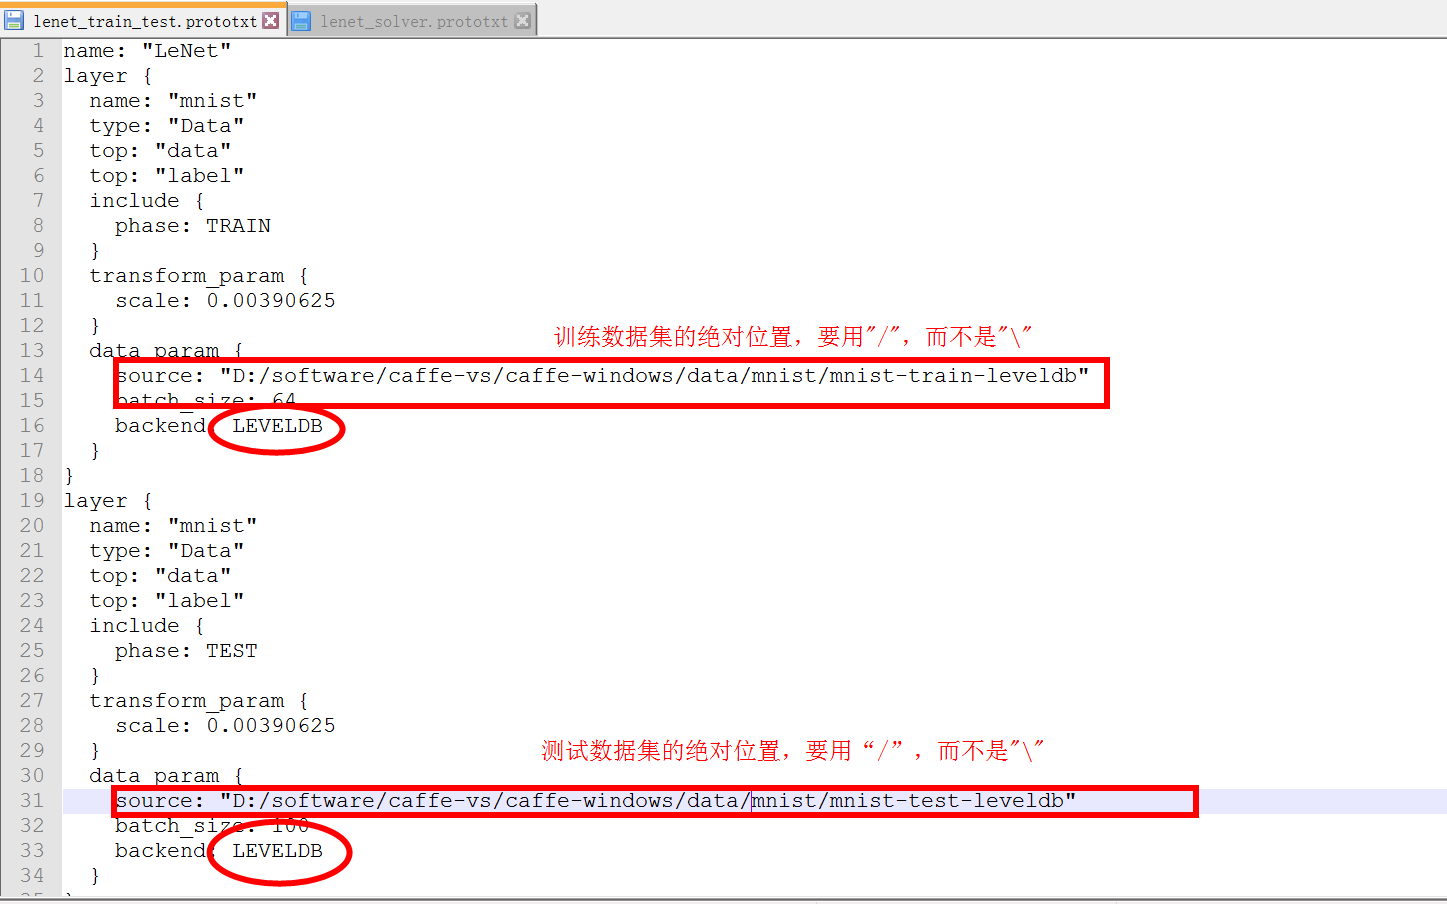
② 開啟lenet_train_test.prototxt
(3)執行caffe程式,具體地
① 開啟cmd命令列,cd到caffe-windows的.\Build\x64\Debug路徑下,在該路徑下,可以直接執行caffe.exe D:\software\caffe-vs\caffe-windows\Build\x64\Debug 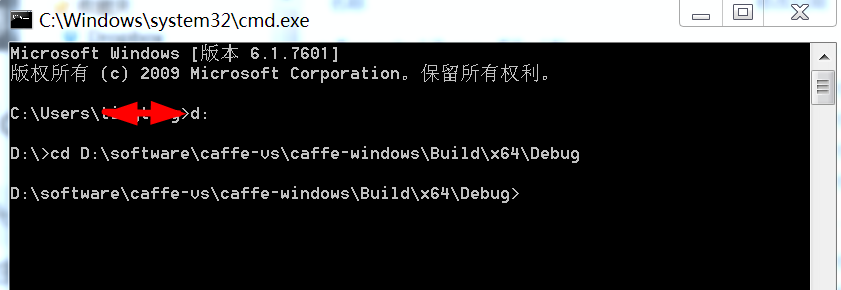
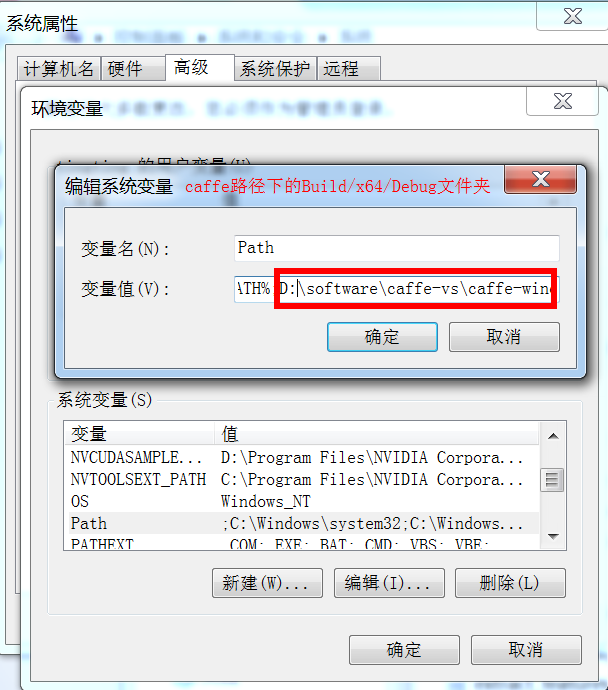
或者,為了方便,可以將caffe的路徑新增到環境變數Path中,這樣,cmd就可以直接識別caffe命令了
② 執行caffe
caffe train -solver lenet_solver.prototxt- 1
注意,因為上一步已經將D:\software\caffe-vs\caffe-windows\Build\x64\Debug路徑新增到環境變數PATH中了,所以,這裡可以直接使用caffe.exe
下面兩步主要配置cuDnn、python和matlab,具體配置時,應該在4.5之前進行
9. 配置python (optional)
如果已經編譯好pycaffe,那麼,為了能夠在python使用caffe,還需要在python中進行一些相關配置
- 新增環境變數
- 在環境變數的使用者變數中,新建使用者變數,變數名“PythonPath”,變數值“caffe_root\Build\x64\Release\pycaffe”
- 或者將資料夾\Build\x64\Release\pycaffe\caffe 複製到\lib\site-packages.
10.配置matlab (optional)
如果已經編譯好matcaffe,那麼,為了能夠在matlab使用caffe,還需要在matlab中進行一些相關配置
-
新增環境變數
- 將
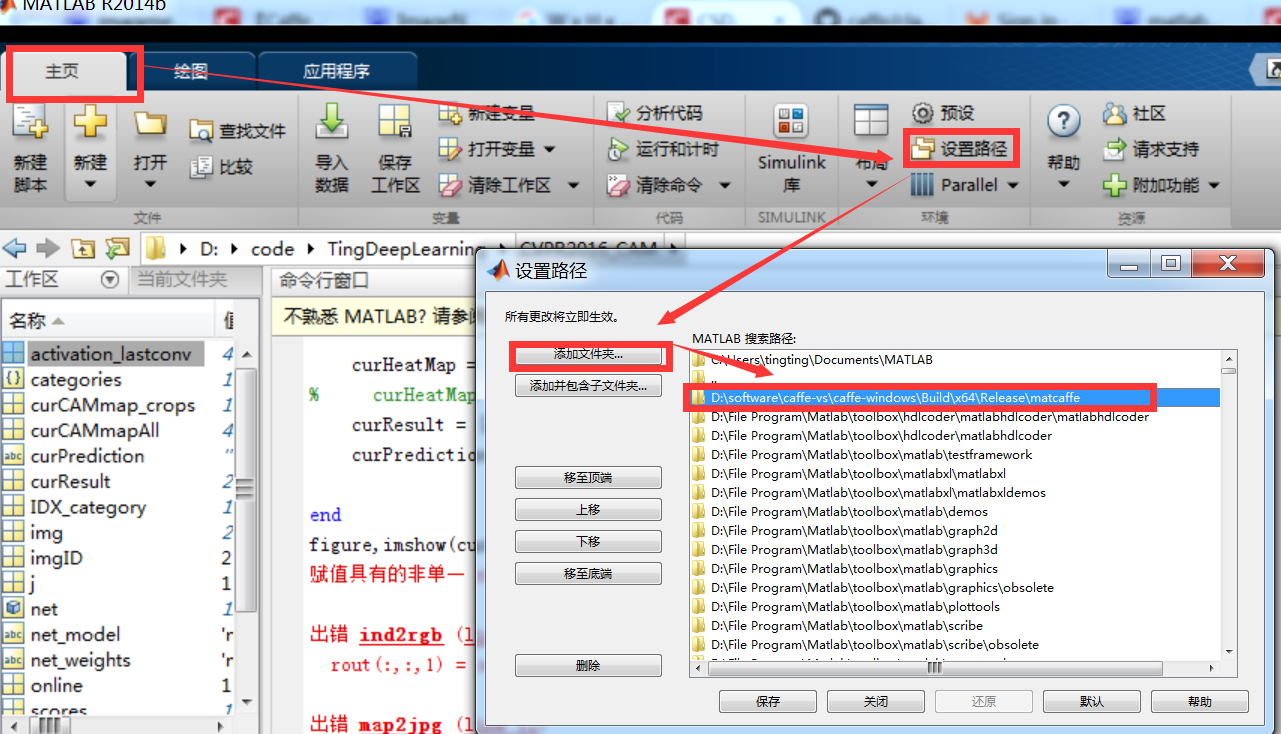
<caffe_root>\Build\x64\Release\matcaffe路徑新增到matlab的搜尋路徑中 - 將
<caffe_root>\Build\x64\Release路徑新增到環境變數PATH中
After you have built solution with Matlab support, in order to use it you have to:
add the generated matcaffe folder to Matlab search path, and
add \Build\x64\Release to your system path. - 將
最後來張圖

