OpenCV-Mat方式的獲取圖片的畫素(一)
阿新 • • 發佈:2019-01-23
作為OpenCV基礎知識中的重中之重,畫素值的讀寫需要我們很用心的掌握。
1、讀取原圖
    const char filename[] = "/Users/linwang/Desktop/Lena.png";
    Mat Im = imread(filename);
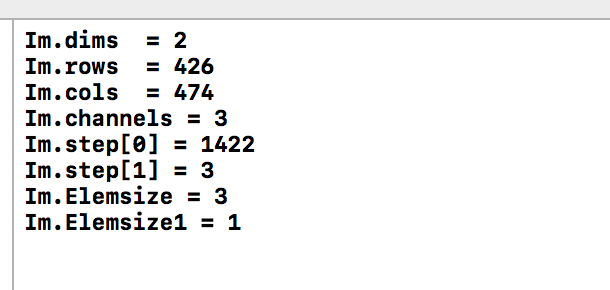
    cout<<"Im.dims  = "<<Im.dims<<endl;
    cout<<"Im.rows  = "<<Im.rows<<endl;
    cout<<"Im.cols  = "<<Im.cols<<endl;
    cout<<"Im.channels = "<<Im.channels()<<endl;
    cout<<"Im.step[0] = " <<Im.step[0]<<endl;
    cout<<"Im.step[1] = " <<Im.step[1]<<endl;
    cout<<"Im.Elemsize = "<<Im.elemSize()<<endl;    //一個畫素點的大小  CV_8U3C=1*3
    cout<<"Im.Elemsize1 = "<<Im.elemSize1()<<endl;  //資料型別的大小 UCHAR = 1 (ElemSize / Channel)
    namedWindow("Old-Lena");
    imshow("Old-Lena", Im);

2、最樸素的指標偏移,讀取畫素點值,修改Lena
    /*2.採用最樸素的方式修改Lena,獲得Test*/
    Mat test_im = Im.clone();
    for (int i = 0; i<test_im.rows; i++)
    {
        uchar * ptr = test_im.data + i * test_im.step;  //step 是一行的資料長度
        for(int j = 0;j<test_im.step;j++)
        {
            *(ptr + j)     = i%255;  //Bule
        }
    }
    cvNamedWindow("Test-Lena");
    imshow("Test-Lena", copy_im);
3、採用C++的Vec來讀取畫素點資料
   /*1.採用C++模版 STL的方式 修改Lena原圖,得到New*/
    Mat copy_im = Im.clone();
    for (int i = 0; i<copy_im.rows; i++)
    {
        for(int j = 0;j<copy_im.cols;j++)
        {
            Vec3b pixel;
            pixel[0] = i%255; //Blue
            pixel[1] = j%255; //Green
            pixel[2] = 0;     //Red
            copy_im.at<Vec3b>(i,j) = pixel;
        }
    }
    cvNamedWindow("New-Lena");
    imshow("New-Lena", copy_im);

4、迭代器方式遍歷影象
    /*3.迭代器方法遍歷影象畫素*/
    Mat IterIm = Im.clone();
    MatIterator_<Vec3b> IterBegin,IterEnd;   //迭代器
    for(IterBegin = IterIm.begin<Vec3b>(),IterEnd = IterIm.end<Vec3b>();IterBegin!=IterEnd;++IterBegin)
    {
        (*IterBegin)[0] = rand()%255;
        (*IterBegin)[1] = rand()%255;
        (*IterBegin)[2] = rand()%255;
    }
    cvNamedWindow("IterImg");
    imshow("IterImg", IterIm);
    cvWaitKey(0);

