Android 基礎:Notification
有關的類和方法
類:
NotificationManager:通知管理器:可以傳送和取消通知
Notification:通知物件,可以設定屬性
方法:
常用方法
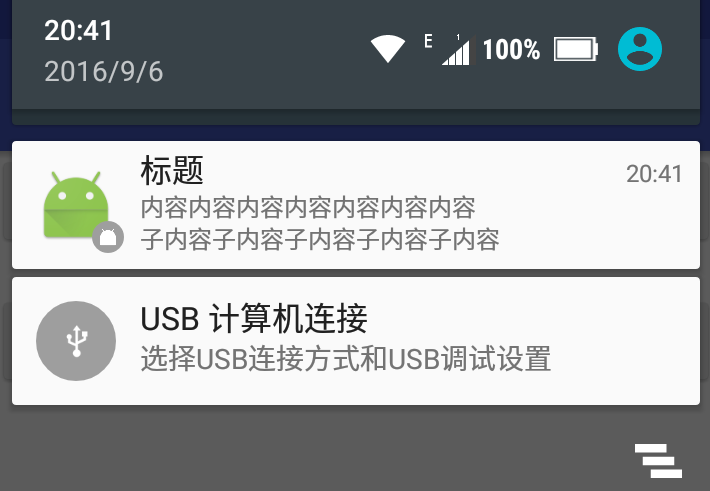
.setContentTitle("標題")
.setContentText("內容內容內容內容內容內容內容")
.setSubText("子內容子內容子內容子內容子內容")
.setTicker("摘要")//通知顯示的內容
.setSmallIcon(R.mipmap.ic_launcher)//設定小圖示,4.x在右邊,5.x在左邊
.setLargeIcon(bitmap)//設定大圖示
.setDefaults 3種方式設定燈光+聲音+震動
notification.defaults |= Notification.DEFAULT_SOUND;
notification.defaults |= Notification.DEFAULT build.setDefaults(Notification.DEFAULT_ALL)build.setDefaults(Notification.DEFAULT_SOUND|Notification.DEFAULT_VIBRATE|Notification.DEFAULT_LIGHTS)關於setVibrate()
vibrate只可以設定一次,用setVibrate()就不可以在用Notification.DEFAULT_VIBRATE,而Notification.DEFAULT_ALL
DEFAULT_VIBRATE,導致無效setVibrate(pattern)無效
private long[] pattern;
pattern = new long[]{0, 2000, 5000, 2000, 5000, 2000};builder.setContentTitle("Title")
.setContentText("message" + getResources().getString(R.string.notification_normal))
.setSmallIcon(R.mipmap.ic_launcher_round)
.setTicker("Ticker")
.setAutoCancel(true)
.setDefaults(Notification.DEFAULT_SOUND | Notification.DEFAULT_LIGHTS)//和setVibrate(pattern)可以同用
// .setDefaults(Notification.DEFAULT_ALL)//和setVibrate(pattern)不可以同用
.setVibrate(pattern);flag:
 public static final int FLAG_SHOW_LIGHTS        = 0x00000001;//控制閃光

 public static final int FLAG_ONGOING_EVENT      = 0x00000002;//將flag設定為這個屬性那麼通知就會像QQ一樣一直在狀態列顯示

 public static final int FLAG_INSISTENT          = 0x00000004; //重複發出聲音,直到使用者響應此通知

 public static final int FLAG_ONLY_ALERT_ONCE    = 0x00000008;//標記聲音或者震動一次

 public static final int FLAG_AUTO_CANCEL        = 0x00000010; //在通知欄上點選此通知後自動清除此通知

 public static final int FLAG_NO_CLEAR           = 0x00000020;//將flag設定為這個屬性那麼通知欄的那個清楚按鈕就不會出現

 public static final int FLAG_FOREGROUND_SERVICE = 0x00000040;//前臺服務標記

 public static final int FLAG_HIGH_PRIORITY = 0x00000080;
下面通過一個Demo演示通知的使用
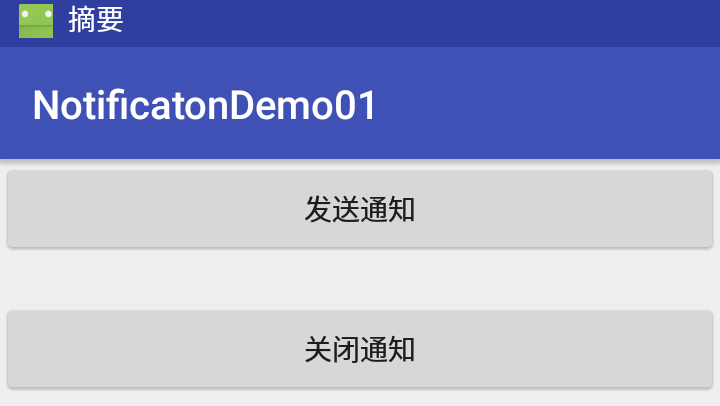
MainActivity有2個Button,一個開啟通知,一個取消通知。
邏輯程式碼
  protected void onCreate(Bundle savedInstanceState) {
       super.onCreate(savedInstanceState);
       setContentView(R.layout.activity_main);

       btn_open = (Button) findViewById(R.id.btn_open);
       btn_close = (Button) findViewById(R.id.btn_close);

       //開啟通知
       btn_open.setOnClickListener(new View.OnClickListener() {
           @Override
           public void onClick(View view) {
               initNotification();
           }
       });

       //關閉通知
       btn_close.setOnClickListener(new View.OnClickListener() {
           @Override
           public void onClick(View view) {
               manager.cancel(NotificationId);//取消通知(根據id)
//                manager.cancelAll();//關閉所有通知
           }
       });
   }
建立通知並設定屬性 + 釋出通知 + 點選通知跳轉到新Activity
//建立通知物件並設定引數
 private void initNotification() {
     //獲取 NotificationManager
     manager = (NotificationManager) getSystemService(NOTIFICATION_SERVICE);

     //建立pendingIntent物件
     setPendingIntent();

     //獲取bitmap物件
     Bitmap bitmap = BitmapFactory.decodeResource(getResources(), R.mipmap.ic_launcher);

     builder = new Notification.Builder(this);
     builder.setContentTitle("標題")
             .setContentText("內容內容內容內容內容內容內容")
             .setSubText("子內容子內容子內容子內容子內容")
             .setTicker("摘要")//通知顯示的內容
             .setSmallIcon(R.mipmap.ic_launcher)//設定小圖示,4.x在右邊,5.x在左邊
             .setLargeIcon(bitmap)//設定大圖示
             .setDefaults(Notification.DEFAULT_LIGHTS | Notification.DEFAULT_VIBRATE | Notification.DEFAULT_SOUND)//設定預設的呼吸燈+震動+聲音
             .setContentIntent(pendingIntent)//開啟通知後做什麼
             .setAutoCancel(true);//點選後自動消失

     notification = builder.build();
     notification.flags |= Notification.FLAG_INSISTENT;//不檢視通知就一直髮出聲音和震動
     //釋出通知
     manager.notify(NotificationId, notification);
 }
自定義震動時長:
long[] vibrates={0,1000,1000,1000,1000,1000};
notification.vibrate = vibrates;
震動+鈴聲+閃光:
notification.defaults = Notification.DEFAULT_ALL獲取PendingIntent
private void setPendingIntent() {
       Intent intent = new Intent(this, NewActivity.class);
       intent.setFlags(Intent.FLAG_ACTIVITY_NEW_TASK);
       pendingIntent = PendingIntent.getActivity(this, 1, intent, 0);
   }
Ticker:
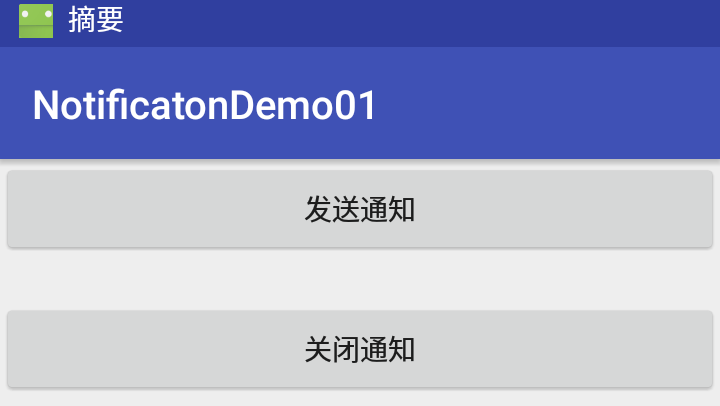
ContentTitle + ContentText + SubText + LargeIcon + SmallIcon
自定義通知佈局
效果圖

方法
| builder方法 | 說明 |
|---|---|
| setContent(contentView) | 新增自定義佈局:高度4行文字 |
| setCustomContentView(contentView) | 新增自定義佈局:高度4行文字 |
| 新增自定義佈局:高度4行文字 | |
| setCustomBigContentView(bigContentView) | 高度最大,全部顯示 |
自定義通知佈局是通過RemoteViews實現的,
有2種方法新增自定義佈局
第一種:已經過時
notification.contentView = contentView;
notification.bigContentView = bigContentView;
第二種:builder
builder.setContent(contentView)
builder.setCustomContentView(contentView)
builder.setCustomBigContentView(bigContentView)
notification.contentView
NotificationCompat.Builder builder = new NotificationCompat.Builder(context);
builder.setContentTitle("Title")
        .setContentText("message")
        .setSmallIcon(R.mipmap.ic_launcher_round)
        .setTicker("ticker")
        .setAutoCancel(true)
        .setSmallIcon(R.mipmap.ic_launcher_round);
Notification notification = builder.build();

//自定義contentView
RemoteViews contentView = new RemoteViews(getPackageName(), R.layout.notification_normal);
contentView.setTextViewText(R.id.tv_normal, getResources().getString(R.string.notification_normal));
notification.contentView = contentView;

//自定義bigContentView
if (Build.VERSION.SDK_INT >= 16) {
    RemoteViews bigContentView = new RemoteViews(getPackageName(), R.layout.notification_enpanded);
    bigContentView.setTextViewText(R.id.tv_expanded, getResources().getString(R.string.notigication_expanded));
    notification.bigContentView = bigContentView;
}

NotificationManager manager = (NotificationManager) getSystemService(NOTIFICATION_SERVICE);
manager.notify(0, notification);
builder.setCustomContentView(view)builder.setCustomBigContentView(view)
RemoteViews contentView = new RemoteViews(getPackageName(), R.layout.notification_normal);
contentView.setTextViewText(R.id.tv_normal, getResources().getString(R.string.notification_normal));

RemoteViews bigContentView = new RemoteViews(getPackageName(), R.layout.notification_enpanded);
bigContentView.setTextViewText(R.id.tv_expanded, getResources().getString(R.string.notigication_expanded));

RemoteViews headerContentView = new RemoteViews(getPackageName(), R.layout.notification__header_up);
bigContentView.setTextViewText(R.id.tv_header, "Header");

NotificationCompat.Builder builder = new NotificationCompat.Builder(context);
builder.setContentTitle("Title")//佔用一行
        .setContentText("message")//佔用一行
        .setSmallIcon(R.mipmap.ic_launcher_round)
        .setTicker("Ticker")
        .setAutoCancel(true)
        .setDefaults(Notification.DEFAULT_ALL)
        .setContent(contentView)//效果和setCustomContentView一樣,同樣是佔用4行,
        .setCustomContentView(contentView)//佔用4行
        .setCustomBigContentView(bigContentView)//最大
//                .setCustomHeadsUpContentView(headerContentView)//無效
;
Notification notification = builder.build();

NotificationManager manager = (NotificationManager) getSystemService(NOTIFICATION_SERVICE);
manager.notify(0, notification);
把service設定成前臺程序
把service設定成前臺程序:
Notification notification = new Notification.Builder(this).build();
startForeground(1, notification);
把service的前臺程序銷燬:
stopForeground(true);浮動通知
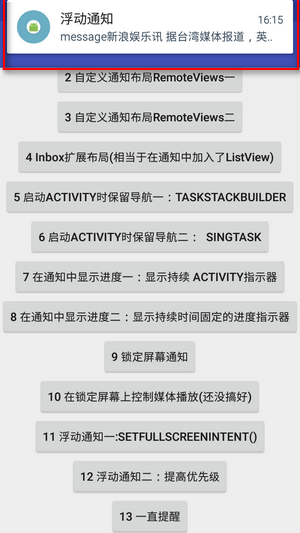
讓通知直接浮動顯示,而不是需要下滑通知欄才顯示。有2種方法
- 提交Notification的優先順序為Notification.PRIORITY_HIGH或者Notification.PRIORITY_MAX,並使用了震動或鈴聲
- 使用者的 Activity 處於全屏模式中(應用使用 fullScreenIntent)
方式一: 通告優先順序
builder.setPriority(Notification.PRIORITY_HIGH)
builder.setPriority(Notification.PRIORITY_MAX)

builder.setDefaults(Notification.DEFAULT_ALL)
方式二:使用fullScreenIntent
Intent intent = new Intent(context, NewActivity.class);
PendingIntent pendingIntent = PendingIntent.getActivity(context, 0, intent, PendingIntent.FLAG_UPDATE_CURRENT);

builder.setFullScreenIntent(pendingIntent, false);//第2個引數:是否是高優先順序
Inbox擴展布局
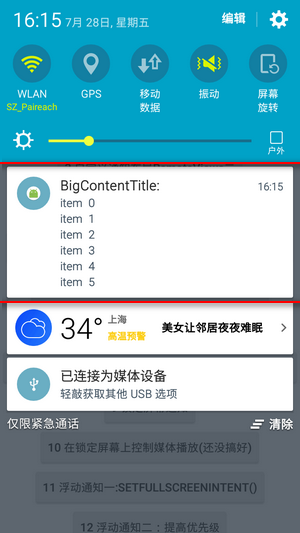
相當於在通知中加入了ListView,但是沒有點選事件
NotificationCompat.InboxStyle inboxStyle = new NotificationCompat.InboxStyle();
inboxStyle.setBigContentTitle("BigContentTitle:");
for (int i = 0; i < 6; i++) {
    inboxStyle.addLine("item  " + i);
}

build..setStyle(inboxStyle);
啟動Activity時保留導航
就是在MainActivity中傳送Notification,點選開啟NewActivity,當關閉NewActivity後,會回到MainActivity。
根據activity分2種實現方式:
- 常規Activity
- 特殊Activity
那麼到底是什麼意思呢?我們知道從Notification開啟Activity_A,必須給Activity_A設定android:launchMode="singleTask"或intent.setFlags(Intent.FLAG_ACTIVITY_NEW_TASK);,但是這個Activity_A只可以在通知種開啟,在其他Activity中無法啟動它,我們把Activity_A成為特殊的Activity,這個Activity_A不是工作流的一部分,可以讓它既可以從通知中開啟Activity_A,也可以在其他Activity中開啟,這是可以的,這種就是常規Activity。
常規Activity
第一步:在AndroidManifest.xml中定義NewActivity的層級結構
首先在AndroidManifest.xml中定義NewActivity的層級結構,對於Android4.1只需要設定parentActivityName即可,值是父Activity中android:name=".MainActivity"中name的值,對於老版本,還需要新增meta-data。
<activity
    android:name=".NewActivity"
    android:parentActivityName=".MainActivity">
    <meta-data
        android:name="android.support.PARENT_ACTIVITY"
        android:value=".MainActivity"/>
</activity>新增android:parentActivityName屬性的目的是:當我們點選通知,開啟Activity_A,,當關閉A時,系統會啟動該屬性對應的Activity(例如MainActivity)。那麼問題來了,為什麼不直接使用startActivty(…),因為如果當前頁就是MainActivity,點選通知開啟A,在關閉A,啟動MainActivity,加上原來的MainActivity就有2個了,必須finish()2次才可以關閉掉MainActivity。
根據可啟動 Activity 的 Intent 建立返回棧:
Intent intent = new Intent(context, NewActivity.class);
TaskStackBuilder builder = TaskStackBuilder.create(context)
         .addParentStack(NewActivity.class)
         .addNextIntent(intent);
PendingIntent pendingIntent = builder.getPendingIntent(0, PendingIntent.FLAG_UPDATE_CURRENT);build.setContentIntent(pendingIntent)注意:必須先設定父堆疊,再設定intent,順序不可錯。
TaskStackBuilder builder = TaskStackBuilder.create(context)
        .addParentStack(NotificationInfoActivity.class)
        .addNextIntent(intent);
特殊Activity
第一步:在清單檔案中,將以下屬性新增到 Activity 的 元素
<activity
    android:name=".NewActivity2"
    android:excludeFromRecents="true"
    android:launchMode="singleTask"
android:taskAffinity=""/>android:excludeFromRecents="true"確保點選通知開啟NewActivity2時不會銷燬MainActivity
第二步:構建併發出通知
Intent intent = new Intent(context, NewActivity2.class);
intent.setFlags(Intent.FLAG_ACTIVITY_NEW_TASK | Intent.FLAG_ACTIVITY_CLEAR_TASK);
PendingIntent pendingIntent = PendingIntent.getActivity(context, 0, intent, PendingIntent.FLAG_UPDATE_CURRENT);build.setContentIntent(pendingIntent)可以在關閉NotificationInfoActivity時啟動MAinActivity嗎?
不可以,因為如果當前頁是MainActivity,此時點選Notification,開啟NotificationInfoActivity,關閉NotificationInfoActivity時,我們啟動MAinActivity,這樣會有2個MAinActivity示例,點選back鍵一次就之關閉一個MAinActivity,點選2次,才可以全部關閉。
顯示進度
分2種:
- 有固定時長的進度顯示
- 無固定時長的進度顯示
是通過build.setProgress (int max, int progress, boolean indeterminate)實現的。setProgress(0, 0, false)清除通知中的progressbar
第一個引數:最大值
第二個引數:當前值
第三個引數:true:不確定時長;false:確定時長
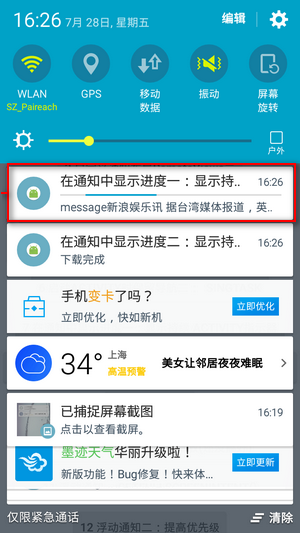
時長不固定
final Notification.Builder builder = new Notification.Builder(context);

builder.setContentTitle("在通知中顯示進度一:顯示持續 Activity指示器")
        .setContentText("message" + getResources().getString(R.string.notification_normal))
        .setSmallIcon(R.mipmap.ic_launcher_round)
        .setTicker("Ticker")
        .setAutoCancel(true)
        .setProgress(0, 0, true)
        .setDefaults(Notification.DEFAULT_ALL);
final NotificationManager manager = (NotificationManager) getSystemService(NOTIFICATION_SERVICE);

new Thread(new Runnable() {
    @Override
    public void run() {
        for (int i = 0; i <= 30; i += 5) {
            builder.setProgress(0, 0, true);
            manager.notify(1, builder.build());
            try {
                Thread.sleep(3000);
            } catch (InterruptedException e) {
                e.printStackTrace();
            }
        }
        builder.setContentText("下載完成").setProgress(0, 0, true);//移除通知
        manager.notify(7, builder.build());
    }
}).start();
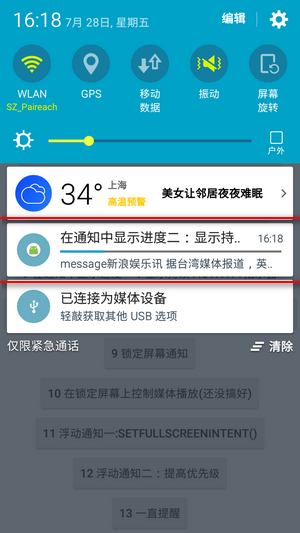
時長固定
final Notification.Builder builder = new Notification.Builder(context);

builder.setContentTitle("在通知中顯示進度二:顯示持續時間固定的進度指示器")
        .setContentText("message" + getResources().getString(R.string.notification_normal))
        .setSmallIcon(R.mipmap.ic_launcher_round)
        .setTicker("Ticker")
        .setAutoCancel(true)
        .setProgress(100, 0, false)
        .setDefaults(Notification.DEFAULT_ALL);
final NotificationManager manager = (NotificationManager) getSystemService(NOTIFICATION_SERVICE);

new Thread(new Runnable() {
    @Override
    public void run() {
        for (int i = 0; i <= 20; i += 5) {
            builder.setProgress(100, i, false);
            manager.notify(8, builder.build());
            try {
                Thread.sleep(3000);
            } catch (InterruptedException e) {
                e.printStackTrace();
            }
        }
        builder.setContentText("下載完成").setProgress(0, 0, false);//移除通知
        manager.notify(8, builder.build());
    }
}).start();
鎖屏顯示
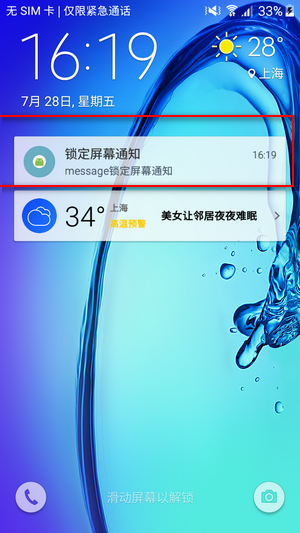
類似於桌布,API>=21
build.setVisibility(Notification.VISIBILITY_PUBLIC)您的應用可以控制在安全鎖定螢幕上顯示的通知中可見的詳細級別。 呼叫 setVisibility() 並指定以下值之一:
VISIBILITY_PUBLIC: 顯示通知的完整內容。
VISIBILITY_SECRET: 不會在鎖定螢幕上顯示此通知的任何部分。
VISIBILITY_PRIVATE: 顯示通知圖示和內容標題等基本資訊,但是隱藏通知的完整內容。
flag:Notification.FLAG_INSISTEN一直提醒
第一次:聲音+震動,之後只有聲音,不可以與Notification.DEFAULT_ALL共用
build.setDefaults(Notification.DEFAULT_SOUND | Notification.DEFAULT_VIBRATE)
notification.flags |= Notification.FLAG_INSISTENT;
demo:
Notification.Builder builder = new Notification.Builder(context);

builder.setContentTitle("一直有聲音+震動+呼吸燈")
        .setContentText("message" + getResources().getString(R.string.notification_normal))
        .setSmallIcon(R.mipmap.ic_launcher_round)
        .setTicker("Ticker")
        .setAutoCancel(true)
        .setDefaults(Notification.DEFAULT_SOUND | Notification.DEFAULT_VIBRATE)
        .setPriority(Notification.PRIORITY_DEFAULT);
Notification notification = builder.build();
notification.flags |= Notification.FLAG_INSISTENT;
NotificationManager manager = (NotificationManager) getSystemService(NOTIFICATION_SERVICE);
manager.notify(13, notification);
bug
1 點選通知,開啟的activity是空白頁,但是我們設定的activity是有內容的,這是為什麼呢?
原因:重寫的onCreate(…)方法有2種:第一種:用protected修飾,且只有1個引數:Bundle;第二種:用public修飾,且有2個引數:Bundle + PersistableBundle,第一種是正確的。
有的部落格說到:
Android中notification點選進入新activity,會開啟多個相同activity,需要在Intent設定如下flag :intent.setFlags(Intent.FLAG_ACTIVITY_SINGLE_TOP);
這種情況我還沒遇到。
nm.notify()無效
一定要設定smallIcon(),不然notification不會顯示。
setSmallIcon(R.mipmap.logo)

