android-topeka學習筆記(一)-----一些不知道的屬性
最近在知乎上看到介紹動畫,一個谷歌的專案:topeka的原始碼
谷歌為移動平臺設計的Chrome應用中的第一個應用,也就是說越來越多的應用可以同時支援在安卓手機和PC上的Chrome瀏覽器中運行了。
至於遊戲,官方介紹只有一句話:一部有趣的問答應用!
想研究一下,瞭解大神都怎麼寫程式碼的…..
首先是清單檔案
<application android:allowBackup="false"
android:fullBackupContent="false"
android:hardwareAccelerated="true" - 1
- 2
- 3
- 4
- 5
- 6
- 7
- 8
- 9
- 10
- 11
- 12
android:allowBackup
1.allowBackup安全風險描述
Android API Level 8及其以上Android系統提供了為應用程式資料的備份和恢復功能,此功能的開關決定於該應用程式中AndroidManifest.xml檔案中的allowBackup屬性值[1] ,其屬性值預設是True。當allowBackup標誌為true時,使用者即可通過adb backup和adb restore來進行對應用資料的備份和恢復,這可能會帶來一定的安全風險。
Android屬性allowBackup安全風險源於adb backup容許任何一個能夠開啟USB 除錯開關的人從Android手機中複製應用資料到外設,一旦應用資料被備份之後,所有應用資料都可被使用者讀取;adb restore容許使用者指定一個恢復的資料來源(即備份的應用資料)來恢復應用程式資料的建立。因此,當一個應用資料被備份之後,使用者即可在其他Android手機或模擬器上安裝同一個應用,以及通過恢復該備份的應用資料到該裝置上,在該裝置上開啟該應用即可恢復到被備份的應用程式的狀態。
尤其是通訊錄應用,一旦應用程式支援備份和恢復功能,攻擊者即可通過adb backup和adb restore進行恢復新安裝的同一個應用來檢視聊天記錄等資訊;對於支付金融類應用,攻擊者可通過此來進行惡意支付、盜取存款等;因此為了安全起見,開發者務必將allowBackup標誌值設定為false來關閉應用程式的備份和恢復功能,以免造成資訊洩露和財產損失。
2.allowBackup安全影響範圍
Android API Level 8以及以上系統
3.allowBackup安全風險詳情
1)allowBackup 風險位置:
AndroidMannifest.xml檔案android:allowBackup屬性;
2) allowBackup風險觸發前提條件:
未將AndroidMannifest.xml檔案中的android:allowBackup屬性值設為false;
3) allowBackup風險原理:
當allowBackup標誌值為true時,即可通過adb backup和adb restore來備份和恢復應用程式資料;
出於安全考慮,阿里聚安全建議關閉應用備份功能; 在AndroidMenifest.xml檔案中,將相應元件的“android:allowBackup”屬性設定為“false”
android:fullBackupContent
AndroidM 新特性 Auto Backup for Apps
自動備份使用者資訊和資料,簡直太棒了!不用開發者自己寫程式碼,不用自己在sd卡上建立亂七八糟的資料夾,android M會自己備份app資訊。對於強迫症同學真是福音。
<app ...
        android:fullBackupContent="@xml/mybackupscheme">
</app>- 1
- 2
- 3
但是谷歌不建議使用
Google Cloud Messaging - For apps that use Google Cloud Messaging for push notifications, there is a known issue where backing up the registration ID returned by Google Cloud Messaging registration can break push notifications for the restored app. It is important
to query the API for a new registration ID after being installed on a new device, which is not be the case if the old registration ID was backed up. To avoid this, exclude the registration id from the set of backed up files.
from 知乎回答
android:supportsRtl=”false”
內容如下:
今天解bug時,遇到這樣一個問題:
問題描述:切換系統語言為阿拉伯文時,actionbar佈局沒有變為從右向左排列。
於是,我在Androidmanifest.xml檔案中的 application 標籤內加上 android:supportsRtl=”true”屬性,發現沒有起到效果。
原因在於 Androidmanifest.xml中對最小SDK版本和目標版本做了要求: <uses-sdk android:minSdkVersion="11"
android:targetSdkVersion="11" />
而使用android:supportsRtl=”true”要求最低SDK版本為17,再將上面那兩句直接刪除或者是修改為>=17的版本即可。
注意:
由於佈局方向可以是從右到左的,所以在寫xml佈局的時候,為了防止出現佈局混亂的現象,不要使用諸如layout_marginRight這種,而應該是layout_marginEnd這種。
這個和 MarginStart Marginend要放在一起解釋
具體請看:
Android MarginLeft與MarginStart的區別
最關鍵一段:
一般情況下,View開始部分就是左邊,但是有的語言目前為止還是按照從右往左的順序來書寫的,例如阿拉伯語,在Android 4.2系統之後,Google在Android中引入了RTL佈局,更好了支援了由右到左文字佈局的顯示,為了更好的相容RTL佈局,google推薦使用MarginStart和MarginEnd來替代MarginLeft和MarginRight,這樣應用可以在正常的螢幕和由右到左顯示文字的螢幕上都保持一致的使用者體驗。
android:windowSoftInputMode=”adjustPan”
對於軟鍵盤的接介紹可以看這兩篇文章:
adjustResize和adjustPan的比較
—adjustPan———————–
keyword:不管屏幕布局是RelativeLayout還是LinearLayout,當Activity設定為adjustPan模式時,效果都是一樣的。點選編輯框時,軟鍵盤彈出來。如果游標被軟鍵盤擋住,那麼整個螢幕往上平移,直至看到游標為止。
——-adjustResize————–
編輯框在RelativeLayout中定義。編輯框上邊(above)的列表元件的高度不會縮小為0,導致顯示出現一點問題。當資訊列表中有資訊時,當輸入一定行數,比如超過9行,編輯框上邊會出現重疊的內容。
將RelativeLayout改成LinearLayout,在編輯框上邊的listView控制元件的height設定為0dip且weight設定為1。
將Activity都設定為adjustResize模式。在軟鍵盤彈出時,列表控制元件的高度會逐漸縮小直至為0。
總而言之:
在androidMainfest.xml檔案中在此Activity中寫入 android:windowSoftInputMode=”adjustPan” 可以讓介面不被彈出的鍵盤擠上去。
android:hardwareAccelerated=”true”
keyword:
在Android中,可以四給不同層次上開啟硬體加速:
1、Application
2、Activity
3、Window
getWindow().setFlags(WindowManager.LayoutParams.FLAG_HARDWARE_ACCELERATED, WindowManager.LayoutParams.FLAG_HARDWARE_ACCELERATED);
4、View
view.setLayerType(View.LAYER_TYPE_SOFTWARE, null);
在這四個層次中,應用和Activity是可以選擇的,Window只能開啟,View只能關閉。
在apk的AndroidManifest中,如果指定了minSDKVersion&targetSDKVersion=7,會使得應用無法使用硬體加速進行繪圖。
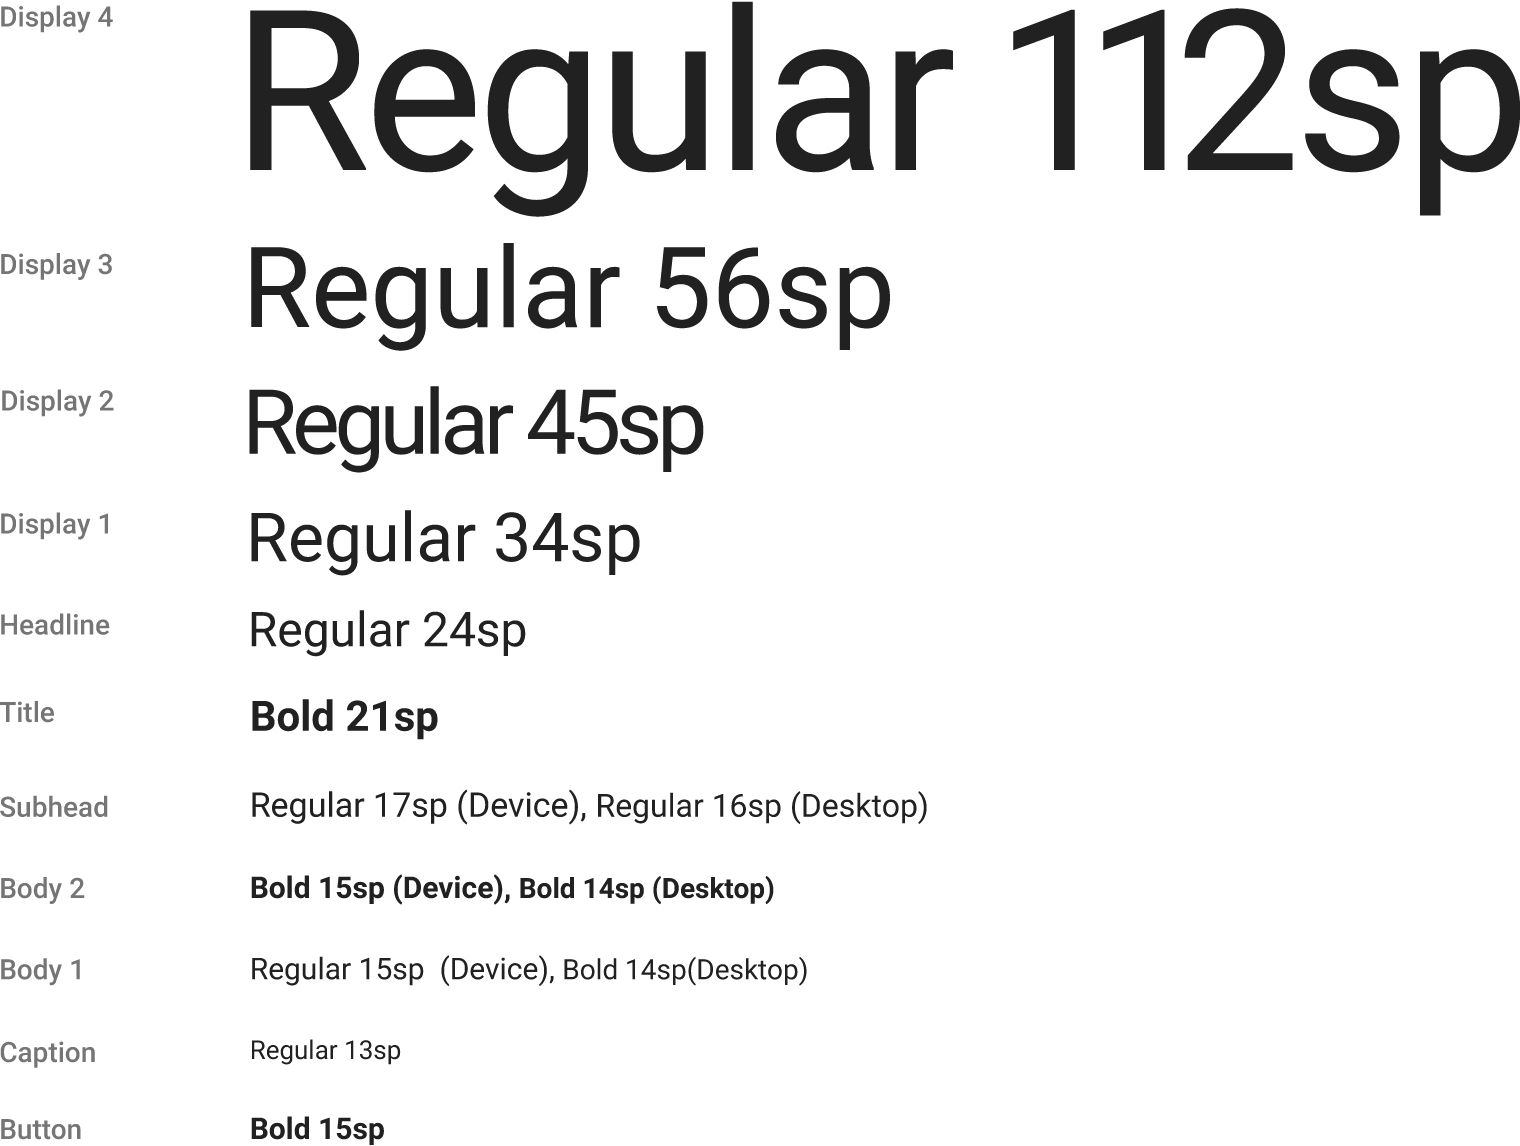
style研究
style="@style/TextAppearance.AppCompat.Display4"
style="@style/TextAppearance.AppCompat.Display3"
style="@style/TextAppearance.AppCompat.Display2"
style="@style/TextAppearance.AppCompat.Display1"
style="@style/TextAppearance.AppCompat.Headline"
style="@style/TextAppearance.AppCompat.Title"
style="@style/TextAppearance.AppCompat.Subhead"
style="@style/TextAppearance.AppCompat.Body2"
style="@style/TextAppearance.AppCompat.Body1"
style="@style/TextAppearance.AppCompat.Caption"
style="@style/TextAppearance.AppCompat.Button"- 1
- 2
- 3
- 4
- 5
- 6
- 7
- 8
- 9
- 10
- 11
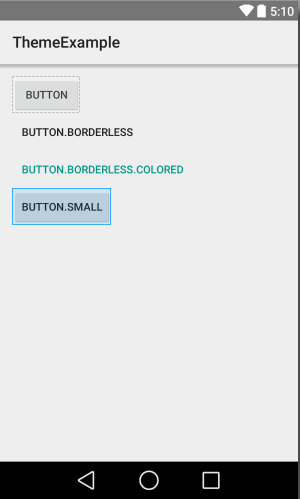
Button使用Material Design標準樣式
style="@style/Widget.AppCompat.Button"
style="@style/Widget.AppCompat.Button.Borderless"
style="@style/Widget.AppCompat.Button.Borderless.Colored"
style="@style/Widget.AppCompat.Button.Small"- 1
- 2
- 3
- 4
tools:context=”activity.SignInActivity”的作用
tools:context=”activity name”這一句不會被打包進APK。只是ADT的Layout Editor在你當前的Layout檔案裡面設定對應的渲染上下文,說明你當前的Layout所在的渲染上下文是activity name對應的那個activity,如果這個activity在manifest檔案中設定了Theme,那麼ADT的Layout Editor會根據這個Theme來渲染你當前的Layout。就是說如果你設定的MainActivity設定了一個Theme.Light(其他的也可以),那麼你在視覺化佈局管理器裡面看到的背景阿控制元件阿什麼的就應該是Theme.Light的樣子。僅用於給你看所見即所得的效果而已。
TextView 採用了 android :text , 而 EditText中使用了 tools:text ,右邊Layout 編輯器會顯示內容Name , sample name 兩個 字型, 如果你執行程式碼後編譯,生成apk 後,終端就只顯示Name,不會顯示Sample Name這個字樣. 大家可以試試執行,看下效果就知道。。
( 比如我們在佈局TextView 中想要顯示一段文字時,以前使用android:text顯示,然後在編譯器中佈局調整,最後完成後刪除android:text屬性。有了tools引數後,可以直接使用tools:text在預覽時顯示文字即可,省卻了上面刪除的麻煩,編譯後此tools:text 相當於註釋了。)
tools:text 這個相當受用啊 防止打包時把測試資料帶進去
from: android基礎–tools:context=”.MainActivity”作用
tools:ignore=”MergeRootFrame,Overdraw,UnusedAttribute”
這個是告知lint檢查的時候忽略掉提示你使用merge標籤來替換FrameLayout。
tools:showIn=”@layout/activity_main”
Android Studio 使用該屬性。通常用在被其他佈局檔案引用的 佈局檔案中。告訴編輯器該佈局檔案用在另外一個佈局檔案中。例如
<RelativeLayout xmlns:android="http://schemas.android.com/apk/res/android"
    xmlns:app="http://schemas.android.com/apk/res-auto"
    xmlns:tools="http://schemas.android.com/tools"
    android:layout_width="match_parent"
    android:layout_height="match_parent"
 app:layout_behavior="@string/appbar_scrolling_view_behavior"
    tools:context="com.example.susan.testdemo8.MainActivity"
tools:showIn="@layout/activity_main">- 1
- 2
- 3
- 4
- 5
- 6
- 7
- 8
這將允許您“在上下文中”檢視和編輯這個佈局。需要 Studio 0.5.8 或更高版本。


