詳解Android外掛化開發-資源訪問
動態載入技術(也叫外掛化技術),當專案越來越龐大的時候,我們通過外掛化開發不僅可以減輕應用的記憶體和CPU佔用,還可以實現熱插拔,即在不釋出新版本的情況下更新某些模組。
通常我們把安卓資原始檔製作成外掛的形式,無外乎有一下幾種:
zip、jar、dex、APK(未安裝APK、安裝APK)
對於使用者來講未安裝的APK才是使用者所需要的,不安裝、不重啟,無聲無息的載入資原始檔,這正是我們開發者追求的結果。
但是,開發中宿主程式調起未安裝的外掛apk,一個很大的問題就是資源如何訪問,這些資原始檔的ID都對映在gen資料夾下的R.java中,而外掛中凡是以R開頭的資源都不能訪問。究其原因是因為宿主程式中並沒有外掛的資源,所以通過R來載入外掛的資源是行不通的,程式會丟擲異常:無法找到某某id所對應的資源。
那麼開發中該怎麼辦呢,今天我們來一起探討一下外掛化開發中資原始檔訪問的解決方案。
想必大家在開發中都寫過類似程式碼,例如,在主程式訪問字串檔案
this.getResources().getString(R.string.app_name);這裡的this,其實就是Context,上下文物件。通常我們的的APK安裝路徑為:
/data/apk/packagename~1/base.apk
APK啟動,Context通過類載入器載入完畢後,會去APK中載入資原始檔。想必大家都知道,Activity的工作主要是通過ContextImpl來完成的, Activity中有一個叫mBase的成員變數,它的型別就是ContextImpl。注意到Context中有如下兩個抽象方法,看起來是和資源有關的,實際上Context就是通過它們來獲取資源的。這兩個抽象方法的真正實現在ContextImpl中,也就是說,只要實現這兩個方法,就可以解決資源問題了。
/** Return an AssetManager instance for your application's package. */

public abstract AssetManager getAssets();

/** Return a Resources instance for your application's package. */

public abstract Resources getResources();
我們若是想使用這兩個方法,需要例項化Context物件,通常我們可以根據APK中的包名完成Context物件的建立:
Context pluginContext = this 但是這樣做有個前提,必須要求初始化時載入的是自己APK,如果我們載入的是未安裝的外掛APK,這麼做肯定就不可取了。為啥呢,看原始碼:
Resources resources = packageInfo.getResources(mainThread);
        if (resources != null) {
            if (activityToken != null
                    || displayId != Display.DEFAULT_DISPLAY
                    || overrideConfiguration != null
                    || (compatInfo != null && compatInfo.applicationScale
                            != resources.getCompatibilityInfo().applicationScale)) {
                resources = mResourcesManager.getTopLevelResources(packageInfo.getResDir(),
                        packageInfo.getSplitResDirs(), packageInfo.getOverlayDirs(),
                        packageInfo.getApplicationInfo().sharedLibraryFiles, displayId,
                        overrideConfiguration, compatInfo, activityToken);
            }
        }
        mResources = resources;
Resources在這裡被賦值,我們再去程式碼中第一行的packageInfo,它來自LoadedApk類,其中的getResources方法如下:
public Resources getResources(ActivityThread mainThread) {
        if (mResources == null) {
            mResources = mainThread.getTopLevelResources(mResDir, mSplitResDirs, mOverlayDirs,
                    mApplicationInfo.sharedLibraryFiles, Display.DEFAULT_DISPLAY, null, this);
        }
        return mResources;
    }
該方法採用單例模式,注意其中的getTopLevelResources()方法中的第一個引數mResDir,我們繼續找其源頭,在ActivityThread類中,發現了:
    /**
     * Creates the top level resources for the given package.
     */
    Resources getTopLevelResources(String resDir, String[] splitResDirs, String[] overlayDirs,
            String[] libDirs, int displayId, Configuration overrideConfiguration,
            LoadedApk pkgInfo) {
        return mResourcesManager.getTopLevelResources(resDir, splitResDirs, overlayDirs, libDirs,
                displayId, overrideConfiguration, pkgInfo.getCompatibilityInfo(), null);
    }
重點看裡面的resDir引數,我們再往上找原始碼,最終找到ResourcesManager類,找到getTopLevelResources()方法:
    /**
     * Creates the top level Resources for applications with the given compatibility info.
     *
     * @param resDir the resource directory.
     * @param overlayDirs the resource overlay directories.
     * @param libDirs the shared library resource dirs this app references.
     * @param compatInfo the compability info. Must not be null.
     * @param token the application token for determining stack bounds.
     */
    public Resources getTopLevelResources(String resDir, String[] splitResDirs,
            String[] overlayDirs, String[] libDirs, int displayId,
            Configuration overrideConfiguration, CompatibilityInfo compatInfo, IBinder token) {
        final float scale = compatInfo.applicationScale;
        ResourcesKey key = new ResourcesKey(resDir, displayId, overrideConfiguration, scale, token);
        Resources r;
        synchronized (this) {
            // Resources is app scale dependent.
            if (false) {
                Slog.w(TAG, "getTopLevelResources: " + resDir + " / " + scale);
            }
            WeakReference<Resources> wr = mActiveResources.get(key);
            r = wr != null ? wr.get() : null;
            //if (r != null) Slog.i(TAG, "isUpToDate " + resDir + ": " + r.getAssets().isUpToDate());
            if (r != null && r.getAssets().isUpToDate()) {
                if (false) {
                    Slog.w(TAG, "Returning cached resources " + r + " " + resDir
                            + ": appScale=" + r.getCompatibilityInfo().applicationScale);
                }
                return r;
            }
        }
        //if (r != null) {
        //    Slog.w(TAG, "Throwing away out-of-date resources!!!! "
        //            + r + " " + resDir);
        //}

        AssetManager assets = new AssetManager();
        // resDir can be null if the 'android' package is creating a new Resources object.
        // This is fine, since each AssetManager automatically loads the 'android' package
        // already.
        if (resDir != null) {
            if (assets.addAssetPath(resDir) == 0) {
                return null;
            }
        }

        if (splitResDirs != null) {
            for (String splitResDir : splitResDirs) {
                if (assets.addAssetPath(splitResDir) == 0) {
                    return null;
                }
            }
        }

        if (overlayDirs != null) {
            for (String idmapPath : overlayDirs) {
                assets.addOverlayPath(idmapPath);
            }
        }

        if (libDirs != null) {
            for (String libDir : libDirs) {
                if (assets.addAssetPath(libDir) == 0) {
                    Slog.w(TAG, "Asset path '" + libDir +
                            "' does not exist or contains no resources.");
                }
            }
        }

        //Slog.i(TAG, "Resource: key=" + key + ", display metrics=" + metrics);
        DisplayMetrics dm = getDisplayMetricsLocked(displayId);
        Configuration config;
        boolean isDefaultDisplay = (displayId == Display.DEFAULT_DISPLAY);
        final boolean hasOverrideConfig = key.hasOverrideConfiguration();
        if (!isDefaultDisplay || hasOverrideConfig) {
            config = new Configuration(getConfiguration());
            if (!isDefaultDisplay) {
                applyNonDefaultDisplayMetricsToConfigurationLocked(dm, config);
            }
            if (hasOverrideConfig) {
                config.updateFrom(key.mOverrideConfiguration);
            }
        } else {
            config = getConfiguration();
        }
        r = new Resources(assets, dm, config, compatInfo, token);
        if (false) {
            Slog.i(TAG, "Created app resources " + resDir + " " + r + ": "
                    + r.getConfiguration() + " appScale="
                    + r.getCompatibilityInfo().applicationScale);
        }

        synchronized (this) {
            WeakReference<Resources> wr = mActiveResources.get(key);
            Resources existing = wr != null ? wr.get() : null;
            if (existing != null && existing.getAssets().isUpToDate()) {
                // Someone else already created the resources while we were
                // unlocked; go ahead and use theirs.
                r.getAssets().close();
                return existing;
            }

            // XXX need to remove entries when weak references go away
            mActiveResources.put(key, new WeakReference<Resources>(r));
            return r;
        }
}
該方法的註釋中,明確指出@param resDir the resource directory,載入本地資源目錄,載入自己的APK。
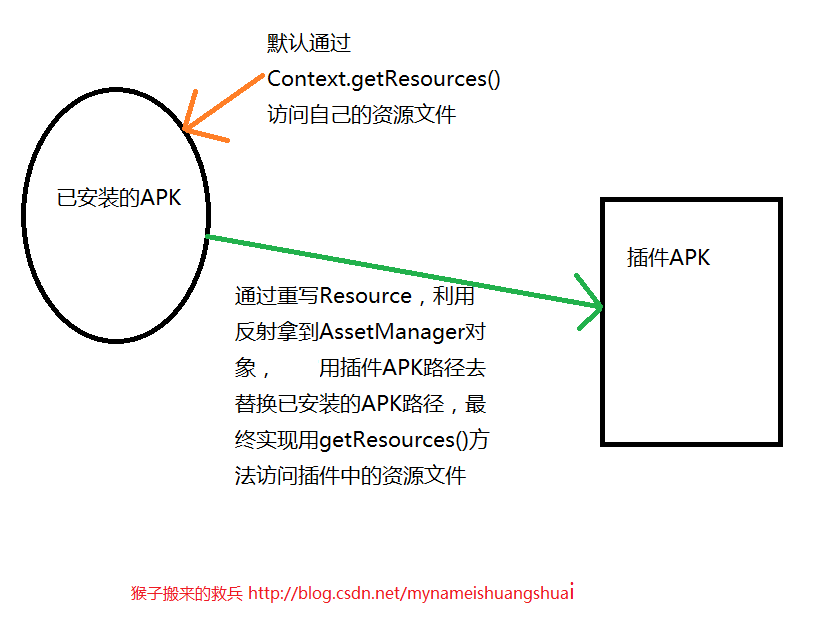
通過以上的分析,我們知道getResources()方法通過AssetManager載入自己的APK,那麼我們要想載入未安裝的外掛APK,唯有自定義實現一個Resources類,專門用來載入未安裝的APK。但是我試過了,直接重寫不行,為啥,因為Android並沒有提供Resource構造方法中的AssetManager的構造方法,我們看下原始碼:
    /**
     * Create a new Resources object on top of an existing set of assets in an
     * AssetManager.
     *
     * @param assets Previously created AssetManager.
     * @param metrics Current display metrics to consider when
     *                selecting/computing resource values.
     * @param config Desired device configuration to consider when
     *               selecting/computing resource values (optional).
     */
    public Resources(AssetManager assets, DisplayMetrics metrics, Configuration config) {
        this(assets, metrics, config, CompatibilityInfo.DEFAULT_COMPATIBILITY_INFO);
    }
接著再看一下Resource構造方法中的AssetManager引數原始碼
    /**
     * Create a new AssetManager containing only the basic system assets.
     * Applications will not generally use this method, instead retrieving the
     * appropriate asset manager with {@link Resources#getAssets}.    Not for
     * use by applications.
     * {@hide}
     */
    public AssetManager() {
        synchronized (this) {
            if (DEBUG_REFS) {
                mNumRefs = 0;
                incRefsLocked(this.hashCode());
            }
            init(false);
            if (localLOGV) Log.v(TAG, "New asset manager: " + this);
            ensureSystemAssets();
        }
    }
注意註釋中的{@hide},隱藏起來了,Android系統不讓我們使用。既然不讓我們直接使用,那我們可以採用反射的方式來拿到AssetManager。接下來我把自定義的實現類貼出來,給大家示例:
/**
 *
 * @ClassName: MyPluginResources
 * @Description: 自定義外掛資原始檔獲取工具類
 * @author 猴子搬來的救兵http://blog.csdn.net/mynameishuangshuai
 * @version
 */
public class MyPluginResources extends Resources{

    public MyPluginResources(AssetManager assets, DisplayMetrics metrics, Configuration config) {
        super(assets, metrics, config);
    }

    /**
     * 自定義返回外掛的資原始檔的Resource方法
     * @param resources
     * @param assets
     * @return
     */
    public static MyPluginResources getPluginResources(Resources resources,AssetManager assets){
        MyPluginResources pluginResources = new MyPluginResources(assets, resources.getDisplayMetrics(), resources.getConfiguration());
        return pluginResources;
    }

    //自己定義載入外掛APK的AssetsManager
    public static AssetManager getPluginAssetsManager(File apkFile,Resources resources) throws ClassNotFoundException{
        // 由於系統沒有提供AssetManager的例項化方法,因此我們使用反射
        Class<?> forName = Class.forName("android.content.res.AssetManager");
        Method[] declaredMethods = forName.getDeclaredMethods();
        for(Method method :declaredMethods){
            if(method.getName().equals("addAssetPath")){
                try {
                    AssetManager assetManager = AssetManager.class.newInstance();
                    // 呼叫addAssetPath方法,引數為我們外掛APK的路徑
                    method.invoke(assetManager, apkFile.getAbsolutePath());
                    return assetManager;
                } catch (Exception e) {
                    e.printStackTrace();
                }
            }
        }
        return null;
    }
}
這樣,我們在專案中就可以使用我們自定義的AssetManager來獲取未安裝外掛APK中的資原始檔
AssetManager assetManager = PluginResources.getPluginAssetsManager(apkFile,
            this.getResources());
參考:《Android開發藝術探索》

