
GLSurfaceView渲染過程詳解
GLSurfaceView提供了下列特性:
1> 管理一個surface,這個surface就是一塊特殊的記憶體,能直接排版到android的檢視view上。
2> 管理一個EGL display,它能讓opengl把內容渲染到上述的surface上。
3> 使用者自定義渲染器(render)。
4> 讓渲染器在獨立的執行緒裡運作,和UI執行緒分離。
5> 支援按需渲染(on-demand)和連續渲染(continuous)。
6> 一些可選工具,如除錯。
概念:
Display(EGLDisplay) 是對實際顯示裝置的抽象。
Surface(EGLSurface)是對用來儲存影象的記憶體區域FrameBuffer的抽象,包括Color Buffer, Stencil Buffer ,Depth Buffer.
Context (EGLContext) 儲存OpenGL ES繪圖的一些狀態資訊。
步驟:
獲取EGLDisplay物件
初始化與EGLDisplay 之間的連線。
獲取EGLConfig物件
建立EGLContext 例項
建立EGLSurface例項
連線EGLContext和EGLSurface.
使用GL指令繪製圖形
斷開並釋放與EGLSurface關聯的EGLContext物件
刪除EGLSurface物件
刪除EGLContext物件
終止與EGLDisplay之間的連線。
GLSurfaceView的繪製流程
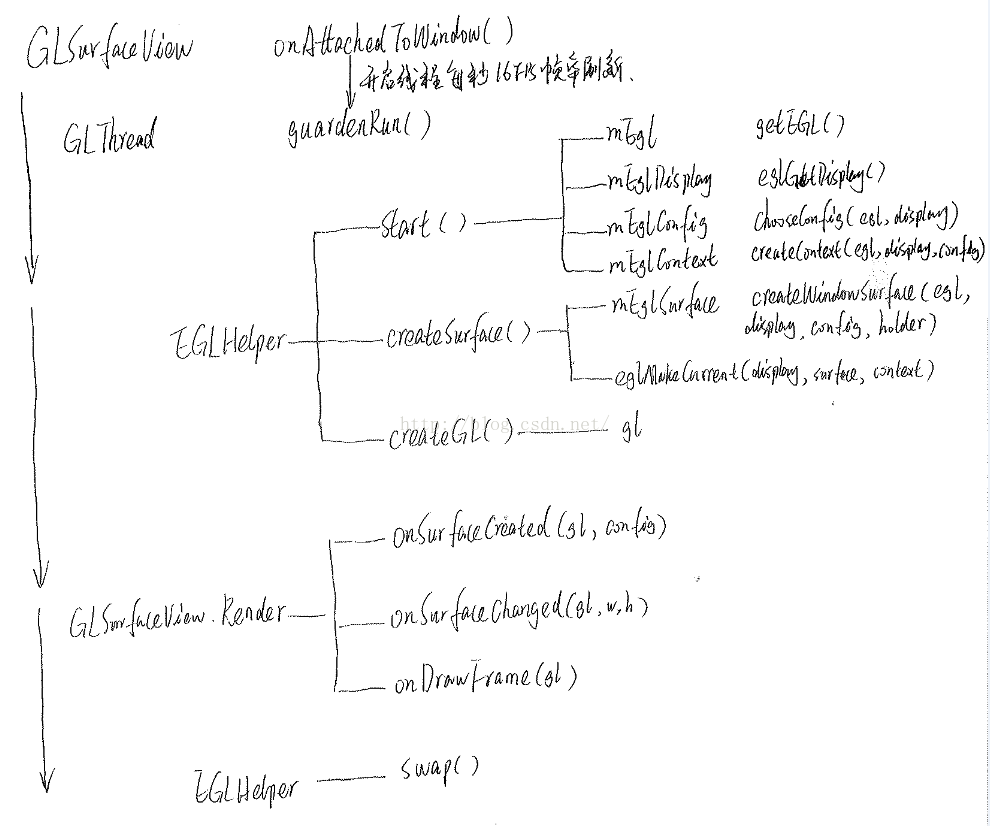
由上圖可知,GLSurfaceView的主要繪製過程都是在一個子執行緒中完成,即整個繪製最終都是guardenRun()中完成。在這個過程中完成了整個EGL繪製的所有步驟。
我把guardenRun()的大多數細節程式碼都刪掉了,剩下一些精華:
 private void guardedRun() throws InterruptedException {

                while (true) {
                    synchronized (sGLThreadManager) {
                        while (true) {

                            // Ready to draw?
                            if (readyToDraw()) {
                                // If we don't have an EGL context, try to acquire one.
                                if (! mHaveEglContext) {
                                    if (sGLThreadManager.tryAcquireEglContextLocked(this)) {
                                         mEglHelper.start();
                                    }
                                }

                            sGLThreadManager.wait();
                        }
                    } // end of synchronized(sGLThreadManager)

                    if (createEglSurface) {
                        if (mEglHelper.createSurface()) {
                           ...
                        }
                    }

                    if (createGlInterface) {
                        gl = (GL10) mEglHelper.createGL();
                    }

                    if (createEglContext) {
                        if (view != null) {
                            view.mRenderer.onSurfaceCreated(gl, mEglHelper.mEglConfig);
                        }
                    }

                    if (sizeChanged) {
                        if (view != null) {
                            view.mRenderer.onSurfaceChanged(gl, w, h);
                        }
                        sizeChanged = false;
                    }


                    if (view != null) {
                        view.mRenderer.onDrawFrame(gl);
                    }

                    int swapError = mEglHelper.swap();
        }
其中mEglHelper.start():
        public void start() {
            /*
             * Get an EGL instance
             */
            mEgl = (EGL10) EGLContext.getEGL();

            /*
             * Get to the default display.
             */
            mEglDisplay = mEgl.eglGetDisplay(EGL10.EGL_DEFAULT_DISPLAY);


            mEglConfig = view.mEGLConfigChooser.chooseConfig(mEgl, mEglDisplay);

            /*
            * Create an EGL context. We want to do this as rarely as we can, because an
            * EGL context is a somewhat heavy object.
            */
            mEglContext = view.mEGLContextFactory.createContext(mEgl, mEglDisplay, mEglConfig);

        }
mEglHelper.start()就完成了4步:
1,獲取EGLDisplay物件
2,初始化與EGLDisplay 之間的連線。
3,獲取EGLConfig物件
4,建立EGLContext 例項
請注意註解中提到createContext()建立的mEglContext是一個重量級物件,在建立的時候很耗資源,我們儘可能少的建立它。所以,在guardenRun()中我們做了對mEglContext的是否存在的判斷:
 if (! mHaveEglContext) {
                       if (sGLThreadManager.tryAcquireEglContextLocked(this)) {
                                         mEglHelper.start();
                                    }
                                }
接下來createSurface()
 /**
         * Create an egl surface for the current SurfaceHolder surface. If a surface
         * already exists, destroy it before creating the new surface.
         *
         * @return true if the surface was created successfully.
         */
        public boolean createSurface() {
            if (view != null) {
                mEglSurface = view.mEGLWindowSurfaceFactory.createWindowSurface(mEgl,
                        mEglDisplay, mEglConfig, view.getHolder());
            }

            /*
             * Before we can issue GL commands, we need to make sure
             * the context is current and bound to a surface.
             */
            if (!mEgl.eglMakeCurrent(mEglDisplay, mEglSurface, mEglSurface, mEglContext)) {
                /*
                 * Could not make the context current, probably because the underlying
                 * SurfaceView surface has been destroyed.
                 */
                return false;
            }
            return true;
}5,建立mEglSurface,這個代表了將要被渲染的那段記憶體。請注意到createWindowSurface()的四個引數,尤其是最後一個引數view.getHolder()。
createSurface()上面有一句註解:Create an egl surface for the current SurfaceHolder surface.這個只能意會,很難言傳。我理解是被渲染後的mEglSurface也是為了給mSurface來呈現的。總之mEglSurface和mSurface之間一定有著很重要的關係的,在一定程度上你也可以理解他們代表著同一塊用來渲染的記憶體。
6,連線EGLContext和EGLSurface:eglMakeCurrent()。
7,使用GL指令繪製圖形
<span style="white-space:pre">		</span>    if (createGlInterface) {
                        gl = (GL10) mEglHelper.createGL();
                    }

                    if (createEglContext) {
                        if (view != null) {
                            view.mRenderer.onSurfaceCreated(gl, mEglHelper.mEglConfig);
                        }
                    }

                    if (sizeChanged) {
                        if (view != null) {
                            view.mRenderer.onSurfaceChanged(gl, w, h);
                        }
                        sizeChanged = false;
                    }


                    if (view != null) {
                        view.mRenderer.onDrawFrame(gl);
}在整個guardenRun()過程中,你應該要發現一個很重要的點,這是一個無限迴圈的程式,而onDrawFrame(gl)幾乎是沒有設定任何障礙就可以每次迴圈都被觸發。而onDrawFrame(gl)的實現正是整個渲染的主體部分,由Render的子類來實現。
後面幾個步驟就不一一講訴了
8,斷開並釋放與EGLSurface關聯的EGLContext物件
9,刪除EGLSurface物件
10,刪除EGLContext物件
11,終止與EGLDisplay之間的連線。
在使用GlSurfaceView的時候,通常會繼承GLSurfaceView,並重載一些和使用者輸入事件有關的方法。如果你不需要過載事件方法,GLSurfaceView也可以直接使用, 你可以使用set方法來為該類提供自定義的行為。
說到這裡,我就上一個最簡化的demo:
public class MainActivity extends Activity {
    private MyGLSurfaceView mGLView;

    @Override
    protected void onCreate(Bundle savedInstanceState) {
        super.onCreate(savedInstanceState);
        mGLView = new MyGLSurfaceView(this);
        mGLView.setRenderer(new ClearRenderer());
        setContentView(mGLView);
    }

    @Override
    protected void onPause() {
        super.onPause();
        mGLView.onPause();
    }

    @Override
    protected void onResume() {
        super.onResume();
        mGLView.onResume();
    }

    class ClearRenderer implements MyGLSurfaceView.Renderer {

        @Override
        public void onSurfaceCreated(GL10 gl, javax.microedition.khronos.egl.EGLConfig config) {

        }

        public void onSurfaceChanged (GL10 gl, int w, int h)
        {
            gl.glViewport(0, 0, w, h);
        }

        public void onDrawFrame(GL10 gl) {
            gl.glClearColor(mRed, mGreen, mBlue, 1.0f);
            gl.glClear(GL10.GL_COLOR_BUFFER_BIT | GL10.GL_DEPTH_BUFFER_BIT);
        }

    }
}
GLSurfaceView的繪製過程要點
1,GLSurfaceview的渲染模式RenderMode
在onAttachedToWindow後就啟動了一個無線迴圈的子執行緒,該子執行緒完成了整個繪製流程,並系統預設是負責不斷重新整理重繪,重新整理的幀率是60FPS。從這裡也可以看出來,GLSurfaceView系統預設是16ms就重繪一次,這樣的耗效能的重繪操作一定是要用在那種有持續動畫的效果才有意義。
當然,你也可以通過設定setRenderMode去設定主動重新整理:
    /**
     * Set the rendering mode. When renderMode is
     * RENDERMODE_CONTINUOUSLY, the renderer is called
     * repeatedly to re-render the scene. When renderMode
     * is RENDERMODE_WHEN_DIRTY, the renderer only rendered when the surface
     * is created, or when {@link #requestRender} is called. Defaults to RENDERMODE_CONTINUOUSLY.
     * <p>
     * Using RENDERMODE_WHEN_DIRTY can improve battery life and overall system performance
     * by allowing the GPU and CPU to idle when the view does not need to be updated.
     * <p>
     * This method can only be called after {@link #setRenderer(Renderer)}
     *
     * @param renderMode one of the RENDERMODE_X constants
     * @see #RENDERMODE_CONTINUOUSLY
     * @see #RENDERMODE_WHEN_DIRTY
     */
    public void setRenderMode(int renderMode) {
        mGLThread.setRenderMode(renderMode);
    }
2,事件處理
為了處理事件,一般都是繼承GLSurfaceView類並重載它的事件方法。但是由於GLSurfaceView是多執行緒操作,所以需要一些特殊的處理。由於渲染器在獨立的渲染執行緒裡,你應該使用Java的跨執行緒機制跟渲染器通訊。queueEvent(Runnable)方法就是一種相對簡單的操作。
class MyGLSurfaceView extends GLSurfaceView {
    private MyRenderer mMyRenderer;

        public void start() {
            mMyRenderer = ...;
            setRenderer(mMyRenderer);
        }


        public boolean onKeyDown(int keyCode, KeyEvent event) {

            if (keyCode == KeyEvent.KEYCODE_DPAD_CENTER) {
                queueEvent(new Runnable() {
                    // 這個方法會在渲染執行緒裡被呼叫
                         public void run() {
                             mMyRenderer.handleDpadCenter();
                         }});
                     return true;
                 }

                 return super.onKeyDown(keyCode, event);
            }
      }
}
呼叫queueEvent就是給佇列中新增runnable
public void queueEvent(Runnable r) {

    synchronized(sGLThreadManager) {
        mEventQueue.add(r);
        sGLThreadManager.notifyAll();
    }

}
在guardenRun()中有如下程式碼:
<span>		</span>if (! mEventQueue.isEmpty()) {
                    event = mEventQueue.remove(0);
                    break;
                }

                ...

                if (event != null) {
                    event.run();
                    event = null;
                    continue;
}(注:如果在UI執行緒裡呼叫渲染器的方法,很容易收到“call to OpenGL ES API with no current context”的警告,典型的誤區就是在鍵盤或滑鼠事件方法裡直接呼叫opengl es的API,因為UI事件和渲染繪製在不同的執行緒裡。更甚者,這種情況下呼叫glDeleteBuffers這種釋放資源的方法,可能引起程式的崩潰,因為UI執行緒想釋放它,渲染執行緒卻要使用它。)
關於GLSurfaceView的渲染過程的重要知識點已經介紹完畢,瞭解這些對開發當然是很有用的,很多時候你需要實現自定義的類GLSurfaceView的類。
那麼現在,最後剩下的就是onDrawFrame(GL10 gl)的主體繪製的實現,這也是最重要的一個部分,因為涉及的內容較多,就不在這裡陳述了。這裡使用的就是opengl的繪製引擎進行渲染操作,跟之前View的渲染是使用的Skia渲染引擎。
還記得View的繪製onDraw(Canvas canvas)嗎,對比onDrawFrame(GL10 gl),我想你該知道區別了。一個使用Skia引擎渲染,一個使用opengl引擎渲染。
問題:
1,GLSurfaceView繼承了SurfaceView,它自己的mEglSurface和從父類繼承的mSurface之間的關係?
但是呢,
  mEglSurface = view.mEGLWindowSurfaceFactory.createWindowSurface(mEgl,
mEglDisplay, mEglConfig, view.getHolder());為了驗證我的這個想法,於是我列印了mSurface和mEglSurface的地址,發現他們卻不是同一塊地址。這就讓人深思了,現在的情況只能說明,他們兩個一定有關係,但是又不是指向同一塊地址。對這方面有經驗的朋友歡迎指導。
2,你怎麼知道onDrawFrame是60FPS的幀率呢?
Android系統每隔16ms發出VSYNC訊號,觸發GPU對UI進行渲染,如果每次渲染都成功,這樣就能夠達到流暢的畫面所需要的60fps,為了能夠實現60fps,這意味著程式的大多數操作都必須在16ms內完成。
如果你的某個操作花費時間是24ms,系統在得到VSYNC訊號的時候就無法進行正常渲染,這樣就發生了丟幀現象。那麼使用者在32ms內看到的會是同一幀畫面。(卡頓現象)
使用者容易在UI執行動畫或者滑動ListView的時候感知到卡頓不流暢,是因為這裡的操作相對複雜,容易發生丟幀的現象,從而感覺卡頓。有很多原因可以導致丟幀,也許是因為你的layout太過複雜,無法在16ms內完成渲染,有可能是因為你的UI上有層疊太多的繪製單元,還有可能是因為動畫執行的次數過多。這些都會導致CPU或者GPU負載過重。
3,那我們為什麼要選擇16ms,60fps的幀率去VSYNC一次呢?
12fps大概類似手動快速翻動書籍的幀率,這明顯是可以感知到不夠順滑的。
24fps使得人眼感知的是連續線性的運動,電影膠圈通常使用的幀率,
低於30fps是無法順暢表現絢麗的畫面內容的,60fps來達到想要的效果,
超過60fps是沒有必要的。
開發app的效能目標就是保持60fps,這意味著每一幀你只有16ms=1000/60的時間