Log日誌框架-對原生Log進行簡單封裝
閒來無事,對以前專案中使用的對Log的封裝使用抽取出來,寫成一個Demo供博友參考。
Demo是以Gradle構建的專案。其中涉及到打Release包跟Debug包的時候對於日誌輸出的控制,由gradle指令碼進行控制,下文我再細說。
先看下日誌的輸出效果:
效果比較簡潔,主要展示日誌的具體來源及日誌訊息,並提供點選快速定位程式碼的功能。
下面直接看程式碼:
package com.csf.simplelog.utils;

import android.text.TextUtils;
import android.util.Log;

/**
 * ClassName: LogUtil
 * Description:日誌工具類
 * Created by chensf on 2016-7-27 9:53.
 */
public class LogUtil {

    private static final String TAG = LogUtil.class.getSimpleName();
    /**
     * 日誌輸出等級
     */
    private static int LOG_LEVEL = Log.VERBOSE;

    /**
     * 是否顯示日誌
     */
    private static boolean isShowLog = true;

    private static final String DOUBLE_DIVIDER = "-----------------------------------------------------------------------------------------------------------";

    public static void init(boolean isShowLog) {
        LogUtil.isShowLog = isShowLog;
    }

    public static void init(boolean isShowLog, int logLevel) {
        LogUtil.isShowLog = isShowLog;
        LogUtil.LOG_LEVEL = logLevel;
    }

    public static int v(Object msg) {
        return v(TAG, msg);
    }

    public static int v(String tag, Object msg) {
        return v(tag, msg, null);
    }

    public static int v(String tag, Object msg, Throwable tr) {
        return printLog(Log.VERBOSE, tag, msg, tr);
    }

    public static int d(Object msg) {
        return d(TAG, msg);
    }

    public static int d(String tag, Object msg) {
        return d(tag, msg, null);
    }

    public static int d(String tag, Object msg, Throwable tr) {
        return printLog(Log.DEBUG, tag, msg, tr);
    }

    public static int i(Object msg) {
        return i(TAG, msg);
    }

    public static int i(String tag, Object msg) {
        return i(tag, msg, null);
    }

    public static int i(String tag, Object msg, Throwable tr) {
        return printLog(Log.INFO, tag, msg, tr);
    }

    public static int w(Object msg) {
        return w(TAG, msg);
    }

    public static int w(String tag, Object msg) {
        return w(tag, msg, null);
    }

    public static int w(String tag, Object msg, Throwable tr) {
        return printLog(Log.WARN, tag, msg, tr);
    }

    public static int e(Object msg) {
        return e(TAG, msg);
    }

    public static int e(String tag, Object msg) {
        return e(tag, msg, null);
    }

    public static int e(String tag, Object msg, Throwable tr) {
        return printLog(Log.ERROR, tag, msg, tr);
    }

    private static int printLog(int type, String tag, Object msgObj, Throwable tr) {
        if (!isShowLog) {
            return 0;
        }
        String msg;
        StringBuilder builder = new StringBuilder(DOUBLE_DIVIDER).append('\n').append(getFunctionName())
                .append(DOUBLE_DIVIDER).append('\n').append("  ");
        if (msgObj == null) {
            msg = "";
        } else {
            msg = msgObj.toString();
        }
        if (!TextUtils.isEmpty(msg)) {
            builder.append(msg);
        }
        if (tr != null) {
            builder.append('\n').append(Log.getStackTraceString(tr));
        }
        builder.append('\n').append(DOUBLE_DIVIDER);
        switch (type) {
            case Log.VERBOSE:
                if (LOG_LEVEL <= Log.VERBOSE) {
                    return Log.v(tag, builder.toString());
                }
                break;
            case Log.DEBUG:
                if (LOG_LEVEL <= Log.DEBUG) {
                    return Log.d(tag, builder.toString());
                }
                break;
            case Log.INFO:
                if (LOG_LEVEL <= Log.INFO) {
                    return Log.i(tag, builder.toString());
                }
                break;
            case Log.WARN:
                if (LOG_LEVEL <= Log.WARN) {
                    return Log.w(tag, builder.toString());
                }
                break;
            case Log.ERROR:
                if (LOG_LEVEL <= Log.ERROR) {
                    return Log.e(tag, builder.toString());
                }
                break;
        }
        return 0;
    }

    private static String getFunctionName() {
        StackTraceElement[] elements = Thread.currentThread().getStackTrace();
        if (elements == null) {
            return "";
        }
        for (StackTraceElement ste : elements) {
            if (ste.isNativeMethod()) {
                continue;
            }
            if (ste.getClassName().equals(Thread.class.getName())) {
                continue;
            }
            if (ste.getClassName().equals(LogUtil.class.getName())) {
                continue;
            }
            return "  " + ste.getFileName().substring(0, ste.getFileName().indexOf(".")) + "." + ste.getMethodName()
                    + " (" + ste.getFileName() + ":" + ste.getLineNumber() + ")\n";
        }
        return "";


    }

}
167行的程式碼,其中提供快速定位功能的程式碼在getFunctionName這個方法中,通過迴圈獲取Stack Trace Element中的element,分析獲取到具體的呼叫類方法及對應行數。程式碼如下:
private static String getFunctionName() {
        StackTraceElement[] elements = Thread.currentThread().getStackTrace();
        if (elements == null) {
            return "";
        }
        for (StackTraceElement ste : elements) {
            if (ste.isNativeMethod()) {
                continue;
            }
            if (ste.getClassName().equals(Thread.class.getName())) {
                continue;
            }
            if (ste.getClassName().equals(LogUtil.class.getName())) {
                continue;
            }
            return "  " + ste.getFileName().substring(0, ste.getFileName().indexOf(".")) + "." + ste.getMethodName()
                    + " (" + ste.getFileName() + ":" + ste.getLineNumber() + ")\n";
        }
        return "";
下面我們將目光回到對Log的封裝類LogUtil上,LogUtil只是對原生Log類進行簡單的封裝,通過增加屬性isShowLog及LOG_LEVEL對我們的log進行控制,方便在釋出Release包的時候快速關閉日誌輸出。
LogUtil提供兩個初始函式,
public static void init(boolean isShowLog) {
        LogUtil.isShowLog = isShowLog;
    }

    public static void init(boolean isShowLog, int logLevel) {
        LogUtil.isShowLog = isShowLog;
        LogUtil.LOG_LEVEL = logLevel;
    }
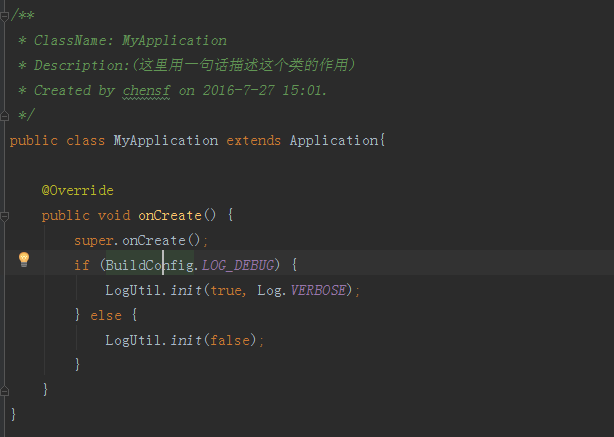
這兩個函式二選一,最好是在應用的入口進行初始化,一般我們會自定義一個Application的繼承類。在其方法onCreate中就能進行應用的初始工作。
程式碼如下:

然後在AndroidManifest中引用這個MyApplication類
   <application
        android:name=".config.MyApplication"
        android:allowBackup="true"
        android:icon="@mipmap/ic_launcher"
        android:label="@string/app_name"
        android:supportsRtl="true"
        android:theme="@style/AppTheme" >
在MyApplication的onCreate方法中,我們看到,我這裡通過
BuildConfig.LOG_DEBUG這個值來控制日誌是否輸出。
我們來看這個語句LogUtil.init(true, Log.VERBOSE);其中參一是是否開啟日誌輸出,參二顧名思義,就是日誌的級別,這裡我將級別控制設定為最低的VERBOSE,意思就是所有的日誌資訊,VERBOSE,DEBUG,INFO,WARN,ERROR這些級別的資訊都會輸出。如果傳遞引數Log.ERROR,那就只會輸出錯誤日誌,因為我們的Log.ERROR的級別比VERBOSE,DEBUG,INFO,WARN都要高。具體的大家去看到Demo的效果。
回到上面的BuildConfig.LOG_DEBUG,機智的小夥伴會發現BuildConfig中並沒有LOG_DEBUG這個屬性,那麼我們來講下開文提到
“涉及到打Release包跟Debug包的時候對於日誌輸出的控制,由gradle指令碼進行控制”
通過Gradle指令碼來進行控制日誌的輸出,這樣我們就不用在打包的時候手動去修改程式碼。
下面貼出部分Gradle指令碼:
 buildTypes {
        debug {
            //顯示日誌
            buildConfigField("boolean","LOG_DEBUG","true");
        }
        release {
            //不顯示日誌
            buildConfigField("boolean","LOG_DEBUG","false");
            minifyEnabled false
            proguardFiles getDefaultProguardFile('proguard-android.txt'), 'proguard-rules.pro'
        }
}- 1
- 2
- 3
- 4
- 5
- 6
- 7
- 8
- 9
- 10
- 11
- 12
在主工程的Gradle指令碼的buildTypes下,在debug跟release中增加buildConfigField(“boolean”,”LOG_DEBUG”,”true”);
這個語句的意思是在BuildConfig中增加欄位LOG_DEBUG,debug下LOG_DEBUG的值為true,release下則為false.然後再通過該值去初始化LogUtil,達到控制日誌輸出。

