如何使用VS建立SharePoint自定義Ribbon選單(圖文和程式碼)
如何使用VS建立SharePoint自定義Ribbon選單
SharePoint Ribbon選單
SharePoint 2010為我們帶來了很多新功能,這些新功能使得SharePoint更像是一個Office客戶端應用程式,這無疑是令人振奮的。提到Office就不能不
提到Office 2007帶來的Ribbon,Ribbon的出現徹底改變了以往Office客戶端的操作方式,初用時或許會覺得不習慣,但時間長了就會發現確實是非常好
第一步:建立Feature
我們首先要做的就是定義一個Feature檔案,目前來看在2010中Feature的寫法與2007中還是一樣的。
導航到C:\Program Files\Common Files\Microsoft Shared\Web Server Extensions\14\TEMPLATE\FEATURES,先建立一個檔案
夾,名字可以叫“CustomRibbonButton”,隨後在其中新增一個Feature.xml檔案。
程式碼

Code highlighting produced by Actipro CodeHighlighter (freeware)http://www.CodeHighlighter.com/--> 1 <?xml version="1.0" encoding="utf-8" ?>
<Feature Id="A8DA4BE9-8F82-4E94-9723-D51E8B5D683E"
  Title="CustomRibbonButton"
  Description="CustomRibbonButton"
  Version="1.0.0.0"
  Scope="Web"
  xmlns="http://schemas.microsoft.com/sharepoint/">
  <ElementManifests>
    <ElementManifest Location="CustomRibbonButton.xml" />
  </ElementManifests>
</Feature>
第二步:建立支援檔案
與SharePoint 2007一樣,我們還需要建立一個Feature的支援檔案,這個檔案中包含了按鈕的現實方式,點選後的事件等等資訊。
下面有一些地方需要注意,首先在第6行裡需要指定我們這個按鈕將關聯的列表或項內容型別的識別符號,現在來看與2007時的還一樣。
另外一點就是第9行的“Sequence” 屬性,這個屬性指定了我們要新增的按鈕所在組中的位置。
接著往下看,第14行的“Location” 屬性,這裡指定了這個按鈕應該被新增到哪個Tab下的哪個組中。
程式碼

Code highlighting produced by Actipro CodeHighlighter (freeware)http://www.CodeHighlighter.com/--> 1 <Elements xmlns="http://schemas.microsoft.com/sharepoint/">

  <CustomAction

    Id="CustomRibbonButton"
    RegistrationId="101"
    RegistrationType="List"
    Location="CommandUI.Ribbon"
    Sequence="5"
    Title="Move Documents">

    <CommandUIExtension>
      <CommandUIDefinitions>
        <CommandUIDefinition Location="Ribbon.Documents.Manage.Controls._children">
          <Button
              Id="Ribbon.Documents.New.TestButton"
              Alt="Move Documents"
              Sequence="5"
              Command="Test_Button"
              Image32by32="/_layouts/images/CustomRibbon/network32.GIF"
              Image16by16="/_layouts/images/CustomRibbon/network16.GIF"
              LabelText="Move Documents"
              TemplateAlias="o1" />
        </CommandUIDefinition>
      </CommandUIDefinitions>

      <CommandUIHandlers>
        <CommandUIHandler
          Command="Test_Button"
          CommandAction="javascript:alert('Welcome To SharePoint 2010 !');" />
      </CommandUIHandlers>

    </CommandUIExtension>
  </CustomAction>

</Elements>
其格式為:Ribbon.[Tab].[Group].Controls._children下面第19行,“Command” 屬性,這個屬性將“CommandUIDefinition” 與“CommandUIHandler” 關聯起來。
第23行“TemplateAlias” 屬性,定義了這個按鈕在頁面中是32X32還是16X16,“o1”是32,“o2”是16。
最後再來看下“CommandUIHandler” 部分,第29行的“Command” 屬性與第19行的“Command” 相對應,以將Button與其操作關聯起來。
最重要的是30行的“CommandAction” 標記,在這個標記中我們將定義按鈕被按下時將要執行的Javascript指令碼。SharePoint 2010為我
們提供了豐富的Javascript API,通過這些API我們可以做更多的事情。
第三步:部署在SharePoint 2010中我們可以通過PowerShell更方便的部署應用了,開啟SharePoint 2010管理控制檯,依次執行下面兩條命令
Install-SPFeature FeatureFolderName
Enable-SPFeature FeatureFolderName –Url http://server/site/subsite
圖文部分,下面用圖片說一下,以便不過腦子就能搞定。
SharePont 2010裡允許你自定Ribbon選單,下面開始介紹:
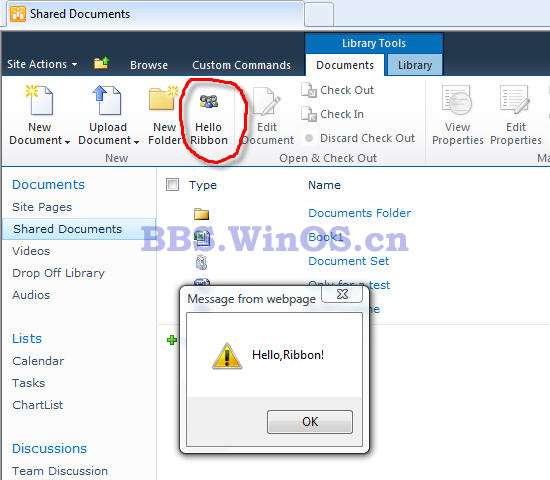
SharePoint 2010中的Ribbon可以進行定製開發,通過使用XML和JavaScript。其中,XML定義了Ribbon中的控制元件,JavaScript指令碼實現了Ribbon的功能,在SharePoint Foundation 2010中。Ribbon通過前臺指令碼來實現對應的功能,我們可以新增Ribbon、替換或刪除已有的Ribbon,我將使用Visual Studio 2010建立一個非常簡單的Ribbon,點選彈出“Hello Ribbon!”。
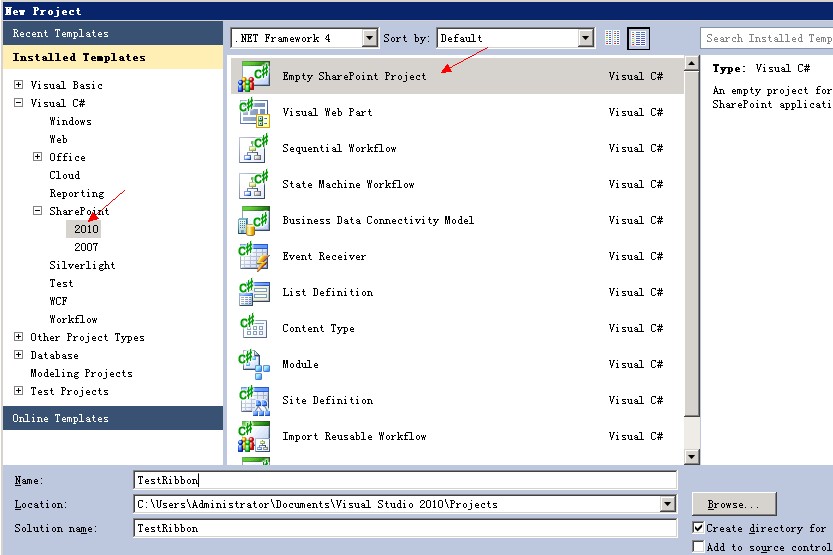
首先,在Visual Studio 2010中建立一個“空白SharePoint專案”,我把它命名成“TestRibbon”:
選擇部署為場解決方案
然後右擊專案名TestRibbon,選擇新增--新建項,新增一個Empty Element,這裡採用預設名字EmptyElement1
將新添的EmptyElement1中的Element.xml檔案更新為如下內容:
<?xml version="1.0" encoding="utf-8"?>
<Elements xmlns="http://schemas.microsoft.com/sharepoint/">
<CustomAction Id="Ribbon.CustomGroup" RegistrationId="101" RegistrationType="List" Title="New Ribbon Button"
Location="CommandUI.Ribbon">
<CommandUIExtension>
<CommandUIDefinitions>
<CommandUIDefinition
Location="Ribbon.Documents.New.Controls._children">
<Button Id="Ribbon.Documents.New.MyButton"
Command="MyButtonCommand"
Image32by32="/_layouts/images/PPEOPLE.GIF"
LabelText="Hello Ribbon"
TemplateAlias="o2" />
</CommandUIDefinition>
</CommandUIDefinitions>
<CommandUIHandlers>
<CommandUIHandler
Command="MyButtonCommand"
CommandAction="javascript:alert('Hello,Ribbon!');" />
</CommandUIHandlers>
</CommandUIExtension>
</CustomAction>
</Elements>
在上面的XML中,<CommandUIDefinitions>節點定義了Ribbon的位置及Ribbon中的控制元件,<CommandUIDefinitions>節點實現了Ribbon的功能,二者通過Command屬性進行關聯,功能非常簡單,彈出一”Hello,Ribbon!”對話方塊,在CommandUIDefinition中定義了Ribbon的位置,Ribbon.Documents.New即Documents標籤New組下,Button控制元件定義了它顯示的文字和圖片。
這樣,一個非常簡單的Ribbon就完成了,右擊專案名,選擇部署。注意:TemplateAlias="o2" />,並不是數字:零貳
找到對應的路徑,文件庫Ribbon的Document標籤New組下,如圖,已經有了我們建立的Hello Ribbon,點選,彈出“Hello ,Ribbon!”對話方塊。
細心的朋友可能會發現,這個過程怎麼這麼眼熟?沒錯,自定義一個Ribbon跟之前我們部署Feature是一樣,實際上,這就是一個Feature,在“站點集功能”中,能看到:
在對應的路徑下,也有我們的定義檔案:C:\Program Files\Common Files\Microsoft
Shared\Web Server Extensions\14\TEMPLATE\FEATURES\TestRibbon_Feature1。因此,我們完全可以通過像之前部署Feature一樣來新增Ribbon,這兒就不在贅述。
另外,在SharePoint 2010中已經定義了非常多的Ribbon,請參閱http://msdn.microsoft.com/en-us/library/ee537543(office.14).aspx,他們的定義在C:\Program
Files\Common Files\Microsoft Shared\Web Server Extensions\14\TEMPLATE\GLOBAL\XML\ CMDUI.XML檔案中。


