pytorch實現yolo-v3 (原始碼閱讀和復現) -- 005
阿新 • • 發佈:2019-01-26
前面已經搭建了YOLO V3的網路, 只需要在此基礎上提供輸入,並對預測結果過濾,就可以輸出了,完整工程程式碼已分享.
1. 影象預處理部分preprocess.py
給定影象路徑以及期望的尺寸, 進行整體縮放後, 居中放置在畫布上,並返回,
返回值值包括 : 處理後圖像, 原圖, 原圖尺寸
def letterbox_image(img, input_dim):
"""
調整影象尺寸
將影象按照比例進行縮放,此時 某個邊正好可以等於目標長度,另一邊小於等於目標長度
將縮放後的資料拷貝到畫布中心,返回完成縮放
"""
ori_w, ori_h = img.shape[1 2. 檢測指令碼
detect.py
from __future__ import division
import time
import torch
from torch.autograd import Variable
import cv2
from util import *
import argparse
import os
import os.path as osp
from darknet import Darknet
from preprocess import preprocess_image, inp_to_image
import random
import pickle as pkl

def arg_parse():
    """
    檢測模組的引數轉換
    """
    # 格式: 引數名, 目標引數(dest是字典的key),幫助資訊,型別, 預設值
    parser = argparse.ArgumentParser(description="Yolo v3 檢測模型")
    parser.add_argument("--images", dest="images", help="待檢測影象目錄", type=str, default="imgs")
    parser.add_argument("--dets", dest="dets", help="檢測結果儲存目錄", type=str, default="det")
    parser.add_argument("--bs", dest="bs", help="Batch 大小, 預設為 1", default=1)
    parser.add_argument("--confidence", dest="confidence", help="目標檢測結果置信度閾值", default=0.5)
    parser.add_argument("--nms_thresh", dest="nms_thresh", help="NMS非極大值抑制閾值", default=0.4)

    parser.add_argument("--cfg", dest="cfg", help="配置檔案", default="cfg/yolov3.cfg", type=str)
    parser.add_argument("--weights", dest="weights", help="模型權重", default="yolov3.weights", type=str)

    parser.add_argument("--resize", dest="resize", help="網路輸入解析度. 解析度越高,則準確率越高; 反之亦然.", \
                        default="416", type=str)
    parser.add_argument("--scales", dest="scales", help="縮放尺度用於檢測", default="1,2,3", type=str)

    # 返回轉換好的結果
    return parser.parse_args()

if __name__ == '__main__':
    args = arg_parse() # 型別: argparse.Namespace, 可以像easydict一樣使用
    print(args)

    scales = args.scales
    images = args.images
    batch_size = args.bs
    confidence = args.confidence
    nms_thresh = args.nms_thresh

    # GPU環境是否可用
    CUDA = torch.cuda.is_available()

    # coco 資料集
    num_class, classes = load_classes("data/coco.names")

    # 建立神經網路
    print("載入神經網路...")
    model = Darknet(args.cfg)
    model.load_weights(args.weights)
    print("模型載入成功.")

    # 網路輸入資料大小
    model.net_info["height"] = int(args.resize)
    input_dim = model.net_info["height"]
    assert input_dim > 0 and input_dim % 32 == 0

    # 如果GPU可用, 模型切換到cuda中執行
    if CUDA:
        model.cuda()
    # 評估模式
    model.eval()

    # 載入待檢測影象列表
    try:
        imlist = [os.path.join(images, img) for img in os.listdir(images) if os.path.splitext(img)[1] in [".png", ".jpg", ".jpeg"]]
    except NotADirectoryError:
        imlist = []
        imlist.append(os.path.join(images))
    except FileNotFoundError:
        print("%s 不是有效的目錄或者檔案" % (images,))
        exit()

    # 儲存結果目錄
    if not os.path.exists(args.dets):
        os.mkdir(args.dets)

    load_batch = time.time()
    # 載入全部待檢測影象
    # map: 轉換函式prep_image, 兩個陣列 imlist [input_dim for x in imlist] 為其提供引數
    batches = list(map(preprocess_image, imlist, [input_dim for x in imlist]))
    ptt_images = [x[0] for x in batches] # ptt: pytorch_tensor
    ori_images = [x[1] for x in batches]
    ori_images_dim_list = [x[2] for x in batches]
    # repeat(*size), 沿著指定維度複製資料
    # 注: size維度必須和資料本身維度要一致
    ori_images_dim_list = torch.FloatTensor(ori_images_dim_list).repeat(1, 2) # (11,4) 原始影象尺寸

    if CUDA:
        ori_images_dim_list = ori_images_dim_list.cuda()

    # 所有檢測結果
    # objs = []
    # 第i個影象批次
    i = 0
    #  批處理 ...
    write = False
    # batch >1 支援實現
    if batch_size>1:
        num_batches = int(len(imlist)/batch_size + 0.5)
        ptt_images = [torch.cat(
                        (ptt_images[ i * batch_size: min((i + 1) * batch_size, len(ptt_images)) ]) )
                      for i in range(num_batches)]

    # 暫未支援batch>1
    for batch in ptt_images:
        start = time.time()
        if CUDA:
            batch = batch.cuda()

        with torch.no_grad():
            predictions = model(Variable(batch), CUDA)
        # 結果過濾
        predictions = write_results(predictions, confidence, num_class, nms=True, nms_thresh=nms_thresh)

        if type(predictions) == int:
            i += 1
            continue
        end = time.time()

        print(end - start, predictions.shape) # 單位 秒

        predictions[:, 0] += i * batch_size # [0]表示影象索引

        if  not write:
            output = predictions
            write = True
        else:
            output = torch.cat((output, predictions))

        for im_num, image in enumerate(imlist[i*batch_size: min((i+1)*batch_size, len(imlist))]):
            im_ind =  i*batch_size + im_num # 影象編號
            objs = [ classes[int(x[-1])] for x in output if int(x[0]) == im_ind] # 輸出第im_ind影象結果
            print("{0:20s} predicted in {1:6.3f} seconds".format(osp.split(image)[-1], (end-start)/batch_size))
            print("{0:20s} {1:s}".format("Objects detected", " ".join(objs)))
            print("----------------------------------------------------------")
        i += 1


    # 對所有的輸入的檢測結果
    try:
        output
    except:
        print("沒有檢測到任何目標")
        exit()

    # 0: 影象索引 1-4: 座標(在縮放後圖像中的位置) 5:score 6: ??? 7(-1):類別
    # print(output)

    # 對output結果按照dim=0維度分組?
    ori_images_dim_list = torch.index_select(ori_images_dim_list, 0, output[:, 0].long()) # pytorch 切片torch.index_select(data, dim, indices)
    scaling_factor = torch.min(input_dim/ori_images_dim_list, 1)[0].view(-1, 1)

    # 座標換算,將居中的位置座標轉換為以(0,0)為起點的座標 x-x'soffset, y-y'soffset
    output[:, [1,3]] -= (input_dim - scaling_factor*ori_images_dim_list[:, 0].view(-1,1))/2 # x416 - (縮放後x<=416長度/2 )
    output[:, [2,4]] -= (input_dim - scaling_factor*ori_images_dim_list[:, 1].view(-1,1))/2

    output[:, 1:5] /= scaling_factor # 縮放至原圖大小尺寸

    # 繪圖
    colors = pkl.load(open("pallete", "rb"))
    def draw(x, batch, results):
        # batch 轉換後的影象, 沒用到這裡
        c1 = tuple(x[1:3].int()) # x1,y1
        c2 = tuple(x[3:5].int()) # x2,y2
        img = results[int(x[0])] # 影象索引
        cls = int(x[-1])
        label = "%s" % classes[cls]
        color = random.choice(colors) # 隨機選擇顏色
        # 繪圖(繪製一條結果)
        cv2.rectangle(img, c1, c2, color, 1)
        t_size = cv2.getTextSize(label, cv2.FONT_HERSHEY_PLAIN, 1, 1)[0]
        c2 = c1[0] + t_size[0] + 3, c1[1] + t_size[1] + 4
        cv2.rectangle(img, c1, c2, color, -1)
        cv2.putText(img, label, (c1[0], c1[1] + t_size[1] + 4), cv2.FONT_HERSHEY_PLAIN, 1, [225, 255, 255], 1)
        return img
    # 開始逐條繪製output中結果
    list(map(lambda x: draw(x, ptt_images, ori_images), output))
    # 儲存檔案路徑
    det_names = ["{}/det_{}".format(args.dets, osp.split(x)[-1]) for x in imlist]
    list(map(cv2.imwrite, det_names, ori_images))
主時鐘對程式碼已經做了很細緻的解釋, 下面只陳述下主要過程:
搭建網路,並初始化權重
預處理輸入影象,並依據batch size引數調整, 預處理函式的輸出是batch為1的tensor
分批次進行預測, 將預測結果進行nms過濾, 並剔除掉置信度不夠的區域, 列印最終的檢測結果到控制檯
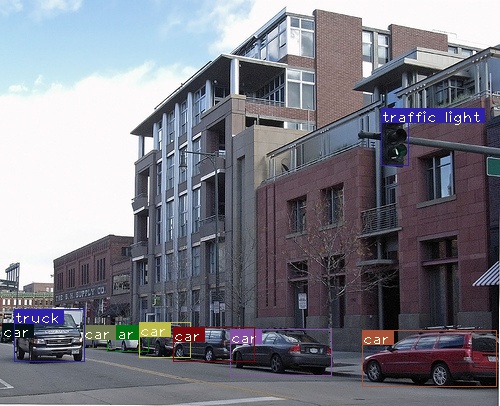
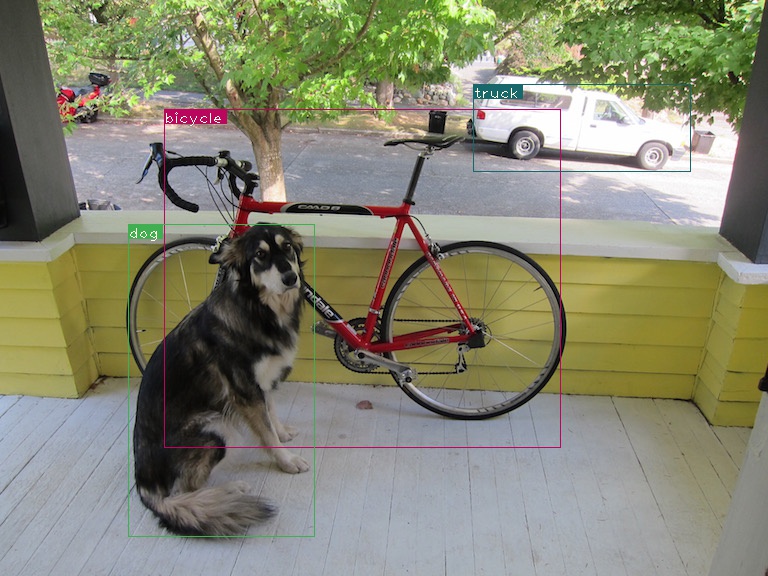
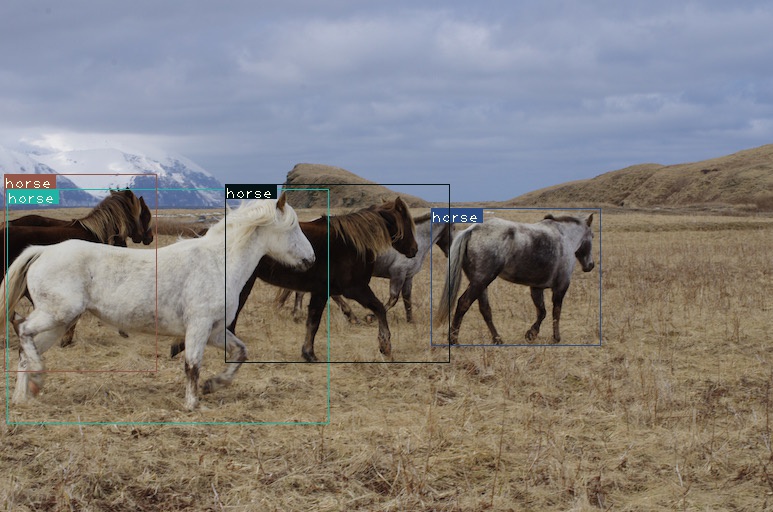
output中儲存所有的檢測結果, 利用其中資訊,展開視覺化,將結果儲存在了det目錄下.
檢測結果示例如圖: