
Android Camera 實時濾鏡(四)
阿新 • • 發佈:2019-01-26
基於Android平臺PS特效的自定義演算法的實現
在ARGB顏色空間,分別使用A(Transparency)、R(Red)、G(Green)、B(Blue)四個值來描述一個畫素點,那麼對於一個寬w高h的圖片來說,共有w*h個畫素點,可以用一個數組物件int [] pixels來表示相應的圖片,pixels = { p1,p2,p3…}。在把各個畫素點都用ARGB來表示,那麼這張圖片就可以用一個[w*h,4]的矩陣來描述:
pixels = {
         pa1,pr1,pg1,pb1,
         pa2,pr2,pg2,pb2,
         pa3,pr3,pg3,pb3,
         ……
}
android平臺在獲取畫素方面提供了 Bitmap.getPixels 方法,我需要做的是遍歷影象的畫素點,對每一個畫素點進行計算。然後將計算完的畫素點通過Color.red/green/blue 方法處理後,將畫素點填回Bitmap,從而得到濾鏡後的影象。這種方式比ColorMatrix 要靈活,可以滿足PS特效的實現效果。
1、簡單的反色濾鏡實現
取出圖片的畫素點,然後用255減去每個畫素點,那麼得到的就是一張有反色效果的圖片
演算法如下:
/**
* @author neil
*/
public class AntiColorFilter implements ImageFilterInterface {
private ImageData image = null; // 圖片資訊類
public AntiColorFilter(Bitmap bmp) {
image = new ImageData(bmp);
}
public ImageData imageProcess() {
int width = image.getWidth();
int 2、油畫濾鏡的實現
通過查資料瞭解到油畫濾鏡的演算法是”用當前點四周一定範圍內任意一點的顏色來替代當前點顏色,最常用的是隨機的採用相鄰點進行替代”

演算法如下:
public ImageData imageProcess() {
int width = image.getWidth();
int height = image.getHeight();
int R, G, B, pixel,xx = 0,yy = 0;
for (int y = 0; y < height; y++) {
for (int x = 0; x < width; x++) {
int pos = getRandomInt(1, 10000) % Model;
xx = (x + pos) < width ? (x + pos) : (x - pos) >= 0 ? (x - pos) : x;
yy = (y + pos) < height ? (y + pos) : (y - pos) >= 0 ? (y - pos) : y;
R = image.getRComponent(xx, yy); // 獲取RGB三原色
G = image.getGComponent(xx, yy);
B = image.getBComponent(xx, yy);
image.setPixelColor(x, y, R, G, B);
} // x
} // y
return image;
}
public static int getRandomInt(int a, int b) {
int min = Math.min(a, b);
int max = Math.max(a, b);
return min + (int)(Math.random() * (max - min + 1));
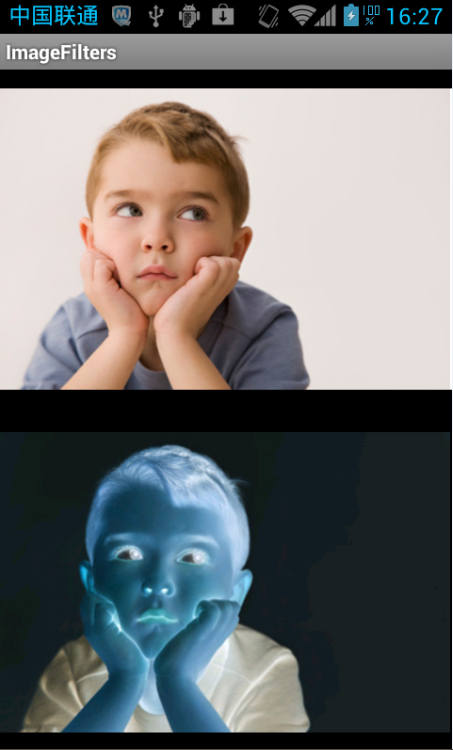
} 3、冰凍濾鏡的實現
冰凍濾鏡的演算法是將畫素點顏色加深,每個象素都用RGB三原色來表示,(0,0,0)就是純黑,而(255,255,255)就是純白,因此將沒個畫素點的RGB指變小,顏色就會加深

int width = image.getWidth();
        int height = image.getHeight();
        int R, G, B, pixel;
        for (int y = 0; y < height; y++) {
            for (int x = 0; x < width; x++) {
                R = image.getRComponent(x, y); // 獲取RGB三原色
                G = image.getGComponent(x, y);
                B = image.getBComponent(x, y);

                pixel = R - G - B;
                pixel = pixel * 3 / 2;
                if (pixel < 0)
                    pixel = -pixel;
                if (pixel > 255)
                    pixel = 255;
                R = pixel;


                pixel = G - B - R;
                pixel = pixel * 3 / 2;
                if (pixel < 0)
                    pixel = -pixel;
                if (pixel > 255)
                    pixel = 255;
                G = pixel;


                pixel = B - R - G;
                pixel = pixel * 3 / 2;
                if (pixel < 0)
                    pixel = -pixel;
                if (pixel > 255)
                    pixel = 255;
                B = pixel;

                image.setPixelColor(x, y, R, G, B);
            } // x
        } // y