菜鳥流程-Touching App(2)- 設定介面
額,一不小心浪了幾天,這篇部落格會說說我寫設定介面時的程式碼過程,個人認為是這四個介面裡面最簡單的一個。但是,由於我和美工是第一次配合弄這個,所以還是遇到了幾個坑。
下面進入正題了。
一、介面元素分析
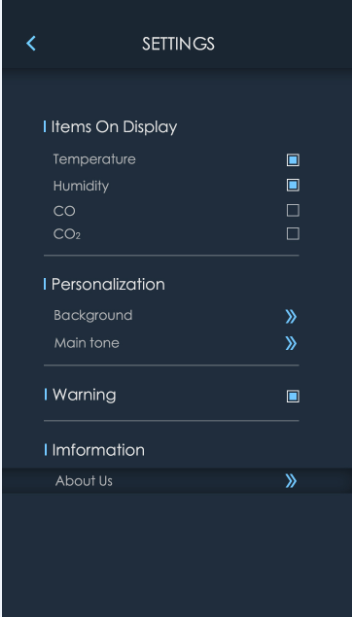
還是先看一下美工給我的圖。
第一、我要吐槽的是,這個介面他是過了很久才給我的!!和他妹子去祖國北邊的大草原浪去了=。=
第二、我更要吐槽的是,相比於之前的介面,這個介面明顯差了點什麼。是的,沒有給資料。
不過,還好我堅持的是百分比繪圖,所以就目測了一下各個元件的長寬比,然後成功在坑爹的美工手上活了下來。
好了,說正經的,分析一下元素。
其實是把一個大的模組重複了四次,所以我們只分析第一塊,Items On Display,這個好了。
其實很簡單,都用不著自定義view。
一個TextView—>Items On Display
一個空白
一個TextView靠左,一個CheckBox靠右—>Temprature
一個TextView靠左,一個CheckBox靠右—>Humidity
一個TextView靠左,一個CheckBox靠右—>Co
一個TextView靠左,一個CheckBox靠右—>CO2
一個空白
一個橫線
下面的部分只需要重複以上步驟就好了。
另外需要考慮的是各個部分所佔長寬的大小,顯然,這個工作是我目測得到的,不過幸好最後感覺效果還闊以。
我分析之後的圖片權重分佈是這樣的:
、、、本來想做一張圖片,上面佈滿線條和數字來提高一下逼格的,不過有點晚了,我的xml程式碼我也懶得看了,權重資料就沒有。而且繪圖軟體只有畫圖和sai,用得都不熟練,暫且偷一回懶吧。
二、實現佈局
在我寫這篇部落格的時候,我學到了自定義屬性,組合控制元件這些知識,然而已經用不上了,程式碼已經寫好了,我也懶得改了,也許哪天心血來潮會改改,畢竟看上去要高大上一點。而目前的程式碼呢,基於上面那個片段是這樣的:
<!-- 標題1 -->
<TextView
style="@style/zhuBiaooTi"
android:layout_width 額,基本上是把每一行都放在了一個layout裡面,這樣是因為:
1、只有LinearLayout才有weight屬性,所以最外層用的LinearLayout。
2、我覺得RelativeLayout方便佈局一點,比如alignParentRight,marginLeft這種,所以每一層都用RelativeLayout包裹了一下。
具體的佈置呢,不難,瞟瞟程式碼就好了。
其中的checkBox的狀態用了美工提供的兩個圖片,xml是這樣 :
<?xml version="1.0" encoding="utf-8"?>
<selector xmlns:android="http://schemas.android.com/apk/res/android" >
    <item android:state_checked="true" android:drawable="@drawable/check_ed"></item>
    <item android:state_selected="true" android:drawable="@drawable/check_ed"></item>
    <item android:state_pressed="true" android:drawable="@drawable/check_ed"></item>
    <item android:state_selected="false" android:drawable="@drawable/check"></item>

</selector>
圖片在原始碼裡面有,感興趣的大大可以下載了去玩。
上面講了設定的主介面,也就是中間那一塊可以按的部分,我們還需要佈置一下頂部。
頂部是這樣的,有一個返回按鈕,一個DETAILS標題,一個下方的黑色外發光橫線,這樣一分析就感覺簡單了很多,具體的實現我也不說了,直接看程式碼。
<!-- 標題欄 -->

    <RelativeLayout
        android:id="@+id/biaoti_layout"
        android:layout_width="fill_parent"
        android:layout_height="142px"
        android:background="@drawable/mybiaoti_background" >

        <!-- 返回按鈕 -->
        <FrameLayout
            android:id="@+id/backbutton_frame"
            android:layout_width="240px"
            android:layout_height="142px"
            >
             <ImageButton
            android:id="@+id/button_back"
            android:layout_width="15px"
            android:layout_height="25px"
            android:layout_gravity="center_vertical"
            android:scaleType="fitCenter"
            android:background="@drawable/back_buutton" />
             <ImageButton
                 android:id="@+id/button_back_frontone"
                 android:layout_gravity="center_vertical"
                 android:layout_width="100px"
                 android:layout_height="60px"
                 android:background="#00ffffff"
                 />
        </FrameLayout>

        <!-- 標題文字 -->

        <TextView
            android:id="@+id/biaoti_text"
            android:layout_width="fill_parent"
            android:layout_height="fill_parent"
            android:layout_alignParentLeft="true"
            android:gravity="center"
            android:text="DETAILS"
            android:textColor="#ffffffff" />
    </RelativeLayout>
如果大大們看的稍微認真一點,就會發現我的返回按鈕居然有兩個ImageButton,而且是放在了FrameLayout裡面,也就是一個覆蓋了另一個。。。
這是因為,有一個坑,叫做按鈕太小根本點不到。
美工忙於划船不靠漿,只好用這個方法了:
用一個透明的按鈕覆蓋在原來的按鈕上,當按鈕附近區域被按下時,透明按鈕的透明度降低,彷彿按鈕被按下一樣,就是這麼個道理~
最後,其實還有一點框架漏了,那就是左右兩邊的空白,這個只需要在設定的主介面的最外層的RelativeLayout那裡設定寬度為560px(因為目前假設是720*1280px),並且水平居中就可以了。當然,最後在佈置介面的時候,需要在java程式碼裡面動態更改這個寬度,跟上一節的原理一樣:
獲取當前螢幕寬度mScreenWidth後,設定寬度width=560*mScreenWidth/720;,這樣就可以匹配螢幕了~
哦,最後上一下完整的Activity的java程式碼,包括一些事件處理方法等等,不過都還沒有實現對應的邏輯,只是彈出了一些logcat方便除錯。
package com.example.guochuang;

import android.app.Activity;
import android.content.Intent;
import android.os.Bundle;
import android.util.DisplayMetrics;
import android.view.KeyEvent;
import android.view.View;
import android.view.View.OnClickListener;
import android.widget.CheckBox;
import android.widget.CompoundButton;
import android.widget.CompoundButton.OnCheckedChangeListener;
import android.widget.FrameLayout;
import android.widget.ImageButton;
import android.widget.LinearLayout;
import android.widget.RelativeLayout;
import android.widget.TextView;
import android.widget.Toast;

public class SettingActivity extends Activity {

    // 介面元件
    RelativeLayout mBiaoTiLayout;
    LinearLayout mSheZhiLayout;
    ImageButton mBackButton,mBackButtonFrontOne;
    TextView mBiaoTiText;
    CheckBox mCheckTemp, mCheckHumi, mCheckCo, mCheckCo2, mCheckWarning;
    ImageButton mButtonBackground, mButtonMaintone, mButtonAboutUs;
    FrameLayout mBackButtonFrame;
    TextView fubiaoti11,fubiaoti12,fubiaoti13,fubiaoti14,fubiaoti21,fubiaoti22,fubiaoti30,fubiaoti41;


    // 變數
    private int mNum;

    private int mScreenWidth;
    private int mScreenHeight;

    @Override
    protected void onCreate(Bundle savedInstanceState) {
        super.onCreate(savedInstanceState);
        setContentView(R.layout.setting_layout);

        // 儲存主介面的mNum數值
        Intent intent = getIntent();
        mNum = intent.getIntExtra("number", 0);

        DisplayMetrics dm = getResources().getDisplayMetrics();
        mScreenWidth = dm.widthPixels;
        mScreenHeight = dm.heightPixels;

        adaptScreen();

        initListener();

    }

    private void adaptScreen() {

        // 匹配標題欄layout
        mBiaoTiLayout = (RelativeLayout) findViewById(R.id.biaoti_layout);
        RelativeLayout.LayoutParams params = (RelativeLayout.LayoutParams) mBiaoTiLayout
                .getLayoutParams();
        params.height = 142 * mScreenHeight / 1280;
        mBiaoTiLayout.setLayoutParams(params);
        // 匹配標題欄返回按鈕
                //後面一層按鈕
                mBackButton = (ImageButton) findViewById(R.id.button_back);
                FrameLayout.LayoutParams params2 = (FrameLayout.LayoutParams) mBackButton
                        .getLayoutParams();
                params2.height = 25 * mScreenHeight / 1280;
                params2.width = 15 * mScreenWidth / 720;
                mBackButton.setX(120 * mScreenWidth / 720);
                mBackButton.setLayoutParams(params2);
                //按鈕底層layout
                mBackButtonFrame=(FrameLayout)findViewById(R.id.backbutton_frame);
                mBackButtonFrame.getLayoutParams().width=240*mScreenWidth/720;
                mBackButtonFrame.getLayoutParams().height=142*mScreenHeight/1280;
                //前面一層按鈕
                mBackButtonFrontOne=(ImageButton)findViewById(R.id.button_back_frontone);
                mBackButtonFrontOne.setX(77*mScreenWidth/720);
                mBackButtonFrontOne.getLayoutParams().height=60*mScreenHeight/1280;
                mBackButtonFrontOne.getLayoutParams().width=100*mScreenWidth/720;
                mBackButtonFrontOne.setBackgroundColor(0x00ffffff);
                mBackButtonFrontOne.setOnClickListener(new OnClickListener() {

                    @Override
                    public void onClick(View v) {
                        // TODO Auto-generated method stub
                        mBackButtonFrontOne.setBackgroundColor(0x11ffffff);
                        /*Timer timer=new Timer();
                        TimerTask myTask=new TimerTask() {

                            @Override
                            public void run() {
                                // TODO Auto-generated method stub
                                mBackButtonFrontOne.setBackgroundColor(0x00ffffff);
                            }
                        };
                        timer.schedule(task, 200);*/

                        Intent intent=new Intent();
                        intent.putExtra("number", mNum);
                        intent.setClass(SettingActivity.this, MainActivity.class);
                        SettingActivity.this.startActivity(intent);

                    }
                });

        /*mBackButton = (ImageButton) findViewById(R.id.button_back);
        RelativeLayout.LayoutParams backparams = (RelativeLayout.LayoutParams) mBackButton
                .getLayoutParams();
        backparams.height = 25 * mScreenHeight / 1280;
        backparams.width = 15 * mScreenWidth / 720;
        mBackButton.setX(120 * mScreenWidth / 720);
        mBackButton.setLayoutParams(backparams);*/

        // 匹配標題欄漢字
        mBiaoTiText = (TextView) findViewById(R.id.biaoti_text);
        mBiaoTiText.setTextSize(20 * mScreenWidth / 720);

        // 匹配設定介面層
        mSheZhiLayout = (LinearLayout) findViewById(R.id.shezhi_layout);
        RelativeLayout.LayoutParams params3 = (RelativeLayout.LayoutParams) mSheZhiLayout
                .getLayoutParams();
        params3.width = 560 * mScreenWidth / 720;
        // 匹配標題1,標題2按鈕
        mCheckTemp = (CheckBox) findViewById(R.id.check_temp);
        mCheckHumi = (CheckBox) findViewById(R.id.check_humi);
        mCheckCo = (CheckBox) findViewById(R.id.check_co);
        mCheckCo2 = (CheckBox) findViewById(R.id.check_co2);
        mCheckWarning = (CheckBox) findViewById(R.id.check_warning);
        adaptButton(mCheckTemp, mCheckHumi, mCheckCo, mCheckCo2, mCheckWarning);
        mButtonBackground = (ImageButton) findViewById(R.id.button_background);
        mButtonMaintone = (ImageButton) findViewById(R.id.button_mainTone);
        mButtonAboutUs = (ImageButton) findViewById(R.id.button_aboutUs);
        adaptButton(mButtonBackground, mButtonMaintone, mButtonAboutUs);

        //為各層文字找到控制元件,準備新增點選事件
        fubiaoti11=(TextView)findViewById(R.id.fubiaoti11);
        fubiaoti12=(TextView)findViewById(R.id.fubiaoti12);
        fubiaoti13=(TextView)findViewById(R.id.fubiaoti13);
        fubiaoti14=(TextView)findViewById(R.id.fubiaoti14);
        fubiaoti21=(TextView)findViewById(R.id.fubiaoti21);
        fubiaoti22=(TextView)findViewById(R.id.fubiaoti22);
        fubiaoti30=(TextView)findViewById(R.id.textWarning30);
        fubiaoti41=(TextView)findViewById(R.id.fubiaoti41);
        //匹配文字控制元件
        fubiaoti11.setTextSize(15*mScreenHeight/1280);
        fubiaoti12.setTextSize(15*mScreenHeight/1280);
        fubiaoti13.setTextSize(15*mScreenHeight/1280);
        fubiaoti14.setTextSize(15*mScreenHeight/1280);
        fubiaoti21.setTextSize(15*mScreenHeight/1280);
        fubiaoti22.setTextSize(15*mScreenHeight/1280);
        fubiaoti30.setTextSize(20*mScreenHeight/1280);
        fubiaoti41.setTextSize(15*mScreenHeight/1280);

    }

    private void adaptButton(CheckBox... boxs) {
        for (CheckBox box : boxs) {

            RelativeLayout.LayoutParams params = (RelativeLayout.LayoutParams)box
                    .getLayoutParams();
            params.height = Math.min(25 * mScreenHeight / 1280,25 * mScreenWidth / 720);
            params.width =  Math.min(25 * mScreenHeight / 1280,25 * mScreenWidth / 720);
            box.setLayoutParams(params);
        }
    }

    private void adaptButton(ImageButton... buttons) {
        for (ImageButton button : buttons) {
            RelativeLayout.LayoutParams params = (RelativeLayout.LayoutParams) button
                    .getLayoutParams();
            params.height = 24 * mScreenHeight / 1280;
            params.width = 20 * mScreenWidth / 720;
            button.setLayoutParams(params);
        }

    }

    private void initListener() {

        mBackButton.setOnClickListener(new OnClickListener() {

            @Override
            public void onClick(View v) {
                // TODO Auto-generated method stub
                Intent intent = new Intent();
                intent.putExtra("number", mNum);
                intent.setClass(SettingActivity.this, MainActivity.class);
                SettingActivity.this.startActivity(intent);
            }
        });
        mCheckTemp.setOnCheckedChangeListener(new OnCheckedChangeListener() {

            @Override
            public void onCheckedChanged(CompoundButton buttonView,
                    boolean isChecked) {
                // TODO Auto-generated method stub
                if (isChecked) {
                    Toast.makeText(SettingActivity.this, "啊,Temprature被選中了",
                            Toast.LENGTH_SHORT).show();
                } else {
                    Toast.makeText(SettingActivity.this, "啊,Temprature被取消了",
                            Toast.LENGTH_SHORT).show();
                }
            }
        });
        mCheckHumi.setOnCheckedChangeListener(new OnCheckedChangeListener() {

            @Override
            public void onCheckedChanged(CompoundButton buttonView,
                    boolean isChecked) {
                // TODO Auto-generated method stub
                if (isChecked) {
                    Toast.makeText(SettingActivity.this, "啊,Humidity被選中了",
                            Toast.LENGTH_SHORT).show();
                } else {
                    Toast.makeText(SettingActivity.this, "啊,Humidity被取消了",
                            Toast.LENGTH_SHORT).show();
                }
            }
        });
        mCheckCo.setOnCheckedChangeListener(new OnCheckedChangeListener() {

            @Override
            public void onCheckedChanged(CompoundButton buttonView,
                    boolean isChecked) {
                // TODO Auto-generated method stub
                if (isChecked) {
                    Toast.makeText(SettingActivity.this, "啊,Co被選中了",
                            Toast.LENGTH_SHORT).show();
                } else {
                    Toast.makeText(SettingActivity.this, "啊,Co被取消了",
                            Toast.LENGTH_SHORT).show();
                }
            }
        });
        mCheckCo2.setOnCheckedChangeListener(new OnCheckedChangeListener() {

            @Override
            public void onCheckedChanged(CompoundButton buttonView,
                    boolean isChecked) {
                // TODO Auto-generated method stub
                if (isChecked) {
                    Toast.makeText(SettingActivity.this, "啊,Co2被選中了",
                            Toast.LENGTH_SHORT).show();
                } else {
                    Toast.makeText(SettingActivity.this, "啊,Co2被取消了",
                            Toast.LENGTH_SHORT).show();
                }
            }
        });
        mCheckWarning.setOnCheckedChangeListener(new OnCheckedChangeListener() {

            @Override
            public void onCheckedChanged(CompoundButton buttonView,
                    boolean isChecked) {
                // TODO Auto-generated method stub
                if (isChecked) {
                    Toast.makeText(SettingActivity.this, "啊,warning被選中了",
                            Toast.LENGTH_SHORT).show();
                } else {
                    Toast.makeText(SettingActivity.this, "啊,warning被取消了",
                            Toast.LENGTH_SHORT).show();
                }
            }
        });
        mButtonBackground.setOnClickListener(new OnClickListener() {

            @Override
            public void onClick(View v) {
                // TODO Auto-generated method stub
                Toast.makeText(SettingActivity.this, "啊,Background被點了",
                        Toast.LENGTH_SHORT).show();
            }
        });
        mButtonMaintone.setOnClickListener(new OnClickListener() {

            @Override
            public void onClick(View v) {
                // TODO Auto-generated method stub
                Toast.makeText(SettingActivity.this, "啊,Main tone被點了",
                        Toast.LENGTH_SHORT).show();
            }
        });
        mButtonAboutUs.setOnClickListener(new OnClickListener() {

            @Override
            public void onClick(View v) {
                // TODO Auto-generated method stub
                Toast.makeText(SettingActivity.this, "啊,About Us被點了",
                        Toast.LENGTH_SHORT).show();
            }
        });

        //為textView新增點選事件,增加按鈕範圍
    OnClickListener textViewListener=new OnClickListener() {

            @Override
            public void onClick(View v) {
                // TODO Auto-generated method stub
                switch (v.getId()) {
                case R.id.fubiaoti11:
                    mCheckTemp.setChecked(!mCheckTemp.isChecked());
                    break;
                case R.id.fubiaoti12:
                    mCheckHumi.setChecked(!mCheckHumi.isChecked());
                    break;
                case R.id.fubiaoti13:
                    mCheckCo.setChecked(!mCheckCo.isChecked());
                    break;
                case R.id.fubiaoti14:
                    mCheckCo2.setChecked(!mCheckCo2.isChecked());
                    break;
                case R.id.fubiaoti21:
                    Toast.makeText(SettingActivity.this, "啊,21被按了,即將進入background介面", 3000).show();
                    break;
                case R.id.fubiaoti22:
                    Toast.makeText(SettingActivity.this, "啊,22被按了,即將進入main tone介面", 3000).show();
                    break;
                case R.id.textWarning30:
                    mCheckWarning.setChecked(!mCheckWarning.isChecked());
                    break;
                case R.id.fubiaoti41:
                    Toast.makeText(SettingActivity.this, "啊,41被按了,即將進入about us介面", 3000).show();
                    break;


                default:
                    break;
                }
            }
        };
        fubiaoti11.setOnClickListener(textViewListener);
        fubiaoti12.setOnClickListener(textViewListener);
        fubiaoti13.setOnClickListener(textViewListener);
        fubiaoti14.setOnClickListener(textViewListener);
        fubiaoti21.setOnClickListener(textViewListener);
        fubiaoti22.setOnClickListener(textViewListener);
        fubiaoti30.setOnClickListener(textViewListener);
        fubiaoti41.setOnClickListener(textViewListener);

    }

    //監聽返回按鈕
    @Override
    public boolean onKeyDown(int keyCode, KeyEvent event)
    {
        if (keyCode == KeyEvent.KEYCODE_BACK )
        {
            Intent intent=new Intent();
            intent.putExtra("number", mNum);
            intent.setClass(SettingActivity.this, MainActivity.class);
            SettingActivity.this.startActivity(intent);

        }

        return true;

    }


}
唉喲、、粘上來之後才發現,,看得頭疼[笑哭][笑哭][笑哭]
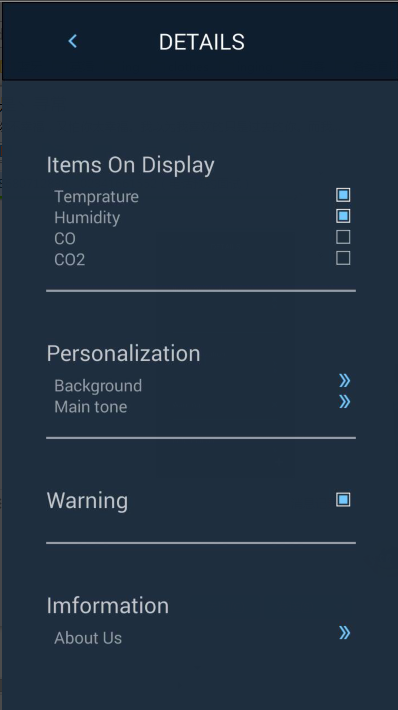
最後的介面是這樣的,不管是虛擬機器320*480px還是手機720*1280px都是一樣一樣的。
好了,這個介面的介紹就到此為止了,關於原始碼的下載呢,在這個系列的第一篇有,就不附了。


