Qt學習:三維繪圖之OpenGL和Qt的結合
OpenGL是繪製三維圖形的標準API。Qt應用程式可以使用QtOpenGL模組繪製三維圖形,該模組依賴於系統的OpenGL庫。Qt OpenGL模組提供QGLWidget類,可以通過對它子類化,並使用OpenGL命令開發出自己的視窗部件。對許多三維應用程式來說,這就足夠了。
這節假設大家都已經學過OpenGL,這樣我們就無後顧之憂了。
在Qt中繪製OpenGL通常需要做以下工作:1)、必須子類化QGLWidget;2)、實現幾個虛擬函式:void initiallizeGL()
void resizeGL(), void paintGL(), 這些都是在QGLWidget中實現的,還有一些和使用者互動的虛擬函式,諸如void mouseMoveEvent()之類的,想必大家都比較熟了,這些虛擬函式是在Widget中實現的。
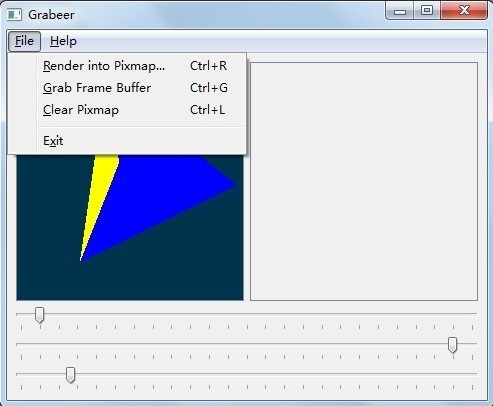
下面我們介紹一個例子。先給出該程式的效果:
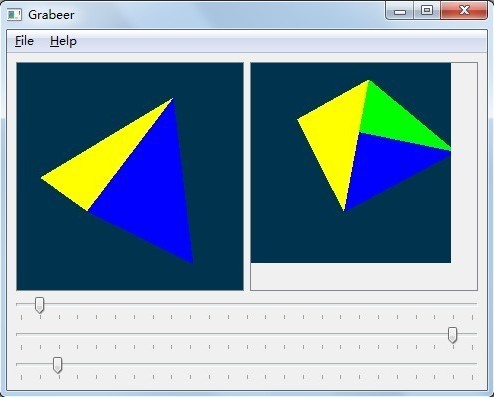
選單欄裡的第一項可以完成一個自定義大小的抓圖,即由使用者自己決定抓圖的大小,抓圖會顯示在右側的方框裡,注意這裡只能設定圖形的大小小雨當前圖形的尺寸, 如果大於當前圖形尺寸,則鉗位到當前圖形尺寸。效果看起來應該是這樣:
選單欄第二項也是一個抓圖功能,它返回一個當前圖形尺寸的圖形,並填充到右側。
第三項即清除右側圖形。
這個程式碼由以下部件構成:
一個QMainWindow,我們通過子類化這個類來完成自己想要的一些功能。
一個QWidget,我們把它作為中央視窗,在其上新增自己想要的一些子部件。
兩個QScrollBar,用來盛載一個QGLWidget和一個QLabel。
一個QGLWidget,我們通過子類化它並把它加進一個QScrollBar來實現三維繪圖,即上圖所示的左邊視窗。
一個QLabel,同樣,我們把這個QLabel加進一個QScrollBar來接收抓圖後的顯示效果。
三個QSlider,我們通過這三個滑動條控制所繪製的四面體沿x,y,z軸轉動,同樣滑鼠拖動這個四面體也可以改變滑動條的值。
以上是整個程式的框架。
以下是程式碼的實現部分。
MainWindow 類定義了我們整個程式的框架:
//mainwindow.h
#ifndef MAINWINDOW_H
#define MAINWINDOW_H

#include <QMainWindow>

class QAction;
class QLabel;
class QMenu;
class QSlider;
class QScrollArea;

class GLWidget;

class MainWindow : public QMainWindow
{
    Q_OBJECT

public:
    MainWindow(QWidget *parent = 0);
    ~MainWindow();

private slots:
    void renderIntoPixmap();
    void grabFrameBuffer();
    void clearPixmap();
    void about();

private:

    void createMenus();
    void createActions();

    QSlider *createSlider(const char *changedSignal, const char *setterSlot);
    void setPixmap(const QPixmap &pixmap);
    QSize getSize();

    QWidget *centralWidget;
    QScrollArea *glWidgetArea;
    QScrollArea *pixmapLabelArea;
    GLWidget *glWidget;
    QLabel *pixmapLabel;
    QSlider *xSlider;
    QSlider *ySlider;
    QSlider *zSlider;

    QMenu *fileMenu;
    QMenu *helpMenu;
    QAction *renderIntoPixmapAction;
    QAction *grabFrameBufferAction;
    QAction *clearPixmapAction;
    QAction *exitAction;
    QAction *aboutAction;
    QAction *aboutQtAction;

};

#endif // MAINWINDOW_H
以下是程式的實現部分:
//mainwindow.cpp
#include <QtOpenGL>
#include <QAction>
#include <QLabel>
#include <QMenu>
#include <QSlider>
#include <QScrollArea>
#include <QMenuBar>
#include <QApplication>


#include "mainwindow.h"
#include "glwidget.h"

MainWindow::MainWindow(QWidget *parent)
    : QMainWindow(parent)
{
    centralWidget = new QWidget;
    setCentralWidget(centralWidget);

    glWidget = new GLWidget;
    pixmapLabel = new QLabel;

    glWidgetArea = new QScrollArea;
    glWidgetArea->setWidget(glWidget);
    //glWidgetArea->viewport()->setBackgroundRole(QPalette::Dark);
    glWidgetArea->setWidgetResizable(true);
    glWidgetArea->setHorizontalScrollBarPolicy(Qt::ScrollBarAlwaysOff);
    glWidgetArea->setVerticalScrollBarPolicy(Qt::ScrollBarAlwaysOff);
    glWidgetArea->setSizePolicy(QSizePolicy::Ignored, QSizePolicy::Ignored);
    glWidgetArea->setMinimumSize(50, 50);

    pixmapLabelArea = new QScrollArea;
    pixmapLabelArea->setWidget(pixmapLabel);
    pixmapLabelArea->setSizePolicy(QSizePolicy::Ignored, QSizePolicy::Ignored);
    pixmapLabelArea->setMinimumSize(50, 50);

    //在構造一個QSlider時將QGLWidget的訊號和槽傳給這個函式的形參,這樣就可以在QMainWindow中
    //控制OpenGL的動作了,而讓GLWidget類只完成繪圖工作。
    xSlider = createSlider(SIGNAL(xRotationChanged(int)),
                           SLOT(setXRotation(int)));
    ySlider = createSlider(SIGNAL(yRotationChanged(int)),
                           SLOT(setYRotation(int)));
    zSlider = createSlider(SIGNAL(zRotationChanged(int)),
                           SLOT(setZRotation(int)));

    /*
    xSlider = new QSlider(Qt::Horizontal);
    ySlider = new QSlider(Qt::Horizontal);
    zSlider = new QSlider(Qt::Horizontal);
    */

    QGridLayout *centralLayout = new QGridLayout;
    centralLayout->addWidget(glWidgetArea, 0, 0);
    centralLayout->addWidget(pixmapLabelArea, 0, 1);
    centralLayout->addWidget(xSlider, 1, 0, 1, 2);
    centralLayout->addWidget(ySlider, 2, 0, 1, 2);
    centralLayout->addWidget(zSlider, 3, 0, 1, 2);
    centralWidget->setLayout(centralLayout);

    createActions();
    createMenus();

    xSlider->setValue(15 * 16);
    ySlider->setValue(345 * 16);
    zSlider->setValue(0 * 16);

    setWindowTitle(tr("Grabeer"));
    resize(480, 360);
}

void MainWindow::setPixmap(const QPixmap &pixmap)
{
    pixmapLabel->setPixmap(pixmap);
    QSize size = pixmap.size();
    if (size - QSize(1, 0) == pixmapLabelArea->maximumViewportSize())
        size -= QSize(1, 0);
    pixmapLabel->resize(size);
}

QSize MainWindow::getSize()
{
    bool ok;
    QString text = QInputDialog::getText(this, tr("Grabber"),
                                         tr("Enter Pixmap Size:"),
                                         QLineEdit::Normal,
                                         tr("%1 x %2").arg(glWidget->width())
                                                      .arg(glWidget->height()),
                                         &ok);
    if (!ok)
        return QSize();

    QRegExp regExp(tr("([0-9]+) *x *([0-9]+)"));
    if (regExp.exactMatch(text)) {
        int width = regExp.cap(1).toInt();
        int height = regExp.cap(2).toInt();
        if (width > 0 && width < 2048 && height > 0 && height < 2048)
             return QSize(width, height);
    }
    return glWidget->size();
}

void MainWindow::renderIntoPixmap()
{
    QSize size = getSize();
    if (size.isValid()) {
        QPixmap pixmap = glWidget->renderPixmap(size.width(), size.height());
        setPixmap(pixmap);
    }
}

void MainWindow::grabFrameBuffer()
{
    //QGLWidget有一個返回其幀緩衝區的QImage圖片的函式
    QImage image = glWidget->grabFrameBuffer();
    //QPixmap的fromImage函式把一個QImage轉換成QPixmap
    setPixmap(QPixmap::fromImage(image));
}

void MainWindow::clearPixmap()
{
    setPixmap(QPixmap()); //給它傳一個空的物件
}

void MainWindow::about()
{
    QMessageBox::about(this, tr("About Grabber"),
             tr("The <b>Grabber</b> example demonstrates two approaches for "
                "rendering OpenGL into a Qt pixmap."));
}

QSlider *MainWindow::createSlider(const char *changedSignal,
                                  const char *setterSlot)
{
    QSlider *slider = new QSlider(Qt::Horizontal);
    slider->setRange(0, 16 * 360);
    slider->setSingleStep(16);
    slider->setPageStep(15 * 16);
    slider->setTickInterval(15 * 16);
    slider->setTickPosition(QSlider::TicksRight);

    //這種經典的用法一定要小心,報錯:glWidget的槽函式在傳進來的時候已經被強制轉換成SLOT了,
    //所以setterSlot不用SLOT修飾;同樣,changedSignal也不能再拿SIGNAL修飾
    connect(slider, SIGNAL(valueChanged(int)), glWidget, setterSlot);
    connect(glWidget, changedSignal, slider, SLOT(setValue(int)));

    return slider;
}

void MainWindow::createActions()
{
    renderIntoPixmapAction = new QAction(tr("&Render into Pixmap..."), this);
    renderIntoPixmapAction->setShortcut(tr("Ctrl+R"));
    renderIntoPixmapAction->setToolTip(tr("yes, triggerd it"));
    connect(renderIntoPixmapAction, SIGNAL(triggered()),
            this, SLOT(renderIntoPixmap()));

    grabFrameBufferAction = new QAction(tr("&Grab Frame Buffer"), this);
    grabFrameBufferAction->setShortcut(tr("Ctrl+G"));
    connect(grabFrameBufferAction, SIGNAL(triggered()),
            this, SLOT(grabFrameBuffer()));

    clearPixmapAction = new QAction(tr("&Clear Pixmap"), this);
    clearPixmapAction->setShortcut(tr("Ctrl+L"));
    connect(clearPixmapAction, SIGNAL(triggered()), this, SLOT(clearPixmap()));

    exitAction = new QAction(tr("E&xit"), this);
    exitAction->setShortcuts(QKeySequence::Quit);
    connect(exitAction, SIGNAL(triggered()), this, SLOT(close()));

    aboutAction = new QAction(tr("&About"), this);
    connect(aboutAction, SIGNAL(triggered()), this, SLOT(about()));

    aboutQtAction = new QAction(tr("About &Qt"), this);
    connect(aboutQtAction, SIGNAL(triggered()), qApp, SLOT(aboutQt()));
}

void MainWindow::createMenus()
{
    fileMenu = menuBar()->addMenu(tr("&File"));
    fileMenu->addAction(renderIntoPixmapAction);
    fileMenu->addAction(grabFrameBufferAction);
    fileMenu->addAction(clearPixmapAction);
    fileMenu->addSeparator();
    fileMenu->addAction(exitAction);

    helpMenu = menuBar()->addMenu(tr("&Help"));
    helpMenu->addAction(aboutAction);
    helpMenu->addAction(aboutQtAction);
}

MainWindow::~MainWindow()
{
}
GLWidget類是整個繪圖的部分,在這部分雖然用了一點Qt的東西,但我們不是非要這樣使用,我們可以用整個純淨的OpengGL庫來完成我們的繪製。
//glwidget.h
#ifndef GLWIDGET_H
#define GLWIDGET_H

#include <QGLWidget>

class GLWidget : public QGLWidget
{
    Q_OBJECT

public:
    explicit GLWidget(QWidget *parent = 0);

    int xRotation() const { return xRot; }
    int yRotation() const { return yRot; }
    int zRotation() const { return zRot; }

signals:
    void xRotationChanged(int angle);
    void yRotationChanged(int angle);
    void zRotationChanged(int angle);

public slots:
    void setXRotation(int angle);
    void setYRotation(int angle);
    void setZRotation(int angle);

protected:
    void initializeGL();
    void paintGL();
    void resizeGL(int w, int h);
    void mousePressEvent(QMouseEvent *event);
    void mouseMoveEvent(QMouseEvent *event);

private slots:
    void alwaysRotate();
    void drawTriangle();

private:
    void normalizeAngle(int *angle);

    int xRot;
    int yRot;
    int zRot;

    QColor faceColors[4];
    QPoint lastPos;
};

#endif // GLWIDGET_H
以下是程式碼實現部分:
//glwidget.cpp
#include <QtGui>
#include <QtOpenGL>

#include <math.h>

#include "glwidget.h"

GLWidget::GLWidget(QWidget *parent) :
    QGLWidget(parent)
{
    xRot = 0;
    yRot = 0;
    zRot = 0;

    faceColors[0] = Qt::red;
    faceColors[1] = Qt::green;
    faceColors[2] = Qt::blue;
    faceColors[3] = Qt::yellow;

    QTimer *timer = new QTimer(this);
    connect(timer, SIGNAL(timeout()), this, SLOT(alwaysRotate()));
    timer->start(70);
}

void GLWidget::initializeGL()
{
    glClearColor(0.0, 0.2, 0.3, 1.0);
    glShadeModel(GL_SMOOTH);
    glEnable(GL_DEPTH);
}

void GLWidget::paintGL()
{
    glClear(GL_COLOR_BUFFER_BIT | GL_DEPTH_BUFFER_BIT);

    glPushMatrix();
    drawTriangle();
    glPopMatrix();
}

void GLWidget::resizeGL(int w, int h)
{
    int side = qMin(w, h);
    glViewport((width() - side) / 2, (height() - side) / 2, side, side);

    glMatrixMode(GL_PROJECTION);
    glLoadIdentity();
    glFrustum(-1.2, 1.2, -1.2, 1.2, 5.0, 60.0);
    glMatrixMode(GL_MODELVIEW);
    glLoadIdentity();
    glTranslatef(0.0, 0.0, -40.0);
}

void GLWidget::mousePressEvent(QMouseEvent *event)
{
    lastPos = event->pos();
}

void GLWidget::mouseMoveEvent(QMouseEvent *event)
{
    int dx = event->x() - lastPos.x();
    int dy = event->y() - lastPos.y();

    if (event->buttons() & Qt::LeftButton) {
        (xRot + 4 * dx);
        setYRotation(yRot + 4 * dy);
    } else if (event->buttons() & Qt::RightButton) {
        (xRot + 4 * dy);
        setZRotation(zRot + 4 * dx);
    }

    lastPos = event->pos();
}

void GLWidget::drawTriangle()
{
    static const GLfloat P1[3] = { 0.0, -1.0, +2.0 };
    static const GLfloat P2[3] = { +1.73205081, -1.0, -1.0 };
    static const GLfloat P3[3] = { -1.73205081, -1.0, -1.0 };
    static const GLfloat P4[3] = { 0.0, +2.0, 0.0 };

    static const GLfloat * const coords[4][3] = {
        { P1, P2, P3 }, { P1, P3, P4 }, { P1, P4, P2 }, { P2, P4, P3 }
    };

    glMatrixMode(GL_MODELVIEW);
    glLoadIdentity();
    glTranslatef(0.0, 0.0, -10.0);
    glRotatef(xRot, 1.0, 0.0, 0.0);
    glRotatef(yRot, 0.0, 1.0, 0.0);
    glRotatef(zRot, 0.0, 0.0, 1.0);

    for (int i = 0; i != 4; ++i) {
        //glLoadName(i);
        glBegin(GL_TRIANGLES);
        qglColor(faceColors[i]);
        for (int j = 0; j < 3; ++j) {
            glVertex3f(coords[i][j][0], coords[i][j][1],
                       coords[i][j][2]);
        }
        glEnd();
    }
}

void GLWidget::normalizeAngle(int *angle)
{
    while (*angle < 0)
        angle += 360 * 16;
    while (*angle > 360 *16)
        angle -= 360 *16;
}

void GLWidget::setXRotation(int angle)
{
    normalizeAngle(&angle);
    if ( angle != xRot ) {
        xRot = angle;
        emit xRotationChanged(angle);
        updateGL();
    }
}

void GLWidget::setYRotation(int angle)
{
    normalizeAngle(&angle);
    if ( angle != yRot ) {
        yRot = angle;
        emit yRotationChanged(angle);
        updateGL();
    }
}

void GLWidget::setZRotation(int angle)
{
    normalizeAngle(&angle);
    if ( angle != zRot ) {
        zRot = angle;
        emit zRotationChanged(angle);
        updateGL();
    }
}

void GLWidget::alwaysRotate()
{
    zRot += 2;
    emit zRotationChanged(zRot);
    updateGL();
}
至此,我們就完成了整個應用程式的編寫,繼續努力。


