iOS開發之自定義載入等待框(MBProgressHUD)
阿新 • • 發佈:2019-01-26
原文地址:http://blog.csdn.net/ryantang03/article/details/7877120
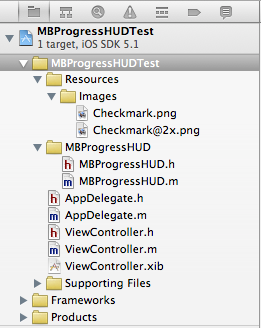
MBProgressHUD是一個開源專案,實現了很多種樣式的提示框,使用上簡單、方便,並且可以對顯示的內容進行自定義,功能很強大,很多專案中都有使用到。到GitHub上可以下載到專案原始碼https://github.com/jdg/MBProgressHUD,下載下來後直接把MBProgressHUD.h和MBProgressHUD.m拖入工程中就行,別忘了選擇拷貝到工程。完了在需要使用的地方匯入標頭檔案就可以開始使用了。首先看下工程截圖:
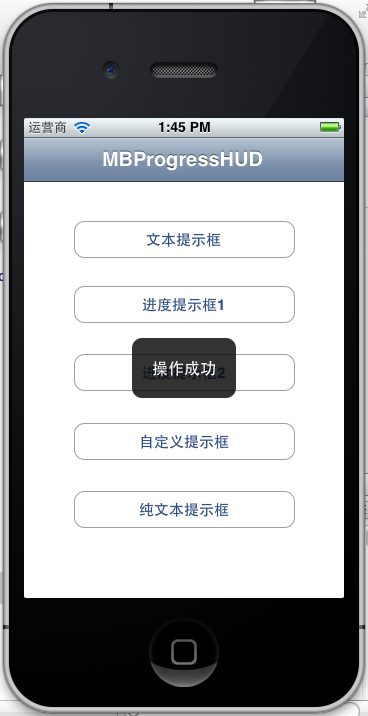
接下來是整個Demo的完整介面,這裡我只選擇出了幾個常用的對話方塊,其他樣式的在原始碼提供的Demo裡可以找到,要用的話直接參考就可以。

接下來直接上程式碼了,標頭檔案部分:
#import <UIKit/UIKit.h>
#import "MBProgressHUD.h"

@interface ViewController : UIViewController
{
    //HUD(Head-Up Display,意思是擡頭顯示的意思)
    MBProgressHUD *HUD;
}

- (IBAction)showTextDialog:(id)sender;
- (IBAction)showProgressDialog:(id)sender;
- (IBAction)showProgressDialog2:(id)sender;
- (IBAction)showCustomDialog:(id)sender;
- (IBAction)showAllTextDialog:(id)sender;

@end
實現檔案(按鈕實現部分):
- (IBAction)showTextDialog:(id)sender {
    //初始化進度框,置於當前的View當中
    HUD = [[MBProgressHUD alloc] initWithView:self.view];
    [self.view addSubview:HUD];

    //如果設定此屬性則當前的view置於後臺
    HUD.dimBackground = YES;

    //設定對話方塊文字
    HUD.labelText = @"請稍等";

    //顯示對話方塊
    [HUD showAnimated:YES whileExecutingBlock:^{
        //對話方塊顯示時需要執行的操作
        sleep(3);
    } completionBlock:^{
        //操作執行完後取消對話方塊
        [HUD removeFromSuperview];
        [HUD release];
        HUD = nil;
    }];
}

- (IBAction)showProgressDialog:(id)sender {
    HUD = [[MBProgressHUD alloc] initWithView:self.view];
    [self.view addSubview:HUD];
    HUD.labelText = @"正在載入";

    //設定模式為進度框形的
    HUD.mode = MBProgressHUDModeDeterminate;
    [HUD showAnimated:YES whileExecutingBlock:^{
        float progress = 0.0f;
        while (progress < 1.0f) {
            progress += 0.01f;
            HUD.progress = progress;
            usleep(50000);
        }
    } completionBlock:^{
        [HUD removeFromSuperview];
        [HUD release];
        HUD = nil;
    }];
}

- (IBAction)showProgressDialog2:(id)sender {
    HUD = [[MBProgressHUD alloc] initWithView:self.view];
    [self.view addSubview:HUD];
    HUD.labelText = @"正在載入";
    HUD.mode = MBProgressHUDModeAnnularDeterminate;

    [HUD showAnimated:YES whileExecutingBlock:^{
        float progress = 0.0f;
        while (progress < 1.0f) {
            progress += 0.01f;
            HUD.progress = progress;
            usleep(50000);
        }
    } completionBlock:^{
        [HUD removeFromSuperview];
        [HUD release];
        HUD = nil;
    }];
}

- (IBAction)showCustomDialog:(id)sender {
    HUD = [[MBProgressHUD alloc] initWithView:self.view];
    [self.view addSubview:HUD];
    HUD.labelText = @"操作成功";
    HUD.mode = MBProgressHUDModeCustomView;
    HUD.customView = [[[UIImageView alloc] initWithImage:[UIImage imageNamed:@"Checkmark"]] autorelease];
    [HUD showAnimated:YES whileExecutingBlock:^{
        sleep(2);
    } completionBlock:^{
        [HUD removeFromSuperview];
        [HUD release];
        HUD = nil;
    }];

}

- (IBAction)showAllTextDialog:(id)sender {
    HUD = [[MBProgressHUD alloc] initWithView:self.view];
    [self.view addSubview:HUD];
    HUD.labelText = @"操作成功";
    HUD.mode = MBProgressHUDModeText;

    //指定距離中心點的X軸和Y軸的偏移量,如果不指定則在螢幕中間顯示
//    HUD.yOffset = 150.0f;
//    HUD.xOffset = 100.0f;

    [HUD showAnimated:YES whileExecutingBlock:^{
        sleep(2);
    } completionBlock:^{
        [HUD removeFromSuperview];
        [HUD release];
        HUD = nil;
    }];
}
依次實現的效果如下:
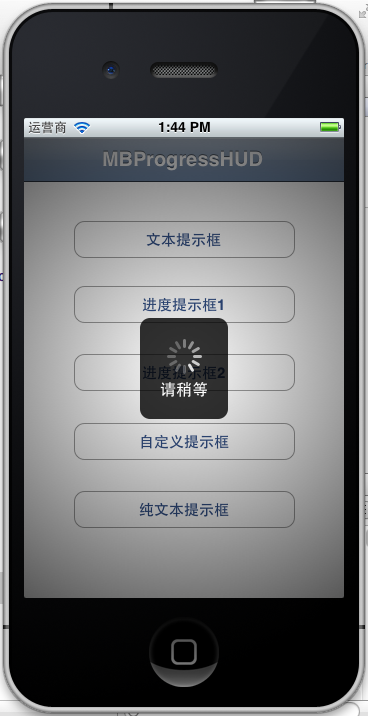
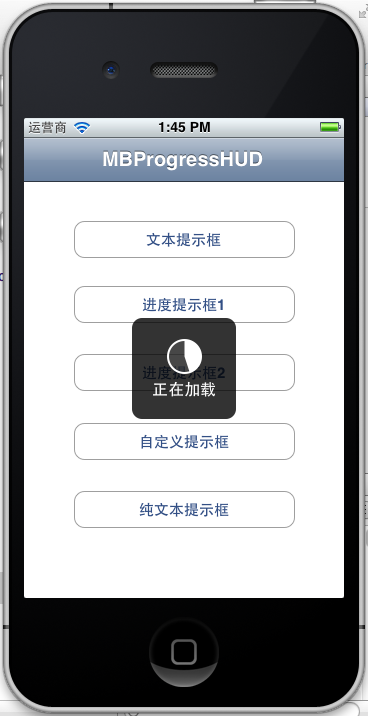

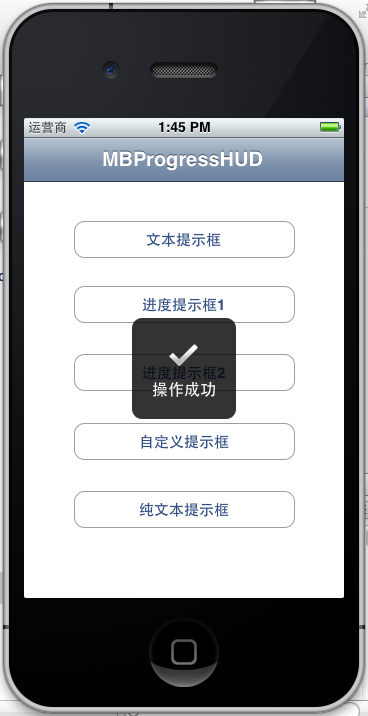
下面這個效果就類似Android中的Toast:
以上就簡單介紹了MBProgressHUD的使用,這裡都是採用block的形式來操作的,這樣寫起程式碼來更直觀也更高效。
