
springMVC +mybatis+mysql多套資料來源配置
導讀-
在專案中可能有時候我們需要配置多套資料來源,網上巴拉巴拉半天,都講得太潦草了,對於第一次搞的人來說確實有點頭疼,與其說在網上瞎找,還不如認真的自己動手操練一波,下面我就來介紹一下mybatis實現多套資料來源的方式。
剛開始我也是和大家一樣,利用mybatis的mybatis-generator-core-1.3.2從表生成xml檔案,這裡寫個小插曲,照顧一下新手,(老司機可以繞道,可以跳過閱讀),可以按照下面的方式進行
- 1:配置一下配置檔案
一般主要是配置一下資料庫連線,和需要生成的表,以及匯出的位置,詳細內容下下面配置
<?xml version="1.0" encoding="UTF-8"?> - 執行編譯命令
通過完成配置檔案的編寫後,在mybatis-generator-core-1.3.2.jar同級目錄,執行編譯命令,就可以輕鬆完成又表生成實體類和xml的mapper檔案啦。命令如下
java -jar mybatis-generator-core-1.3.2.jar -configfile generatorConfig.xml -overwrite注意:若是原來有對應的xml檔案,新生成的檔案會追加到原來的mapper檔案後面,尼瑪,我就被坑了一次,後來檢視居然有相同的方法在xml檔案裡面,專案啟動報錯。
相關包和檔案請點選這裡
言歸正傳,
首先,我們在專案中建立一個jdbc.properties檔案,可以將全部的資料庫地址寫入到此配置檔案中
jdbc.driver=com.mysql.jdbc.Driver
#伺服器資料庫
#jdbc.url=jdbc:mysql://67.209.190.39:3306/twjitm?useUnicode=true&characterEncoding=utf-8
#jdbc.username=root
#jdbc.password=123456
#本地資料庫
#jdbc.url=jdbc:mysql://127.0.0.1:3306/twjitm?useUnicode=true&characterEncoding=utf-8
#本地服後臺管理系統資料庫地址
jdbc.url-admin=jdbc:mysql://127.0.0.1:3306/admin?useUnicode=true&characterEncoding=utf-8
jdbc.username-admin=root
jdbc.password-admin=123456
#商城網站地址
jdbc.url-shop=jdbc:mysql://127.0.0.1:3306/shop?useUnicode=true&characterEncoding=utf-8
jdbc.username-shop=root
jdbc.password-shop=123456

#正式服伺服器地址

#最大連線數
c3p0.maxPoolSize=30000
#最小連線數
c3p0.minPoolSize=10
#關閉連線後不自動commit
c3p0.autoCommitOnClose=false
#獲取連線超時時間
c3p0.checkoutTimeout=10000
#當獲取連線失敗重試次數
c3p0.acquireRetryAttempts=2
在進行配置
例如本例子中採用配置兩套資料庫來做測試,一個admin,一個shop兩個資料來源,在企業級開發中可能我們會對資料庫採用很多分庫分表策略,
其實原理都一樣,
applicationContext.xml 中首先將properties檔案載入進來,採用 context:property-placeholder 標籤
可以同時載入多個這樣的配置檔案;下面就是我的專案中使用的,如有redis的配置檔案,
applicationContext.xml
<?xml version="1.0" encoding="UTF-8"?>
<beans xmlns="http://www.springframework.org/schema/beans"
       xmlns:xsi="http://www.w3.org/2001/XMLSchema-instance"
       xmlns:mvc="http://www.springframework.org/schema/mvc"
       xmlns:context="http://www.springframework.org/schema/context"
       xsi:schemaLocation="http://www.springframework.org/schema/beans
       http://www.springframework.org/schema/beans/spring-beans.xsd
        http://www.springframework.org/schema/mvc
        http://www.springframework.org/schema/mvc/spring-mvc.xsd
       http://www.springframework.org/schema/context
       http://www.springframework.org/schema/context/spring-context.xsd">
    <mvc:annotation-driven/>
    <!-- 切入點 -->
    <context:property-placeholder
            location="classpath:jdbc/jdbc.properties,classpath:redis/redis.properties"/>
    <!--
        <context:property-placeholder location="classpath:redis/redis.properties" ignore-unresolvable="true"/>
    -->

    <!--<bean class="com.twjitm.common.listener.StartupServerListener"></bean>-->
</beans>
這樣,我們就能夠在xml檔案中使用properties中定義的資料了,然而,我覺得上面介紹的內容可能大家都覺得太普遍了,其實都是為了使得mybatis配置多套資料來源做準備工作,同時,我們在maven專案中整合這一個功能,在spring配置檔案applicationContext-mybatis.xml檔案中
建立多套資料來源地址,詳細內容如下,
<?xml version="1.0" encoding="UTF-8"?>
<beans xmlns="http://www.springframework.org/schema/beans"
       xmlns:xsi="http://www.w3.org/2001/XMLSchema-instance"
       xmlns:context="http://www.springframework.org/schema/context"
       xmlns:tx="http://www.springframework.org/schema/tx"
       xmlns:mvc="http://www.springframework.org/schema/mvc"
       xsi:schemaLocation="http://www.springframework.org/schema/beans
       http://www.springframework.org/schema/beans/spring-beans.xsd
       http://www.springframework.org/schema/context
       http://www.springframework.org/schema/context/spring-context.xsd
       http://www.springframework.org/schema/tx
       http://www.springframework.org/schema/tx/spring-tx.xsd
        http://www.springframework.org/schema/mvc
        http://www.springframework.org/schema/mvc/spring-mvc.xsd">
      <!-- 掃描service層 -->
    <mvc:annotation-driven/>
    <context:component-scan base-package="com.test.*.server" use-default-filters="false"/>

    <!-- 資料庫連線池 -->
    <bean id="admin" class="com.mchange.v2.c3p0.ComboPooledDataSource">
        <property name="driverClass" value="${jdbc.driver}"/>
        <property name="jdbcUrl" value="${jdbc.url-admin}"/>
        <property name="user" value="${jdbc.username-admin}"/>
        <property name="password" value="${jdbc.password-admin}"/>
        <property name="maxPoolSize" value="${c3p0.maxPoolSize}"/>
        <property name="minPoolSize" value="${c3p0.minPoolSize}"/>
        <property name="autoCommitOnClose" value="${c3p0.autoCommitOnClose}"/>
        <property name="checkoutTimeout" value="${c3p0.checkoutTimeout}"/>
        <property name="acquireRetryAttempts" value="${c3p0.acquireRetryAttempts}"/>
    </bean>
    <!--第二套資料來源-->
    <bean id="shop" class="com.mchange.v2.c3p0.ComboPooledDataSource">
        <property name="driverClass" value="${jdbc.driver}"/>
        <property name="jdbcUrl" value="${jdbc.url-shop}"/>
        <property name="user" value="${jdbc.username-shop}"/>
        <property name="password" value="${jdbc.password-shop}"/>
        <property name="maxPoolSize" value="${c3p0.maxPoolSize}"/>
        <property name="minPoolSize" value="${c3p0.minPoolSize}"/>
        <property name="autoCommitOnClose" value="${c3p0.autoCommitOnClose}"/>
        <property name="checkoutTimeout" value="${c3p0.checkoutTimeout}"/>
        <property name="acquireRetryAttempts" value="${c3p0.acquireRetryAttempts}"/>
    </bean>
    <!--動態資料來源的配置-->
    <bean id="dynamicDataSource" class="com.test.common.mybatis.DynamicDataSource">
        <property name="targetDataSources">
            <map key-type="java.lang.String">
                <entry value-ref="admin" key="admin"/>
                <entry value-ref="shop" key="shop"/>
            </map>
        </property>
        <property name="defaultTargetDataSource" ref="admin">
        </property>
    </bean>


    <!-- 配置SqlSessionFactory物件 -->
    <bean id="sqlSessionFactory" class="org.mybatis.spring.SqlSessionFactoryBean">
        <!-- 注入資料庫連線池 -->
        <property name="dataSource" ref="dynamicDataSource"/>
        <!-- 掃描model包 使用別名 -->
        <property name="typeAliasesPackage" value="com.bufan.admin.*.entity"/>
        <!-- 掃描sql配置檔案:mapper需要的xml檔案 -->
        <!-- <property name="mapperLocations" value="classpath:mapper/*.xml"/>-->
     <property name="mapperLocations" value="classpath:mapper/*/*.xml"/>
        <property name="configurationProperties">
            <props>
                <prop key="mapUnderscoreToCamelCase">true</prop>
            </props>
        </property>
        <!-- <property name="plugins" >
             <array>
                 <bean class="com.test.common.mybatis.mapperhelper.MapperInterceptor"/>
             </array>
         </property>-->
    </bean>

       <!--這個地方主要是用來用Mapper來替換xml檔案形式的,與本例子無關-->
   <!--<bean class="tk.mybatis.spring.mapper.MapperScannerConfigurer">
        <property name="basePackage" value="com.bufan.admin.*.dao"/>
        <property name="properties">
            <value>
                mappers=tk.mybatis.mapper.common.Mapper
            </value>
        </property>
        <property name="sqlSessionFactoryBeanName" value="sqlSessionFactory"/>
    </bean>-->


    <!-- 配置掃描Dao介面包,動態實現Dao介面,注入到spring容器中 -->
   <bean class="org.mybatis.spring.mapper.MapperScannerConfigurer">
        <property name="sqlSessionFactoryBeanName" value="sqlSessionFactory"/>
       <property name="basePackage" value="com.test.admin.*.dao"/>
    </bean>

    <!-- 配置事務管理器 -->
    <bean id="transactionManager" class="org.springframework.jdbc.datasource.DataSourceTransactionManager">
        <!-- 注入資料庫連線池 -->
        <property name="dataSource" ref="dynamicDataSource"/>
    </bean>

    <!-- 配置基於註解的宣告式事務 -->
    <tx:annotation-driven transaction-manager="transactionManager"/>

</beans>
正如大家所看到的,添加了自定義一個類,一個是DynamicDataSource,其實DynamicDataSource,是繼承了
spring的AbstractRoutingDataSource,充當了DataSource的路由中介, 能有在執行時, 根據某種key值來動態切換到真正的DataSource上。
在spring的官方文件上是這麼介紹的
Abstract {@link javax.sql.DataSource} implementation that routes {@link #getConnection()}
calls to one of various target DataSources based on a lookup key. The latter is usually
(but not necessarily) determined through some thread-bound transaction context.
大概意思就是getConnection()根據查詢lookup key鍵對不同目標資料來源的呼叫,通常是通過(但不一定)某些執行緒繫結的事物上下文來實現。
通過這我們知道可以實現:
多資料來源的動態切換,在程式執行時,把資料來源資料來源動態織入到程式中,靈活的進行資料來源切換。 基於多資料來源的動態切換,我們可以實現讀寫分離,這麼做缺點也很明顯,無法動態的增加資料來源
DynamicDataSource.java 檔案如下
public class DynamicDataSource extends AbstractRoutingDataSource {
    @Override
    protected Object determineCurrentLookupKey() {
        System.out.println(CustomerContextHolder.getCustomerType());
        return CustomerContextHolder.getCustomerType();
    }

}
CustomerContextHolder.java檔案內容輸入,採用ThreadLocal模式來實現一個安全的執行緒訪問,有關ThreadLocal類更多
內容,請點選這裡
public class CustomerContextHolder {
    public static final String DATASOURCE_ADMIN = "admin";
    public static final String DATASOURCE_SHOP = "shop";

    public static final ThreadLocal<String> contextHolder = new ThreadLocal<String>();

    public static void setCustomerType(String customerType) {
        contextHolder.set(customerType);
    }

    public static String getCustomerType() {
        return contextHolder.get();
    }

    public static void clearCustomerType() {
        contextHolder.remove();
    }
}
最後,比如要操作資料庫的時候我們只需要在設定
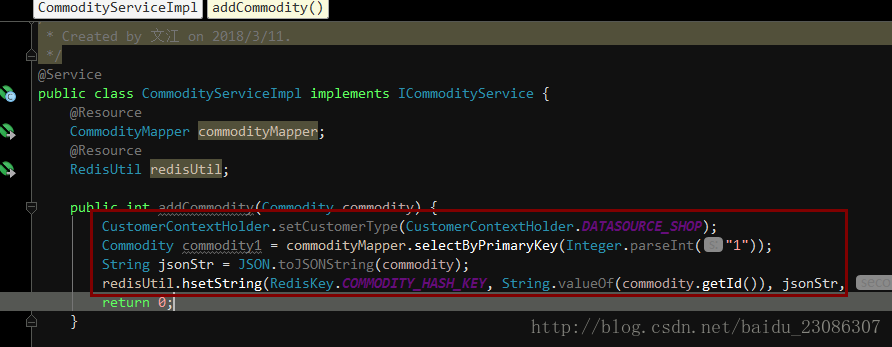
就代表要操作shop這個庫了。
到此,我們就能實現mybatis動態的切換資料來源。