WPF 深入淺出 模板(DataTemplate 資料外衣、ControlTemplate 控制元件外衣、ItemsPanelTemplate 項佈局
一、模板內函
模板就是“具有一定規格的樣板”,有了模板,就可以依據它製造出很多一樣的例項。
模板分為三大類:
DataTemplate 資料外衣
ControlTemplate 控制元件外衣
ItemsPanelTemplate 項佈局(如:ListBox的item)
<Application.Resources>
<Style>
<Setter Property="Template">
<Setter.Value>
<ControlTemplate></ControlTemplate>
</Setter.Value>
</Setter>
</Style>
<DataTemplate></DataTemplate>
</Application.Resources>
二、DataTemplate 資料外衣(使用資料驅動)
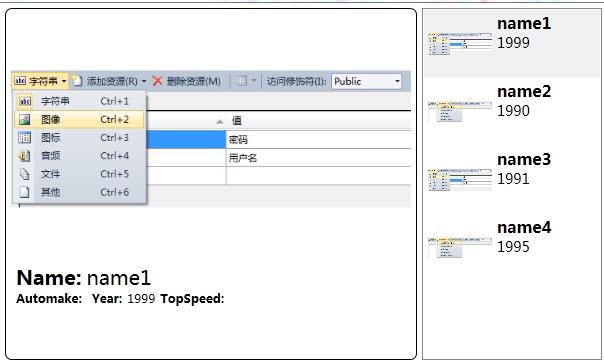
效果:
程式碼:
    public class Car
    {
        public string Automake { get; set; }
        public string Name { get; set; }
        public string Year { get; set; }
        public string TopSpeed { get; set; }
    }
    //廠商名稱轉換成Logo圖片路徑
    public class AutomakerTologoPathConverter:IValueConverter
    {

        public object Convert(object value, Type targetType, object parameter, System.Globalization.CultureInfo culture)
        {
            string uriStr = string.Format(@"/Resources/Images/{0}.jpg", (string)value);
            return new BitmapImage(new Uri(uriStr, UriKind.Relative));
        }

        public object ConvertBack(object value, Type targetType, object parameter, System.Globalization.CultureInfo culture)
        {
            throw new NotImplementedException();
        }
    }
窗體程式碼:
<Window x:Class="WpfApplication.Window15"
        xmlns="http://schemas.microsoft.com/winfx/2006/xaml/presentation"
        xmlns:x="http://schemas.microsoft.com/winfx/2006/xaml"
        xmlns:local="clr-namespace:WpfApplication"
        Title="Window15" Height="400" Width="700">

    <Window.Resources>
        <local:AutomakerTologoPathConverter x:Key="n2p"/>
        <!--詳細頁外衣-->
        <DataTemplate x:Key="carDetailViewTemplate">
            <Border BorderBrush="Black" BorderThickness="1" CornerRadius="6">
                <StackPanel Margin="5">
                    <Image Width="400" Height="250"
                           Source="{Binding Automake,Converter={StaticResource n2p}}"/>
                    <StackPanel Orientation="Horizontal" Margin="5,0">
                        <TextBlock Text="Name:" FontWeight="Bold" FontSize="20"/>
                        <TextBlock Text="{Binding Name}" FontSize="20" Margin="5,0"/>
                    </StackPanel>
                    <StackPanel Orientation="Horizontal" Margin="5,0">
                        <TextBlock Text="Automake:" FontWeight="Bold"/>
                        <TextBlock Text="{Binding Automaker}" Margin="5,0"/>
                        <TextBlock Text="Year:" FontWeight="Bold" />
                        <TextBlock Text="{Binding Year}" Margin="5,0"/>
                        <TextBlock Text="TopSpeed:" FontWeight="Bold" />
                        <TextBlock Text="{Binding TopSeed}" Margin="5,0"/>
                    </StackPanel>
                </StackPanel>
            </Border>
        </DataTemplate>
        <!--列表外衣-->
       <DataTemplate x:Key="carListItemViewTemplate">
            <Grid Margin="2">
                <StackPanel Orientation="Horizontal">
                    <Image Source="{Binding Automake, Converter={StaticResource n2p}}" Grid.RowSpan="3" Width="64" Height="64"/>
                    <StackPanel Margin="5,0">
                        <TextBlock Text="{Binding Name}" FontSize="16" FontWeight="Bold"/>
                        <TextBlock Text="{Binding Year}" FontSize="14"/>
                    </StackPanel>
                </StackPanel>
            </Grid>
        </DataTemplate>
    </Window.Resources>

    <!--窗體內容-->
    <StackPanel Orientation="Horizontal" Margin="5">
        <UserControl ContentTemplate="{StaticResource carDetailViewTemplate}"
                     Content="{Binding SelectedItem,ElementName=listboxCars}"/>

        <ListBox x:Name="listboxCars" Width="180" Margin="5,0"
                 ItemTemplate="{StaticResource carListItemViewTemplate}"/>
    </StackPanel>
</Window>
ContentTemplate="{StaticResource carDetailViewTemplate}" 給使用者控制元件新增外衣
ItemTemplate="{StaticResource carListItemViewTemplate}" 給ListBox每個Item項新增外衣
    public partial class Window15 : Window
    {
        public Window15()
        {
            InitializeComponent();
            InitialCarList();
        }

        private void InitialCarList()
        {
            List<Car> carList = new List<Car>()
            {
               new Car(){Automake="4",Name="name1",Year="1999",TopSpeed="300"},
               new Car(){Automake="5",Name="name2",Year="1990",TopSpeed="150"},
               new Car(){Automake="4",Name="name3",Year="1991",TopSpeed="350"},
               new Car(){Automake="5",Name="name4",Year="1995",TopSpeed="400"},
            };
            listboxCars.ItemsSource = carList;
        }
    }
三、ControlTemplate 控制元件外衣
<Application.Resources>
<Style x:Key="鍵名" BasedOn="{x:Null}" TargetType="{x:Type TextBox}">
<!---屬性簡單直接value,屬性複雜就Setter.Value->
<Setter Property="Foreground" Value="{DynamicResource {x:Static SystemColors.ControlTextBrushKey}}"/>
<Setter Property="Template">
<Setter.Value>
<ControlTemplate TargetType="{x:Type TextBox}">
外衣
<ControlTemplate.Triggers>
<Trigger>
觸發器
</Trigger>
</ControlTemplate.Triggers>
</ControlTemplate>
</Setter.Value>
</Setter>
</Style>
<Application.Resources>
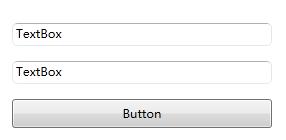
例項:輸入文字框,邊圓角
第一步:控制元件模板
	<Application.Resources>
		<LinearGradientBrush x:Key="TextBoxBorder" EndPoint="0,20" MappingMode="Absolute" StartPoint="0,0">
			<GradientStop Color="#ABADB3" Offset="0.05"/>
			<GradientStop Color="#E2E3EA" Offset="0.07"/>
			<GradientStop Color="#E3E9EF" Offset="1"/>
		</LinearGradientBrush>
		<Style x:Key="RoundCornerTextBoxStyle" BasedOn="{x:Null}" TargetType="{x:Type TextBox}">
			<Setter Property="Foreground" Value="{DynamicResource {x:Static SystemColors.ControlTextBrushKey}}"/>
			<Setter Property="Background" Value="{DynamicResource {x:Static SystemColors.WindowBrushKey}}"/>
			<Setter Property="BorderBrush" Value="{StaticResource TextBoxBorder}"/>
			<Setter Property="BorderThickness" Value="1"/>
			<Setter Property="Padding" Value="1"/>
			<Setter Property="AllowDrop" Value="true"/>
			<Setter Property="FocusVisualStyle" Value="{x:Null}"/>
			<Setter Property="ScrollViewer.PanningMode" Value="VerticalFirst"/>
			<Setter Property="Stylus.IsFlicksEnabled" Value="False"/>
			<Setter Property="Template">
				<Setter.Value>
					<ControlTemplate TargetType="{x:Type TextBox}">
                       <Border x:Name="Bd" Background="{TemplateBinding Background}" BorderBrush="{TemplateBinding BorderBrush}" BorderThickness="{TemplateBinding BorderThickness}" CornerRadius="5">
						<ScrollViewer x:Name="PART_ContentHost" SnapsToDevicePixels="{TemplateBinding SnapsToDevicePixels}"/>
					   </Border>

						<ControlTemplate.Triggers>
							<Trigger Property="IsEnabled" Value="false">
								<Setter Property="Background" TargetName="Bd" Value="{DynamicResource {x:Static SystemColors.ControlBrushKey}}"/>
								<Setter Property="Foreground" Value="{DynamicResource {x:Static SystemColors.GrayTextBrushKey}}"/>
							</Trigger>
						</ControlTemplate.Triggers>
					</ControlTemplate>
				</Setter.Value>
			</Setter>
		</Style>
	<!-- 應該在此定義應用程式級的資源。-->
	</Application.Resources>
注意:TemplateBinding 將自己的屬性關聯到目標控制元件的某個屬性上。
第二步:樣式繫結模板
<TextBox Style="{DynamicResource RoundCornerTextBoxStyle}"/>
四、ItemsControl的PanelTemplate
控制 ItemControl條目容器
<ListBox>
<ListBox.ItemsPanel>
<ItemsPanelTemplate>
<StackPanel Orientation="Horizontal"/> 條目會包裝放到一個水平排列的StackPanel中
</ItemsPanelTemplate>
</ListBox.ItemsPanel>
<!--條目-->
<TextBlock Text="A"/>
<TextBlock Text="B"/>
<TextBlock Text="C"/>
<TextBlock Text="D"/>
</ListBox>
五、DataTemplate 與 ControlTemplate 的關係與應用
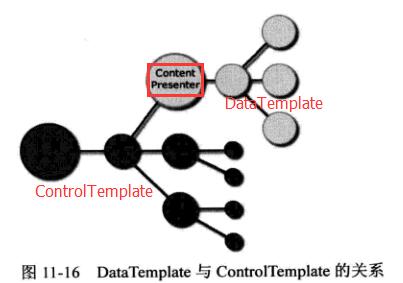
決定控制元件外觀的是 ControlTemplate, 是控制元件 Template 屬性的值。 決定資料外觀的是 DataTemplate , 是控制元件 ContentTemplate 屬性的值。
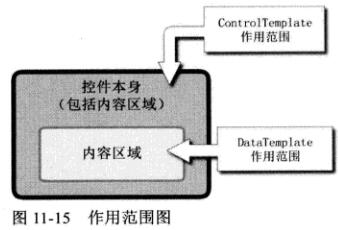
ContentPresenter(內容content,內容位置,內容模板 contentTemplate) 控制元件是ControlTemplate控制元件樹的一個結點。 DataTemplate 控制元件樹是 ControlTemplae控制元件樹的一顆子樹。
1、所有目標樣式
<Window>
<Style TargetType="{x:Type TextBox}">
<Setter Property="Template">
<Setter.Value>
<ControlTemplate TargetType="{x:Type TextBox}">
控制元件模板
</ControlTemplate>
</Setter.Value>
</Setter>
</Style>
<StackPanel>
<TextBox/>
<TextBox Style="{x:null}" text="不應用樣式"/>
</StackPanel>
</Window>
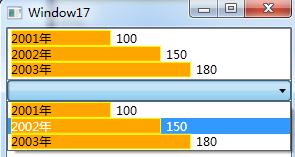
2、設定 DataTemplate 的 DataType 屬性,可以把 DataTemplate 應用在那種資料型別上。
效果:
程式碼:
建立資料型別
    public class Unit
    {
        public int Price { get; set; }
        public string Year { get; set; }
    }
資料型別模板、資料型別源
<Window x:Class="WpfApplication.Window17"
xmlns="http://schemas.microsoft.com/winfx/2006/xaml/presentation"
xmlns:x="http://schemas.microsoft.com/winfx/2006/xaml"
xmlns:local="clr-namespace:WpfApplication"
xmlns:c="clr-namespace:System.Collections;assembly=mscorlib"
Title="Window17" Height="300" Width="300">
<Window.Resources>
<!--資料型別 (模板)-->
<DataTemplate DataType="{x:Type local:Unit}">
<Grid>
<StackPanel Orientation="Horizontal">
<Grid>
<Rectangle Stroke="Yellow" Fill="Orange" Width="{Binding Price}"/>
<TextBlock Text="{Binding Year}"/>
</Grid>
<TextBlock Text="{Binding Price}" Margin="5,0"/>
</StackPanel>
</Grid>
</DataTemplate>
<!--資料型別 (源)-->
<c:ArrayList x:Key="ds">
<local:Unit Year="2001年" Price="100"/>
<local:Unit Year="2002年" Price="150"/>
<local:Unit Year="2003年" Price="180"/>
</c:ArrayList>
</Window.Resources>
<StackPanel>
<!--繫結資料型別源-->
<ListBox ItemsSource="{StaticResource ds}"/>
<ComboBox ItemsSource="{StaticResource ds}"/>
</StackPanel>
</Window>
3、XmlDataProvider 做為資料來源
<Window x:Class="WpfApplication.Window17"
xmlns="http://schemas.microsoft.com/winfx/2006/xaml/presentation"
xmlns:x="http://schemas.microsoft.com/winfx/2006/xaml"
xmlns:local="clr-namespace:WpfApplication"
xmlns:c="clr-namespace:System.Collections;assembly=mscorlib">
<Window.Resources>
<!--資料型別 (模板)-->
<DataTemplate DataType="Unit">
<Grid>
<StackPanel Orientation="Horizontal">
<Grid>
<Rectangle Stroke="Yellow" Fill="Orange" Width="{Binding [email protected]}"/>
<TextBlock Text="{Binding [email protected]}"/>
</Grid>
<TextBlock Text="{Binding [email protected]}" Margin="5,0"/>
</StackPanel>
</Grid>
</DataTemplate>
<XmlDataProvider x:Key="ds" XPath="Units/Unit">
<x:XData>
<Units xmlns="">
<Unit Year="2001" Price="150"/>
<Unit Year="2002" Price="180"/>
<Unit Year="2003" Price="200"/>
</Units>
</x:XData>
</XmlDataProvider>
</Window.Resources>
<StackPanel>
<!--繫結資料型別源-->
<ListBox ItemsSource="{Binding Source={StaticResource ds}}"/>
<ComboBox ItemsSource="{Binding Source={StaticResource ds}}"/>
</StackPanel>
</Window>
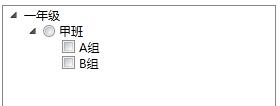
4、TreeView 顯示多層級,不同型別的資料。因為資料型別不同,我們需要每種資料型別設定一種模板。
使用層級資料模板 HierarchicalDataTemplate
xml資料
<?xml version="1.0" encoding="utf-8" ?>
<Data xmlns="">
  <Grade Name="一年級">
    <Class Name="甲班">
      <Group Name="A組"/>
      <Group Name="B組"/>
    </Class>
  </Grade>
</Data>
<Window x:Class="AutomaticConfigurationAPP.Window3"
xmlns="http://schemas.microsoft.com/winfx/2006/xaml/presentation"
xmlns:x="http://schemas.microsoft.com/winfx/2006/xaml"
Title="Window3" Height="300" Width="300">
<Window.Resources>
<!--Source資料來源 XPath資料來源路徑-->
<XmlDataProvider x:Key="ds" Source="/Resources/Xml/Data.xml" XPath="Data/Grade"/>
<!--年級模板-->
<HierarchicalDataTemplate DataType="Grade" ItemsSource="{Binding XPath=Class}">
<TextBlock Text="{Binding [email protected]}" />
</HierarchicalDataTemplate>
<!--班級模板-->
<HierarchicalDataTemplate DataType="Class" ItemsSource="{Binding XPath=Group}">
<RadioButton Content="{Binding [email protected]}" GroupName="gn"/>
</HierarchicalDataTemplate>
<!--小組模板-->
<HierarchicalDataTemplate DataType="Group">
<CheckBox Content="{Binding [email protected]}"/>
</HierarchicalDataTemplate>
</Window.Resources>
<Grid>
<TreeView Margin="5" ItemsSource="{Binding Source={StaticResource ds}}"/>
</Grid>
</Window>5、同一種資料型別的巢狀結構。
只設計一個 HierarchicalDataTemplate ,會自動產生迭代效果。
效果:
<?xml version="1.0" encoding="utf-8" ?>
<Data xmlns="">
  <Operation Name="檔案" Gesture="F">
    <Operation Name="新建" Gesture="N">
      <Operation Name="專案" Gesture="Control + P"/>
      <Operation Name="網站" Gesture="Control + W"/>
    </Operation>
  </Operation>
</Data>
<Window x:Class="AutomaticConfigurationAPP.Window4"
xmlns="http://schemas.microsoft.com/winfx/2006/xaml/presentation"
xmlns:x="http://schemas.microsoft.com/winfx/2006/xaml"
Title="Window4" Height="300" Width="300">
<Window.Resources>
<!--Source資料來源 XPath資料路徑-->
<XmlDataProvider x:Key="ds" Source="/Resources/Xml/Data2.xml" XPath="Data/Operation"/>
<!--資料模板-->
<HierarchicalDataTemplate DataType="Operation" ItemsSource="{Binding XPath=Operation}">
<StackPanel Orientation="Horizontal">
<TextBlock Text="{Binding [email protected]}" Margin="10,0"/>
<TextBlock Text="{Binding [email protected]}"/>
</StackPanel>
</HierarchicalDataTemplate>
</Window.Resources>
<StackPanel MenuItem.Click="StackPanel_Click">
<Menu ItemsSource="{Binding Source={StaticResource ds}}"/>
</StackPanel>
</Window>
        private void StackPanel_Click(object sender, RoutedEventArgs e)
        {
            MenuItem mi = e.OriginalSource as MenuItem;
            //HierarchicalDataTemplate 作用的目標是MenuItem.Header
            XmlElement xe = mi.Header as XmlElement;
            MessageBox.Show(xe.Attributes["Name"].Value);

        }
六、從外部訪問 Template (模板)的控制元件、獲取它的屬性值
DataTemplate 和 ControlTemplate 兩個類均派生自 FrameWorkTemplate類。這個類有個 FindName方法 供我們查詢內部控制元件。
ControlTemplate 物件: 訪問其目標控制元件 Template . FindName就能拿到。
DataTemplate 物件: 直接使用低層資料(如果想獲得控制元件長度、寬度 Template . FindName)。
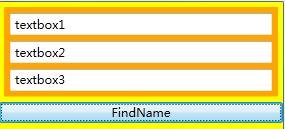
1、獲得ControlTemplate 中的控制元件。
效果:
<Window x:Class="AutomaticConfigurationAPP.Window5"
xmlns="http://schemas.microsoft.com/winfx/2006/xaml/presentation"
xmlns:x="http://schemas.microsoft.com/winfx/2006/xaml"
Title="Window5" Height="300" Width="300">
<Window.Resources>
<ControlTemplate x:Key="cTmp">
<StackPanel Background="Orange">
<TextBox x:Name="textbox1" Margin="6"/>
<TextBox x:Name="textbox2" Margin="6,0"/>
<TextBox x:Name="textbox3" Margin="6"/>
</StackPanel>
</ControlTemplate>
</Window.Resources>
<StackPanel Background="Yellow">
<UserControl x:Name="uc" Template="{StaticResource cTmp}" Margin="5"/>
<Button Content="FindName" Click="Button_Click"/>
</StackPanel>
</Window>
事件
private void Button_Click(object sender, RoutedEventArgs e)
{
//Template.FindName
TextBox tb= uc.Template.FindName("textbox1", this.uc) as TextBox;
tb.Text = "textbox1";
StackPanel sp = tb.Parent as StackPanel;
(sp.Children[1] as TextBox).Text = "textbox2";
(sp.Children[2] as TextBox).Text = "textbox3";
}
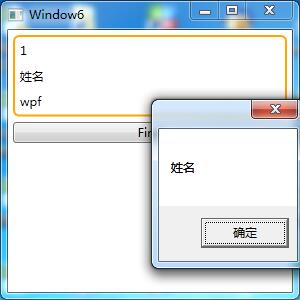
2、獲得DataTemplate 中的控制元件。
如果獲得與使用者介面相關的資料(比如控制元件的寬度、高度)ContentTemplate.FindName("")。
如果獲得與業務相關的資料,直接訪問底層(WPF採用資料驅動UI邏輯)Content
效果:
    public class Student
    {
        public int Id { get; set; }
        public string Name { get; set; }
        public string Skill { get; set; }
        public bool HasJob { get; set; }
    }
XAML
<Window x:Class="AutomaticConfigurationAPP.Window6"
xmlns="http://schemas.microsoft.com/winfx/2006/xaml/presentation"
xmlns:x="http://schemas.microsoft.com/winfx/2006/xaml"
xmlns:local="clr-namespace:AutomaticConfigurationAPP"
Title="Window6" Height="300" Width="300">
<Window.Resources>
<local:Student x:Key="stu" Id="1" Name="姓名" Skill="wpf" HasJob="True"/>
<DataTemplate x:Key="stuDT">
<Border BorderBrush="Orange" BorderThickness="2" CornerRadius="5">
<StackPanel>
<TextBlock Text="{Binding Id}" Margin="5"/>
<TextBlock x:Name="textblockname" Text="{Binding Name}" Margin="5"/>
<TextBlock Text="{Binding Skill}" Margin="5"/>
</StackPanel>
</Border>
</DataTemplate>
</Window.Resources>
<StackPanel>
<ContentPresenter x:Name="cp"
Content="{StaticResource stu}"
ContentTemplate="{StaticResource stuDT}"
Margin="5"/>
<!--Content="{StaticResource 內容資料來源}" ContentTemplate="{StaticResource 內容模板}"-->
<Button Content="Find" Margin="5,0" Click="Button_Click"/>
</StackPanel>
</Window>
C#
//內容模板查詢控制元件
TextBlock tb= this.cp.ContentTemplate.FindName("textblockname", this.cp) as TextBlock;
MessageBox.Show(tb.Text);
//直接使用底層資料
Student stu = this.cp.Content as Student;
MessageBox.Show(stu.Name);
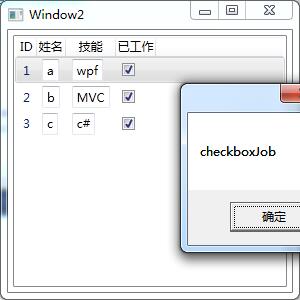
例項:訪問業務邏輯資料、訪問介面邏輯資料
介面:
XAML
<Window x:Class="AutomaticConfigurationAPP.Window2"
xmlns="http://schemas.microsoft.com/winfx/2006/xaml/presentation"
xmlns:x="http://schemas.microsoft.com/winfx/2006/xaml"
xmlns:c="clr-namespace:System.Collections;assembly=mscorlib"
xmlns:local="clr-namespace:AutomaticConfigurationAPP"
Title="Window2" Height="300" Width="300">
<Window.Resources>
<c:ArrayList x:Key="stuList">
<local:Student Id="1" Name="a" Skill="wpf" HasJob="True"/>
<local:Student Id="2" Name="b" Skill="MVC" HasJob="True"/>
<local:Student Id="3" Name="c" Skill="c#" HasJob="True"/>
</c:ArrayList>
<DataTemplate x:Key="nameDT">
<TextBox x:Name="textboxname" Text="{Binding Name}" GotFocus="textboxname_GotFocus"/>
</DataTemplate>
<DataTemplate x:Key="skillDT">
<TextBox x:Name="textboxskill" Text="{Binding Skill}"/>
</DataTemplate>
<DataTemplate x:Key="hasjobDT">
<CheckBox x:Name="checkboxJob" IsChecked="{Binding HasJob}"/>
</DataTemplate>
</Window.Resources>
<Grid Margin="5">
<ListView x:Name="listviewStudent" ItemsSource="{StaticResource stuList}">
<ListView.View>
<!--ListView的View屬性是GridView-->
<GridView>
<GridViewColumn Header="ID" DisplayMemberBinding="{Binding Id}"/>
<!--CellTemplate是TextBox-->
<GridViewColumn Header="姓名" CellTemplate="{StaticResource nameDT}"/>
<GridViewColumn Header="技能" CellTemplate="{StaticResource skillDT}"/>
<GridViewColumn Header="已工作" CellTemplate="{StaticResource hasjobDT}"/>
</GridView>
</ListView.View>
</ListView>
</Grid>
</Window>
c#
private void textboxname_GotFocus(object sender, RoutedEventArgs e)
{
//訪問業務邏輯資料
TextBox tb = e.OriginalSource as TextBox;//獲得事件的源頭(TextBox)
//沿UI元素樹上溯到DataTemplate的目標控制元件(ContentPresenter),並獲取它內容,它內容一定是個Student
ContentPresenter cp = tb.TemplatedParent as
ContentPresenter;
Student stu = cp.Content as Student;//一行
//MessageBox.Show(stu.HasJob.ToString());
this.listviewStudent.SelectedItem = stu;
//訪問介面邏輯資料
//查詢包含的ListViewItem
ListViewItem lvi = this.listviewStudent.ItemContainerGenerator.ContainerFromItem(stu) as ListViewItem;
CheckBox chb = this.FindVisualChild<CheckBox>(lvi);
MessageBox.Show(chb.Name);
}
private ChildType FindVisualChild<ChildType>(DependencyObject obj)
where ChildType:DependencyObject
{
//視覺化物件包含的子集個數
for (int i = 0; i < VisualTreeHelper.GetChildrenCount(obj); i++)
{
//返回指定父可視物件中位於指定集合索引位置的子可視物件
DependencyObject child = VisualTreeHelper.GetChild(obj, i);
if (child != null && child is ChildType)
{
return child as ChildType;
}
else
{
ChildType childofChild = FindVisualChild<ChildType>(child);
if (childofChild != null)
return childofChild;
}
}
return null;
}
七、Style 樣式
Style樣式包含兩種元素:
Setter類 設定控制元件靜態的外觀。
Trigger類 設定控制元件行為的風格。
例項一:模板繫結Padding屬性的值,並使用屬性值在ContentPresenter 元素周圍建立外邊距。
            <Button Margin="5" Padding="5" Background="Black" Template="{Binding Source={StaticResource ButtonTemplate}}">
                控制元件模板
            </Button>
<Window.Resources>
<ControlTemplate x:Key="ButtonTemplate" TargetType="{x:Type Button}">
<Border Name="borderName"
BorderBrush="Orange"
BorderThickness="3"
CornerRadius="2"
Background="Red"
TextBlock.Foreground="White">
<!-- ContentPresenter 就是負責將Content屬性顯示出來 -->
<!--模板繫結:模板從 應用模板 中獲取值 Margin="{TemplateBinding Padding}"-->
<ContentPresenter
RecognizesAccessKey="True"
Margin="{TemplateBinding Padding}">
</ContentPresenter>
</Border>
<ControlTemplate.Triggers>
<Trigger Property="IsMouseOver" Value="True">
<Setter TargetName="borderName" Property="Background" Value="DarkRed"/>
</Trigger>
<Trigger Property="IsPressed" Value="True">
<Setter TargetName="borderName" Property="Background" Value="IndianRed"/>
<Setter TargetName="borderName" Property="BorderBrush" Value="DarkKhaki"/>
</Trigger>
</ControlTemplate.Triggers>
</ControlTemplate>
</Window.Resources>例項二:動畫按鈕
<Window.Resources>
<ControlTemplate x:Key="ButtonTemplate" TargetType="{x:Type Button}">
<Border BorderBrush="Orange"
BorderThickness="3"
CornerRadius="2"
Background="Red"
TextBlock.Foreground="White"
Name="Border">
<Grid>
<Rectangle Name="FocusCue"
Visibility="Hidden"
Stroke="Black"
StrokeThickness="1"
StrokeDashArray="1 2"
SnapsToDevicePixels="True" >
</Rectangle>
<ContentPresenter RecognizesAccessKey="True"
Margin="{TemplateBinding Padding}">
</ContentPresenter>
</Grid>
</Border>
<ControlTemplate.Triggers>
<EventTrigger RoutedEvent="MouseEnter">
<BeginStoryboard>
<Storyboard>
<ColorAnimation Storyboard.TargetName="Border" Storyboard.TargetProperty="Background.Color"
To="Blue" Duration="0:0:1" AutoReverse="True" RepeatBehavior="Forever"></ColorAnimation>
</Storyboard>
</BeginStoryboard>
</EventTrigger>
<EventTrigger RoutedEvent="MouseLeave">
<BeginStoryboard>
<Storyboard>
<ColorAnimation Storyboard.TargetName="Border" Storyboard.TargetProperty="Background.Color" Duration="0:0:0.5"></ColorAnimation>
</Storyboard>
</BeginStoryboard>
</EventTrigger>
<Trigger Property="IsPressed" Value="True">
<Setter TargetName="Border" Property="Background" Value="IndianRed" />
<Setter TargetName="Border" Property="BorderBrush" Value="DarkKhaki" />
</Trigger>
<Trigger Property="IsKeyboardFocused" Value="True">
<Setter TargetName="FocusCue" Property="Visibility" Value="Visible" />
</Trigger>
</ControlTemplate.Triggers>
</ControlTemplate>
</Window.Resources>
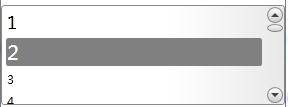
例項三:修改LIstBox樣式(巢狀模板)。
步驟:
1、ItemsPresenter 外觀(ListBox)
2、ContentPresenter 外觀(ListBoxItem)
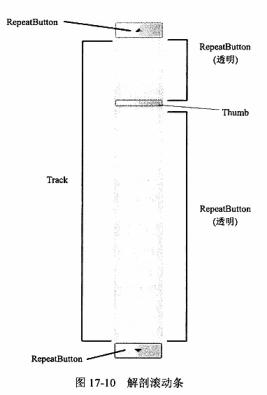
3、ScrollBar外觀
<Window x:Class="AutomaticConfigurationAPP.Window1"
        xmlns="http://schemas.microsoft.com/winfx/2006/xaml/presentation"
        xmlns:x="http://schemas.microsoft.com/winfx/2006/xaml"
        Title="Window1" Height="300" Width="300">
    <Window.Resources>
        <!--單色畫刷-->
        <SolidColorBrush x:Key="StandardBorderBrush" Color="#888" />
        <SolidColorBrush x:Key="HoverBorderBrush" Color="#DDD" />
        <SolidColorBrush x:Key="SelectedBackgroundBrush" Color="Gray" />
        <SolidColorBrush x:Key="SelectedForegroundBrush" Color="White" />
        <LinearGradientBrush x:Key="ListBoxBackgroundBrush" StartPoint="0,0" EndPoint="1,0.001">
            <GradientBrush.GradientStops>
                <GradientStopCollection>
                    <GradientStop Color="White" Offset="0.0" />
                    <GradientStop Color="White" Offset="0.6" />
                    <GradientStop Color="#DDDDDD" Offset="1.2"/>
                </GradientStopCollection>
            </GradientBrush.GradientStops>
        </LinearGradientBrush>

        <LinearGradientBrush x:Key="StandardBrush" StartPoint="0,0" EndPoint="0,1">
            <GradientBrush.GradientStops>
                <GradientStopCollection>
                    <GradientStop Color="#FFF" Offset="0.0"/>
                    <GradientStop Color="#CCC" Offset="1.0"/>
                </GradientStopCollection>
            </GradientBrush.GradientStops>
        </LinearGradientBrush>

        <SolidColorBrush x:Key="GlyphBrush" Color="#444" />
        <LinearGradientBrush x:Key="PressedBrush" StartPoint="0,0" EndPoint="0,1">
            <GradientBrush.GradientStops>
                <GradientStopCollection>
                    <GradientStop Color="#BBB" Offset="0.0"/>
                    <GradientStop Color="#EEE" Offset="0.1"/>
                    <GradientStop Color="#EEE" Offset="0.9"/>
                    <GradientStop Color="#FFF" Offset="1.0"/>
                </GradientStopCollection>
            </GradientBrush.GradientStops>
        </LinearGradientBrush>

        <!--滾動條按鈕為圓圈-->
        <Style x:Key="ScrollBarLineButtonStyle" TargetType="{x:Type RepeatButton}">
            <Setter Property="Focusable" Value="False"/>
            <Setter Property="Template">
                <Setter.Value>
                    <ControlTemplate TargetType="{x:Type RepeatButton}">
                        <Grid Margin="1">
                            <Ellipse Name="Border" StrokeThickness="1" Stroke="{StaticResource StandardBorderBrush}"
                     Fill="{StaticResource StandardBrush}"></Ellipse>
                            <ContentPresenter HorizontalAlignment="Center" VerticalAlignment="Center"></ContentPresenter>
                        </Grid>
                        <ControlTemplate.Triggers>
                            <Trigger Property="IsPressed" Value="true">
                                <Setter TargetName="Border" Property="Fill" Value="{StaticResource PressedBrush}" />
                            </Trigger>
                        </ControlTemplate.Triggers>
                    </ControlTemplate>
                </Setter.Value>
            </Setter>
        </Style>
        <!--滾動條Thumb上的RepeatButton物件,背景為透明-->
        <Style x:Key="ScrollBarPageButtonStyle" TargetType="{x:Type RepeatButton}">
            <Setter Property="IsTabStop" Value="False"/>
            <Setter Property="Focusable" Value="False"/>
            <Setter Property="Template">
                <Setter.Value>
                    <ControlTemplate TargetType="{x:Type RepeatButton}">
                        <Border Background="Transparent" />
                    </ControlTemplate>
                </Setter.Value>
            </Setter>
        </Style>
        <!--滾動條Thumb形狀為橢圓-->
        <Style x:Key="ScrollBarThumbStyle" TargetType="{x:Type Thumb}">
            <Setter Property="IsTabStop" Value="False"/>
            <Setter Property="Focusable" Value="False"/>
            <Setter Property="Margin" Value="1,0,1,0" />
            <Setter Property="Background" Value="{StaticResource StandardBrush}" />
            <Setter Property="BorderBrush" Value="{StaticResource StandardBorderBrush}" />
            <Setter Property="Template">
                <Setter.Value>
                    <ControlTemplate TargetType="{x:Type Thumb}">
                        <Ellipse Stroke="{StaticResource StandardBorderBrush}"
                     Fill="{StaticResource StandardBrush}"></Ellipse>
                    </ControlTemplate>
                </Setter.Value>
            </Setter>
        </Style>

        <ControlTemplate x:Key="VerticalScrollBar" TargetType="{x:Type ScrollBar}">
            <Grid>
                <!--滾動條包含三行網格。頂部,低部放按鈕。中間Track元素-->
                <Grid.RowDefinitions>
                    <RowDefinition MaxHeight="18"/>
                    <RowDefinition Height="*"/>
                    <RowDefinition MaxHeight="18"/>
                </Grid.RowDefinitions>

                <RepeatButton
                    Grid.Row="0"
                    Height="18"
                    Style="{StaticResource ScrollBarLineButtonStyle}"
                    Command="ScrollBar.LineUpCommand" >
                    <!--繪製向上箭頭的Path物件(箭頭使用,微語言路徑)-->
                    <Path
                       Fill="{StaticResource GlyphBrush}"
                       Data="M 0 4 L 8 4 L 4 0 Z">
                    </Path>
                </RepeatButton>

                <!--Track名稱必須是PART_Track,為了使ScrollBar能成功關聯到它的程式碼-->
                <!--ViewportSize="0" 尺度更具內容變化-->
                <Track
                    Name="PART_Track"
                    Grid.Row="1"
                    IsDirectionReversed="True"
                    ViewportSize="0">
                    <!--Track封裝兩個RepeatButton物件和Thumb元素-->
                    <Track.DecreaseRepeatButton>
                        <RepeatButton Command="ScrollBar.PageUpCommand" Style="{StaticResource ScrollBarPageButtonStyle}">
                        </RepeatButton>
                    </Track.DecreaseRepeatButton>
                    <Track.Thumb>
                        <Thumb Style="{StaticResource ScrollBarThumbStyle}">
                        </Thumb>
                    </Track.Thumb>
                    <Track.IncreaseRepeatButton>
                        <RepeatButton Command="ScrollBar.PageDownCommand" Style="{StaticResource ScrollBarPageButtonStyle}">
                        </RepeatButton>
                    </Track.IncreaseRepeatButton>
                </Track>

                <RepeatButton
                    Grid.Row="3"
                    Height="18"
                    Style="{StaticResource ScrollBarLineButtonStyle}"
                    Command="ScrollBar.LineDownCommand">
                    <Path
                       Fill="{StaticResource GlyphBrush}"
                       Data="M 0 0 L 4 4 L 8 0 Z">
                    </Path>
                </RepeatButton>

            </Grid>
        </ControlTemplate>


        <Style TargetType="{x:Type ScrollBar}">
            <Setter Property="SnapsToDevicePixels" Value="True"/>
            <Setter Property="OverridesDefaultStyle" Value="true"/>
            <Style.Triggers>
                <!--垂直滾動條模板-->
                <Trigger Property="Orientation" Value="Vertical">
                    <Setter Property="Width" Value="18"/>
                    <Setter Property="Height" Value="Auto" />
                    <Setter Property="Template" Value="{StaticResource VerticalScrollBar}" />
                </Trigger>
            </Style.Triggers>
        </Style>

        <!-- ItemsPresenter 外觀-->
        <Style TargetType="{x:Type ListBox}">
            <Setter Property="Template">
                <Setter.Value>
                    <ControlTemplate TargetType="{x:Type ListBox}">
                        <!--巢狀模板-->
                        <Border
                            Name="border"
                            Background="{StaticResource ListBoxBackgroundBrush}"
                            BorderBrush="{StaticResource StandardBorderBrush}"
                            BorderThickness="1" CornerRadius="3"
                            >
                            <!--ScrollViewer 容納所有列表項(ItemsPresenter)-->
                            <ScrollViewer Focusable="False">
                                <ItemsPresenter Margin="2"></ItemsPresenter>
                            </ScrollViewer>
                        </Border>
                    </ControlTemplate>
                </Setter.Value>
            </Setter>
        </Style>

        <!-- ContentPresenter 外觀-->
        <Style TargetType="{x:Type ListBoxItem}">
            <Setter Property="Template">
                <Setter.Value>
                    <ControlTemplate TargetType="{x:Type ListBoxItem}">
                        <Border
                           Name="Border"
                           BorderThickness="2"
                           CornerRadius="3"
                           Padding="1"
                           SnapsToDevicePixels="True">
                            <ContentPresenter></ContentPresenter>
                        </Border>
                        <ControlTemplate.Triggers>
                            <EventTrigger RoutedEvent="ListBoxItem.MouseEnter">
                                <EventTrigger.Actions>
                                    <BeginStoryboard>
                                        <Storyboard>
                                            <DoubleAnimation
                                                Storyboard.TargetProperty="FontSize"
                                                To="20"
                                                Duration="0:0:1">
                                            </DoubleAnimation>
                                            <!--字型1秒鐘=20大小-->
                                        </Storyboard>
                                    </BeginStoryboard>
                                </EventTrigger.Actions>
                            </EventTrigger>
                            <EventTrigger RoutedEvent="ListBoxItem.MouseLeave">
                                <EventTrigger.Actions>
                                    <BeginStoryboard>
                                        <Storyboard>
                                            <DoubleAnimation
                                                Storyboard.TargetProperty="FontSize"
                                                BeginTime="0:0:0.5"
                                                Duration="0:0:0.2">
                                                <!--字型延遲0.5秒,0.2秒縮小-->
                                            </DoubleAnimation>
                                        </Storyboard>
                                    </BeginStoryboard>
                                </EventTrigger.Actions>
                            </EventTrigger>

                            <Trigger Property="IsMouseOver" Value="True">
                                <Setter TargetName="Border" Property="BorderBrush" Value="{StaticResource HoverBorderBrush}"/>
                            </Trigger>
                            <Trigger Property="IsSelected" Value="True">
                                <Setter TargetName="Border" Property="Background" Value="{StaticResource SelectedBackgroundBrush}"/>
                                <Setter TargetName="Border" Property="TextBlock.Foreground" Value="{StaticResource SelectedForegroundBrush}"/>
                            </Trigger>
                        </ControlTemplate.Triggers>
                    </ControlTemplate>
                </Setter.Value>
            </Setter>
        </Style>

    </Window.Resources>
    <Grid>
         <ListBox Height="100">
            <ListBoxItem Content="1" />
            <ListBoxItem Content="2" />
            <ListBoxItem Content="3" />
            <ListBoxItem Content="4" />
            <ListBoxItem Content="5" />
            <ListBoxItem Content="6" />
            <ListBoxItem Content="7" />
            <ListBoxItem Content="8" />
        </ListBox>
    </Grid>
</Window>
相關推薦
WPF 深入淺出 模板(DataTemplate 資料外衣、ControlTemplate 控制元件外衣、ItemsPanelTemplate 項佈局
一、模板內函 模板就是“具有一定規格的樣板”,有了模板,就可以依據它製造出很多一樣的例項。 模板分為三大類: DataTemplate 資料外衣 ControlTemplate 控制元件外衣 ItemsPanelTemplate 項佈局(如:ListBox的item)
js--彈出對話方塊、改變控制元件內容、驗證輸入郵箱的合法性
<!DOCTYPE html> <html> <head> <meta charset="utf-8"> <title></title> <script type="text/javascript">
ApolloStudio高手之路(6):用Python以極簡方式讀寫OPC DA、OPC UA資料並實現UI控制元件自動繫結重新整理顯示
OPC(OLE for Process Control, 用於過程控制的OLE)是一個工業標準,OPC是為了連線資料來源(OPC伺服器)和資料的使用者(OPC應用程式)之間的軟體介面標準。資料來源可以是PLC,DCS,條形碼讀取器等控制裝置。隨控制系統構成的不同,作為資料來源的OPC伺服器既可以
WPF 自定義控制元件的坑(蠢的:自定義控制元件內容不顯示)
原文: WPF 自定義控制元件的坑(蠢的:自定義控制元件內容不顯示) 自定義控制元件不顯示內容 由於工作需要在寫WPF,其中想要實現一些自己的控制元件所以直接自定義了控制元件博主是繼承了ContenControl的控制元件開始寫的但是發現不管設定Content屬性為任何都是不顯示
Android Studio 各個資料夾的作用和控制元件作用、基本語句
一、各個資料夾下存放的東西 1、src :----包----存放java原始碼 2、gen:---自動生成的配置檔案 3、Android 4.4.2:包含android.jar檔案。這是一個java歸檔檔案,其中包含構建應用程式所需的所有android SDK庫(views,
機房系統(八)——【日期控制元件DTPicker、比較日期大小】
"寧可讓程式(員)多幹活,也不能讓使用者多做"。本著為使用者著想、給使用者以方便的原則,系統中用選代替填,給使用者減少很多不必要的麻煩。 在機房系統裡遇到了填寫日期的問題。VB中已經為我們提供了專門的日期控制元件,設
Android開發學習筆記(十二)基礎UI控制元件之ImageView、CheckBox、RadioButton
一、ImageView:直接繼承自View,它的作用是在介面上顯示Drawable物件。 ImageView在佈局檔案(如main_activity.xml)中常用的屬性 有 scaleType ,s
C#進階 WPF基礎一 XAML控制元件基礎、佈局
一、控制元件模型 WPF的控制元件與WinForm類似。區別在於WPF的控制元件可以用XAML手寫,並且功能更多更強大 二、XAML語言 1、概念:在WPF中用來描述控制元件的語言. 特點: 與XML、HTML語言類似,但對大小寫敏感 一個XAML標籤代表NEW一個控制元件
獲取iframe中的內容、查詢獲取指定元素(關於用c++呼叫WEBBROWSER控制元件,使用相關介面操作web頁面元素的一些方法)
最近開發WINDOWS下的應用程式,需要用到C++中呼叫WEBBROWSER控制元件操作網頁的相關技術,查閱了一下相關文件,反覆除錯了幾天,對其中的技術有了一些膚淺的認識,大多數C++程式設計師對COM應該不陌生,其實用C++操作網頁,在前端應用層上主要就是對COM介面的查
縮放系列(二):所有子控制元件也隨著縮放、手勢縮放、多點觸控layout
下面是一個功能強大的改造的例子: 可以實現以下需求: 1.兩個手指進行縮放佈局 2.所有子控制元件也隨著縮放, 3.子控制元件該有的功能不能丟失(像button有可被點選的功能,縮放後不能丟失該功能) 執行效果圖: java程式碼如下 MainActi
WPF DoubleAnimation設定控制元件大小、背景顏色的動畫
///<summary>/// 設定控制元件的【大小、背景】動畫效果,/// 高度、寬度預設當前大小,背景預設White~LightGreen///</summary>///<param name="control">要設定動畫的控制元件</param>///
WPF中查詢子控制元件、父控制元件的方法
/// <summary> /// 查詢指定型別的子控制元件 /// </summary> /// <typeparam name="childItem">子控制元件型別&l
wpf 繫結資料無法更新ui控制元件可能存在的問題
BindingMode的列舉值有: ① OneWay ② TwoWay ③ OneTime:根據源端屬性值設定目標屬性值,之後的改變會被忽略,除非呼叫BindingExpression.UpdateTarge方法 ④ OneWayToSource:與OneWay類似,
寫了一段VBA程式碼後, Excel每次儲存時都彈出警告:”此文件中包含巨集、Activex控制元件、XML擴充套件包資訊“(office 2007)
前言:今天在寫一段VBA程式碼之後,遇到一個問題, Excel每次儲存時就報一個警告(使用的是office 2007): 此文件中包含巨集、Activex控制元件、XML擴充套件包資訊
【WPF學習】第五十九章 理解控制元件模板
最近工作比較忙,未能及時更新內容,敬請了解!!! 對於視覺化樹的分析引出了幾個有趣問題。例如,控制元件如何從邏輯樹表示擴張成視覺化樹表示? 每個控制元件都有一個內建的方法,用於確定如何渲染控制元件(作為一組更基礎的元素)。該方法稱為控制元件模板(control template),是用XAML標記
Android 開發:(三)安卓常用控制元件以及仿《微門戶》登入介面實現
一、常用控制元件: 1、文字類控制元件 TextView 負責展示文字,非編輯 EditText 可編輯文字控制元件 2、按鈕類控制元件 Button 按鈕 ImageButton 圖片按鈕 RadioButton與RadioGroup 單
SQLite資料庫、ListView控制元件的使用
android下資料庫的建立(重點) 在Android平臺上,集成了一個輕量級嵌入式關係型資料庫—SQLite,SQLite3支援 NULL、INTEGER、REAL(浮點數字)、TEXT(字串文字)和BLOB(二進位制物件)資料型別,也接受varchar(n)、char(n)、deci
iOS開發:常用的UIView控制元件——UILabel、UITextField、UIButton
前面幾篇文章已經對iOS開發中比較基本的幾個檔案進行了瞭解,今天主要學習StoryBoard檔案和幾個常見的UI控制元件。 Storyboard功能是在iOS5開始新增的功能,一種新技術的出現大多是為了彌補舊技術的不足,而在storyboard之前iOS 開發設計介面是使用nib檔案(xib
Android自定義View——自定義搜尋框(SearchView) 非常實用的控制元件
好多東西寫起來太麻煩了,而且我在最開始用的也不是自己寫的,所以找了一個非常棒的測試了一下. 轉載的 在 Android開發中,當系統資料項比較多時,常常會在app新增搜尋功能,方便使用者能快速獲得需要的資料。搜尋欄對於我們並不陌生,在許多app都能見到它,比如豌
.net自定義控制元件Control、WebControl、CompositeControl
一、呈現方法 1、Control主要有以下4個方法用於呈現 1 //該方法為入口方法 2 public virtual void RenderControl (HtmlTextWriter writer) 3 { 4 this.RenderControl(write

