
Android-MVVM架構-Data Binding的使用
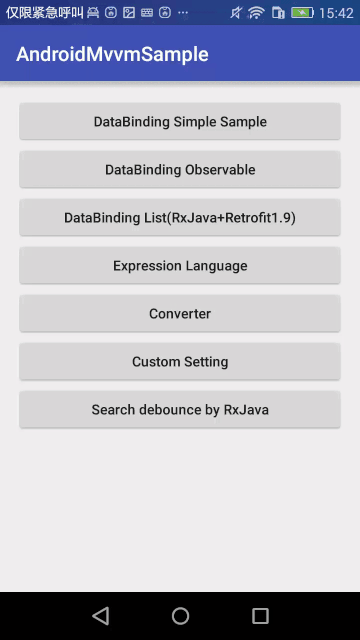
專案整體效果:
什麼是MVVM , 為什麼需要MVVM?
MVVM是Model-View-ViewModel的簡寫. 它是有三個部分組成:Model、View、ViewModel。
Model:資料模型層。包含業務邏輯和校驗邏輯。
View:螢幕上顯示的UI介面(layout、views)。
ViewModel:View和Model之間的連結橋樑,處理檢視邏輯。
MVVM架構圖如下:

MVVM架構通過ViewModel隔離了UI層和業務邏輯層,降低程式的耦合度。通過DataBinding實現View和ViewModel之間的繫結。
Android App 中MVC的不足
一般來說,我們開發Android App是基於MVC,由於MVC的普及和快速開發的特點,一個app從0開發一般都是基於MVC的。
Activity、Fragment相當於C (Controller), 佈局相當於V(View), 資料層相當於M(Model)
隨著業務的增長,Controller裡的程式碼會越來越臃腫,因為它不只要負責業務邏輯,還要控制View的展示。也就是說Activity、Fragment雜糅了Controller和View,耦合變大。並不能算作真正意義上的MVC。
編寫程式碼基本的過程是這樣的,在Activity、Fragment中初始化Views,然後拉取資料,成功後把資料填充到View裡。
假如有如下場景:
我們基於MVC開發完第一版本,然後企業需要迭代2.0版本,並且UI介面變化比較大,業務變動較小,怎麼辦呢?
當2.0的所有東西都已經評審過後。這個時候,新建佈局,然後開始按照新的效果圖,進行UI佈局。然後還要新建Activity、Fragment把相關邏輯和資料填充到新的View上。
如果業務邏輯比較複雜,需要從Activity、Fragment中提取上個版本的所有邏輯,這個時候自己可能就要暈倒了,因為一個複雜的業務,一個Activity幾千行程式碼也是很常見的。千辛萬苦做完提取完,可能還會出現很多bug。
MVP架構圖如下:
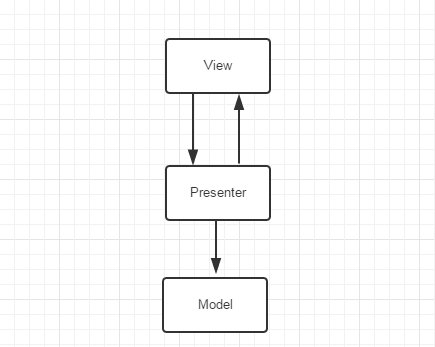
MVP把檢視層抽象到View介面,邏輯層抽象到Presenter介面,提到了程式碼的可讀性。降低了檢視邏輯和業務邏輯的耦合。
但是有MVP的不足:
- 介面過多,一定程度影響了編碼效率。其實這也不算是不足,為了更好的分層解耦,這也是必須的。
- 導致Presenter的程式碼量過大。
這個時候MVVM就閃亮登場了。從上面的MVVM功能圖我們知道:
- 可重用性。你可以把一些檢視邏輯放在一個ViewModel裡面,讓很多view重用這段檢視邏輯。
在Android中,佈局裡可以進行一個檢視邏輯,並且Model發生變化,View也隨著發生變化。 - 低耦合。以前Activity、Fragment中需要把資料填充到View,還要進行一些檢視邏輯。現在這些都可在佈局中完成(具體程式碼請看後面)
甚至都不需要再Activity、Fragment去findViewById。這時候Activity、Fragment只需要做好的邏輯處理就可以了。
現在我們回到上面從app1.0到app2.0迭代的問題,如果用MVVM去實現那就比較簡單,這個時候不需要動Activity、Fragment,
只需要把佈局按照2.0版本的效果實現一遍即可。因為檢視邏輯和資料填充已經在佈局裡了,這就是上面提到的可重用性。
Android中如何實現DataBinding?
Google在2015年的已經為我們DataBinding技術。下面就詳細講解如何使用DataBinding。
環境準備
在工程根目錄build.gradle檔案加入如下配置,把Android Gradle 外掛升級到最新:
dependencies {
    classpath 'com.android.tools.build:gradle:1.5.0'
}
在app裡的build.gradle檔案加入如下配置,啟用data binding 功能:
dataBinding {
    enabled true
}
來個簡單的例子
實現上面效果的“Data Binding Simple Sample”
data binding 佈局格式和以往的有些區別:
<?xml version="1.0" encoding="utf-8"?>
<layout xmlns:android="http://schemas.android.com/apk/res/android">
   <data>
       <variable name="user" type="com.example.User"/>
   </data>

   //normal layout
   <TextView android:layout_width="wrap_content"
           android:layout_height="wrap_content"
           android:text="@{user.firstName}"/>
</layout>
佈局的根節點為
佈局裡使用的model 通過中的指定:
<variable name="user" type="com.example.User"/>設定空間屬性的值,通過@{}語法來設定:
android:text="@{user.firstName}"
下面是完整的佈局實現:
<?xml version="1.0" encoding="utf-8"?>
<layout xmlns:android="http://schemas.android.com/apk/res/android">

    <data>

        <variable
            name="user"
            type="com.mvvm.model.User"/>
    </data>

    <LinearLayout
        xmlns:tools="http://schemas.android.com/tools"
        android:layout_width="match_parent"
        android:layout_height="match_parent"
        android:orientation="vertical"
        android:padding="16dp"
        tools:context=".ui.MainActivity">


        <TextView
            android:layout_width="wrap_content"
            android:layout_height="wrap_content"
            android:text="@{user.realName}"
            android:textSize="14dp"/>

        <TextView
            android:layout_width="wrap_content"
            android:layout_height="wrap_content"
            android:layout_marginTop="10dp"
            android:text="@{user.mobile}"
            android:textSize="14dp"/>


        <TextView
            android:layout_width="wrap_content"
            android:layout_height="wrap_content"
            android:text="@{String.valueOf(user.age)}"
            android:textSize="14dp"/>

        <LinearLayout
            android:layout_width="wrap_content"
            android:layout_height="15dp"
            android:layout_marginBottom="40dp"
            android:layout_marginTop="40dp"
            android:gravity="center_vertical"
            android:orientation="horizontal">

            <View
                android:layout_width="match_parent"
                android:layout_height="1dp"

                android:layout_weight="1"
                android:background="@android:color/darker_gray"/>

            <TextView
                android:layout_width="wrap_content"
                android:layout_height="wrap_content"
                android:text="With String Format"
                android:textSize="10dp"
                android:textStyle="bold"/>

            <View
                android:layout_width="match_parent"
                android:layout_height="1dp"
                android:layout_marginBottom="20dp"
                android:layout_marginTop="20dp"
                android:layout_weight="1"
                android:background="@android:color/darker_gray"/>


        </LinearLayout>

        <TextView
            android:id="@+id/tv_realName"
            android:layout_width="wrap_content"
            android:layout_height="wrap_content"
            android:text="@{@string/name_format(user.realName)}"
            android:textSize="14dp"/>

        <TextView
            android:id="@+id/tv_phone"
            android:layout_width="wrap_content"
            android:layout_height="wrap_content"
            android:layout_marginTop="10dp"
            android:text="@{@string/mobile_format(user.mobile)}"
            android:textSize="14dp"/>

    </LinearLayout>
</layout>
接下來實現資料模型類User:
public class User {

    private String userName;
    private String realName;
    private String mobile;
    private int age;

    public User(String realName, String mobile) {
        this.realName = realName;
        this.mobile = mobile;
    }

    public User() {
    }

    //ignore getter and setter. see code for detail.

}
在Activity中 繫結資料
    @Override
    public void onCreate(Bundle savedInstanceState) {
        super.onCreate(savedInstanceState);
        binding = DataBindingUtil.setContentView(this, R.layout.activity_simple);
        fetchData();
    }

    //模擬獲取資料
    private void fetchData() {
        new AsyncTask<Void, Void, Void>() {

            @Override
            protected void onPreExecute() {
                super.onPreExecute();
                showLoadingDialog();
            }

            @Override
            protected Void doInBackground(Void... params) {
                try {
                    Thread.sleep(2000);
                } catch (InterruptedException e) {
                    e.printStackTrace();
                }
                return null;
            }

            @Override
            protected void onPostExecute(Void aVoid) {
                super.onPostExecute(aVoid);
                hideLoadingDialog();
                User user = new User("Chiclaim", "13512341234");
                binding.setUser(user);
                //binding.setVariable(com.mvvm.BR.user, user);
            }
        }.execute();
    }
}
通過DataBindingUtil.setContentView設定佈局,通過binding類設定資料模型:
binding.setUser(user);佈局詳解
import匯入
通過標籤匯入:
<data>
    <import type="android.view.View"/>
    <import type="com.mvvm.model.User"/>
    <variable name="user" type="User">
</data>
android:visibility="@{user.isAdult ? View.VISIBLE : View.GONE}"
如果產生了衝突可以使用別名的方式:
<import type="com.example.User"/>
<import type="com.mvvm.model.User" alias="MyUser"/>
<variable name="user" type="User">
<variable name="user" type="MyUser">
集合泛型左尖括號需要使用轉譯:
<import type="com.example.User"/> <import type="java.util.List"/> <variable name="user" type="User"/> <variable name="userList" type="List<User>"/>使用匯入類的靜態欄位和方法:
<data>
    <import type="com.example.MyStringUtils"/>
    <variable name="user" type="com.example.User"/>
</data>
…
<TextView
    android:text="@{MyStringUtils.capitalize(user.lastName)}"
    android:layout_width="wrap_content"
    android:layout_height="wrap_content"/>
像JAVA一樣,java.lang.*是自動匯入的。
Variables
在節點中使用來設定。
<import type="android.graphics.drawable.Drawable"/>
<variable name="user"  type="com.example.User"/>
<variable name="image" type="Drawable"/>
<variable name="note"  type="String"/>
Binding類裡將會包含通過variable設定name的getter和setter方法。如上面的setUser,getUser等。
如果控制元件設定了id,那麼該控制元件也可以在binding類中找到,這樣就不需要findViewById來獲取View了。
自定義Binding類名(Custom Binding Class Names)
以為根節點佈局,android studio預設會自動產生一個Binding類。類名為根據佈局名產生,如一個名為activity_simple的佈局,它的Binding類為ActivitySimpleBinding,所在包為app_package/databinding。
當然也可以自定義Binding類的名稱和包名:
<data class="CustomBinding"></data>在app_package/databinding下生成CustomBinding;<data class=".CustomBinding"></data>在app_package下生成CustomBinding;<data class="com.example.CustomBinding"></data>明確指定包名和類名。
Includes
<?xml version="1.0" encoding="utf-8"?>
<layout xmlns:android="http://schemas.android.com/apk/res/android"
        xmlns:bind="http://schemas.android.com/apk/res-auto">
   <data>
       <variable name="user" type="com.example.User"/>
   </data>
   <LinearLayout
       android:orientation="vertical"
       android:layout_width="match_parent"
       android:layout_height="match_parent">
       <include layout="@layout/name"
           bind:user="@{user}"/>
       <include layout="@layout/contact"
           bind:user="@{user}"/>
   </LinearLayout>
</layout>
name.xml 和 contact.xml都必須包含 <variable name="user" ../>
DataBinding Obervable
在上面的一個例子上,資料是不變,隨著使用者的與app的互動,資料發生了變化,如何更新某個控制元件的值呢?
有如下幾種方案(具體實現下載程式碼,執行,點選DataBinding Observable 按鈕):
- BaseObservable的方式
使User繼承BaseObservable,在get方法上加上註解@Bindable,會在BR(BR類自動生成的)生成該欄位標識(int)
set方法裡notifyPropertyChanged(BR.field);
public class User extends BaseObservable{

    private String userName;
    private String realName;

    /**
     * 注意: 在BR裡對應的常量為follow
     */
    private boolean isFollow;


    public User(String realName, String mobile) {
        this.realName = realName;
        this.mobile = mobile;
    }

    public User() {
    }

    @Bindable
    public boolean isFollow() {
        return isFollow;
    }

    public void setIsFollow(boolean isFollow) {
        this.isFollow = isFollow;
        notifyPropertyChanged(BR.follow);
    }

    @Bindable
    public String getUserName() {
        return userName;
    }

    public void setUserName(String userName) {
        this.userName = userName;
        notifyPropertyChanged(BR.userName);
    }
如果資料發生變化通過set方法,view的值會自動更新,是不是很方便。
- 通過ObserableField來實現
public class UserField {
    public final ObservableField<String> realName = new ObservableField<>();
    public final ObservableField<String> mobile = new ObservableField<>();

}
佈局中使用:
   <variable name="fields" type="com.mvvm.model.UserField"/>

   <TextView
       android:layout_width="wrap_content"
       android:layout_height="wrap_content"
       android:background="@null"
       android:text="@{fields.realName}"
       android:textSize="14dp"/>
程式碼中設定/改變資料:
userField.realName.set("Chiclaim");
- Observable Collections方式:
private ObservableArrayMap<String, Object> map = new ObservableArrayMap();

//設定資料
map.put("realName", "Chiclaim");
map.put("mobile", "110");
佈局中使用:
   <TextView
        android:layout_width="wrap_content"
        android:layout_height="wrap_content"
        android:layout_marginLeft="10dp"
        android:text="@{collection[`mobile`]}"
        android:textSize="14dp"
        android:textStyle="bold"/>
下面通過DataBinding來實現列表
獲取square公司retrofit程式碼貢獻者資料列表,通過RecyclerView來實現。
RecyclerView的Adapter實現的核心方法為兩個onCreateViewHolder、onBindViewHolder方法和Item的ViewHolder。
    @Override
    public RecyclerView.ViewHolder onMyCreateViewHolder(ViewGroup parent, int viewType) {
        ItemContributorBinding binding = DataBindingUtil.inflate(inflater, R.layout.item_contributor, parent, false);
        ContributorViewHolder viewHolder = new ContributorViewHolder(binding.getRoot());
        viewHolder.setBinding(binding);
        return viewHolder;
    }

    @Override
    public void onMyBindViewHolder(RecyclerView.ViewHolder viewHolder, int position) {
        ContributorViewHolder contributorViewHolder = (ContributorViewHolder) viewHolder;
        Contributor contributor = getModel(position);
        contributorViewHolder.getBinding().setVariable(com.mvvm.BR.contributor, contributor);
        contributorViewHolder.getBinding().executePendingBindings();
        Picasso.with(mContext).load(contributor.getAvatar_url()).
                into(contributorViewHolder.binding.ivAvatar);
    }
通過setVariable方法來關聯資料。
getBinding().setVariable(com.mvvm.BR.contributor, contributor)
大家看到BR.contributor的contributor常量是怎麼產生的?佈局裡的中的name屬性值。如: 那麼就會自動生成BR.book。有點類似以前的R裡面的id。 有人會問了如果別的實體(model)也有相同的book屬性怎麼辦?那他到底使用哪個呢?其實這是不會衝突,因為在不用的地方用,他的上下文(Binging)不一樣,所以不會衝突。也是和以前的R裡面的常量是一回事情。只是把它放到BR裡面去了。所以我猜想BR的全稱應該是(Binding R(R就是以前我們用的常量類))雖然官方沒有說明。
通過executePendingBindings強制執行繫結資料。
Item對應的VIewHolder
    public class ContributorViewHolder extends RecyclerView.ViewHolder {

        ItemContributorBinding binding;

        public void setBinding(ItemContributorBinding binding) {
            this.binding = binding;
        }

        public ItemContributorBinding getBinding() {
            return binding;
        }

        public ContributorViewHolder(View itemView) {
            super(itemView);
        }
    }
EL表示式(Expression Language)
DataBinding支援的表示式有:
數學表示式: + - / * %
字串拼接 +
邏輯表示式 && ||
位操作符 & | ^
一元操作符 + - ! ~
位移操作符 >> >>> <<
比較操作符 == > < >= <=
instanceof
分組操作符 ()
字面量 - character, String, numeric, null
強轉、方法呼叫
欄位訪問
陣列訪問 []
三元操作符 ?:
聚合判斷(Null Coalescing Operator)語法 ‘??’
  <TextView
     android:layout_width="wrap_content"
     android:layout_height="wrap_content"
     android:padding="5dp"
     android:text="@{user.userName ?? user.realName}"
     android:textSize="12dp"/>
上面的意思是如果userName為null,則顯示realName。
Resource(資源相關)
在DataBinding語法中,可以吧resource作為其中的一部分。如:
android:padding="@{large? @dimen/largePadding : @dimen/smallPadding}"
除了支援dimen,還支援color、string、drawable、anim等。
注意,對mipmap圖片資源支援還是有問題,目前只支援drawable。
Event Binding (事件繫結)
事件處理器:
public interface UserFollowEvent {
    void follow(View view);
    void unFollow(View view);
}
佈局中使用:
<variable
     name="event"
     type="com.mvvm.event.UserFollowEvent"/>

android:onClick="@{user.isFollow ? event.unFollow : event.follow}"
在Activity實現該介面UserFollowEvent:
    @Override
    public void follow(View view) {
        user.setIsFollow(true);
    }

    @Override
    public void unFollow(View view) {
        user.setIsFollow(false);
    }
效果如下所示:

點選按鈕後:

Custom Setter(自定義Setter方法)
有些時候我們需要自定義binding邏輯,如:在一個TextView上設定大小不一樣的文字,這個時候就需要我們自定義binding邏輯了.
在比如我們為ImageView載入圖片,通過總是通過類似這樣的的程式碼來實現:
Picasso.with(view.getContext()).load(url).into(view);如果我們自定Setter方法,那麼這些都可以是自動的。怎麼實現呢?
@BindingAdapter({"imageUrl"})
public static void loadImage(ImageView view, String url) {
      Log.d("BindingAdapter", "loadImage(ImageView view, String url)");
      Log.d("BindingAdapter", url + "");
      Picasso.with(view.getContext()).load(url).into(view);
}
@BindingAdapter({“imageUrl”}) 這句話意味著我們自頂一個imageUrl屬性,可以在佈局檔案中使用。當在佈局檔案中設定該屬性的值發生改變,會自動
呼叫loadImage(ImageView view, String url)方法。
佈局中使用:
<ImageView
      android:layout_width="50dp"
      android:layout_height="50dp"
      android:background="#f0f0f0"
      app:imageUrl="@{avatar}"/>
再來看下如何實現:在一個TextView上設定大小不一樣的文字(其實是一樣的)
@BindingAdapter("spanText")
public static void setText(TextView textView, String value) {
    Log.d("BindingAdapter", "setText(TextView textView,String value)");
    SpannableString styledText = new SpannableString(value);
    styledText.setSpan(new TextAppearanceSpan(textView.getContext(), R.style.style0),
            0, 5, Spanned.SPAN_EXCLUSIVE_EXCLUSIVE);
    styledText.setSpan(new TextAppearanceSpan(textView.getContext(), R.style.style1),
            5, 12, Spanned.SPAN_EXCLUSIVE_EXCLUSIVE);
    styledText.setSpan(new TextAppearanceSpan(textView.getContext(), R.style.style0),
            12, value.length(), Spanned.SPAN_EXCLUSIVE_EXCLUSIVE);
    textView.setText(styledText, TextView.BufferType.SPANNABLE);
}
<TextView
android:layout_width="wrap_content"
android:layout_height="wrap_content"
app:spanText="@{`Hello Custom Setter`}"/>注意:使用自定義Setter,需要使用dataBinding語法。以下用法是不對的:
<TextView
    android:layout_width="wrap_content"
    android:layout_height="wrap_content"
    app:spanText="Hello Custom Setter"/>
其他的例子就不一一在這裡介紹了,詳情可以檢視github上的程式碼。
have Fun!