
Nutch教程——匯入Nutch工程,執行完整爬取 by 逼格DATA
阿新 • • 發佈:2019-01-30
在使用本教程之前,需要滿足條件:
1)有一臺Linux或Linux虛擬機器
2)安裝JDK(推薦1.7)
3)安裝Apache Ant
下載Nutch原始碼:
安裝IDE:
推薦使用Intellij或者Netbeans,如果用eclipse也可以,不推薦。轉換:
Nutch原始碼是用ant進行構建的,需要轉換成eclipse工程才可以匯入IDE正確使用,Intellij和Netbeans都可以支援ecilpse工程。 解壓下載的apache-nutch-1.9-src.zip,得到資料夾apache-nutch-1.9。 在執行轉換之前,我們先修改一下ivy中的一個源,將它改為開源中國的映象,否則轉換的過程會非常緩慢。(ant原始碼中並沒有附帶依賴jar包,ivy負責從網上自動下載jar包)。 修改apache-nutch-1.9資料夾中的ivy/ivysettings.xml: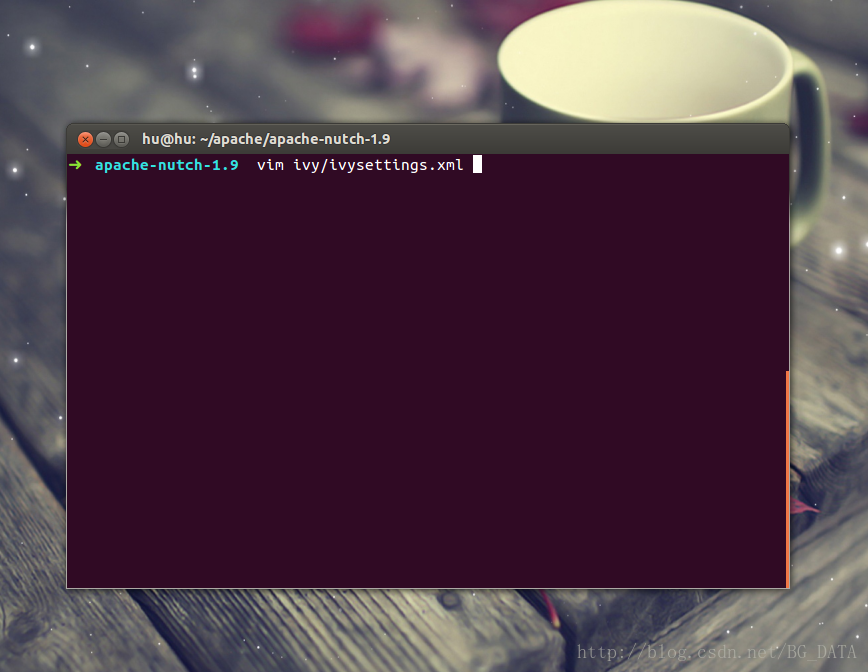 找到:
找到:
<property name="repo.maven.org"
      value="http://repo1.maven.org/maven2/"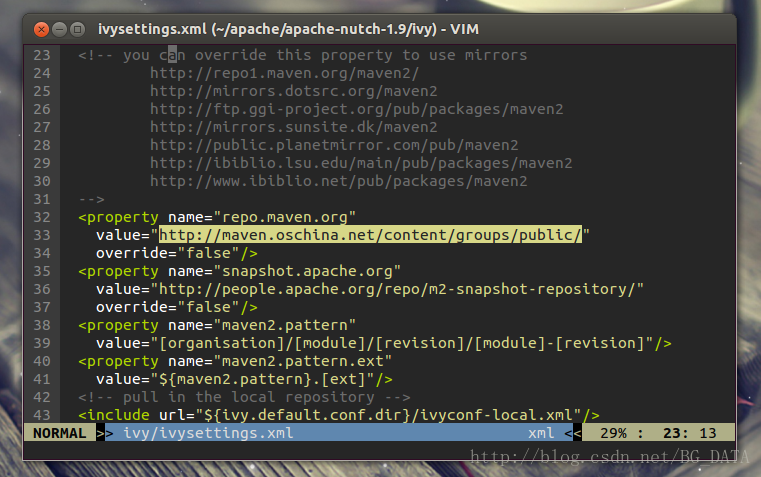
override="false"/>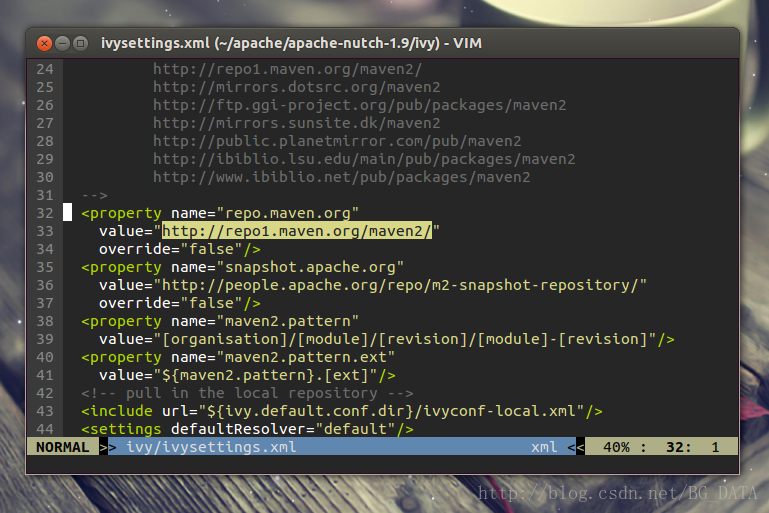 將value修改為http://maven.oschina.net/content/groups/public/
修改後:
將value修改為http://maven.oschina.net/content/groups/public/
修改後:
<property name="repo.maven.org"
      value="http://maven.oschina.net/content/groups/public/"
      override="false"/>
 儲存並退出,保證當前目錄為apache-nutch-1.9,執行命令:
然後耐心等待,這個過程ant會根據ivy從中心倉庫下載各種依賴jar包,可能要十幾分鍾。ant eclipse -verbose

-verbose引數加上之後可以看到ant過程的詳細資訊。 10分鐘左右,轉換成功:

開啟Intellij, File -> Import Project ->選擇apache-nutch-1.9資料夾,確定後選擇Import project from external model(Eclipse)
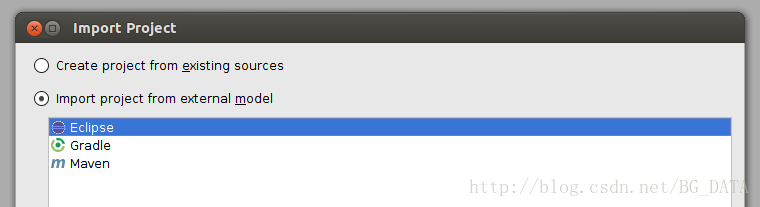
一直點選next到結束。成功將專案匯入Intellij:

原始碼匯入工程後,並不能執行完整的爬取。Nutch將爬取的流程切分成很多階段,每個階段分別封裝在一個類的main函式中。在外面通過Linux Shell呼叫這些main函式,來完整爬取的流程。我們在後續教程中會對流程排程做一個詳細的說明。 下面我們來執行Nutch中最簡單的流程:Inject。我們知道爬蟲在初始階段,是需要人工給出一個或多個url,作為起始點(廣度遍歷樹的樹根)。Inject的作用,就是把使用者寫在檔案裡的種子(一行一個url,是TextInputFormat),插入到爬蟲的URL管理檔案(crawldb,是SequenceFile)中。 從src資料夾中找到org.apache.nutch.crawl.Injector類:

在閱讀Nutch原始碼的過程中,最重要的就是找到每個類的main函式:
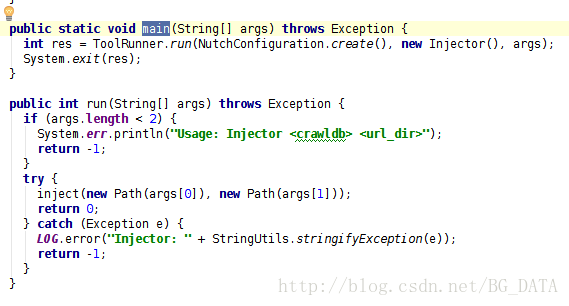
可以看到,main函式其實是利用ToolRunner,執行了run(String[] args)。這裡ToolRunner.run會從第二個引數(new Injector())這個物件中,找到run(String[] args)這個方法執行。 從run方法中可以看出來,String[] args需要有2個引數,第一個引數表示爬蟲的URL管理資料夾(輸出),第二個引數表示種子資料夾(輸入)。對hadoop中的map reduce程式來說,輸入資料夾是必須存在的,輸出資料夾應該不存在。我們建立一個資料夾 /tmp/urls,來存放種子檔案(作為輸入)。

在seed.txt中加入一個種子URL
http://www.cnbeta.com/指定一個資料夾/tmp/crawldb來作為URL管理資料夾(輸出) 有一種簡單的方法來指定args,直接在main函式下加一行:
args=new String[]{"/tmp/crawldb","/tmp/urls"};
執行這個類,我們會發現報錯了(下面只給了錯誤的一部分):
Caused by: java.lang.RuntimeException: x point org.apache.nutch.net.URLNormalizer not found.
	at org.apache.nutch.net.URLNormalizers.<init>(URLNormalizers.java:123)
	at org.apache.nutch.crawl.Injector$InjectMapper.configure(Injector.java:84)
	... 23 more
這是因為用這種方式執行,按照Nutch預設的配置,不能正確地載入外掛。我們需要修改Nutch的配置檔案,為外掛資料夾指定一個絕對路徑,修改conf/nutch-default.xml檔案,找到:
<property>
        <name>plugin.folders</name>
        <value>plugins</value>
        <description>Directories where nutch plugins are located.  Each
            element may be a relative or absolute path.  If absolute, it is used
            as is.  If relative, it is searched for on the classpath.</description>
</property><property>
<name>plugin.folders</name>
<value>/home/hu/apache/apache-nutch-1.9/src/plugin</value>
<description>Directories where nutch plugins are located. Each
element may be a relative or absolute path. If absolute, it is used
as is. If relative, it is searched for on the classpath.</description>
</property>建議在修改nutch-default.xml時,將原來的配置註釋,並複製一份新的修改,方便還原:
 現在再執行Injector.java,看到結果:

執行成功。
讀取爬蟲檔案:
我們檢視程式的輸出 tree /tmp/crawldb ,如果沒有tree命令,就直接用資源管理器之類的檢視吧: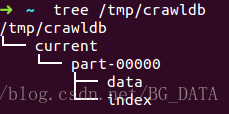
檢視裡面的data檔案:
vim /tmp/crawldb/current/part-00000/data 這是一個SequenceFile,Nutch中除了Inject的輸入(種子)之外,其他檔案
全部以SequenceFile的形式儲存。SequenceFile的結構如下:
這是一個SequenceFile,Nutch中除了Inject的輸入(種子)之外,其他檔案
全部以SequenceFile的形式儲存。SequenceFile的結構如下:
key0 value0
key1 value1
key2  value2
......
keyn valuenpackage org.apache.nutch.example;
import org.apache.hadoop.conf.Configuration;
import org.apache.hadoop.fs.FileSystem;
import org.apache.hadoop.fs.Path;
import org.apache.hadoop.io.SequenceFile;
import org.apache.hadoop.io.Text;
import org.apache.nutch.crawl.CrawlDatum;
import java.io.IOException;
/**
* Created by hu on 15-2-9.
*/
public class InjectorReader {
public static void main(String[] args) throws IOException {
Configuration conf=new Configuration();
Path dataPath=new Path("/tmp/crawldb/current/part-00000/data");
FileSystem fs=dataPath.getFileSystem(conf);
SequenceFile.Reader reader=new SequenceFile.Reader(fs,dataPath,conf);
Text key=new Text();
CrawlDatum value=new CrawlDatum();
while(reader.next(key,value)){
System.out.println("key:"+key);
System.out.println("value:"+value);
}
reader.close();
}
}key:http://www.cnbeta.com/
value:Version: 7
Status: 1 (db_unfetched)
Fetch time: Mon Feb 09 13:20:36 CST 2015
Modified time: Thu Jan 01 08:00:00 CST 1970
Retries since fetch: 0
Retry interval: 2592000 seconds (30 days)
Score: 1.0
Signature: null
Metadata:
_maxdepth_=1000
_depth_=1我們可以看到,程式讀出了剛才Inject到crawldb的url,key是url,value是一個CrawlDatum物件,這個物件用來維護爬蟲的URL管理資訊,我們可以看到一行:
Status: 1 (db_unfetched)完整爬取:
下面給出的是各位最期待的程式碼,就是如何用Nutch完成一次完整的爬取。官方程式碼在1.7之前(包括1.7),包含一個Crawl.java,這個程式碼的main函式可以執行一次完整的爬取,但是從1.7之後就取消了。只保留了使用Linux Shell來呼叫每個流程,來完成爬取的方法。但是好在取消的Crawl.java修改一下,還是可以使用的。 在爬取之前,我們先修改一下conf/nutch-default.xml中的一個地方,找到:<property>
<name>http.agent.name</name>
<value></value>
<description>HTTP 'User-Agent' request header. MUST NOT be empty -
please set this to a single word uniquely related to your organization.
NOTE: You should also check other related properties:
http.robots.agents
http.agent.description
http.agent.url
http.agent.email
http.agent.version
and set their values appropriately.
</description>
</property>在<value></value>中隨意新增一個值,修改為:
<property>
  <name>http.agent.name</name>
  <value>test</value>
  <description>HTTP 'User-Agent' request header. MUST NOT be empty -
  please set this to a single word uniquely related to your organization.

  NOTE: You should also check other related properties:

    http.robots.agents
    http.agent.description
    http.agent.url
    http.agent.email
    http.agent.version

  and set their values appropriately.

  </description>
</property>
這個值會在傳送http請求時,作為User-Agent欄位。 下面給出程式碼:
package org.apache.nutch.crawl;

import java.util.*;
import java.text.*;

// Commons Logging imports
import org.apache.commons.lang.StringUtils;
import org.slf4j.Logger;
import org.slf4j.LoggerFactory;

import org.apache.hadoop.fs.*;
import org.apache.hadoop.conf.*;
import org.apache.hadoop.mapred.*;
import org.apache.hadoop.util.Tool;
import org.apache.hadoop.util.ToolRunner;
import org.apache.nutch.parse.ParseSegment;
import org.apache.nutch.indexer.IndexingJob;
//import org.apache.nutch.indexer.solr.SolrDeleteDuplicates;
import org.apache.nutch.util.HadoopFSUtil;
import org.apache.nutch.util.NutchConfiguration;
import org.apache.nutch.util.NutchJob;

import org.apache.nutch.fetcher.Fetcher;

public class Crawl extends Configured implements Tool {
    public static final Logger LOG = LoggerFactory.getLogger(Crawl.class);

    private static String getDate() {
        return new SimpleDateFormat("yyyyMMddHHmmss").format
                (new Date(System.currentTimeMillis()));
    }


    /* Perform complete crawling and indexing (to Solr) given a set of root urls and the -solr
       parameter respectively. More information and Usage parameters can be found below. */
    public static void main(String args[]) throws Exception {
        Configuration conf = NutchConfiguration.create();
        int res = ToolRunner.run(conf, new Crawl(), args);
        System.exit(res);
    }

    @Override
    public int run(String[] args) throws Exception {

        /*種子所在資料夾*/
        Path rootUrlDir = new Path("/tmp/urls");
        /*儲存爬取資訊的資料夾*/
        Path dir = new Path("/tmp","crawl-" + getDate());
        int threads = 50;
        /*廣度遍歷時爬取的深度,即廣度遍歷樹的層數*/
        int depth = 2;
        long topN = 10;

        JobConf job = new NutchJob(getConf());
        FileSystem fs = FileSystem.get(job);

        if (LOG.isInfoEnabled()) {
            LOG.info("crawl started in: " + dir);
            LOG.info("rootUrlDir = " + rootUrlDir);
            LOG.info("threads = " + threads);
            LOG.info("depth = " + depth);
            if (topN != Long.MAX_VALUE)
                LOG.info("topN = " + topN);
        }

        Path crawlDb = new Path(dir + "/crawldb");
        Path linkDb = new Path(dir + "/linkdb");
        Path segments = new Path(dir + "/segments");
        Path indexes = new Path(dir + "/indexes");
        Path index = new Path(dir + "/index");

        Path tmpDir = job.getLocalPath("crawl"+Path.SEPARATOR+getDate());
        Injector injector = new Injector(getConf());
        Generator generator = new Generator(getConf());
        Fetcher fetcher = new Fetcher(getConf());
        ParseSegment parseSegment = new ParseSegment(getConf());
        CrawlDb crawlDbTool = new CrawlDb(getConf());
        LinkDb linkDbTool = new LinkDb(getConf());

        // initialize crawlDb
        injector.inject(crawlDb, rootUrlDir);
        int i;
        for (i = 0; i < depth; i++) {             // generate new segment
            Path[] segs = generator.generate(crawlDb, segments, -1, topN, System
                    .currentTimeMillis());
            if (segs == null) {
                LOG.info("Stopping at depth=" + i + " - no more URLs to fetch.");
                break;
            }
            fetcher.fetch(segs[0], threads);  // fetch it
            if (!Fetcher.isParsing(job)) {
                parseSegment.parse(segs[0]);    // parse it, if needed
            }
            crawlDbTool.update(crawlDb, segs, true, true); // update crawldb
        }
        /*
        if (i > 0) {
            linkDbTool.invert(linkDb, segments, true, true, false); // invert links

            if (solrUrl != null) {
                // index, dedup & merge
                FileStatus[] fstats = fs.listStatus(segments, HadoopFSUtil.getPassDirectoriesFilter(fs));

                IndexingJob indexer = new IndexingJob(getConf());
                indexer.index(crawlDb, linkDb,
                        Arrays.asList(HadoopFSUtil.getPaths(fstats)));

                SolrDeleteDuplicates dedup = new SolrDeleteDuplicates();
                dedup.setConf(getConf());
                dedup.dedup(solrUrl);
            }

        } else {
            LOG.warn("No URLs to fetch - check your seed list and URL filters.");
        }
        */
        if (LOG.isInfoEnabled()) { LOG.info("crawl finished: " + dir); }
        return 0;
    }


}
2015-02-09 14:23:17,171 INFO  crawl.CrawlDb (CrawlDb.java:update(115)) - CrawlDb update: finished at 2015-02-09 14:23:17, elapsed: 00:00:01
2015-02-09 14:23:17,171 INFO  crawl.Crawl (Crawl.java:run(117)) - crawl finished: /tmp/crawl-20150209142212
有些時候爬蟲爬一層就停止了,有幾種原因: 1)種子對應的頁面大小超過配置的上限,頁面被忽略。 2)nutch預設遵循robots協議,有可能robots協議禁止了爬取,不過出現這種情況日誌會給出相關資訊。 3)網頁沒有被正確爬取(這種情況少)。 爬很多入口網站時容易出現第一種情況,這種情況只需要找到conf/nutch-default.xml中的:
<property>
  <name>http.content.limit</name>
  <value>65536</value>
  <description>The length limit for downloaded content using the http://
  protocol, in bytes. If this value is nonnegative (>=0), content longer
  than it will be truncated; otherwise, no truncation at all. Do not
  confuse this setting with the file.content.limit setting.
  </description>
</property>
將value設定為-1即可
<property>
  <name>http.content.limit</name>
  <value>-1</value>
  <description>The length limit for downloaded content using the http://
  protocol, in bytes. If this value is nonnegative (>=0), content longer
  than it will be truncated; otherwise, no truncation at all. Do not
  confuse this setting with the file.content.limit setting.
  </description>
</property>
如果看到日誌中有說被robots協議阻攔,修改Fetcher.java的原始碼,找到:
if (!rules.isAllowed(fit.u.toString())) {
                // unblock
                fetchQueues.finishFetchItem(fit, true);
                if (LOG.isDebugEnabled()) {
                  LOG.debug("Denied by robots.txt: " + fit.url);
                }
                output(fit.url, fit.datum, null, ProtocolStatus.STATUS_ROBOTS_DENIED, CrawlDatum.STATUS_FETCH_GONE);
                reporter.incrCounter("FetcherStatus", "robots_denied", 1);
                continue;
              }
將整段程式碼註釋即可。 教程持續更新中。。。。