Eclipse搭建Hibernate框架 Demo
阿新 • • 發佈:2019-01-30
第一步:首先去官網下載需要的JAR包 地址:http://hibernate.org/ (我這裡使用的是5.1.10版本的)
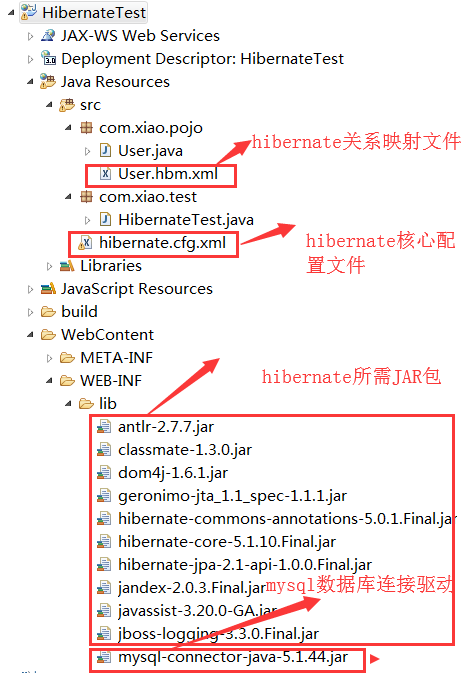
第二步:建立動態web專案,工程目錄結構如下:
第三步:書寫hibernate核心配置檔案-hibernate.cfg.xml:(切記:資料庫連線資訊改成自己的)
<?xml version="1.0" encoding="UTF-8"?>
<!DOCTYPE hibernate-configuration PUBLIC
	"-//Hibernate/Hibernate Configuration DTD 3.0//EN"
	"http://www.hibernate.org/dtd/hibernate-configuration-3.0.dtd">
<hibernate-configuration>

	<session-factory>
	<!--
		在解壓檔案  hibernate-release-5.1.10.Final\project\etc 目錄下
		在檔案hibernate.properties中搜素mysql 就可以看見如下name屬性
		#hibernate.dialect org.hibernate.dialect.MySQLDialect
		#hibernate.dialect org.hibernate.dialect.MySQLInnoDBDialect
		#hibernate.dialect org.hibernate.dialect.MySQLMyISAMDialect
		#hibernate.connection.driver_class com.mysql.jdbc.Driver
		#hibernate.connection.url jdbc:mysql:///test
		#hibernate.connection.username gavin
		#hibernate.connection.password

	 -->
	 	<!-- 必須的五項配置  這是使用的Hibernate自帶的連線池,不用於生產環境-->
		<property name="hibernate.connection.driver_class">com.mysql.jdbc.Driver</property>
		<property name="hibernate.connection.url">jdbc:mysql://localhost:3306/all_db</property>
		<property name="hibernate.connection.username">root</property>
		<property name="hibernate.connection.password">root</property>
		<property name="hibernate.dialect">org.hibernate.dialect.MySQLDialect</property>

		<!-- 在解壓檔案  hibernate-release-5.1.10.Final\project\etc 目錄下
			 在檔案hibernate.properties中搜素show就可以看見如下name屬性
		 -->
		<!-- #hibernate.show_sql true -->
		<property name="hibernate.show_sql">true</property>
		<!--#hibernate.format_sql true -->
		<property name="hibernate.format_sql">true</property>
	<!--
		 	在解壓檔案  hibernate-release-5.1.10.Final\project\etc 目錄下
			 在檔案hibernate.properties中搜素hbm2就可以看見如下name屬性
		        #hibernate.hbm2ddl.auto  none		不讓Hibernate維護表
		        #hibernate.hbm2ddl.auto create-drop	每次建立一個新表,執行完程式刪除這個表
			#hibernate.hbm2ddl.auto create		每次建立一個新表
			#hibernate.hbm2ddl.auto update		資料庫中有表,使用原來的,沒有,建立一個新的,可以更新表結構
			#hibernate.hbm2ddl.auto validate 	只會使用原有的表,對對映關係進行校驗
	-->
		<property name="hibernate.hbm2ddl.auto">update</property>
		<!-- 載入對映檔案 -->
		<mapping resource="com/xiao/pojo/User.hbm.xml"/>


	</session-factory>

</hibernate-configuration>
第四步:書寫實體類-User.java:
package com.xiao.pojo;

/**
 * @author 笑笑
 *
 * 2017年12月7日下午10:19:15
 */
public class User {
		private Integer id = 0;
		private String name = null;
		private String password = null;

		public Integer getId() {
			return id;
		}
		public void setId(Integer id) {
			this.id = id;
		}

		public String getName() {
			return name;
		}
		public void setName(String name) {
			this.name = name;
		}
		public String getPassword() {
			return password;
		}
		public void setPassword(String password) {
			this.password = password;
		}

		@Override
		public String toString() {
			return "User [id=" + id + ", name=" + name + ", password=" + password + "]";
		}

}
第五步:書寫對映檔案-User.hbm.xml:
<?xml version="1.0" encoding="UTF-8"?>
<!DOCTYPE hibernate-mapping PUBLIC
    "-//Hibernate/Hibernate Mapping DTD 3.0//EN"
    "http://www.hibernate.org/dtd/hibernate-mapping-3.0.dtd">

<hibernate-mapping>

	<class name="com.xiao.pojo.User" table="hibernate_test">

		<!-- 對映主鍵 -->
		<id name="id" column="id">
			<generator class="native"></generator>
		</id>
		<!-- 對映其他欄位,如果實體類與表的欄位相一致,可以省略 -->
		<property name="name"	  column="name" />
		<property name="password" column="password" />

	</class>

</hibernate-mapping>
第六步:書寫測試類-HibernateTest.java:
package com.xiao.test;

import org.hibernate.Session;
import org.hibernate.SessionFactory;
import org.hibernate.Transaction;
import org.hibernate.cfg.Configuration;
import org.junit.Test;
import com.xiao.pojo.User;
/**
 * @author 笑笑
 *
 * 2017年12月7日下午10:58:12
 */
public class HibernateTest {
		@Test
		public void test(){

			Configuration cfg = new Configuration().configure();//載入主配置檔案

			SessionFactory sf = cfg.buildSessionFactory();

			Session session = sf.openSession();
			Transaction tx = session.beginTransaction();
			User user = new User();
			user.setName("笑笑");
			user.setPassword("123");
			session.save(user);
			tx.commit();
			session.close();
			sf.close();
		}
}
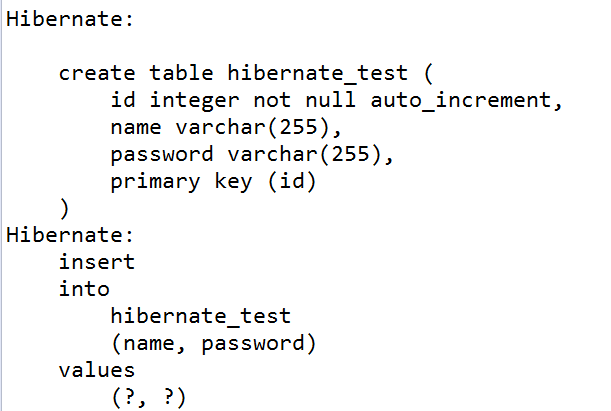
第七步:執行Junit測試,控制輸出如下資訊:
到此,hibernate框架搭建成功!


