
搭建基於註解方式的SSH專案框架
轉自:http://blog.csdn.net/ererfei/article/details/46800415
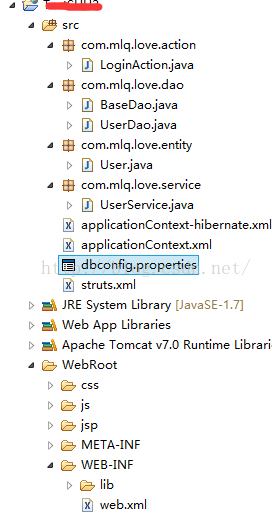
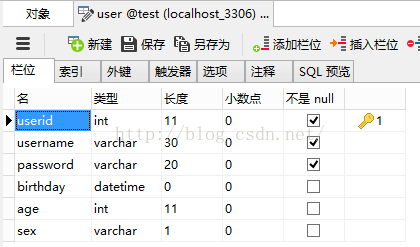
1. 專案目錄以及資料表結構
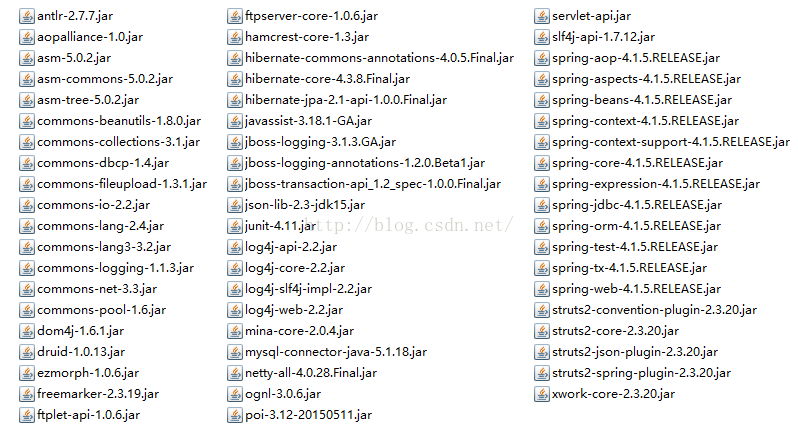
2. 準備jar包
下面是我開發專案準備的jar包,可能有一些是專案依賴的,例如其中的druid-1.0.13.jar、ftplet-api-1.0.6.jar ftpserver-core-1.0.6.jar、junit-4.1.1.jar、slf4j-api-1.7.12這幾個包就是根據需要新增的,分別是阿里巴巴開源資料庫連線池、兩個ftp檔案伺服器、單元測試以及slf4j用於log跟蹤記錄資料庫操作資訊,其他的都是SSH中的jar
3. 配置struts2
配置程式碼如下(所有的配置屬性都可以在struts2-core-×××.jar包中org.apache.struts2下的default.properties中找到)
【struts.xml】
- <?xmlversion="1.0"encoding="UTF-8" ?>
- <!DOCTYPE struts PUBLIC
- "-//Apache Software Foundation//DTD StrutsConfiguration 2.3//EN"
-
"http://struts.apache.org/dtds/struts-2.3.dtd">
- <struts>
- <constantname="struts.enable.DynamicMethodInvocation"value="false" />
- <constantname="struts.devMode"value="true"/>
- <!-- 指定由spring負責action物件的建立 -->
- <constantname="struts.objectFactory"value="spring"/>
- <!-- 國際化設定,請求引數為utf-8編碼 -->
-
<constantname="struts.i18n.encoding"value="utf-8"/>
- <!-- 指定被struts2處理的請求字尾型別,如果有多個,用逗號隔開 -->
- <constantname="struts.action.extension"value="action"/>
- <!-- 指定上傳檔案的大小上限 -->
- <constantname="struts.multipart.maxSize"value="209715200"/>
- <!-- 當配置檔案改動後是否重新載入,生產環境下需要設定為false -->
- <constantname="struts.configuration.xml.reload"value="false"/>
- <!-- 是否使用struts2的開發模式,生產環境下需要設定為false -->
- <constantname="struts.devMode"value="false"/>
- <!-- 瀏覽器是否快取靜態內容,生產環境下需要設定為true -->
- <constantname="struts.serve.static.browserCache"value="true"/>
- <!-- <includefile="example.xml"/> -->
- </struts>
4. 配置Spring+Hibernate
4.1 編寫Spring配置檔案applicationContext.xml
【applicationContext.xml】
- <?xmlversion="1.0"encoding="UTF-8"?>
- <beans
- xmlns="http://www.springframework.org/schema/beans"
- xmlns:xsi="http://www.w3.org/2001/XMLSchema-instance"
- xmlns:aop="http://www.springframework.org/schema/aop"
- xmlns:tx="http://www.springframework.org/schema/tx"
- xmlns:context="http://www.springframework.org/schema/context"
- xmlns:task="http://www.springframework.org/schema/task"
- xsi:schemaLocation="
- http://www.springframework.org/schema/beanshttp://www.springframework.org/schema/beans/spring-beans-4.1.xsd
- http://www.springframework.org/schema/aophttp://www.springframework.org/schema/aop/spring-aop-4.1.xsd
- http://www.springframework.org/schema/txhttp://www.springframework.org/schema/tx/spring-tx-4.1.xsd
- http://www.springframework.org/schema/context http://www.springframework.org/schema/context/spring-context-4.1.xsd
- http://www.springframework.org/schema/taskhttp://www.springframework.org/schema/task/spring-task-4.1.xsd">
- <!-- 掃描base-package下的檔案,並註冊bean,同時啟用已註冊的bean,就是掃描那些用@Service,@component,@Repositiry標識的那些類 -->
- <context:component-scanbase-package="com.mlq.love"/>
- </beans>
4.2編寫Hibernate配置檔案applicationContext-hibernate.xml
首先編寫配置檔案dbconfig.properties,這樣提取出來配置資訊可以比較直觀的檢視和維護
【dbconfig.properties】
- url=jdbc\:mysql\://localhost\:3306/test
- driverClassName=com.mysql.jdbc.Driver
- username=root
- password=centerm
- initialSize=10
- minIdle=5
- maxActive=50
- maxWait=60000
- timeBetweenEvictionRunsMillis=60000
- minEvictableIdleTimeMillis=300000
- poolPreparedStatements=true
- maxPoolPreparedStatementPerConnectionSize=100
- validationQuery=SELECT'x'
- testWhileIdle=true
- testOnBorrow=false
- testOnReturn=false
- maxOpenPreparedStatements=20
- removeAbandoned=false
- removeAbandonedTimeout=1800
- logAbandoned=true
【applicationContext-hibernate.xml】
- <?xmlversion="1.0"encoding="UTF-8" ?>
- <beansxmlns="http://www.springframework.org/schema/beans"
- xmlns:xsi="http://www.w3.org/2001/XMLSchema-instance"xmlns:aop="http://www.springframework.org/schema/aop"
- xmlns:tx="http://www.springframework.org/schema/tx"xmlns:context="http://www.springframework.org/schema/context"
- xmlns:task="http://www.springframework.org/schema/task"
- xsi:schemaLocation="
- http://www.springframework.org/schema/beanshttp://www.springframework.org/schema/beans/spring-beans-4.1.xsd
- http://www.springframework.org/schema/aophttp://www.springframework.org/schema/aop/spring-aop-4.1.xsd
- http://www.springframework.org/schema/txhttp://www.springframework.org/schema/tx/spring-tx-4.1.xsd
- http://www.springframework.org/schema/contexthttp://www.springframework.org/schema/context/spring-context-4.1.xsd
- http://www.springframework.org/schema/taskhttp://www.springframework.org/schema/task/spring-task-4.1.xsd">
- <beanid="propertyConfigurer"
- class="org.springframework.beans.factory.config.PropertyPlaceholderConfigurer">
- <propertyname="locations">
- <list>
- <value>/WEB-INF/classes/dbconfig.properties</value>
- </list>
- </property>
- </bean>
-
相關推薦
搭建基於註解方式的SSH專案框架
轉自:http://blog.csdn.net/ererfei/article/details/46800415 1. 專案目錄以及資料表結構 2. 準備jar包 下面是我開發專案準備的jar包,可能有一些是專案依賴的,例如其中的
基於dubbo的分散式專案框架搭建 開發工具idea (springboot+dubbo+zookeeper+redis+rabbitmq+基於Swagger2的restful api) --(二)
1.dubbo-admin 2.5.8的安裝 http://dubbo.apache.org/en-us/index.html 點選GITHUB 跳轉到github下載dubbo原始碼 點選Branch切換到Tags,找到對應的2.5.8版本,下載該版本,下載解壓完以後
基於dubbo的分散式專案框架搭建 開發工具idea (springboot+dubbo+zookeeper+redis+rabbitmq+基於Swagger2的restful api) --(一)
1. spring-boot web框架下載配置 https://start.spring.io/ 點選Switch to the full version 勾選詳細的配置 根據需要更改group atrifact...等資訊 &nb
基於dubbo的分散式專案框架搭建 開發工具idea (springboot+dubbo+zookeeper+redis+rabbitmq+基於Swagger2的restful api) --(四)
1.rabbitmq的整合 首先在配置檔案裡增加 #rabbitMQ spring.rabbitmq.host=127.0.0.1 spring.rabbitmq.port=5672 spring.rabbitmq.username=root spring.rabbitmq.password
基於dubbo的分散式專案框架搭建 開發工具idea (springboot+dubbo+zookeeper+redis+rabbitmq+基於Swagger2的restful api) --(三)
1.dubbo註冊中心zookeeper 的安裝 http://mirrors.shu.edu.cn/apache/zookeeper/ 選擇對應的版本下載即可 修改zoo_sample.cfg為zoo.cfg(可以先備份一份) 在安裝目錄新建data和log目錄 修改zo
MyEclispe2014 SSH專案框架搭建
建議按照Stuts,Spring,Hibernate的順序來搭建。 搭建SSH框架的方式有兩種,第一種是自己下載jar包,手動匯入,建立並編寫配置檔案,第二種通過MyEclipse自動建立,我們這裡使用第二種,Myeclipse集成了我們需要的jar包,比較方便。 1.新建Web
基於註解的Spirng MVC框架的搭建(基礎篇)
看這篇搭建過程前,最好是先了解一下原理。 最近正好在帶兩個實習生,教他們怎麼搭建一個Spring MVC的框架,網上也看了很多demo,發現各有各的版本,於是自己用Spring3,Hibernate3搭了一個,伺服器是Tomcat6,資料庫是MySql(note:這好像
spring的依賴注入 -------基於註解方式
前言: 做了2年的軟體,剛開始入行的時候,沒有個目標基本上都是在摸索,技術看的我眼花繚亂,這個想學,那個也想學結果是對很多技術一知半解的,工作中才發現,我們要掌握的一門可以搞定快速開發搞定所有業務需求的技術, 所以現在我要對spring的東西達到一個深層次的掌握,儘量避免百度,在開發
基於maven的SSH專案所需pom.xml
Smbms-SpringMVC cn.jjz 1.0-SNAPSHOT 4.0.0 cn.jjz SSHDemo1 war SSHDemo1 Maven Webapp http://maven.apache.org <dependency> &
基於註解方式純手寫spring-ioc
1.定義註解 @Target({ElementType.TYPE}) @Retention(RetentionPolicy.RUNTIME) public @interface ExtService { } 2.工具類 https://blog.csdn.net/qq_419882
如何在ASP.NET 5上搭建基於TypeScript的Angular2專案
一、前言 就在上月,公司的一個同事建議當前的前端全面改用AngularJs進行開發,而我們採用的就是ASP.NET 5專案,原本我的計劃是採用TypeScript直接進行Angular2開發。所以借用這段時間來寫下如何在ASP.NET 5下搭建基於TypeScript的Angualr2的專案,下面我們就進入
springMVC第一個demo(基於註解方式)
因為粗心沒仔細看報錯資訊所以搭建了好久,剛好有時間就記錄下來,希望其他訪問不到Controller類的初學者不要跟我一樣粗心浪費時間 jre版本:1.8 tomca版本:v9.0 spring版本:5.0.1 導包:本人匯入了spring的所有包,沒出現問題,不知道有沒有壞處,高手路過可以指
IDEA搭建Maven風格的SSM專案框架
IDEA + Maven搭建SSM專案框架 1. 建立新Maven專案: 新建一個Maven專案,不要勾選使用模板 填寫各種資訊 下一步 點選finish ; 這裡點一下Enable-Auto-import
Spring AOP學習筆記(一)-AOP相關概念和基於註解方式實現AOP的規則
一、 Spring AOP 概念 其實AOP就是要將我們Aspect中的Pointcut和Target Object中的JointPoint動態的連線起來,同時我們通過Advice指明Pointcut執行的一個時機。這是個人理解 AOP相關名詞解釋
基於註解方式的AOP的配置與應用
AOP是OOP的延續,是Aspect Oriented Programming的縮寫,意思是面向切面程式設計。可以通過預編譯方式和執行期動態代理實現在不修改原始碼的情況下給程式動態統一新增功能的一種技術。AOP實際是GoF設計模式的延續,設計模式孜孜不倦追求的是呼叫者和被呼
Spring mvc基於註解方式實現簡單HelloWorld
實現spring MVC有兩種不同的方式:基於XML配置檔案和基於註解。 上篇部落格介紹了基於XML配置檔案的方式,這裡我們使用基於註解的方式來實現。 下面只重點介紹與XML配置檔案方式不同的兩個地方:Spring配置檔案(springmvc-servlet.xml)
Hibernate基於註解方式的各種對映全面總結
1. 使用HibernateAnnotation來做物件關係對映 1) 新增必須包: hibernate-jpa-2.0-api-1.0.0.Final.jar 2)在實體類中新增JPA的標準註解來進行物件關係對映.註解可以新增在屬性上,也可以新增在getXxx
authorize(基於註解的許可權認證框架)
一、是什麼 很多專案都會用到許可權管理,目前流行的許可權框架(Apache Shiro,Spring Security等)在使用的時候都覺得很繁瑣,特別是在一些小型的專案中。有時候我會想,如果通過註解的方式,直接把許可權註解到訪問的介面方法上那該有多好。 a
Spring 之 IoC 原始碼分析 (基於註解方式)
一、 IoC 理論 IoC 全稱為 Inversion of Control,翻譯為 “控制反轉”,它還有一個別名為 DI(Dep
SSM框架專案搭建系列(七)—Spring AOP之基於註解的宣告式AspectJ
工程結構 其中AOP和com.ssm包下面的檔案不用管;dispatcher-servlet.xml和web.xml和之前專案中的內容一樣。 applicationContext.xml <?xml version="1.0" encodin