佈局優化include與merge
Android 官方提供了三個用來優化佈局的標籤,分別是include、merge與ViewStub,其中ViewStub是動態載入檢視到記憶體,大家可以查閱:Android UI佈局優化之ViewStub
一、include佈局重用:
在Android的應用程式開發中,標題欄是必不可少的一個元素,大部分頁面都要用到,而且佈局都是一樣的,這時候使用include標籤就顯得極其的方便。使用時通常需要注意以下幾點。
- include標籤的layout_*屬性會替換掉被include檢視的根節點的對應屬性。
- include標籤的id屬性會替換掉被include檢視的根節點id
下面例子中,titlebar_layout.xml為標題欄佈局,而activity_main.xml為主介面佈局,activity_setting.xml為設定頁面佈局,這這兩個介面中都include了titlebar_layout.xml檢視。
titlebar_layout.xml:
<?xml version="1.0" encoding="utf-8"?>
<FrameLayout xmlns:android="http://schemas.android.com/apk/res/android"
android:id="@+id/preference_activity_title_root"
android:layout_width="match_parent"
android:layout_height="wrap_content"
android:padding="2dip"
android:background="@drawable/zns_activity_title_bg" - 1
- 2
- 3
- 4
- 5
- 6
- 7
- 8
- 9
- 10
- 11
- 12
- 13
- 14
- 15
- 16
- 17
- 18
- 19
- 20
- 21
- 22
- 23
- 24
- 25
- 26

- 1
- 2
- 3
- 4
- 5
- 6
- 7
- 8
- 9
- 10
- 11
- 12
- 13
- 14
- 15
- 16
- 17
- 18
- 19
- 20
- 21
- 22
- 23
- 24
- 25
- 26
主介面:
<?xml version="1.0" encoding="utf-8"?>
<LinearLayout xmlns:android="http://schemas.android.com/apk/res/android"
    android:layout_width="match_parent"
    android:layout_height="match_parent"
    android:orientation="vertical"
    android:background="#000000">

    <include layout="@layout/titlebar_layout"></include>

    <TextView
        android:layout_width="match_parent"
        android:layout_height="match_parent"
        android:text="這是內容區域"
        android:gravity="center"
        android:textSize="25sp"
        android:textColor="#ffffff"/>
</LinearLayout>- 1
- 2
- 3
- 4
- 5
- 6
- 7
- 8
- 9
- 10
- 11
- 12
- 13
- 14
- 15
- 16
- 17

- 1
- 2
- 3
- 4
- 5
- 6
- 7
- 8
- 9
- 10
- 11
- 12
- 13
- 14
- 15
- 16
- 17
當然,其他介面使用include同樣能包含該標題欄。
一、通過merge減少檢視節點:
merge翻譯成中文是合併的意思,在Android中通過使用merge能夠減少檢視的節點數,
從而減少檢視在繪製過程消耗的時間,達到提高UI效能的效果。使用merge時通常需要注意以下幾點:
- merge必須放在佈局檔案的根節點上。
- merge並不是一個ViewGroup,也不是一個View,它相當於聲明瞭一些檢視,等待被新增。
- merge標籤被新增到A容器下,那麼merge下的所有檢視將被新增到A容器下。
- 因為merge標籤並不是View,所以在通過LayoutInflate.inflate方法渲染的時候, 第二個引數必須指定一個父容器,且第三個引數必須為true,也就是必須為merge下的檢視指定一個父親節點。
- 如果Activity的佈局檔案根節點是FrameLayout,可以替換為merge標籤,這樣,執行setContentView之後,會減少一層FrameLayout節點。
- 自定義View如果繼承LinearLayout,建議讓自定義View的佈局檔案根節點設定成merge,這樣能少一層結點。
- 因為merge不是View,所以對merge標籤設定的所有屬性都是無效的。
其中第一點,我們看看LayoutInflate類的原始碼說明:
} else if (TAG_MERGE.equals(name)) {
    // 如果merge不是根節點,報錯
    throw new InflateException("<merge /> must be the root element");
}- 1
- 2
- 3
- 4

- 1
- 2
- 3
- 4
其中第三點,常用在自定義View中遇到,附上系統LayoutInflate類,對於該現象的原始碼:
if (TAG_MERGE.equals(name)) {
    // 如果是merge標籤,指定的root為空,或則attachToRoot為false,則丟擲異常資訊
    if (root == null || !attachToRoot) {
        throw new InflateException("<merge /> can be used only with a valid "
                + "ViewGroup root and attachToRoot=true");
    }

    rInflate(parser, root, attrs, false, false);
}- 1
- 2
- 3
- 4
- 5
- 6
- 7
- 8
- 9

- 1
- 2
- 3
- 4
- 5
- 6
- 7
- 8
- 9
針對第五點,做一下對比:
佈局檔案1:
<?xml version="1.0" encoding="utf-8"?>
<merge xmlns:android="http://schemas.android.com/apk/res/android">

    <Button
        android:layout_width="match_parent"
        android:layout_height="wrap_content"
        android:layout_gravity="top"
        android:text="頂部Button" />

    <Button
        android:layout_width="match_parent"
        android:layout_height="wrap_content"
        android:layout_gravity="bottom"
        android:text="底部Button" />

</merge>- 1
- 2
- 3
- 4
- 5
- 6
- 7
- 8
- 9
- 10
- 11
- 12
- 13
- 14
- 15
- 16

- 1
- 2
- 3
- 4
- 5
- 6
- 7
- 8
- 9
- 10
- 11
- 12
- 13
- 14
- 15
- 16
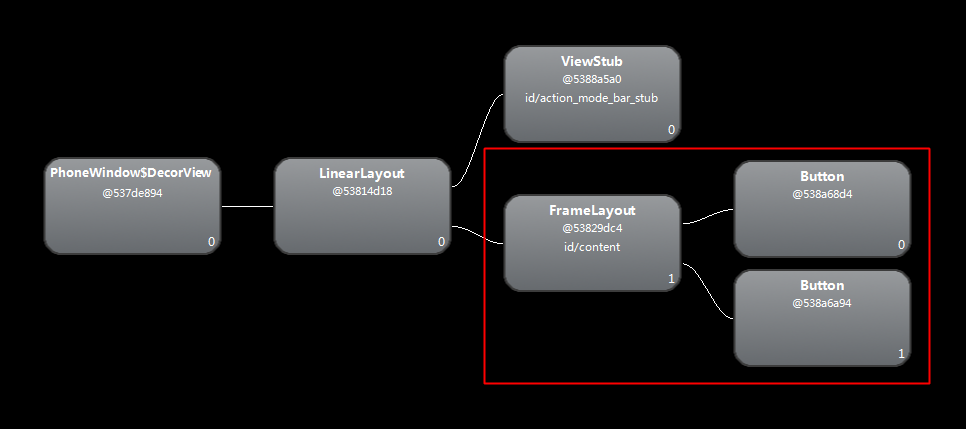
效果1:
佈局檔案2:
<?xml version="1.0" encoding="utf-8"?>
<FrameLayout xmlns:android="http://schemas.android.com/apk/res/android"
    android:layout_width="match_parent"
    android:layout_height="match_parent">

    <Button
        android:layout_width="match_parent"
        android:layout_height="wrap_content"
        android:layout_gravity="top"
        android:text="頂部Button" />

    <Button
        android:layout_width="match_parent"
        android:layout_height="wrap_content"
        android:layout_gravity="bottom"
        android:text="底部Button" />

</FrameLayout>- 1
- 2
- 3
- 4
- 5
- 6
- 7
- 8
- 9
- 10
- 11
- 12
- 13
- 14
- 15
- 16
- 17
- 18

- 1
- 2
- 3
- 4
- 5
- 6
- 7
- 8
- 9
- 10
- 11
- 12
- 13
- 14
- 15
- 16
- 17
- 18
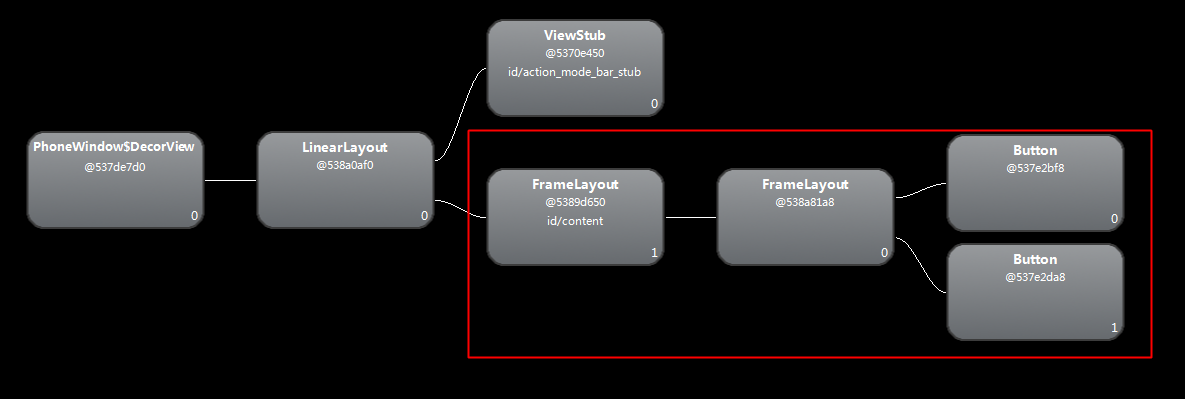
效果2:
我們可以看到,如果使用merge,明顯少了一個FrameLayout節點,這也算一個檢視優化技巧。
下面對第六條(自定義View如果繼承LinearLayout,建議讓自定義View的佈局檔案根節點設定成merge,這樣能少一層結點)進行分析:
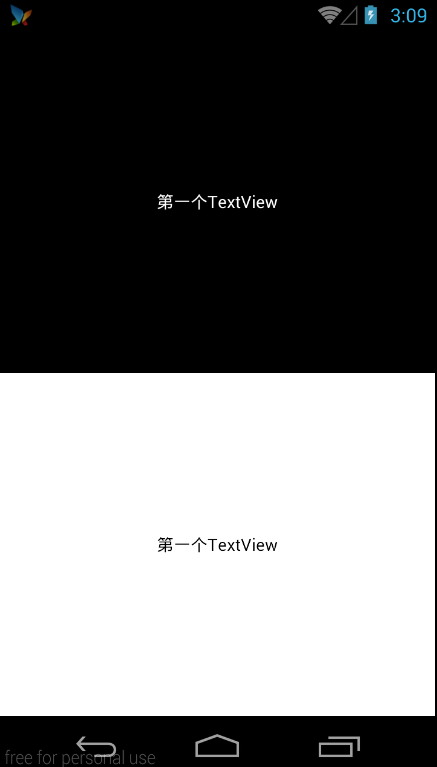
先看看效果,就是一個線性佈局,上下各一個TextView,看看使用merge和不使用merge的檢視節點,
以及使用merge的時候layoutInflate類的注意點。
效果圖:
第一種情況(不使用merge):
佈局檔案:
<?xml version="1.0" encoding="utf-8"?>
<LinearLayout xmlns:android="http://schemas.android.com/apk/res/android"
    android:layout_width="match_parent"
    android:layout_height="match_parent"
    android:orientation="vertical">

    <TextView
        android:layout_width="match_parent"
        android:layout_height="0dp"
        android:layout_weight="1.0"
        android:background="#000000"
        android:gravity="center"
        android:text="第一個TextView"
        android:textColor="#ffffff" />

    <TextView
        android:layout_width="match_parent"
        android:layout_height="0dp"
        android:layout_weight="1.0"
        android:background="#ffffff"
        android:gravity="center"
        android:text="第一個TextView"
        android:textColor="#000000" />

</LinearLayout>- 1
- 2
- 3
- 4
- 5
- 6
- 7
- 8
- 9
- 10
- 11
- 12
- 13
- 14
- 15
- 16
- 17
- 18
- 19
- 20
- 21
- 22
- 23
- 24
- 25

- 1
- 2
- 3
- 4
- 5
- 6
- 7
- 8
- 9
- 10
- 11
- 12
- 13
- 14
- 15
- 16
- 17
- 18
- 19
- 20
- 21
- 22
- 23
- 24
- 25
程式碼:
/**
 * 自定義的View,豎直方向的LinearLayout
 */
public class MergeLayout extends LinearLayout {

    public MergeLayout(Context context) {
        super(context);
        LayoutInflater.from(context).inflate(R.layout.merge_activity, this, true);
    }
}- 1
- 2
- 3
- 4
- 5
- 6
- 7
- 8
- 9
- 10

- 1
- 2
- 3
- 4
- 5
- 6
- 7
- 8
- 9
- 10
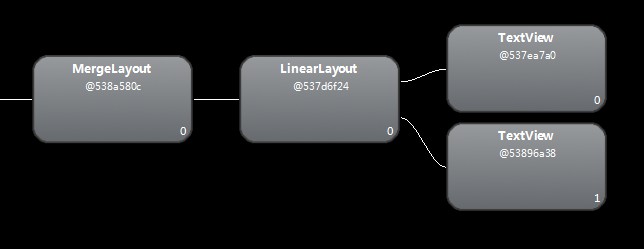
檢視樹:
我們發現,MergeLayout這個自定義控制元件的下面並不是直接跟著兩個TextView,
而是多了一個LinearLayout。
第二種情況(使用merge):
注意因為為merge標籤的設定的屬性都不會生效,所以原來LinearLayout標籤上的屬性需要轉移到Java程式碼中設定。
佈局檔案:
<?xml version="1.0" encoding="utf-8"?>
<!-- 習慣性的標記一下,MergeLayout佈局 android:orientation="vertical" -->
<merge xmlns:android="http://schemas.android.com/apk/res/android" >

    <TextView
        android:layout_width="match_parent"
        android:layout_height="0dp"
        android:layout_weight="1.0"
        android:background="#000000"
        android:gravity="center"
        android:text="第一個TextView"
        android:textColor="#ffffff" />

    <TextView
        android:layout_width="match_parent"
        android:layout_height="0dp"
        android:layout_weight="1.0"
        android:background="#ffffff"
        android:gravity="center"
        android:text="第一個TextView"
        android:textColor="#000000" />

</merge>- 1
- 2
- 3
- 4
- 5
- 6
- 7
- 8
- 9
- 10
- 11
- 12
- 13
- 14
- 15
- 16
- 17
- 18
- 19
- 20
- 21
- 22
- 23

- 1
- 2
- 3
- 4
- 5
- 6
- 7
- 8
- 9
- 10
- 11
- 12
- 13
- 14
- 15
- 16
- 17
- 18
- 19
- 20
- 21
- 22
- 23
個人習慣在用merge的時候在旁邊標明使用到的屬性,以防忘記。
java程式碼中需要設定orientation屬性:
/**
 * 自定義的View,豎直方向的LinearLayout
 */
public class MergeLayout extends LinearLayout {

    public MergeLayout(Context context) {
        super(context);
        // 設定為數值方向的佈局
        setOrientation(VERTICAL);
        LayoutInflater.from(context).inflate(R.layout.merge_activity, this, true);
    }
}- 1
- 2
- 3
- 4
- 5
- 6
- 7
- 8
- 9
- 10
- 11
- 12

- 1
- 2
- 3
- 4
- 5
- 6
- 7
- 8
- 9
- 10
- 11
- 12
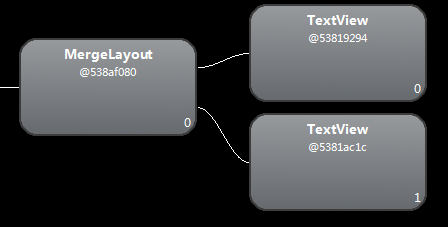
再看看檢視樹:
我們發現,LinearLayout節點被去掉了。但是最終顯示給使用者的介面卻是一樣的。
總結
1. 使用include標籤可以增加布局的複用性,提高效率。
2. 使用merge標籤可以減少檢視樹中的節點個數,加快檢視的繪製,提高UI效能。
3. merge標籤的使用,看上去一次只減少一個節點,但是當一個佈局巢狀很複雜的時候,
節點的個數可能達到幾百個,這個時候,如果每個地方都多一個節點,檢視的繪製時間相應的也就變長了很多。

