小程式canvas繪製環形進度條
阿新 • • 發佈:2019-02-01
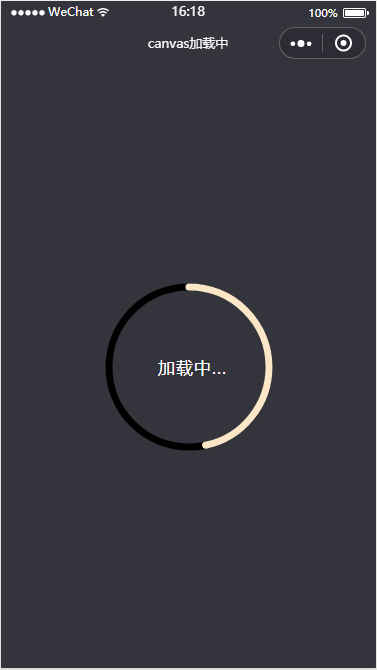
最近微信小程式是真的很火!依稀還記得自己第一次寫android的環形對比圖(點選開啟連結),一晃兩年已經過去了。時間過得真快。第一次寫部落格的時候還是上大三的時候。現在已經工作將近三年了。最近半年由於工作的原因很少寫部落格,那麼現在同樣從環形圖開始擼小程式,廢話少說,直接上圖……
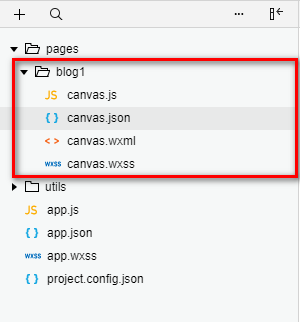
1.首先建立目錄如下所示:
2.編寫canvas.json的內容
{
  "backgroundTextStyle": "light",
  "navigationBarBackgroundColor": "#34343D",
  "navigationBarTitleText": "canvas載入中",
  "navigationBarTextStyle": "white"
}
3.編寫canvas.wxml的內容
<!--pages/blog1/canvas.wxml-->

<view class='container'>
    <view class='progress_box'>
      <!-- 繪製圓環背景 -->
      <canvas class="progress_bg" canvas-id="canvasProgressbg" />
      <!-- 繪製載入中圓弧 -->
      <canvas class="progress_canvas" canvas-id="canvasProgress" />
      <!-- 繪製圓弧中心提示文字 -->
      <view class="progress_text">
        <text class='progress_info'> {{progress_txt}}</text>
      </view>
    </view>
</view>
4.編寫canvas.wxss的內容
4.編寫canvas.js的內容/* pages/blog1/canvas.wxss */ .container { position: fixed; width: 100%; height: 100%; display: flex; flex-direction: column; justify-content: center; align-items: center; background-color: #34343d; } .progress_box { position: absolute; width: 220px; height: 220px; display: flex; align-items: center; justify-content: center; background-color: transparent; } .progress_bg { position: absolute; width: 220px; height: 220px; } .progress_canvas { width: 220px; height: 220px; } .progress_text { position: absolute; display: flex; align-items: center; justify-content: center; } .progress_info { font-size: 35rpx; padding-left: 16rpx; letter-spacing: 2rpx; color: white; }
// pages/blog1/canvas.js
Page({

  /**
   * 頁面的初始資料
   */
  data: {
    //控制progress
    count: 0, // 設定 計數器 初始為0
    countTimer: null,// 設定 定時器
    progress_txt: '載入中...',// 提示文字
  },

  /**
   * 生命週期函式--監聽頁面載入
   */
  onLoad: function (options) {
    //繪製背景
    this.drawProgressbg();
    //開始progress
    this.startProgress();
  },

  /**
  * 畫progress底部背景
  */
  drawProgressbg: function () {
    // 使用 wx.createContext 獲取繪圖上下文 context
    var ctx = wx.createCanvasContext('canvasProgressbg')
    // 設定圓環的寬度
    ctx.setLineWidth(7);
    // 設定圓環的顏色
    ctx.setStrokeStyle('#000000');
    // 設定圓環端點的形狀
    ctx.setLineCap('round')
    //開始一個新的路徑
    ctx.beginPath();
    //設定一個原點(110,110),半徑為100的圓的路徑到當前路徑
    ctx.arc(110, 110, 80, 0, 2 * Math.PI, false);
    //對當前路徑進行描邊
    ctx.stroke();
    //開始繪製
    ctx.draw();
  },

  /**
   * 畫progress進度
   */
  drawCircle: function (step) {
    // 使用 wx.createContext 獲取繪圖上下文 context
    var context = wx.createCanvasContext('canvasProgress');
    // 設定圓環的寬度
    context.setLineWidth(7);
    // 設定圓環的顏色
    context.setStrokeStyle('#FBE6C7');
    // 設定圓環端點的形狀
    context.setLineCap('round')
    //開始一個新的路徑
    context.beginPath();
    //引數step 為繪製的圓環周長,從0到2為一週 。 -Math.PI / 2 將起始角設在12點鐘位置 ,結束角 通過改變 step 的值確定
    context.arc(110, 110, 80, -Math.PI / 2, step * Math.PI - Math.PI / 2, false);
    //對當前路徑進行描邊
    context.stroke();
    //開始繪製
    context.draw()
  },

  /**
   * 開始progress
   */
  startProgress: function () {
    this.setData({
      count: 0
    });
    // 設定倒計時 定時器 每100毫秒執行一次,計數器count+1 ,耗時6秒繪一圈
    this.countTimer = setInterval(() => {
      if (this.data.count <= 60) {
        /* 繪製彩色圓環進度條
        注意此處 傳參 step 取值範圍是0到2,
        所以 計數器 最大值 60 對應 2 做處理,計數器count=60的時候step=2
        */
        this.drawCircle(this.data.count / (60 / 2))
        this.data.count++;
      } else {
        clearInterval(this.countTimer);
        this.startProgress();
      }
    }, 100)
  },

})

