Android系統Recovery工作原理2---update.zip差分包問題的解決
一、生成OTA增量包失敗的解決方案
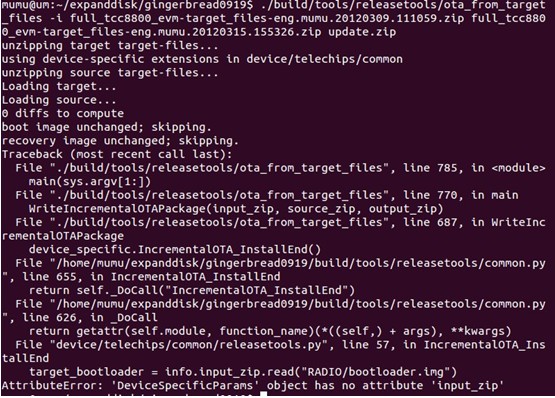
在上一篇中末尾使用build/tools/releasetools/ota_from_target_files指令碼製作update.zip增量包時失敗,我們先將出現的錯誤貼出來。

在執行這個指令碼的最後讀取input_zip中RADIO/bootloader.img時出現錯誤,顯示DeviceSpecifiParams這個物件中沒有input_zip屬性。
我們先從指令碼中出現錯誤的呼叫函式中開始查詢。出現錯誤的呼叫地方是在函WriteIncrementalOTAPackage(443行)中的device_specific.IncrementalOTA_InstallEnd(),其位於WriteIncrementalOTAPackage()中的末尾。進一步跟蹤原始碼發現,這是一個回撥函式,他的具體執行方法位於原始碼中/device/telechips/common/releasetools.py指令碼中的IncrementalOTA_InstallEnd()函式。下面就分析這個函式的作用。
releasetools.py指令碼中的兩個函式FullOTA_InstallEnd()和IncrementalOTA_InstallEnd()的作用都是從輸入包中讀取RADIO/下的bootloader.img檔案寫到輸出包中,同時生成安裝bootloader.img時執行指令碼的那部分命令。只不過一個是直接將輸入包中的bootloader.img映象寫到輸出包中,一個是先比較target_zip和source_zip中的bootloader.img是否不同(使用選項-i生成差分包時),然後將新的映象寫入輸出包中。下面先將這個函式(位於/device/telechips/common/releasetools.py)的具體實現貼出來:

我們的實際情況是,在用命令make otapackage時生成的包中是沒有這個RADIO目錄下的bootloader.img映象檔案(因為這部分更新已被遮蔽掉了)。但是這個函式中對於從包中未讀取到bootloader.img檔案的情況是有錯誤處理的,即返回。所以我們要從 出現的實際錯誤中尋找問題的原由。
真正出現錯誤的地方是:
target_bootloader=info.input_zip.read(“RADIO/bootloader.img”)。
出現錯誤的原因是:AttributeError:‘DeviceSpecificParams’object has no attribute ‘input_zip’,提示我們DeviceSpecificParams物件沒有input_zip這個屬性。
在用ota_from_target_files指令碼製作差分包時使用了選項-i,並且只有這種情況有三個引數,即target_zip 、source_zip、 out_zip。而出現錯誤的地方是target_bootloader=info.input_zip_read(“RADIO/bootloader.img”),它使用的是input_zip,我們要懷疑這個地方是不是使用錯了,而應該使用info.target_zip.read()。下面可以證實一下我們的猜測。
從ota_from_target_files指令碼中WriteFullOTAPackage()和WriteIncrementalOTAPackage這兩個函式(分別用來生成全包和差分包)可以發現,在他們的開始部分都對device_specific進行了賦值。其中WriteFullOTAPackage()對應的引數是input_zip和out_zip,而WriteIncrementalOTAPackage對應的是target_zip,source_zip,out_zip,我們可以看一下在WriteIncrementalOTAPackage函式中這部分的具體實現:

從上圖可以發現,在WriteIncrementalOTAPackage函式對DeviceSpecificParams物件進行初始化時確實使用的是target_zip而不是input_zip。而在releasetools.py指令碼中使用的卻是info.input_zip.read(),所以才會出現DeviceSpecificParams物件沒有input_zip這個屬性。由此我們找到了問題的所在(這是不是原始碼中的一個Bug?)。
將releasetools.py指令碼IncrementalOTA_InstallEnd(info)函式中的 target_bootloader=info.input_zip.
read(“RADIO/bootloader.img”)為:target_bootloader=info.target_zip.read(“RADIO/bootloader.img”),然後重新執行上面提到的製作差分包命令。就生成了我們需要的差分包update.zip。
二、 差分包update.zip的更新測試
在上面製作差分包指令碼命令中,生成差分包的原理是,參照第一個引數(target_zip),將第二個引數(source_zip)中不同的部分輸出到第三個引數(output_zip)中。其中target_zip與source_zip的先後順序不同,產生的差分包也將不同。
在實際的測試過程中,我們的增量包要刪除之前新增的一個應用(在使用update.zip全包升級時增加的),其他的部分如核心都沒有改動,所以生成的差分包很簡單,只有META-INF這個資料夾。主要的不同都體現在updater-script指令碼中,其中的#----start make changes here----之後的部分就是做出改變的部分,最主要的指令碼命令是: delete(“/system/app/CheckUpdateAll.apk” , “/system/recovery.img”);在具體更新時它將刪除CheckUpdateAll.apk這個應用。
- mount("yaffs2", "MTD", "system", "/system");
- assert(file_getprop("/system/build.prop", "ro.build.fingerprint") == "telechips/full_tcc8800_evm/tcc8800:2.3.5/GRJ90/eng.mumu.20120309.100232:eng/test-keys" ||
- file_getprop("/system/build.prop", "ro.build.fingerprint") == "telechips/full_tcc8800_evm/tcc8800:2.3.5/GRJ90/eng.mumu.20120309.100232:eng/test-keys");
- assert(getprop("ro.product.device") == "tcc8800" ||
- getprop("ro.build.product") == "tcc8800");
- ui_print("Verifying current system...");
- show_progress(0.100000, 0);
- # ---- start making changes here ----
- ui_print("Removing unneeded files...");
- delete("/system/app/CheckUpdateAll.apk",
- "/system/recovery.img");
- show_progress(0.800000, 0);
- ui_print("Patching system files...");
- show_progress(0.100000, 10);
- ui_print("Symlinks and permissions...");
- set_perm_recursive(0, 0, 0755, 0644, "/system");
- set_perm_recursive(0, 2000, 0755, 0755, "/system/bin");
- set_perm(0, 3003, 02750, "/system/bin/netcfg");
- set_perm(0, 3004, 02755, "/system/bin/ping");
- set_perm(0, 2000, 06750, "/system/bin/run-as");
- set_perm_recursive(1002, 1002, 0755, 0440, "/system/etc/bluetooth");
- set_perm(0, 0, 0755, "/system/etc/bluetooth");
- set_perm(1000, 1000, 0640, "/system/etc/bluetooth/auto_pairing.conf");
- set_perm(3002, 3002, 0444, "/system/etc/bluetooth/blacklist.conf");
- set_perm(1002, 1002, 0440, "/system/etc/dbus.conf");
- set_perm(1014, 2000, 0550, "/system/etc/dhcpcd/dhcpcd-run-hooks");
- set_perm(0, 2000, 0550, "/system/etc/init.goldfish.sh");
- set_perm_recursive(0, 0, 0755, 0555, "/system/etc/ppp");
- set_perm_recursive(0, 2000, 0755, 0755, "/system/xbin");
- set_perm(0, 0, 06755, "/system/xbin/librank");
- set_perm(0, 0, 06755, "/system/xbin/procmem");
- set_perm(0, 0, 06755, "/system/xbin/procrank");
- set_perm(0, 0, 06755, "/system/xbin/su");
- set_perm(0, 0, 06755, "/system/xbin/tcpdump");
- unmount("/system");
在做更新測試時,我們要以target_zip系統為依據,也就是更新之前的開發板系統是用target_zip包升級後的系統。否則會更新就會失敗,因為在更新時會從系統對應的目錄下讀取裝置以及時間戳等資訊(updater-script指令碼一開始的部分),進行匹配正確後才進行下一步的安裝。
所有準備都完成後,將我們製作的差分包放到SD卡中,在Settings-->About Phone-->System Update-->Installed From SDCARD執行更新。最後更新完成並重啟後,我們會發現之前的CheckUpdateAll.apk被成功刪掉了,大功告成!
至此終於將update.zip包以及其對應的差分包製作成功了,下面的文章開始具體分析製作的update.zip包在實際的更新中所走的過程!
