【Spring Boot】(4)、配置檔案值注入
阿新 • • 發佈:2019-02-02
1、配置檔案使用上節中yaml書寫的配置資訊:
server:
  port: 8081
  path: /hello
person:
  name: zhangsan
  age: 20
  boss: false
  birth: 2017/11/12
  #map寫法1:行內
  maps1: {k1: v1, k2: v2}
  #map寫法2
  maps2:
    k3: v3
    k4: v4
  #陣列寫法1
  lists1:
    - l1
    - l2
  #陣列寫法2:行內
  lists2: [l3, l4]
  # 物件
  dog:
    name: 小狗
    age: 2
2、編寫javaBean
可以匯入配置檔案處理器,然後配置屬性的時候就會有提示/** * 將配置檔案中的配置的每一個屬性值,對映到元件中 * @ConfigurationProperties: 告訴SpringBoot將本類中的所有屬性和配置檔案中相關的配置進行繫結。 * prefix: 配置檔案中的prefix指定的屬性下的所有屬性與該元件屬性一一對應。 * * @ConfigurationProperties: 預設從全域性配置檔案中獲取值 * * 只有這個元件是容器中的元件,容器才能提供@ConfigurationProperties功能。 */ @Component @ConfigurationProperties(prefix = "person") public class Person implements Serializable { private String name; private Integer age; private Boolean boss; private Date birth; private Map<String, Object> maps; private List<Object> lists; private Dog dog; //省略getter和setter }
<!--配置檔案處理器-->
<dependency>
    <groupId>org.springframework.boot</groupId>
    <artifactId>spring-boot-configuration-processor</artifactId>
</dependency>
3、註解
3.1、@ConfigurationProperties
prefix: 配置檔案中的prefix指定的屬性下的所有屬性與該元件屬性一一對應。
預設從全域性配置檔案中獲取值
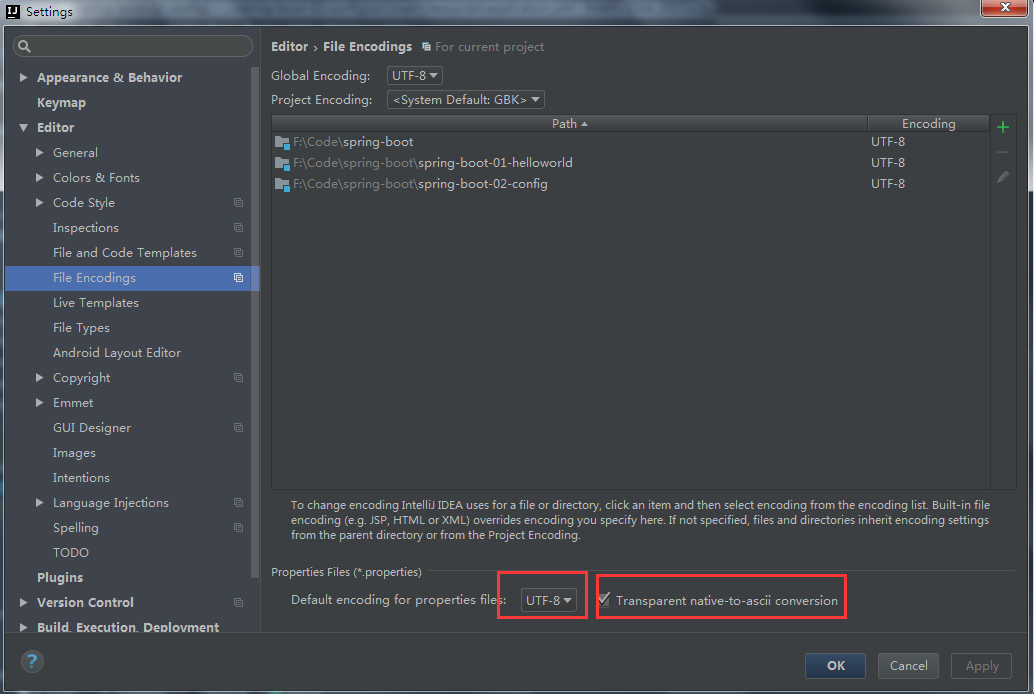
3.2、修改idea的properties預設檔案編碼格式

3.3、@Value和@ConfigurationProperties獲取值的區別
| @ConfigurationProperties | @Value | |
| 功能 | 批量注入配置檔案中的 | 一個一個指定 |
| 鬆散繫結 | 支援鬆散繫結 | 不支援鬆散繫結 |
| SpEL | 不支援 | 支援 |
| JSR303資料校驗 | 支援,@Validated、@Email等 | 不支援 |
| 複雜型別封裝 | 支援 | 不支援 |
如果只是需要配置檔案中的某個屬性,建議使用 @Value。
如果需要對映到某個配置類中的屬性,建議使用 @ConfigurationProperties。
3.4、配置檔案注入值校驗:
@Component
@ConfigurationProperties(prefix = "person")
@Validated
public class Person implements Serializable {

	@Email
	private String name;
	private Integer age;
	private Boolean boss;
	private Date birth;

	private Map<String, Object> maps;
	private List<Object> lists;

	private Dog dog;

    //省略getter和setter
}3.5、@PropertySource
application.properties之外的properties檔案
該註解需要配合@ConfigurationProperties一起使用
需要在@ConfigurationProperties中指定使用的字首prefix(如果有)
需要在@PropertySource指定載入的properties檔案
#employee.properties
employee.name=lisi
employee.age=30
employee.birth=2017/11/11
employee.boss=false
@Component
@PropertySource(value = {"classpath:employee.properties"},encoding = "UTF-8")
@ConfigurationProperties(prefix = "employee")
public class Employee implements Serializable {
private String name;
private Integer age;
private Date birth;
private Boolean boss;
//省略getter和setter
}3.6、@ImportResource
SpringBoot裡面沒有Spring的配置檔案,即使用Spring專案中的xml格式的配置檔案,SpringBoot不能自動識別,如果想讓Spring的配置檔案生效,需要使用@ImportResource標註在一個配置類上,推薦標註在主配置類上。
<!-- beans.xml -->
<?xml version="1.0" encoding="UTF-8"?>
<beans xmlns="http://www.springframework.org/schema/beans"
       xmlns:xsi="http://www.w3.org/2001/XMLSchema-instance"
       xsi:schemaLocation="http://www.springframework.org/schema/beans http://www.springframework.org/schema/beans/spring-beans.xsd">

	<bean id="helloService" class="org.com.cay.spring.boot.service.HelloService"></bean>
</beans>
@ImportResource(locations = {"classpath:beans.xml"})3.7、@Bean
SpringBoot推薦給容器中新增元件的方式:使用註解 @Bean/**
* @Configuration: 指明當前類是一個註解類,用來代替原來的Spring的xml配置檔案
*/
@Configuration
public class MyConfig {
//將方法的返回值新增到容器中,容器中這個元件預設的id為方法名
@Bean
public HelloService helloService(){
System.out.println("新增元件:helloService");
return new HelloService();
}
}====================打個廣告,歡迎關注====================
