感知機介紹及實現
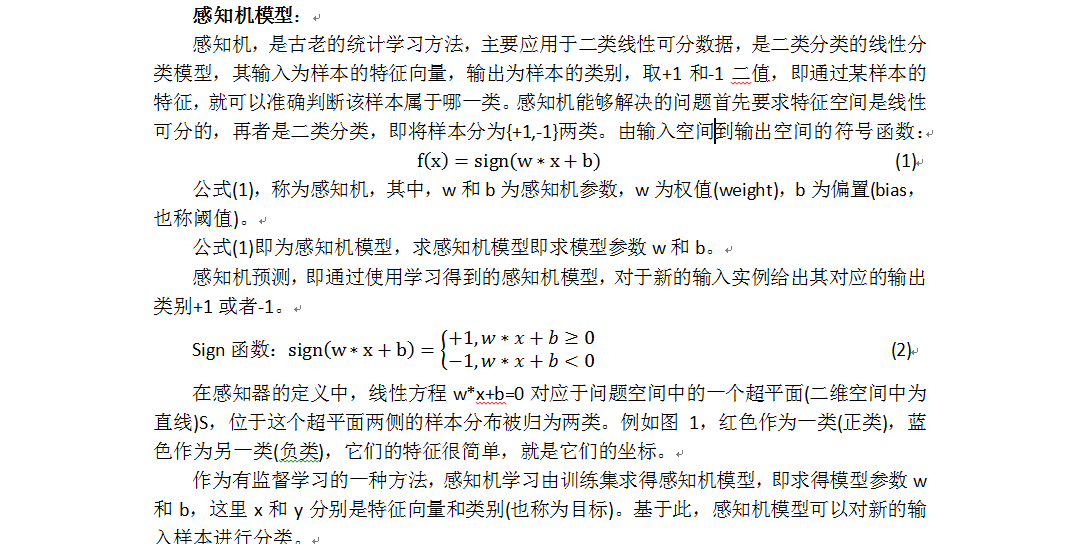
感知機(perceptron)由Rosenblatt於1957年提出,是神經網路與支援向量機的基礎。
感知機是最早被設計並被實現的人工神經網路。感知機是一種非常特殊的神經網路,它在人工神經網路的發展史上有著非常重要的地位,儘管它的能力非常有限,主要用於線性分類。
感知機還包括多層感知機,簡單的線性感知機用於線性分類器,多層感知機(含有隱層的網路)可用於非線性分類器。本文中介紹的均是簡單的線性感知機。
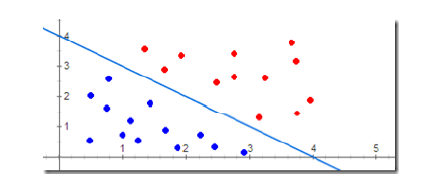
圖 1
感知機工作方式:
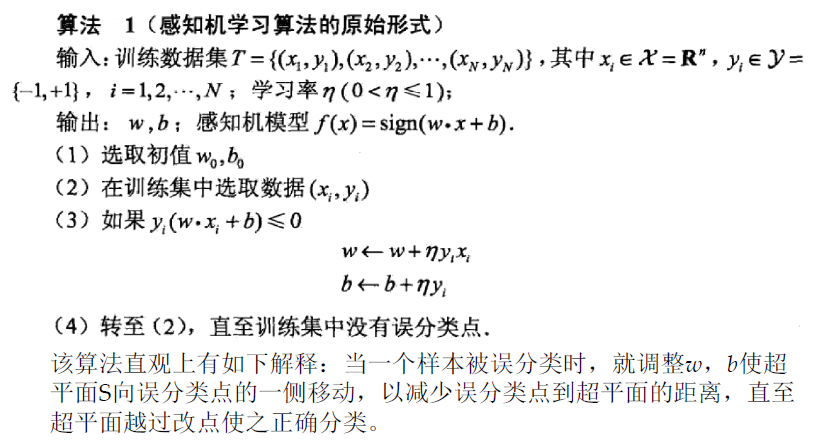
(1)、學習階段:修改權值和偏置,根據”已知的樣本”對權值和偏置不斷修改----有監督學習。當給定某個樣本的輸入/輸出模式對時,感知機輸出單元會產生一個實際輸出向量,用期望輸出(樣本輸出)與實際輸出之差來修正網路連線權值和偏置。
(2)、工作階段:計算單元變化,由響應函式給出新輸入下的輸出。
感知機學習策略:
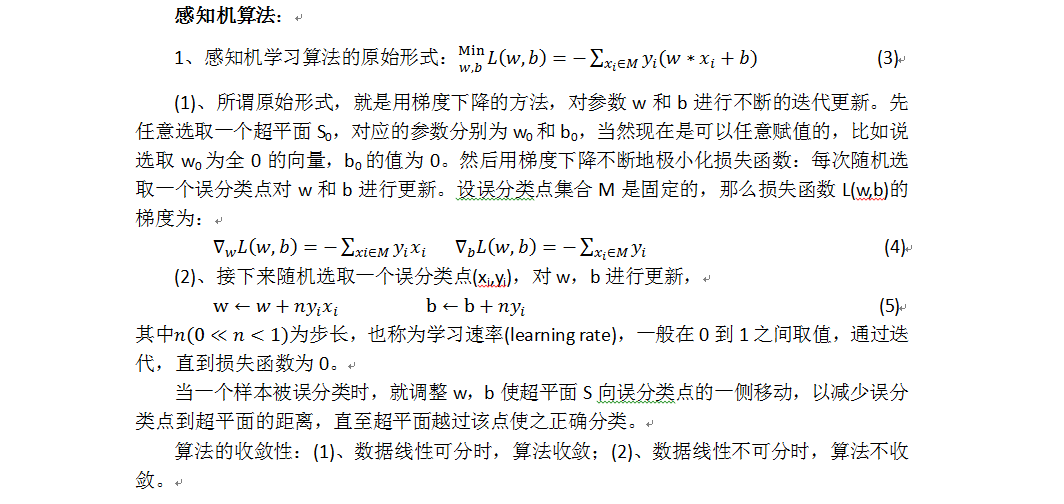
感知機學習的目標就是求得一個能夠將訓練資料集中正負例項完全分開的分類超平面,為了找到分類超平面,即確定感知機模型中的引數w和b,需要定義一個基於誤分類的損失函式,並通過將損失函式最小化來求w和b。
(1)、資料集線性可分性:在二維平面中,可以用一條直線將+1類和-1類完美分開,那麼這個樣本空間就是線性可分的。因此,感知機都基於一個前提,即問題空間線性可分;
(2)、定義損失函式,找到引數w和b,使得損失函式最小。
損失函式的選取
(1)、損失函式的一個自然選擇就是誤分類點的總數,但是這樣的點不是引數w,b的連續可導函式,不易優化;
(2)、損失函式的另一個選擇就是誤分類點到劃分超平面S(w*x+b=0)的總距離。
以下程式碼根據上面的描述實現:
perceptron.hpp:
- #ifndef _PERCEPTRON_HPP_
- #define _PERCEPTRON_HPP_
- #include <vector>
- namespace ANN {
- typedef std::vector<float> feature;
-
typedefintlabel;
- class Perceptron {
- private:
- std::vector<feature> feature_set;
- std::vector<label> label_set;
- int iterates;
- float learn_rate;
- std::vector<float> weight;
- int size_weight;
- float bias;
- void initWeight();
- float calDotProduct(const feature feature_, const std::vector<float> weight_);
- void updateWeight(const feature feature_, int label_);
- public:
- Perceptron(int iterates_, float learn_rate_, int size_weight_, float bias_);
- void getDataset(const std::vector<feature> feature_set_, const std::vector<label> label_set_);
- bool train();
- label predict(const feature feature_);
- };
- }
- #endif // _PERCEPTRON_HPP_
- #include "perceptron.hpp"
- #include <assert.h>
- #include <time.h>
- #include <iostream>
- namespace ANN {
- void Perceptron::updateWeight(const feature feature_, int label_)
- {
- for (int i = 0; i < size_weight; i++) {
- weight[i] += learn_rate * feature_[i] * label_; // formula 5
- }
- bias += learn_rate * label_; // formula 5
- }
- float Perceptron::calDotProduct(const feature feature_, const std::vector<float> weight_)
- {
- assert(feature_.size() == weight_.size());
- float ret = 0.;
- for (int i = 0; i < feature_.size(); i++) {
- ret += feature_[i] * weight_[i];
- }
- return ret;
- }
- void Perceptron::initWeight()
- {
- srand(time(0));
- float range = 100.0;
- for (int i = 0; i < size_weight; i++) {
- float tmp = range * rand() / (RAND_MAX + 1.0);
- weight.push_back(tmp);
- }
- }
- Perceptron::Perceptron(int iterates_, float learn_rate_, int size_weight_, float bias_)
- {
- iterates = iterates_;
- learn_rate = learn_rate_;
- size_weight = size_weight_;
- bias = bias_;
- weight.resize(0);
- feature_set.resize(0);
- label_set.resize(0);
- }
- void Perceptron::getDataset(const std::vector<feature> feature_set_, const std::vector<label> label_set_)
- {
- assert(feature_set_.size() == label_set_.size());
- feature_set.resize(0);
- label_set.resize(0);
- for (int i = 0; i < feature_set_.size(); i++) {
- feature_set.push_back(feature_set_[i]);
- label_set.push_back(label_set_[i]);
- }
- }
- bool Perceptron::train()
- {
- initWeight();
- for (int i = 0; i < iterates; i++) {
- bool flag = true;
- for (int j = 0; j < feature_set.size(); j++) {
- float tmp = calDotProduct(feature_set[j], weight) + bias;
- if (tmp * label_set[j] <= 0) {
- updateWeight(feature_set[j], label_set[j]);
- flag = false;
- }
- }
- if (flag) {
- std::cout << "iterate: " << i << std::endl;
- std::cout << "weight: ";
- for (int m = 0; m < size_weight; m++) {
- std::cout << weight[m] << " ";
- }
- std::cout << std::endl;
- std::cout << "bias: " << bias << std::endl;
- returntrue;
- }
- }
- returnfalse;
- }
- label Perceptron::predict(const feature feature_)
- {
- assert(feature_.size() == size_weight);
- return calDotProduct(feature_, weight) + bias >= 0 ? 1 : -1; //formula 2
- }
- }
test_NN.cpp:
- #include <iostream>
- #include "perceptron.hpp"
- int test_perceptron();
- int main()
- {
- test_perceptron();
- std::cout << "ok!" << std::endl;
- }
- int test_perceptron()
- {
- // prepare data
- constint len_data = 20;
- constint feature_dimension = 2;
- float data[len_data][feature_dimension] = { { 10.3, 10.7 }, { 20.1, 100.8 }, { 44.9, 8.0 }, { -2.2, 15.3 }, { -33.3, 77.7 },
- { -10.4, 111.1 }, { 99.3, -2.2 }, { 222.2, -5.5 }, { 10.1, 10.1 }, { 66.6, 30.2 },
- { 0.1, 0.2 }, { 1.2, 0.03 }, { 0.5, 4.6 }, { -22.3, -11.1 }, { -88.9, -12.3 },
- { -333.3, -444.4 }, { -111.2, 0.5 }, { -6.6, 2.9 }, { 3.3, -100.2 }, { 5.6, -88.8 } };
- int label_[len_data] = { 1, 1, 1, 1, 1, 1, 1, 1, 1, 1,
- -1, -1, -1, -1, -1, -1, -1, -1, -1, -1 };
- std::vector<ANN::feature> set_feature;
- std::vector<ANN::label> set_label;
- for (int i = 0; i < len_data; i++) {
- ANN::feature feature_single;
- for (int j = 0; j < feature_dimension; j++) {
- feature_single.push_back(data[i][j]);
- }
- set_feature.push_back(feature_single);
- set_label.push_back(label_[i]);
- feature_single.resize(0);
- }
- // train
- int iterates = 1000;
- float learn_rate = 0.5;
- int size_weight = feature_dimension;
- float bias = 2.5;
-
相關推薦
感知機介紹及實現
感知機(perceptron)由Rosenblatt於1957年提出,是神經網路與支援向量機的基礎。 感知機是最早被設計並被實現的人工神經網路。感知機是一種非常特殊的神經網路,它在人工神經網路的發展史上有著非常重要的地位,儘管它的能力非常有限,主要用於線性分類。 感知機
感知機演算法及實現
感知機演算法 定義1:假設輸入空間是χ⊆Rn\chi \subseteq R^{n}χ⊆Rn,輸出空間為γ\gammaγ={+1,-1}.輸入x∈χ\in \chi∈χ表示例項的特徵向量,對應於輸入空間的點;輸出y∈γy\in \gammay∈γ表示例項的類別。
Python 純手寫 實現感知機模型及對偶形式
根據《統計學習方法》P29頁演算法2.1,實現感知機模型及對偶形式。 演算法2.1: 輸入:訓練資料集,learning rate alpha。 輸出:權重w,偏置b。 (1)初始化w0,b0 (2)在資料集中選定Xi,Yi帶入 (3)計算Yi * (Xi * w
6種品牌打印機介紹及打印機旗艦店推薦
掃描儀 blank 十大品牌 ron 制造商 lan targe 企業 dia 小朋友上幼兒園了,很開心。老師總是隔三差五的讓帶個照片,做個成長手冊什麽的,這個就老頭疼了,每次都出去打印確實不太方便,要是自己家能有個打印機就好多了,不管什麽時候需要照片,材料什麽的都不必麻煩
KVM虛擬化的四種簡單網絡模型介紹及實現(一)
_for only 應該 code eth tun x86_64 信息 dock KVM中的四種簡單網絡模型,分別如下:1、隔離模型:虛擬機之間組建網絡,該模式無法與宿主機通信,無法與其他網絡通信,相當於虛擬機只是連接到一臺交換機上。2、路由模型:相當於虛擬機連接到一臺路由
KVM虛擬化的四種簡單網絡模型介紹及實現(二)
str drive 51cto -c water -a return dfa 模型 接上篇,介紹NAT網絡模型和橋接模型。 三、NAT模型 NAT模型其實就是SNAT的實現,路由中虛擬機能將報文發送給外部主機,但是外部主機因找不到通往虛擬機的路由因而無法回應請求。但是外部
感知機python2.7實現
# -*- coding: utf-8 -*- class Perceptron(object): def __init__(self, input_num, activator): ''' 感知機只有一個神經元,所以權重向量W的長度等於輸入向量長度,偏置為
DL之perceptron:利用perceptron感知機對股票實現預測
DL之perceptron:利用perceptron感知機對股票實現預測 import numpy as np import operator import os # create a dataset which contains 3 samples with 2 classes def
感知機PLA演算法實現[轉載]
轉自:https://blog.csdn.net/u010626937/article/details/72896144#commentBox 1.實現原始形式 import numpy as np import matplotlib.pyplot as plt #1、建立資料集 def crea
Spring中基於AspectJ的AOP切面程式設計介紹及實現
簡介: AOP Aspect Oriented Programing 面向切面程式設計 AOP採取==橫向抽取==機制,取代了傳統==縱向繼承==體系重複性程式碼(效能監視、事務管理、安全檢查、快取) Spring中的Aop是純Java來實現的,使用==動態代理==的方式增強程
神經網路 感知機 Perceptron python實現
import numpy as np import matplotlib.pyplot as plt import math def create_data(w1=3,w2=-7,b=4,seed=1,size=30): np.random.seed(seed)
MyBatis的學習(一)——MyBatis介紹及實現CRUD操作
一、MyBatis介紹 MyBatis 本是apache的一個開源專案iBatis, 2010年這個專案由apache software foundation 遷移到了google code,並且改名為MyBatis 。2013年11月遷移到Github。 IBATIS一詞來源於“inter
kmp匹配演算法介紹及實現
KMP匹配演算法 最近在看程傑的《大話資料結構》一書,看到了第五章,這一章介紹了對串進行匹配的演算法,包括樸素模式匹配演算法和KMP模式匹配演算法。對於KMP演算法自己也是搞得有點暈乎了,在這裡記錄下,以後說不定徹底弄懂了就回來補上。 KMP演算法是由D.E
ml課程:FM因子分解機介紹及相關程式碼
以下是我的學習筆記,以及總結,如有錯誤之處請不吝賜教。 FM(factorization machines)表示因子分解機,是由Steffen Rendle提出的一種基於矩陣分解的機器學習演算法。目前,被廣泛的應用於廣告預估模型中,相比LR而言,效果更好。主要目標是:解決資料稀疏的情況下,特
k-means(k均值聚類)演算法介紹及實現(c++)
基本介紹: k-means 演算法接受輸入量 k ;然後將n個數據物件劃分為 k個聚類以便使得所獲得的聚類滿足:同一聚類中的物件相似度較高;而不同聚類中的物件相似度較小。聚類相似度是利用各聚類中物件的均值所獲得一個“中心物件”(引力中心)來進行計算的。 工作過程: k
Trie樹介紹及實現(傳統&雙陣列)
Trie樹,又叫字典樹、字首樹(Prefix Tree)、單詞查詢樹 或 鍵樹,是一種樹形結構。典型應用是用於統計和排序大量的字串(但不僅限於字串),所以經常被搜尋引擎系統用於文字詞頻統計。它的優點是最大限度地減少無謂的字串比較, 查詢效率比較高 。 Trie的核心思
【OpenCV學習筆記 020】K-Means聚類演算法介紹及實現
一、K-Means演算法介紹 在資料探勘中,K-Means演算法是一種cluster analysis的演算法,其主要是來計算資料聚集的演算法,主要通過不斷地取離種子點最近均值的演算法。 問題 K-Means演算法主要解決的問題如下圖所示。我們可以看到,在圖的左邊有一些點,
神經網路之多層感知機MLP的實現(Python+TensorFlow)
用 MLP 實現簡單的MNIST資料集識別。 # -*- coding:utf-8 -*- # # MLP """ MNIST classifier, 多層感知機實現 """ # Import
Android AOP介紹及實現原理
深入理解Android之AOP 一、閒談AOP 大家都知道OOP,即ObjectOriented Programming,面向物件程式設計。而本文要介紹的是AOP。AOP是Aspect Oriented Programming的縮寫,中譯文為面向切向程式
幾種伺服器端IO模型的簡單介紹及實現
一些概念: 同步和非同步 同步和非同步是針對應用程式和核心的互動而言的,同步指的是使用者程序觸發I/O操作並等待或者輪詢的去檢視I/O操作是否就緒,而非同步是指使用者程序觸發I/O操作以後便開始做自己的事情,而當I/O操作已經完成的時候會得到I/O完成的通知。 阻塞和非阻塞 阻塞和非阻塞是針對於程序在


