Unity教程之-Unity Attribute的使用總結
Attribute是C#的功能,在Unity中可以使用Attribute來給變數和方法增加新的特性或者功能。
舉兩個例子,在變數上使用[SerializeFiled]特性,可以強制讓變數進行序列化,可以在Unity的Editor上進行賦值。
在Class上使用[RequireComponent]特性,就會在Class的GameObject上自動追加所需的Component。
以下是Unity官網文件中找到的所有Attribute,下面將按照順序,逐個對這些Attribute進行說明和小的測試。
部分例子使用了Unity官方的示例。
UnityEngine
AddComponentMenu
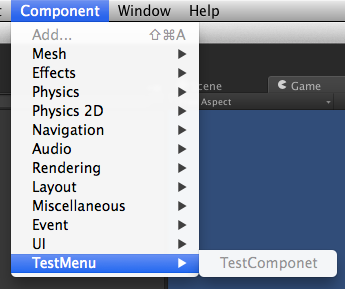
可以在UnityEditor的Component的Menu中增加自定義的專案。選單可以設定多級,使用斜線/分隔即可。在Hierarchy中選中GameObject的時候,點選該選單項,就可以在GameObject上追加該Component。
例如如下程式碼可以完成下圖的效果。
[AddComponentMenu("TestMenu/TestComponet")]
public class TestMenu : MonoBehaviour {
}
ContextMenu
可以在Inspector的ContextMenu中增加選項。
例如,如下程式碼的效果
public class 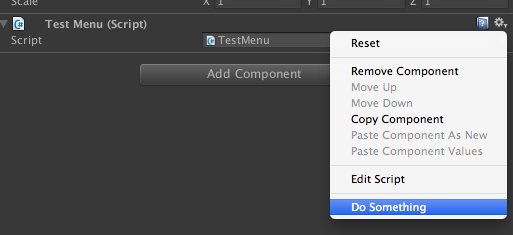
ContextMenuItemAttribute
這個屬性是Unity4.5之後提供的新功能,可以在Inspector上面對變數追加一個右鍵選單,並執行指定的函式。
例子:
public class Sample : MonoBehaviour {
[ContextMenuItem("Reset", "ResetName" 
DisallowMultipleComponent
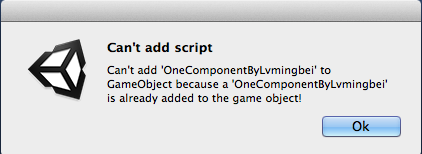
對一個MonoBehaviour的子類使用這個屬性,那麼在同一個GameObject上面,最多隻能新增一個該Class的例項。
嘗試新增多個的時候,會出現下面的提示。
ExecuteInEditMode
預設狀態下,MonoBehavior中的Start,Update,OnGUI等方法,需要在Play的狀態下才會被執行。
這個屬性讓Class在Editor模式(非Play模式)下也能執行。
但是與Play模式也有一些區別。
例如:
Update方法只在Scene編輯器中有物體產生變化時,才會被呼叫。
OnGUI方法只在GameView接收到事件時,才會被呼叫。
HeaderAttribute
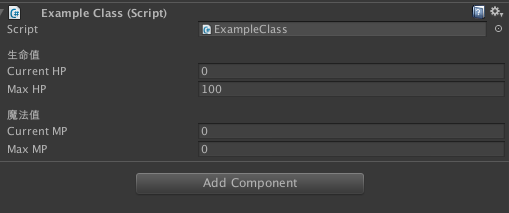
這個屬性可以在Inspector中變數的上面增加Header。
例子:
public class ExampleClass : MonoBehaviour {
    [Header("生命值")]
    public int CurrentHP = 0;
    public int MaxHP = 100;

    [Header("魔法值")]
    public int CurrentMP = 0;
    public int MaxMP = 0;
}
HideInInspector
在變數上使用這個屬性,可以讓public的變數在Inspector上隱藏,也就是無法在Editor中進行編輯。
ImageEffectOpaque
在OnRenderImage上使用,可以讓渲染順序在非透明物體之後,透明物體之前。
例子
[ImageEffectOpaque]
void OnRenderImage (RenderTexture source, RenderTexture destination){
}
MultilineAttribute
在string型別上使用,可以在Editor上輸入多行文字。
public class TestString : MonoBehaviour {
    [MultilineAttribute]
    public string mText;
}
PropertyAttribute
RangeAttribute
在int或者float型別上使用,限制輸入值的範圍
public class TestRange : MonoBehaviour
{
[Range(0, 100)] public int HP;
}
RequireComponent
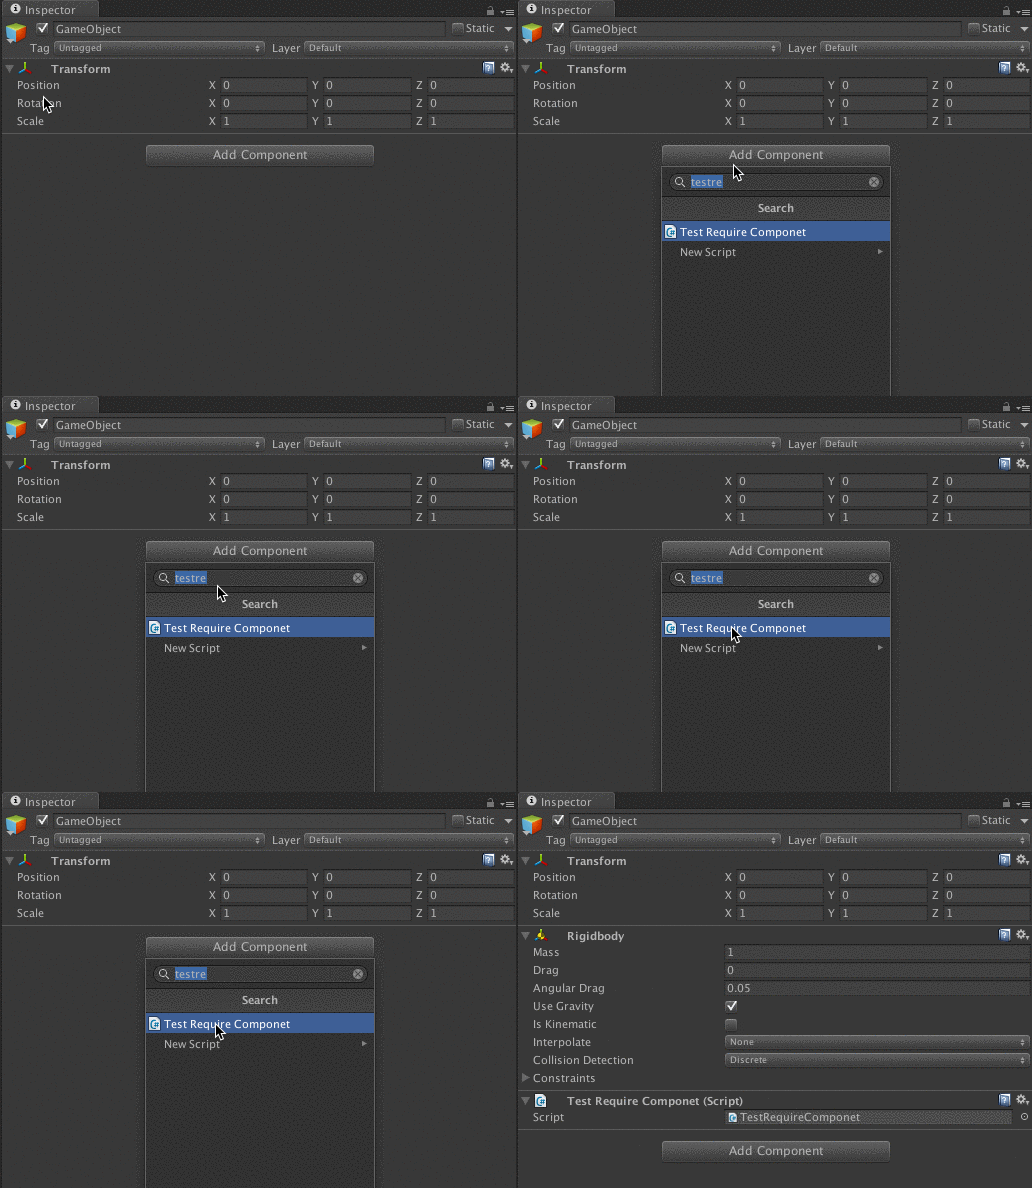
在Class上使用,新增對另一個Component的依賴。
當該Class被新增到一個GameObject上的時候,如果這個GameObject不含有依賴的Component,會自動新增該Component。
且該Componet不可被移除。
例子
[RequireComponent(typeof(Rigidbody))]
public class TestRequireComponet : MonoBehaviour {

}
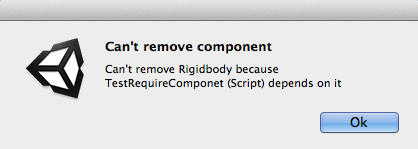
如果嘗試移除被依賴的Component,會有如下提示
RPC
在方法上新增該屬性,可以網路通訊中對該方法進行RPC呼叫。
[RPC]
void RemoteMethod(){
RuntimeInitializeOnLoadMethodAttribute
此屬性僅在Unity5上可用。
在遊戲啟動時,會自動呼叫添加了該屬性的方法。
class MyClass
{
    [RuntimeInitializeOnLoadMethod]
    static void OnRuntimeMethodLoad ()
    {
        Debug.Log("Game loaded and is running");
    }
}
SelectionBaseAttribute
當一個GameObject含有使用了該屬性的Component的時候,在SceneView中選擇該GameObject,Hierarchy上面會自動選中該GameObject的Parent。
SerializeField
在變數上使用該屬性,可以強制該變數進行序列化。即可以在Editor上對變數的值進行編輯,即使變數是private的也可以。
在UI開發中經常可見到對private的元件進行強制序列化的用法。
例子
public class TestSerializeField : MonoBehaviour {
    [SerializeField]
    private string name;

    [SerializeField]
    private Button _button;
}
SharedBetweenAnimatorsAttribute
用於StateMachineBehaviour上,不同的Animator將共享這一個StateMachineBehaviour的例項,可以減少記憶體佔用。
SpaceAttribute
使用該屬性可以在Inspector上增加一些空位。 例子:
public class TestSpaceAttributeByLvmingbei : MonoBehaviour {
    public int nospace1 = 0;
    public int nospace2 = 0;
    [Space(10)]
    public int space = 0;
    public int nospace3 = 0;
}
TextAreaAttribute
該屬性可以把string在Inspector上的編輯區變成一個TextArea。
例子:
public class TestTextAreaAttributeByLvmingbei : MonoBehaviour {
    [TextArea]
    public string mText;
}
TooltipAttribute
這個屬性可以為變數上生成一條tip,當滑鼠指標移動到Inspector上時候顯示。
public class TestTooltipAttributeByLvmingbei : MonoBehaviour {
    [Tooltip("This year is 2015!")]
    public int year = 0;
}
UnityEngine.Serialization
FormerlySerializedAsAttribute
該屬性可以令變數以另外的名稱進行序列化,並且在變數自身修改名稱的時候,不會丟失之前的序列化的值。
例子:
using UnityEngine;
using UnityEngine.Serialization;
public class MyClass : MonoBehaviour {
    [FormerlySerializedAs("myValue")]
    private string m_MyValue;
    public string myValue
    {
        get { return m_MyValue; }
        set { m_MyValue = value; }
    }
}
CustomPreviewAttribute
將一個class標記為指定型別的自定義預覽
Unity4.5以後提供的新功能
例子:
[CustomPreview(typeof(GameObject))]
public class MyPreview : ObjectPreview
{
    public override bool HasPreviewGUI()
    {
        return true;
    }

    public override void OnPreviewGUI(Rect r, GUIStyle background)
    {
        GUI.Label(r, target.name + " is being previewed");
    }
}
DrawGizmo
可以在Scene檢視中顯示自定義的Gizmo
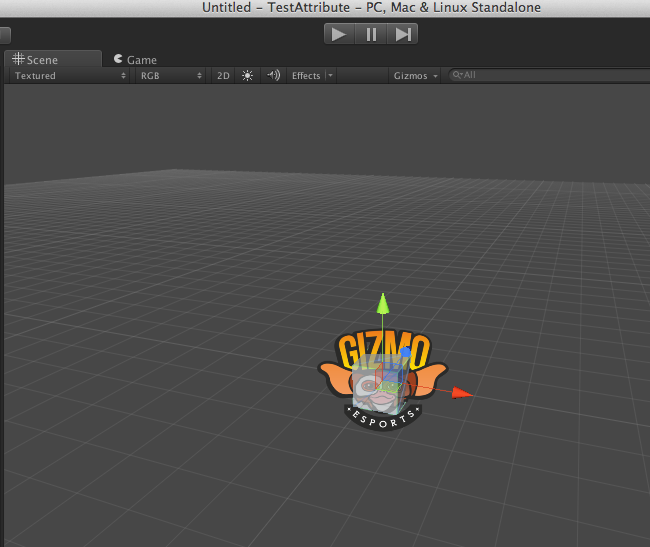
下面的例子,是在Scene檢視中,當掛有MyScript的GameObject被選中,且距離相機距離超過10的時候,便顯示自定義的Gizmo。
Gizmo的圖片需要放入Assets/Gizmo目錄中。
例子:
可以在Scene檢視中顯示自定義的Gizmo
下面的例子,是在Scene檢視中,當掛有MyScript的GameObject被選中,且距離相機距離超過10的時候,便顯示自定義的Gizmo。
Gizmo的圖片需要放入Assets/Gizmo目錄中。
例子:InitializeOnLoadAttribute
在Class上使用,可以在Unity啟動的時候,執行Editor指令碼。
需要該Class擁有靜態的建構函式。
做一個建立一個空的gameobject的例子。
例子:
using UnityEditor;
using UnityEngine;

[InitializeOnLoad]
class MyClass
{
    static MyClass ()
    {
        EditorApplication.update += Update;
        Debug.Log("Up and running");
    }

    static void Update ()
    {
        Debug.Log("Updating");
    }
}
MenuItem
在方法上使用,可以在Editor中建立一個選單項,點選後執行該方法,可以利用該屬性做很多擴充套件功能。 需要方法為static。
例子:
using UnityEngine;
using UnityEditor;
using System.Collections;

public class TestMenuItem : MonoBehaviour {

    [MenuItem ("MyMenu/Create GameObject")]
    public static void CreateGameObject() {
        new GameObject("lvmingbei's GameObject");
    }
}
PreferenceItem
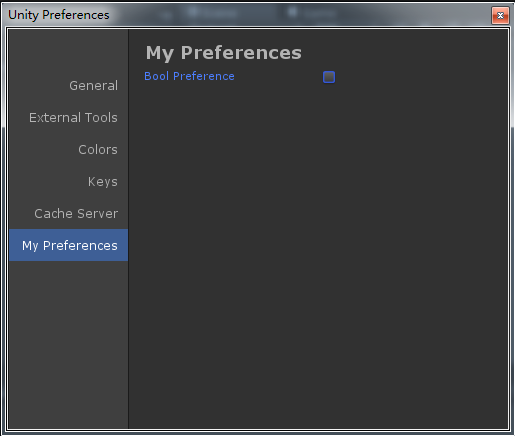
使用該屬性可以定製Unity的Preference介面。
在這裡就使用官方的例子:
using UnityEngine;
using UnityEditor;
using System.Collections;

public class OurPreferences {
    // Have we loaded the prefs yet
    private static bool prefsLoaded = false;

    // The Preferences
    public static bool boolPreference = false;

    // Add preferences section named "My Preferences" to the Preferences Window
    [PreferenceItem ("My Preferences")]
    public static void PreferencesGUI () {
        // Load the preferences
        if (!prefsLoaded) {
            boolPreference = EditorPrefs.GetBool ("BoolPreferenceKey", false);
            prefsLoaded = true;
        }

        // Preferences GUI
        boolPreference = EditorGUILayout.Toggle ("Bool Preference", boolPreference);

        // Save the preferences
        if (GUI.changed)
            EditorPrefs.SetBool ("BoolPreferenceKey", boolPreference);
    }
}

