
CXF開發WebService整合Spring
開發環境jdk1.7 CXF版本3.1.17
如果使用3.1以上的高版本CXF框架,則需要jdk1.8的支援。
專案採用簡單的web專案整合了spring框架,專案啟動則對外發布服務,所需要的jar包,點選連結下載
該jar包就是根據maven依賴得到的最精簡的jar包
如果是maven專案請參考一下依賴資訊
 <dependencies>
        <dependency>
            <groupId>org.apache.cxf</groupId>
            <artifactId>cxf-rt-frontend-jaxws</artifactId>
            <version>3.1.17</version>
        </dependency>
        <dependency>
            <groupId>org.apache.cxf</groupId>
            <artifactId>cxf-rt-transports-http</artifactId>
            <version>3.1.17</version>
        </dependency>
        <dependency>
            <groupId>org.apache.cxf</groupId>
            <artifactId>cxf-rt-transports-http-jetty</artifactId>
            <version>3.1.17</version>
        </dependency>
        <dependency>
            <groupId>org.springframework</groupId>
            <artifactId>spring-context</artifactId>
        </dependency>
        <dependency>
            <groupId>org.springframework</groupId>
            <artifactId>spring-web</artifactId>
        </dependency>
</dependencies>
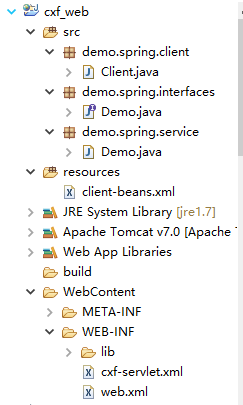
專案截圖
釋出服務
web.xml
增加了CXF框架的Servlet,新增訪問地址對映,訪問路徑需要包含/servcies/才可以訪問到WebService服務
<?xml version="1.0" encoding="UTF-8"?>
<web-app xmlns="http://java.sun.com/xml/ns/javaee" xmlns:xsi="http://www.w3.org/2001/XMLSchema-instance"
	version="2.5"
	xsi:schemaLocation="http://java.sun.com/xml/ns/javaee
	       http://java.sun.com/xml/ns/javaee/web-app_2_5.xsd">
	<display-name>cxf</display-name>

	<servlet>
		<description>Apache CXF Endpoint</description>
		<display-name>cxf</display-name>
		<servlet-name>cxf</servlet-name>
		<servlet-class>org.apache.cxf.transport.servlet.CXFServlet</servlet-class>
		<load-on-startup>1</load-on-startup>
	</servlet>
	<servlet-mapping>
		<servlet-name>cxf</servlet-name>
		<url-pattern>/services/*</url-pattern>
	</servlet-mapping>

	<session-config>
		<session-timeout>60</session-timeout>
	</session-config>
</web-app>
java類
demo.spring.service包下的Demo,代表服務類。必須在類上加 @WebService註解,才可以釋出該類
import javax.jws.WebService;

@WebService
public class Demo {

	public String sayDemo(String s){
		return s;
	}
}
cxf-servlet.xml
這個檔案是釋出服務的配置檔案,id 可以隨意起名,implementor 代表要釋出服務的類在專案中的全限定類名,按著ctrl+滑鼠左鍵可以跳轉到該類上,代表全限定類名沒有寫錯。address 代表要釋出服務地址的最後一位以/demo結尾
<?xml version="1.0" encoding="UTF-8"?>

<beans xmlns="http://www.springframework.org/schema/beans"
	xmlns:xsi="http://www.w3.org/2001/XMLSchema-instance"
	xmlns:jaxws="http://cxf.apache.org/jaxws"
	xsi:schemaLocation=" http://www.springframework.org/schema/beans http://www.springframework.org/schema/beans/spring-beans.xsd http://cxf.apache.org/jaxws http://cxf.apache.org/schemas/jaxws.xsd ">
	<import resource="classpath:META-INF/cxf/cxf.xml" />
	<import resource="classpath:META-INF/cxf/cxf-servlet.xml" />

	<jaxws:endpoint id="demo" implementor="demo.spring.service.Demo"
		address="/demo" />

</beans>
如果訪問頁面不報錯,則代表釋出服務成功。
客戶端呼叫
拿到根據服務地址產生的介面檔案
在磁碟任意位置新建一個資料夾,在資料夾內按shift+滑鼠右鍵,在此處開啟命令視窗。
即可解析生成java介面檔案。根據地址的 portType型別,拿到同名的介面檔案,放到專案中。
首先改包名,然後刪除報錯的地方即可。
demo.spring.interfaces 包下的Demo 即為介面產生的檔案。
client-beans.xml
這個檔案代表客戶端呼叫的配置檔案。
第一個bean id 隨便起,獲取類要用到。class代表產生介面的類在專案中的全限定類名,factory-bean
代表 引用名。在下面的bean id中引用。factory-method="create" 固定值。
第二個bean id 為 factory-bean的值。class="org.apache.cxf.jaxws.JaxWsProxyFactoryBean" 固定值。
<property name="serviceClass" value="demo.spring.interfaces.Demo" />
<property name="address" value="http://localhost:8080/cxf_web/services/demo" />
紅色部分為變動的。第一個value 代表介面的類在專案中的全限定類名。第二個value 代表該類釋出地址的WebServcie
格式為:http://部署地址ip:釋出服務埠/專案名/services/釋出服務地址配置的最後一位(address)。
<?xml version="1.0" encoding="UTF-8"?>

<beans xmlns="http://www.springframework.org/schema/beans"
	xmlns:xsi="http://www.w3.org/2001/XMLSchema-instance"
	xmlns:jaxws="http://cxf.apache.org/jaxws"
	xsi:schemaLocation=" http://www.springframework.org/schema/beans http://www.springframework.org/schema/beans/spring-beans.xsd
	http://cxf.apache.org/jaxws http://cxf.apache.org/schemas/jaxws.xsd">

	<bean id="demo" class="demo.spring.interfaces.Demo" factory-bean="demoFactory"
		factory-method="create" />
	<bean id="demoFactory" class="org.apache.cxf.jaxws.JaxWsProxyFactoryBean">
		<property name="serviceClass" value="demo.spring.interfaces.Demo" />
		<property name="address" value="http://localhost:8080/cxf_web/services/demo" />
	</bean>

</beans>
呼叫服務
demo.spring.client 包下的Client 代表呼叫服務類。
import org.springframework.context.support.ClassPathXmlApplicationContext;

import demo.spring.interfaces.Demo;

public class Client {

	public static void main(String args[]) throws Exception {

		ClassPathXmlApplicationContext context = new ClassPathXmlApplicationContext(
				new String[] { "client-beans.xml" });

		Demo bean = (Demo) context.getBean("demo");
		String sayDemo = bean.sayDemo("abc");
		System.out.println(sayDemo);
		context.close();
		System.exit(0);
	}
}
ClassPathXmlApplicationContext context = new ClassPathXmlApplicationContext(
new String[] { "client-beans.xml" });
代表spring載入配置檔案,產生物件。紅色的就是專案中配置檔名稱。
context.getBean("demo"); demo就是客戶端配置檔案的bean id。強制轉換為 自動生成的Demo檔案,不要用自己寫的。
在呼叫之前先啟動服務,可以訪問到webservice服務。再用客戶端呼叫,如果能夠輸出輸入的值,代表客戶端呼叫成功。
到這裡釋出服務,呼叫服務就完成了。運用cxf框架優勢在於客戶端只需要服務端產生的介面檔案就可以完成呼叫。
思考
一般的專案都是web專案,啟動專案即可釋出服務。本案例中釋出服務就是這樣。
但是,客戶端呼叫是main方法啟動,不友好。應該客戶端啟動就可以拿到spring建立的物件,直接使用物件呼叫方法。
解決方案
1.採用單例模式,讓配置檔案只加載一次
import org.springframework.context.support.ClassPathXmlApplicationContext;

public class SingletonContext {
	private SingletonContext() {
	} // 私有建構函式

	private volatile static ClassPathXmlApplicationContext Context = null; // 單例物件

	public static ClassPathXmlApplicationContext getContext() {
		if (Context == null) {
			synchronized (SingletonContext.class) { // 同步鎖
				if (Context == null) { // 雙重檢測機制
					Context = new ClassPathXmlApplicationContext(new String[] { "client-beans.xml" });
				}
			}
		}
		return Context;
	}
}
2.. 專案啟動讓spring載入客戶端配置的檔案,產生物件。然後在專案中@AutoWired 注入使用。
注意web.xml配置 spring監聽器,指定監聽客戶端配置檔案
client-beans.xmll 配置spring 包掃描,掃描指定介面檔案。注意新增spring context名稱空間約束
專案中引用
@Autowired
private Demo demo;