LwIP學習筆記——STM32 ENC28J60移植與入門
阿新 • • 發佈:2019-02-03
0.前言 去年(2013年)的整理了LwIP相關程式碼,並在STM32上“裸奔”成功。一直沒有時間深入整理,在這裡借博文整理總結。LwIP的移植過程細節很多,博文也不可能一一詳解個別部分只能點到為止。 【本文要點】 【1】不帶作業系統的LwIP移植,LwIP版本為1.4.1。 【2】MCU為STM32F103VE,網絡卡為ENC28J60。 【3】移植過程重點描述ethernetif.c和LwIP巨集配置等。 【4】一個簡單的TCP echo例子。 【5】力求簡單,沒有DHCP功能,甚至沒有用到網絡卡中斷。 【程式碼倉庫】 程式碼倉庫位於Bitbucket 
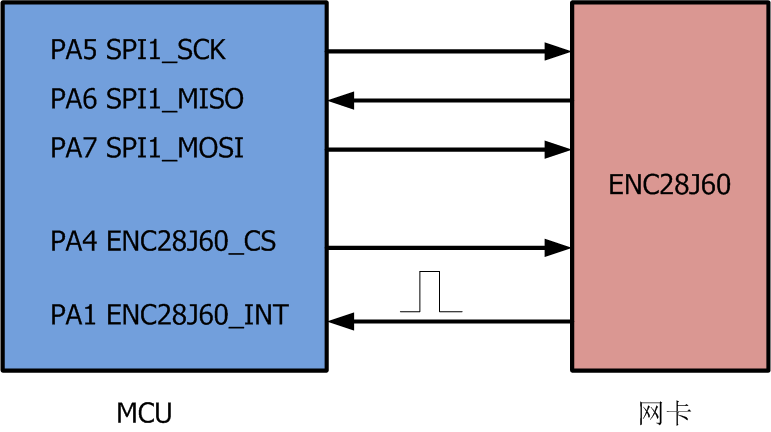
【參考博文】 學習嵌入式網路是一個循序漸進的過程,從淺入深從簡單到複雜。 【3】uIP學習筆記——初次應用協議棧1.ethernetif.c的相關修改 雖然LwIP移植過程比較複雜,但是隻要結合網絡卡具體功能,耐心修改ethernetif.c即可。ethernetif.c重點實現網絡卡的三個功能,初始化,傳送和接收。 為了更好的配合lwIP,修改了ENC28J60學習筆記中部分驅動函式。(換句話說,想要從0開始移植LwIP必須對操作網絡卡非常熟悉) 【1】初始化  圖1 ping實驗 【2】TCP Echo例子 LwIP提供很多示例,TCP Echo示例位於contrib-1.4.1的apps資料夾中,資料夾名為tcpecho_raw)。修改TCP偵聽埠為10086。 err = tcp_bind(echo_pcb, IP_ADDR_ANY, 10086);
圖2 TCP Echo例子5.總結 【1】移植和應用LwIP一定要耐心細緻。 【2】一旦網絡卡接收到資料,應呼叫ethernetif_input函式,呼叫該函式讓資料進入LwIP協議棧。 【3】 netif_add(&enc28j60, &ipaddr, &netmask, &gw, NULL, ðernetif_init, ðernet_input);最後一個引數為ethernet_input,千萬必要寫成ethernetif_input。6.參考資料 更多細節內容請參考圖書資料 【1】《嵌入式網路系統設計——基於Atmel ARM7系列》 【2】《STM32嵌入式系統開發實戰指南——FreeRTOS與LwIP聯合移植》


【參考博文】 學習嵌入式網路是一個循序漸進的過程,從淺入深從簡單到複雜。 【3】uIP學習筆記——初次應用協議棧1.ethernetif.c的相關修改 雖然LwIP移植過程比較複雜,但是隻要結合網絡卡具體功能,耐心修改ethernetif.c即可。ethernetif.c重點實現網絡卡的三個功能,初始化,傳送和接收。 為了更好的配合lwIP,修改了ENC28J60學習筆記中部分驅動函式。(換句話說,想要從0開始移植LwIP必須對操作網絡卡非常熟悉) 【1】初始化
【說明】 【1】 enc28j60_init(netif->hwaddr); low_level_init中指定了enc28j60中的網絡卡地址。 【2】傳送static void low_level_init(struct netif *netif) { struct ethernetif *ethernetif = netif->state; /* set MAC hardware address length */ netif->hwaddr_len = ETHARP_HWADDR_LEN; /* set MAC hardware address */ netif->hwaddr[0] = 'A'; netif->hwaddr[1] = 'R'; netif->hwaddr[2] = 'M'; netif->hwaddr[3] = 'N'; netif->hwaddr[4] = 'E'; netif->hwaddr[5] = 'T'; /* maximum transfer unit */ netif->mtu = 1500; /* device capabilities */ /* don't set NETIF_FLAG_ETHARP if this device is not an ethernet one */ netif->flags = NETIF_FLAG_BROADCAST | NETIF_FLAG_ETHARP | NETIF_FLAG_LINK_UP; /* Do whatever else is needed to initialize interface. */ enc28j60_init(netif->hwaddr); // 【1】 }
static err_t
low_level_output(struct netif *netif, struct pbuf *p)
{
  struct ethernetif *ethernetif = netif->state;
  struct pbuf *q;

  enc28j60_init_send(p->tot_len); //【1】initiate transfer();

#if ETH_PAD_SIZE
  pbuf_header(p, -ETH_PAD_SIZE); /* drop the padding word */
#endif

  for(q = p; q != NULL; q = q->next) {
    /* Send the data from the pbuf to the interface, one pbuf at a
       time. The size of the data in each pbuf is kept in the ->len
       variable. */
    enc28j60_writebuf( q->payload, q->len ); //【2】send data from(q->payload, q->len);
  }

  enc28j60_start_send(); //【3】signal that packet should be sent();

#if ETH_PAD_SIZE
  pbuf_header(p, ETH_PAD_SIZE); /* reclaim the padding word */
#endif

  LINK_STATS_INC(link.xmit);

  return ERR_OK;
}static struct pbuf *
low_level_input(struct netif *netif)
{
struct ethernetif *ethernetif = netif->state;
struct pbuf *p, *q;
u16_t len;
len = enc28j60_packet_getlen(); // 【1】
#if ETH_PAD_SIZE
len += ETH_PAD_SIZE; /* allow room for Ethernet padding */
#endif
/* We allocate a pbuf chain of pbufs from the pool. */
p = pbuf_alloc(PBUF_RAW, len, PBUF_POOL);
if (p != NULL) {
#if ETH_PAD_SIZE
pbuf_header(p, -ETH_PAD_SIZE); /* drop the padding word */
#endif
for(q = p; q != NULL; q = q->next) {
enc28j60_readbuf (q->payload, q->len ); //【2】read data into(q->payload, q->len);
}
enc28j60_finish_receive(); //【3】acknowledge that packet has been read();
#if ETH_PAD_SIZE
pbuf_header(p, ETH_PAD_SIZE); /* reclaim the padding word */
#endif
LINK_STATS_INC(link.recv);
} else {
enc28j60_finish_receive(); //【4】drop packet();
LINK_STATS_INC(link.memerr);
LINK_STATS_INC(link.drop);
}
return p;
}#ifndef __LWIPOPTS_H__
#define __LWIPOPTS_H__
#define SYS_LIGHTWEIGHT_PROT 0
#define NO_SYS 1
#define NO_SYS_NO_TIMERS 1
/* ---------- Memory options ---------- */
/* MEM_ALIGNMENT: should be set to the alignment of the CPU for which
lwIP is compiled. 4 byte alignment -> define MEM_ALIGNMENT to 4, 2
byte alignment -> define MEM_ALIGNMENT to 2. */
#define MEM_ALIGNMENT 4
/* MEM_SIZE: the size of the heap memory. If the application will send
a lot of data that needs to be copied, this should be set high. */
#define MEM_SIZE (5*1024)
/* MEMP_NUM_PBUF: the number of memp struct pbufs. If the application
sends a lot of data out of ROM (or other static memory), this
should be set high. */
#define MEMP_NUM_PBUF 10
/* MEMP_NUM_UDP_PCB: the number of UDP protocol control blocks. One
per active UDP "connection". */
#define MEMP_NUM_UDP_PCB 6
/* MEMP_NUM_TCP_PCB: the number of simulatenously active TCP
connections. */
#define MEMP_NUM_TCP_PCB 10
/* MEMP_NUM_TCP_PCB_LISTEN: the number of listening TCP
connections. */
#define MEMP_NUM_TCP_PCB_LISTEN 6
/* MEMP_NUM_TCP_SEG: the number of simultaneously queued TCP
segments. */
#define MEMP_NUM_TCP_SEG 12
/* MEMP_NUM_SYS_TIMEOUT: the number of simulateously active
timeouts. */
#define MEMP_NUM_SYS_TIMEOUT 3
/* ---------- Pbuf options ---------- */
/* PBUF_POOL_SIZE: the number of buffers in the pbuf pool. */
#define PBUF_POOL_SIZE 10
/* PBUF_POOL_BUFSIZE: the size of each pbuf in the pbuf pool. */
#define PBUF_POOL_BUFSIZE 1500
/* ---------- TCP options ---------- */
#define LWIP_TCP 1
#define TCP_TTL 255
/* Controls if TCP should queue segments that arrive out of
order. Define to 0 if your device is low on memory. */
#define TCP_QUEUE_OOSEQ 0
/* TCP Maximum segment size. */
#define TCP_MSS (1500 - 40) /* TCP_MSS = (Ethernet MTU - IP header size - TCP header size) */
/* TCP sender buffer space (bytes). */
#define TCP_SND_BUF (2*TCP_MSS)
/* TCP sender buffer space (pbufs). This must be at least = 2 *
TCP_SND_BUF/TCP_MSS for things to work. */
#define TCP_SND_QUEUELEN (6 * TCP_SND_BUF)/TCP_MSS
/* TCP receive window. */
#define TCP_WND (2*TCP_MSS)
/* ---------- ICMP options ---------- */
#define LWIP_ICMP 1
/* ---------- DHCP options ---------- */
/* Define LWIP_DHCP to 1 if you want DHCP configuration of
interfaces. DHCP is not implemented in lwIP 0.5.1, however, so
turning this on does currently not work. */
#define LWIP_DHCP 0
/* ---------- UDP options ---------- */
#define LWIP_UDP 1
#define UDP_TTL 255
/* ---------- Statistics options ---------- */
#define LWIP_STATS 0
#define LWIP_PROVIDE_ERRNO 1
/**
* LWIP_NETCONN==1: Enable Netconn API (require to use api_lib.c)
*/
#define LWIP_NETCONN 0
/**
* LWIP_SOCKET==1: Enable Socket API (require to use sockets.c)
*/
#define LWIP_SOCKET 0
#endif /* __LWIPOPTS_H__ */void LwIP_Config (void)
{
struct ip_addr ipaddr;
struct ip_addr netmask;
struct ip_addr gw;
// 呼叫LWIP初始化函式
lwip_init();
IP4_ADDR(&ipaddr, 192, 168, 1, 16); // 設定網路介面的ip地址
IP4_ADDR(&netmask, 255, 255, 255, 0); // 子網掩碼
IP4_ADDR(&gw, 192, 168, 1, 1); // 閘道器
// 初始化enc28j60與LWIP的介面,引數為網路介面結構體、ip地址、
// 子網掩碼、閘道器、網絡卡資訊指標、初始化函式、輸入函式
netif_add(&enc28j60, &ipaddr, &netmask, &gw, NULL, ðernetif_init, ðernet_input);
// 把enc28j60設定為預設網絡卡
netif_set_default(&enc28j60);
netif_set_up(&enc28j60);
} timer_typedef tcp_timer, arp_timer;
/* 設定查詢定時器 ARP定時器 */
timer_set(&tcp_timer, CLOCK_SECOND / 10); // tcp處理定時器 100ms
timer_set(&arp_timer, CLOCK_SECOND * 5); // arp處理定時器 5s
while (1) {
if (enc28j60_packet_getcount() != 0) {
ethernetif_input(&enc28j60);
}
// TCP 定時處理
if (timer_expired(&tcp_timer)) {
timer_set(&tcp_timer, CLOCK_SECOND / 4);
tcp_tmr();
}
// ARP 定時處理
if (timer_expired(&arp_timer)) {
timer_set(&arp_timer, CLOCK_SECOND * 5);
etharp_tmr();
}
} 圖1 ping實驗 【2】TCP Echo例子 LwIP提供很多示例,TCP Echo示例位於contrib-1.4.1的apps資料夾中,資料夾名為tcpecho_raw)。修改TCP偵聽埠為10086。 err = tcp_bind(echo_pcb, IP_ADDR_ANY, 10086);
圖2 TCP Echo例子5.總結 【1】移植和應用LwIP一定要耐心細緻。 【2】一旦網絡卡接收到資料,應呼叫ethernetif_input函式,呼叫該函式讓資料進入LwIP協議棧。 【3】 netif_add(&enc28j60, &ipaddr, &netmask, &gw, NULL, ðernetif_init, ðernet_input);最後一個引數為ethernet_input,千萬必要寫成ethernetif_input。6.參考資料 更多細節內容請參考圖書資料 【1】《嵌入式網路系統設計——基於Atmel ARM7系列》 【2】《STM32嵌入式系統開發實戰指南——FreeRTOS與LwIP聯合移植》

